
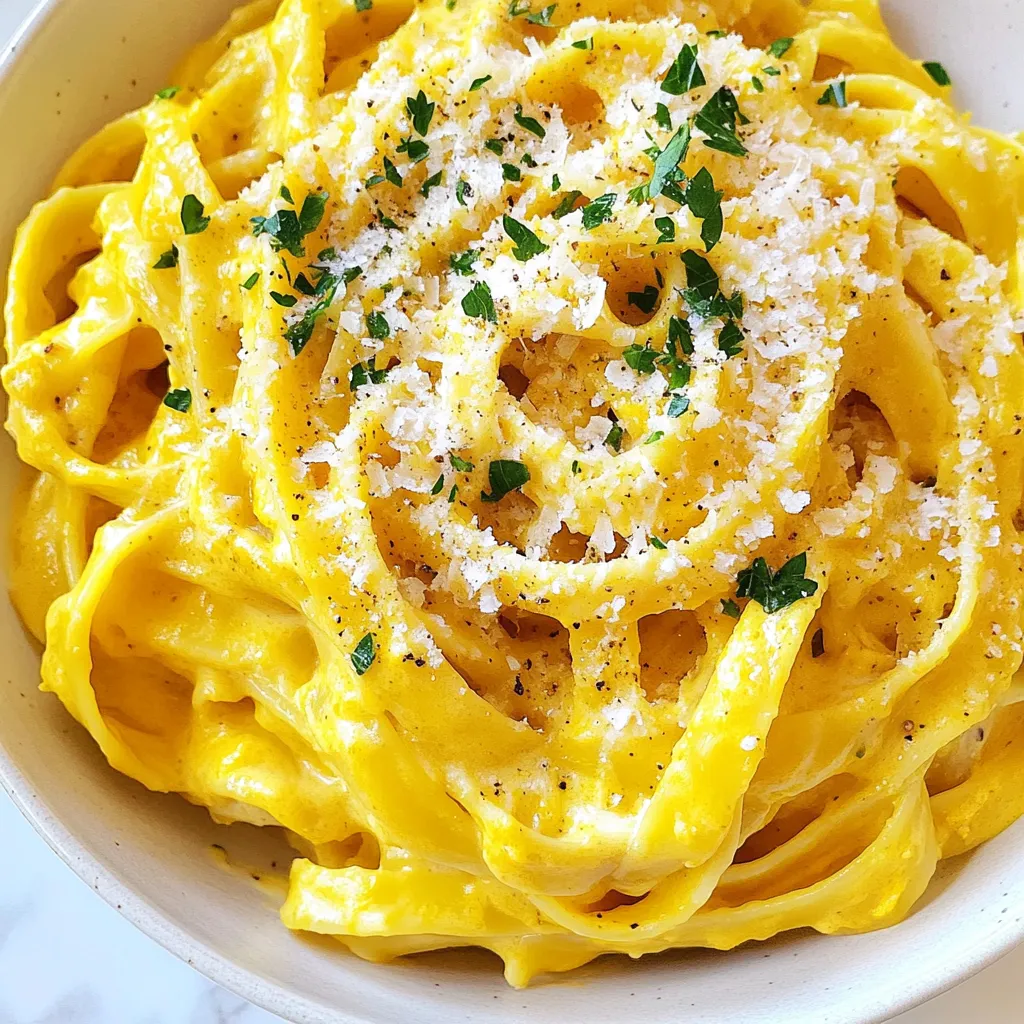
Creamy Pumpkin Alfredo Pasta Rich and Flavorful Dish


Are you ready to savor a dish that combines rich pumpkin flavor with creamy goodness? My Creamy Pumpkin Alfredo Pasta is here to impress! With just a few simple ingredients like fettuccine, pumpkin puree, and Parmesan cheese, you can whip up a meal that’s perfect for any time of year. This dish is not just tasty; it’s a warm hug in a bowl. Let’s dive into the recipe that will have everyone asking for seconds!
Why I Love This Recipe
- Comforting Flavor: The creamy pumpkin Alfredo sauce brings the warm, cozy flavors of fall to your plate, making it perfect for chilly evenings.
- Quick and Easy: With a total prep and cook time of just 25 minutes, this dish is ideal for busy weeknights when you want something delicious without spending hours in the kitchen.
- Versatile Ingredients: Using common pantry staples like fettuccine, pumpkin puree, and Parmesan cheese, you can whip up this dish any time of the year, not just in the fall.
- Customizable: Feel free to add your favorite proteins or vegetables to the pasta, making it a flexible meal that can suit any taste preference.
Ingredients
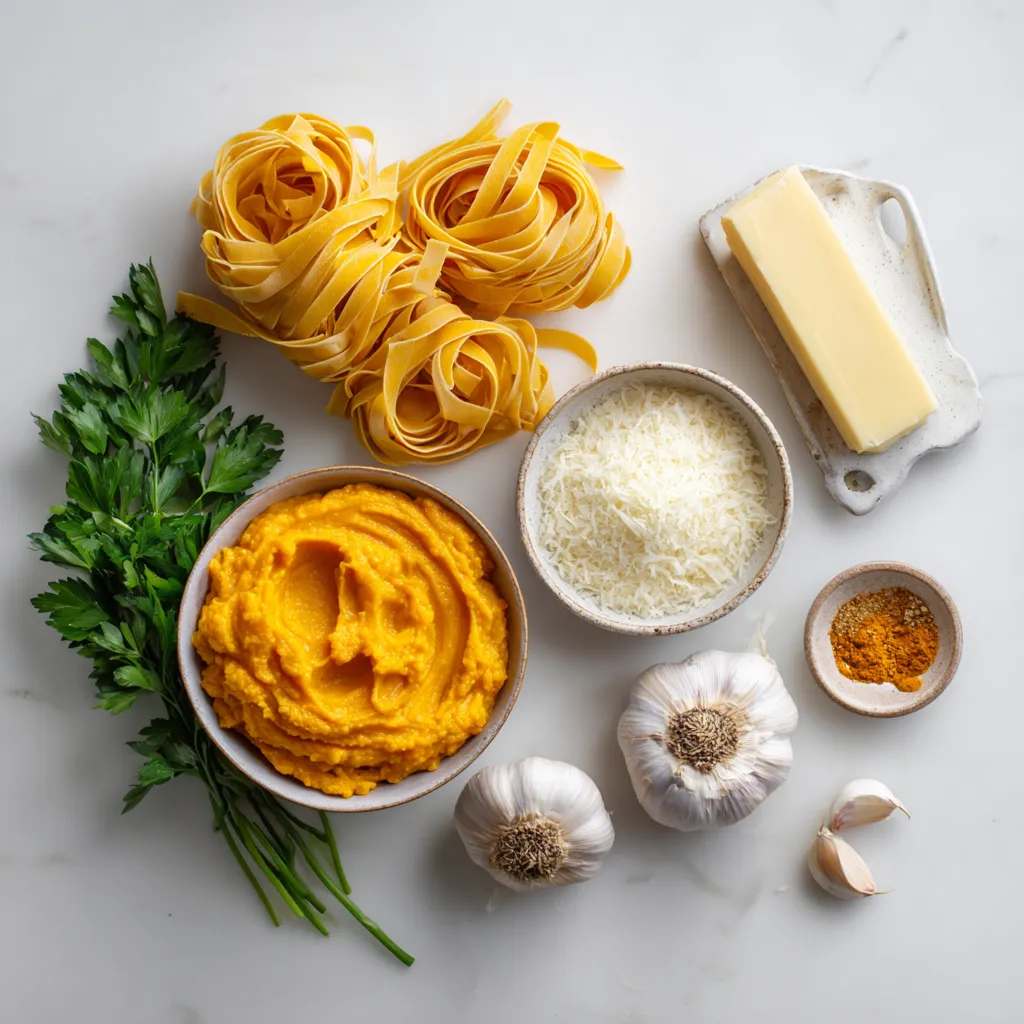
Main Ingredients
- 12 oz fettuccine pasta
- 1 cup pumpkin puree
- 1 cup heavy cream
Additional Ingredients
- 1/2 cup grated Parmesan cheese
- 2 tablespoons unsalted butter
- 3 cloves garlic, minced
- 1/2 teaspoon nutmeg
- Salt and pepper to taste
- Fresh parsley for garnish (optional)
To make creamy pumpkin Alfredo pasta, you need a few key ingredients. The fettuccine pasta forms the base of the dish. The pumpkin puree gives a lovely color and rich flavor. The heavy cream adds a smooth texture and creaminess to your sauce.
Next, you’ll want some grated Parmesan cheese. It brings a salty kick and depth. The unsalted butter helps to sauté the garlic, which gives a fragrant base. Minced garlic adds a punch of flavor. The nutmeg enhances the warmth of the pumpkin. Lastly, add salt and pepper for taste. If you like, you can sprinkle fresh parsley on top to brighten the dish.
These ingredients work together to create a rich, flavorful dish. Each bite will warm you up and bring a taste of fall to your table.
Step-by-Step Instructions
Cooking the Fettuccine
1. First, bring a large pot of salted water to a boil.
2. Add the fettuccine pasta and cook until it is al dente, following the package instructions.
3. Before draining, reserve one cup of the pasta water. This water helps adjust the sauce later.
4. Drain the pasta and set it aside.
Preparing the Sauce
1. In a large skillet, melt two tablespoons of unsalted butter over medium heat.
2. Add three cloves of minced garlic to the skillet and sauté for about one minute. Cook until fragrant but avoid burning the garlic.
3. Next, mix in one cup of pumpkin puree and one cup of heavy cream. Stir well until combined.
4. Let the sauce simmer for three to four minutes. Stir occasionally to keep it from sticking.
5. Then, add half a cup of grated Parmesan cheese and half a teaspoon of nutmeg. Stir until the cheese melts and the sauce becomes creamy.
6. If the sauce is too thick, gradually add some reserved pasta water until you reach your desired consistency.
Combining the Pasta and Sauce
1. Carefully add the cooked fettuccine pasta to the skillet with the sauce.
2. Toss the pasta gently to coat it with the creamy pumpkin Alfredo sauce.
3. Finally, season to taste with salt and pepper. Enjoy this rich and flavorful dish!
Tips & Tricks
Achieving Creaminess
To make this dish rich, start with the right amount of heavy cream. Use one cup of cream for a velvety texture. If the sauce feels too thick, add reserved pasta water slowly. This helps you control the sauce’s thickness without losing flavor.
Enhancing Flavor
Spices can really boost the taste of your dish. Nutmeg is key here, but you can also add a dash of cinnamon for warmth. For a fresh touch, consider garnishing with parsley. It adds color and a hint of freshness.
Cooking Techniques
Be careful with garlic. Sauté it on medium heat for about one minute. If you cook it too long, it burns and tastes bitter. Timing is important when you mix pasta and sauce. Add the pasta right after you finish the sauce. This keeps everything warm and melds the flavors beautifully.
Pro Tips
- Choose the Right Pumpkin: Use pure pumpkin puree for the best flavor. If using fresh pumpkin, roast it until soft and then puree for a more intense taste.
- Adjust the Creaminess: If you prefer a lighter sauce, substitute some of the heavy cream with low-fat milk or vegetable broth without losing the creaminess.
- Don’t Skip the Nutmeg: Nutmeg adds a warm, earthy flavor that complements the pumpkin. Be sure to use fresh nutmeg for an extra aromatic boost.
- Perfect Pasta Toss: Make sure to add the pasta to the sauce while it’s still hot. This helps the sauce cling better and enhances the overall flavor of the dish.
Variations
Dietary Modifications
For those who want to enjoy this dish while keeping their diet in mind, I have some great options. If you’re vegetarian, you can simply skip any meat and still enjoy the creamy pumpkin Alfredo. This dish is rich and satisfying on its own.
If you need a gluten-free option, swap out the fettuccine for gluten-free pasta. Many brands offer great alternatives that taste just as good. Look for chickpea or brown rice pasta for added protein and fiber.
Flavor Variations
Want to amp up the flavor? You can add protein like chicken, shrimp, or even crispy bacon. Cook the protein separately and toss it in at the end. This will add texture and make the dish more filling.
You can also include veggies to boost the nutrition. Spinach or mushrooms work well in this sauce. Just sauté them before adding the pumpkin puree for a great mix of flavors.
Sauce Tweaks
To make the sauce your own, try different types of cheese. While Parmesan is classic, adding mozzarella or gouda can create a unique taste. Each cheese brings its own flavor, making the dish fun to explore.
If you want to spice things up, consider adding herbs or seasonings. A dash of red pepper flakes can add heat, while fresh thyme or rosemary can add a fragrant touch. Adjust these according to your taste for a personal twist on this creamy pumpkin Alfredo.
Storage Info
Storing Leftovers
To keep your creamy pumpkin Alfredo pasta fresh, store it in an airtight container. Make sure to cool the pasta to room temperature first. Place it in the fridge within two hours of cooking. This way, it stays safe to eat. Your leftovers will last up to three days in the fridge. You can enjoy it later, but the sooner, the better for taste.
Reheating Tips
When you want to enjoy your pasta again, use gentle heat. The microwave works well if you cover the dish. Add a splash of water or cream to prevent dryness. Heat it in short bursts, stirring in between.
For longer storage, you can freeze the pasta. Place it in a freezer-safe container and it can last for up to three months. Just remember to thaw it in the fridge before reheating. Enjoy every creamy bite!
FAQs
What can I substitute for heavy cream in this recipe?
You can use milk mixed with butter as a substitute for heavy cream. For every cup of cream, use 3/4 cup of milk and 1/4 cup of melted butter. This mix gives a similar richness. You can also try coconut milk for a dairy-free option. It adds a nice flavor without losing creaminess.
How do I make homemade pumpkin puree?
Making homemade pumpkin puree is easy. Start with a small pumpkin. Cut it in half and scoop out the seeds. Place the halves cut-side down on a baking sheet. Bake at 350°F (175°C) for about 45 minutes. Let it cool, then scoop out the flesh and blend until smooth. Store it in your fridge for up to a week.
Can I use a different type of pasta for this dish?
Yes, you can use other types of pasta. Here are some good options:
- Penne
- Rigatoni
- Bowtie
Each type has its unique texture. Cooking times may vary:
- Penne: 11-13 minutes
- Rigatoni: 12-14 minutes
- Bowtie: 10-12 minutes
Just check the package for the best cooking time. Make sure to cook it al dente for the best results!
This blog post guides you through making a creamy pumpkin fettuccine. We covered the main and additional ingredients, step-by-step instructions, and tips for success. Remember to assess your sauce’s creaminess and flavor. You can customize it with proteins or veggies, too. Store leftovers properly to enjoy later. I hope you’re excited to try this comforting dish. Happy cookin

Creamy Pumpkin Alfredo Pasta
Ingredients
- 12 oz fettuccine pasta
- 1 cup pumpkin puree (canned or homemade)
- 1 cup heavy cream
- 0.5 cup grated Parmesan cheese
- 2 tablespoons unsalted butter
- 3 cloves garlic, minced
- 0.5 teaspoon nutmeg
- to taste salt and pepper
- for garnish fresh parsley (optional)
Instructions
- Bring a large pot of salted water to a boil. Cook the fettuccine pasta according to package instructions until al dente. Reserve 1 cup of pasta water, then drain the pasta and set aside.
- In a large skillet over medium heat, melt the unsalted butter. Add the minced garlic and sauté for about 1 minute until fragrant, being careful not to burn it.
- Stir in the pumpkin puree and heavy cream, mixing well until combined. Let it simmer for about 3-4 minutes, stirring occasionally.
- Add the grated Parmesan cheese and nutmeg to the sauce, stirring until the cheese is melted and the sauce is creamy. If the sauce is too thick, gradually add some reserved pasta water until the desired consistency is achieved.
- Season the sauce with salt and pepper to taste.
- Carefully add the cooked fettuccine pasta to the skillet, tossing gently to coat the pasta with the creamy pumpkin Alfredo sauce.
- Serve immediately, garnished with freshly chopped parsley if desired. Enjoy the warmth of fall in every bite!
![- 200g rice noodles - 1 tablespoon coconut oil - 1 onion, thinly sliced - 2 garlic cloves, minced - 1 tablespoon ginger, minced - 1 red bell pepper, sliced - 1 cup broccoli florets - 1 carrot, julienned - 1 can (400ml) coconut milk - 3 tablespoons red curry paste - 2 tablespoons soy sauce - 1 tablespoon lime juice - Fresh basil leaves for garnish - Salt and pepper to taste For this recipe, you can switch up the vegetables. Try adding snap peas or zucchini for a new twist. For the best flavor, I recommend brands like Thai Kitchen for red curry paste and Chaokoh for coconut milk. These brands offer great taste and consistency. If you want to make this meal even easier, use pre-chopped vegetables. They save time and still taste fresh. Explore your local market for seasonal veggies too! They add color and flavor to your dish. For the full recipe, check the instructions above to create your own Thai Red Curry Noodles. Enjoy the process and the flavors! Start by boiling water in a large pot. Add the rice noodles and cook them based on the package instructions. Usually, it takes about 4-6 minutes. Stir gently to keep them from sticking. To avoid sticky noodles, drain them right away. Rinse them under cold water to stop the cooking process. Toss them with a little coconut oil to keep them separate. This step makes a big difference! Slice your vegetables neatly for even cooking. Use a sharp knife for best results. For the onion, cut it thinly. Mince the garlic and ginger finely. Slice the red bell pepper and julienne the carrot. Cut the broccoli into small florets. Now, let’s talk about cooking times. Sauté the onion for about 2-3 minutes until it’s soft. Then add the garlic and ginger for one more minute. After that, toss in the bell pepper, broccoli, and carrot. Cook for about 5 minutes until they are tender but still crisp. In a large skillet or wok, pour in the coconut milk. Add the red curry paste and stir well. Mix until the paste is fully dissolved in the milk. This creates a rich, creamy sauce. Next, add the cooked rice noodles. Gently fold them into the sauce. Make sure every noodle gets coated. This is key for great flavor. Let everything simmer for 2-3 minutes to heat through. Serve hot, garnished with fresh basil leaves. This adds a lovely touch to your dish and makes it even more flavorful. Enjoy every bite! For the full recipe, see above. To get the best taste, always use fresh ingredients. Fresh vegetables and herbs boost flavors. Pre-packaged items often lack depth and freshness. When it comes to balancing flavors, think about these three key elements: - Spicy: Use more red curry paste for heat. - Sweet: A teaspoon of sugar can soften strong flavors. - Salty: Soy sauce adds a nice umami kick. Adjust these as needed for your taste. For cooking, I recommend using a wok. A wok heats evenly and helps stir-fry better. If you don't have one, a large skillet works well too. When adding protein, think about these options: - Chicken: Thinly slice for quick cooking. - Tofu: Use firm tofu, cut into cubes, and sauté until golden. - Shrimp: Add shrimp last to avoid overcooking. Cook protein separately, then mix it in at the end. Pair your Thai Red Curry Noodles with side dishes like: - Steamed jasmine rice - A fresh cucumber salad - Spring rolls for a crunchy touch For a nice presentation, serve in deep bowls. Garnish with fresh basil leaves and lime wedges. This adds color and freshness, making your meal look restaurant-quality. {{image_2}} You can easily make Thai Red Curry Noodles vegan or vegetarian. Start by swapping the coconut milk for a plant-based version. Use vegetable broth if you want a lighter taste. For protein, try tofu or tempeh. Both options soak up flavors well. Thai Red Curry Noodles change across Thailand. In the north, cooks add more herbs like cilantro and mint. In the south, seafood is common. You might see shrimp or fish added to the dish. Each region has unique flavors that make the dish special. Feel free to add local veggies, like eggplant or bamboo shoots, to your version. Get creative with your Thai Red Curry Noodles! Add fresh herbs, like basil or cilantro, for a burst of flavor. You can also try different spices. A pinch of cumin or coriander can enhance the taste. If you like heat, add chili flakes or fresh peppers. Change up the recipe by adding new veggies or proteins each time you make it. The options are endless! For the complete recipe, check the [Full Recipe]. After you enjoy your Thai Red Curry Noodles, let any leftovers cool first. Place them in an airtight container. This keeps the flavors fresh. You can store them in the fridge for up to three days. If you want to keep them longer, freeze them in a freezer-safe container. They can last for up to three months in the freezer. When you reheat, avoid using high heat. This helps keep the noodles from getting mushy. The best way is to use a skillet over medium heat. Add a splash of water to help steam the noodles. You can also pop them in the microwave. Just cover the bowl to keep moisture in. To refresh the dish, add fresh basil or a squeeze of lime juice right before serving. To make meals quicker, you can prep some ingredients ahead of time. Slice your veggies like bell peppers and carrots a day before. Cook the rice noodles in advance and store them separately. When you are ready to eat, simply combine the prepped ingredients with the sauce. This way, you can whip up your Thai Red Curry Noodles in no time on busy weekdays! What can I substitute for red curry paste? You can use yellow curry paste or green curry paste. These options have different flavors but still work well. You can also make a homemade version. Just blend some dried red chilies, garlic, and spices. It may taste a bit different but still delicious. Can I make Thai Red Curry Noodles gluten-free? Yes, you can easily make this dish gluten-free. Simply use gluten-free soy sauce or tamari instead of regular soy sauce. Make sure that the rice noodles are also gluten-free. Most rice noodles are naturally gluten-free. How to make this recipe nut-free To make this recipe nut-free, ensure you don't use any nut-based oils or sauces. Coconut oil is safe. Just check your red curry paste to ensure it doesn’t contain nuts. Caloric content and nutritional breakdown This dish is rich in flavor and nutrition. A serving has about 400 calories. It includes healthy fats from coconut milk and fiber from vegetables. The rice noodles provide energy from carbohydrates. What is the origin of Thai Red Curry Noodles? Thai Red Curry Noodles come from Thailand, where curry is a staple. This dish combines the bold flavors of red curry paste with rice noodles. It’s a favorite among locals and visitors. How does this dish differ from other Thai noodle dishes? Thai Red Curry Noodles are creamier and richer than others like Pad Thai. They use coconut milk and red curry paste, giving them a unique taste. Other dishes may focus more on soy sauce or tamarind for flavor. Thai Red Curry Noodles are a delicious and flexible dish. You can choose different veggies and proteins to fit your taste. I shared tips for cooking and serving, so your meal looks and tastes great. Remember to store leftovers well and reheat them with care. These simple steps will help you enjoy this dish again. Keep exploring flavors and making it your own. Happy cooking!](https://dailydishlab.com/wp-content/uploads/2025/07/3b703aa1-219d-4915-aa03-8b54d55df68d-768x768.webp)
![- 1 lb boneless, skinless chicken breasts - 3 tablespoons olive oil - 2 tablespoons fresh lemon juice - 2 tablespoons Greek yogurt - 3 cloves garlic, minced The main ingredients are key to great flavor. The chicken serves as the base. Use fresh, quality chicken for the best taste. Olive oil adds richness. Lemon juice gives a nice tang. Greek yogurt adds creaminess and helps tenderize the meat. Garlic brings a punch of flavor that everyone loves. - 1 teaspoon dried oregano - 1 teaspoon dried thyme - 1 teaspoon paprika - Salt and pepper to taste Herbs and spices elevate your dish. Oregano is a classic Greek herb. Thyme adds earthiness, while paprika gives a subtle warmth. Salt and pepper enhance all flavors. You can adjust these to fit your taste. Fresh herbs can also work well if you have them on hand. - Wooden or metal skewers - Fresh parsley, chopped (for garnish) - Lemon wedges (for serving) Skewers are a must for souvlaki. If you use wooden skewers, soak them in water first. This prevents burning on the grill. Fresh parsley adds color and freshness on top. Lemon wedges are perfect for squeezing over the chicken. They boost flavor and add brightness to each bite. For the complete recipe, check out the Full Recipe section. In a medium bowl, whisk together the marinade ingredients. Combine 3 tablespoons of olive oil, 2 tablespoons of fresh lemon juice, and 2 tablespoons of Greek yogurt. Next, add 3 minced cloves of garlic, 1 teaspoon of dried oregano, 1 teaspoon of dried thyme, and 1 teaspoon of paprika. Finish with salt and pepper to taste. This mix is key for flavor. Now, take your 1 pound of boneless, skinless chicken breasts. Cut them into 1-inch cubes. Coat the chicken cubes in the marinade. Make sure each piece is well covered. After that, cover the bowl and place it in the refrigerator. Let it marinate for at least 30 minutes or up to 2 hours. This step makes the chicken juicy and tasty. First, preheat your grill or grill pan over medium-high heat. Once hot, thread the marinated chicken onto skewers. If you use wooden skewers, make sure they soaked in water for 30 minutes first. Leave some space between each piece for even cooking. Grill the chicken skewers for about 10 to 12 minutes. Turn them occasionally. Check for doneness by ensuring the internal temperature reaches 165°F (75°C). Once cooked, remove the skewers from the grill. Let them rest for about 5 minutes. This resting time allows the juices to spread throughout the chicken. For a full recipe, refer back to the earlier section. Enjoy your Greek chicken souvlaki with a garnish of fresh parsley and lemon wedges on the side! To get the best flavor from your chicken souvlaki, timing matters. I recommend marinating the chicken for at least 30 minutes. If you have more time, marinate for up to 2 hours. This longer time lets the chicken absorb the marinade's flavors deeply. Remember, the lemon juice helps tenderize the meat, making it juicy and tasty. You can grill souvlaki for that smoky flavor. However, if you don’t have a grill, you can use an oven or stovetop. When grilling, keep the heat medium-high. This way, the chicken gets nice grill marks and cooks evenly. If cooking in the oven, set it to 400°F (200°C). Cook for about 15-20 minutes, flipping halfway. Always check that the chicken reaches an internal temperature of 165°F (75°C) to ensure it’s safe to eat. Juicy chicken is the goal, so don’t overcook it. Presentation makes your dish more appealing. Serve the chicken souvlaki on a large platter. Drizzle some olive oil over the top for shine. Add a bowl of tzatziki sauce for dipping. Pair it with fresh veggies like cucumber and tomato salad. This not only looks great but also adds color and freshness to your meal. For the final touch, garnish with chopped parsley and a few lemon wedges on the side. This makes your meal pop and invites everyone to dig in. For the full recipe, check out the [Full Recipe]. {{image_2}} You can switch up the chicken for lamb or beef. Both meats add great taste. Lamb gives a rich flavor, while beef adds a hearty bite. Use the same marinade for these meats. Just ensure they are cut into similar-sized pieces. This way, they cook evenly. Grill them until they reach the right temperature. For lamb, that’s about 145°F (63°C). For beef, aim for 160°F (71°C). If you want a meat-free meal, try using vegetables or tofu. Bell peppers, zucchini, and mushrooms work well on skewers. Tofu soaks up the marinade nicely. Cut your vegetables into chunks that match the size of meat pieces. Marinate them just like the chicken. Grill the skewers until the veggies are tender and slightly charred. This gives a nice smoky flavor. Don’t be afraid to play with the herbs and spices. If you like more heat, add crushed red pepper flakes. Fresh herbs like basil or mint can also brighten the dish. You can even try adding cumin for a warm, earthy taste. Each tweak can make your souvlaki unique. Just remember to keep the balance of flavors in check. Enjoy the process of experimenting! For the full recipe, check out the original version. To keep your chicken souvlaki fresh, let it cool down first. Place it in an airtight container. Store it in the fridge for up to three days. Make sure to consume it within this time for the best taste. If you have any sides, like tzatziki or salad, store them separately. This keeps flavors fresh and prevents sogginess. When reheating chicken souvlaki, the best method is using an oven or a grill. Preheat your oven to 350°F (175°C). Place the skewers on a baking sheet. Heat for about 10-15 minutes. This method helps keep the chicken juicy. For the grill, warm it up and grill for 5 minutes, turning often. Check that the internal temperature reaches 165°F (75°C) for safe eating. If you want to save chicken souvlaki for later, freezing is a great option. First, let it cool completely. Then, wrap each skewer in plastic wrap. Place them in a freezer-safe bag. Label the bag with the date. You can freeze it for up to three months. To defrost, place the bag in the fridge overnight. Reheat as mentioned above. Enjoy your delicious meal later! The best way to marinate chicken for souvlaki is to use a mix of flavors. A simple marinade includes olive oil, lemon juice, Greek yogurt, garlic, and herbs. I recommend marinating your chicken for at least 30 minutes. For the best flavor, let it sit for up to 2 hours. This longer time helps the flavors soak into the chicken. Be sure to refrigerate the chicken while it marinates. Yes, you can cook Greek chicken souvlaki in the oven. First, preheat your oven to 400°F (200°C). Thread the marinated chicken onto skewers. Place the skewers on a baking sheet lined with parchment paper. Cook for about 15-20 minutes, turning the skewers halfway through. This helps them cook evenly and get a nice color. Check that the chicken is fully cooked before serving. To know if the chicken is fully cooked, use a meat thermometer. The safe internal temperature for chicken is 165°F (75°C). Insert the thermometer into the thickest part of the chicken. If it reads 165°F or higher, your chicken is done. If not, cook it a bit longer and check again. Always ensure your chicken is safe to eat for the best experience. This article covers how to make Greek chicken souvlaki, from ingredients to storage tips. You learned about the main ingredients, marinade prep, cooking methods, and serving ideas. Remember, marinating is key for flavor. Do not shy away from using different proteins or veggies. These variations can lead to new, tasty dishes. Storing and reheating properly will keep your leftovers enjoyable. Now, you’re ready to impress at your next meal with this easy, delicious recipe. Enjoy your cooking adventure!](https://dailydishlab.com/wp-content/uploads/2025/07/2cbb5fd3-8ba9-46d6-bdce-6c8d1fc81688-768x768.webp)
