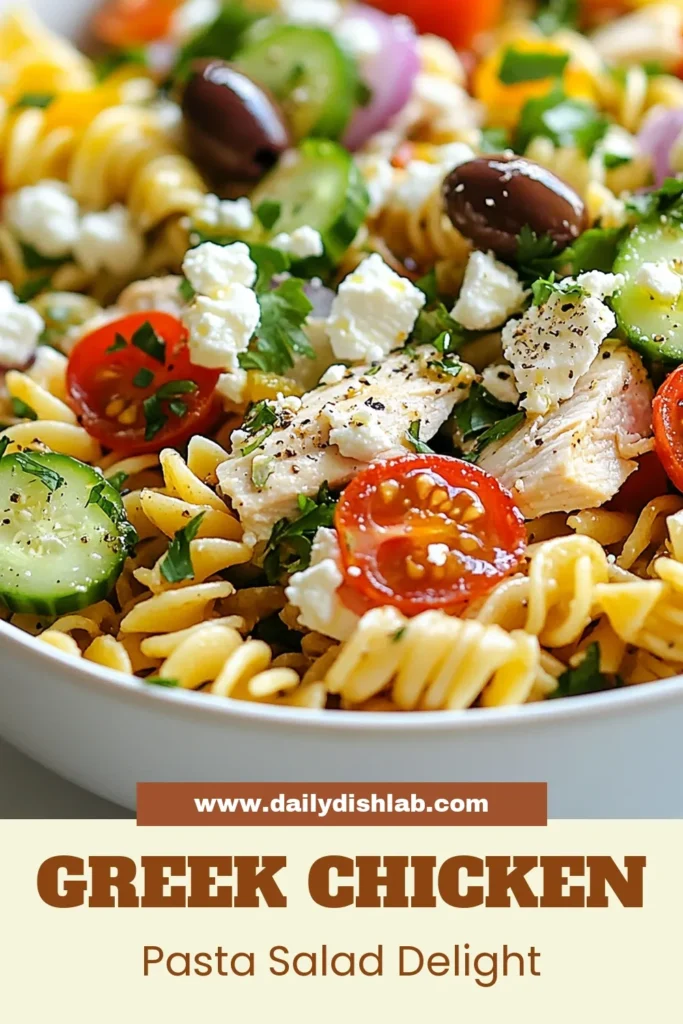
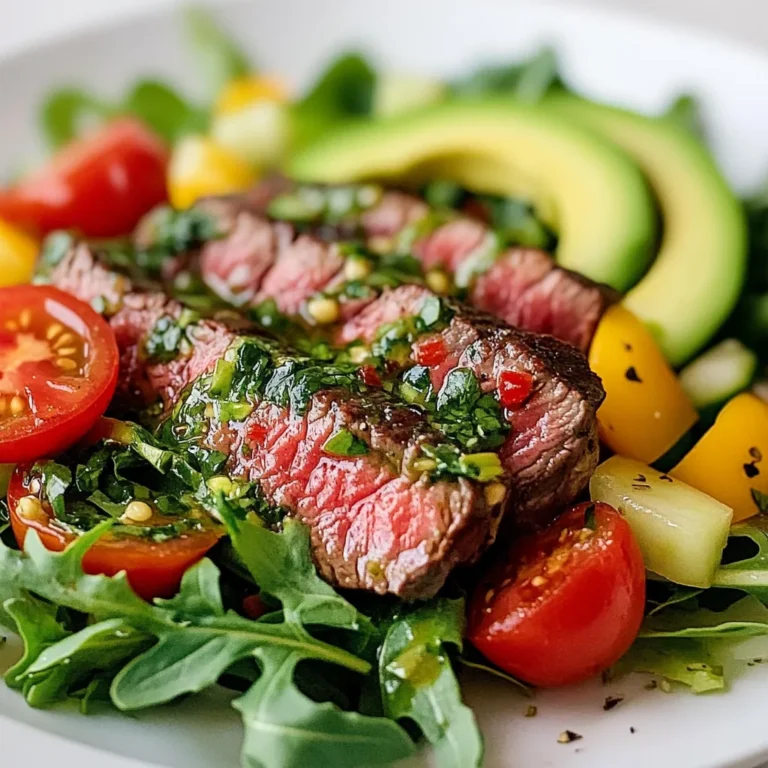
Greek Chicken Pasta Salad Flavorful and Fresh Dish

Looking for a dish that bursts with flavor and freshness? The Greek Chicken Pasta Salad is the answer! This vibrant salad combines juicy chicken, crisp vegetables, and feta cheese, all dressed in a light vinaigrette. It’s perfect for lunch, dinner, or even meal prep. Join me as I share the easy steps and tips you need to make this healthy, delicious salad a family favorite!
Why I Love This Recipe
- Flavorful and Fresh: This Greek Chicken Pasta Salad bursts with vibrant flavors from the fresh vegetables and tangy feta cheese, making it a delightful addition to any meal.
- Quick and Easy: With a prep time of just 15 minutes, this recipe is perfect for busy weeknights or last-minute gatherings.
- Versatile Ingredients: You can easily customize this salad by adding or substituting your favorite ingredients, such as different proteins or seasonal veggies.
- Make-Ahead Friendly: This salad tastes even better after chilling in the fridge, making it ideal for meal prep or potlucks.
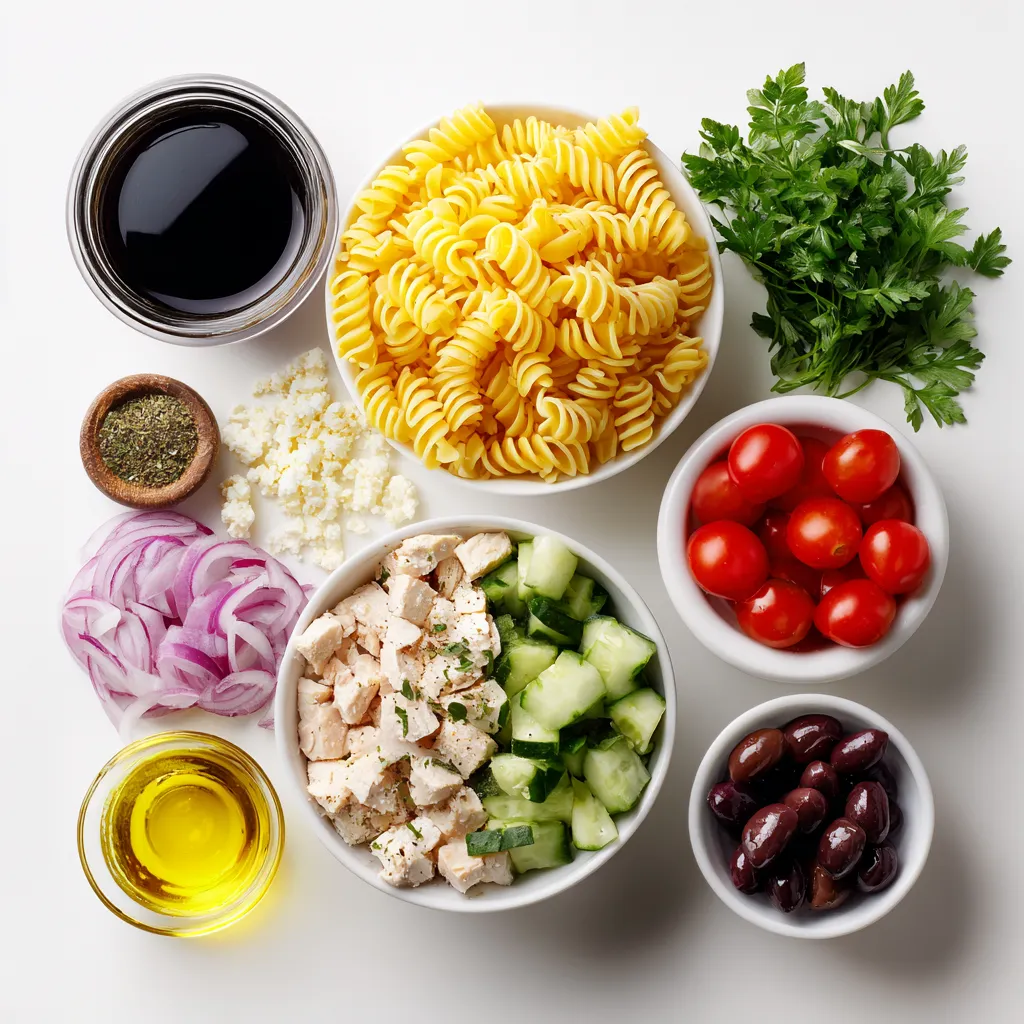
Ingredients
Main Ingredients
- 2 cups rotini or penne pasta
- 1 pound cooked chicken breast, diced
- 1 cup cherry tomatoes, halved
- 1 cucumber, diced
- 1/2 red onion, thinly sliced
- 1 cup Kalamata olives, pitted and halved
- 1 cup feta cheese, crumbled
- 1/4 cup fresh parsley, chopped
Dressing Ingredients
- 1/4 cup olive oil
- 2 tablespoons red wine vinegar
- 1 teaspoon dried oregano
- Salt and pepper to taste
Optional Garnishes
- Additional parsley
- Slices of cucumber
I love this Greek Chicken Pasta Salad because it is fresh and bright. The main ingredients create a colorful dish. The rotini or penne pasta serves as a great base. Choose either pasta for a fun twist. The cooked chicken adds protein and keeps you full. Cherry tomatoes give a pop of color and sweetness.
Next, the cucumber adds a nice crunch. The red onion brings a sharp flavor, but it’s not too strong. Kalamata olives add a briny taste that balances everything. Feta cheese gives a creamy texture and salty kick. Fresh parsley adds a touch of brightness and freshness.
For the dressing, I mix olive oil and red wine vinegar for a tangy base. Dried oregano gives it that classic Greek flavor we love. Finally, I season with salt and pepper to make it perfect.
You can also add optional garnishes for extra flair. A sprinkle of parsley on top looks nice. Slices of cucumber on the side make it look fresh and inviting. This dish is not just filling; it’s also a feast for the eyes!
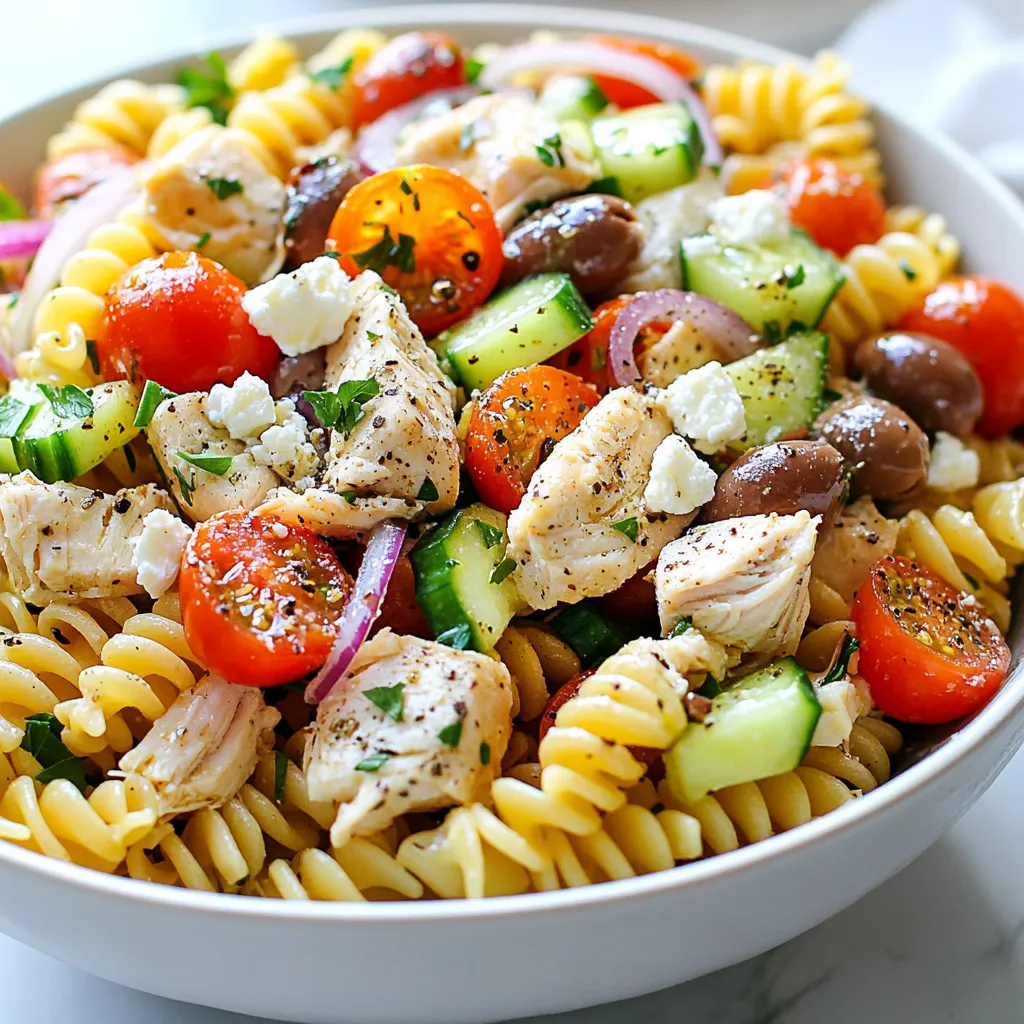
Step-by-Step Instructions
Cooking the Pasta
Start by boiling a large pot of salted water. This helps add flavor to the pasta. Once the water is boiling, add 2 cups of rotini or penne pasta. Cook it until it is al dente, which means it should be firm but not hard. This usually takes about 8 to 10 minutes. Drain the pasta in a colander and rinse it under cold water. This cools it down and stops the cooking process.
Combining Ingredients
In a large mixing bowl, combine the cooled pasta with 1 pound of diced cooked chicken. Next, add in 1 cup of halved cherry tomatoes, 1 diced cucumber, and 1/2 thinly sliced red onion. Then, toss in 1 cup of pitted and halved Kalamata olives, along with 1 cup of crumbled feta cheese. Mix these ingredients well so that everything is evenly distributed.
Making the Dressing
In a small bowl, whisk together 1/4 cup of olive oil and 2 tablespoons of red wine vinegar. Add in 1 teaspoon of dried oregano, along with salt and pepper to taste. Whisk until the dressing is smooth and well mixed. Taste it and adjust the seasoning if needed.
Assembling the Salad
Drizzle the dressing over the pasta salad. Then, gently toss all the ingredients together until everything is well coated with the dressing. Finally, add 1/4 cup of chopped fresh parsley and give the salad another gentle toss to mix it in.
Chilling the Salad
Cover the bowl with plastic wrap or a lid. Place the salad in the refrigerator for at least 30 minutes. This chilling time allows the flavors to meld beautifully. Enjoy your flavorful and fresh Greek chicken pasta salad!
Tips & Tricks
Pasta Cooking Tips
To ensure your pasta doesn’t stick, follow these tips:
- Use plenty of salted water when boiling the pasta.
- Stir the pasta for the first minute while it cooks.
- Avoid adding oil to the water, as it can prevent sauce from sticking later.
Rinsing the pasta is key. After cooking, drain and rinse it under cold water. This stops the cooking process and cools the pasta down quickly. It also helps remove some starch, which can make the dish too sticky.
Perfecting the Dressing
Adjust the flavors of your dressing to suit your taste. If you want more tang, add extra vinegar. If you prefer a milder taste, use less. Mix and taste until you find the perfect balance.
If you don’t have red wine vinegar, try these alternatives:
- Lemon juice for a fresh zing.
- Apple cider vinegar for a sweeter note.
- Balsamic vinegar if you want a richer flavor.
Serving Suggestions
For presentation, serve the salad in a large bowl. You can also use individual plates for a nice touch. Garnish with extra parsley and cucumber slices to make it look fresh and inviting.
Pair this salad with grilled meats or a crusty bread. It also works well with a light soup or roasted veggies for a complete meal.
Pro Tips
- Cook Pasta Al Dente: Make sure to cook the pasta just until al dente for the best texture, as it will continue to absorb dressing and flavors while it cools.
- Chill Before Serving: Allow the salad to chill in the refrigerator for at least 30 minutes before serving to enhance the flavors and ensure a refreshing taste.
- Use Fresh Ingredients: Opt for fresh, high-quality ingredients, especially when it comes to olives and feta cheese, to elevate the taste of your salad.
- Customize Your Veggies: Feel free to add or substitute your favorite vegetables, such as bell peppers or artichokes, to suit your taste and make the dish your own.
Variations
Protein Alternatives
You can switch up the protein in your Greek chicken pasta salad. Grilled shrimp adds a light touch. It pairs well with the pasta and veggies. Tofu is another great choice for a plant-based option. It soaks up the dressing and adds a nice texture.
If you want something quick, rotisserie chicken is perfect. Just shred it and mix it in. It saves time and still tastes great.
Dietary Modifications
For those who need gluten-free options, look for gluten-free pasta. Many brands offer pasta that tastes just as good. This way, everyone can enjoy the salad.
If you’re vegan, try using a dairy-free feta. There are many brands that mimic the taste and texture of regular feta. It keeps the salad flavorful while meeting dietary needs.
Flavor Add-ins
To boost flavor, add capers or roasted red peppers. They bring a nice zing to the dish. You can also mix in fresh herbs like basil or dill. They add depth and freshness to each bite.
Experiment with these variations to make the salad your own. Each change can create a fun twist on this classic dish.
Storage Info
Short-Term Storage
To keep your Greek Chicken Pasta Salad fresh, place it in an airtight container. Make sure the lid fits tightly. This helps prevent any odors from other foods. The salad will last about 3 to 5 days in the fridge. Before serving, give it a good stir to mix everything well.
Freezing Tips
You can freeze Greek Chicken Pasta Salad, but it may change texture. If you want to freeze it, do not add the dressing yet. Instead, freeze the salad ingredients together. Use a freezer-safe bag or container. Remove as much air as possible to avoid freezer burn. It can last up to 3 months in the freezer. When ready to eat, thaw it in the fridge overnight.
Reheating Instructions
Most salads, including this one, are best served cold. However, if you prefer it warm, gently reheat the chicken separately. Use a microwave or skillet on low heat. Avoid reheating the pasta and veggies together as they may become soggy. After reheating the chicken, mix it back in with the salad. Always serve it fresh for the best taste.
FAQs
How long can I store Greek Chicken Pasta Salad?
You can store Greek Chicken Pasta Salad in the fridge for up to three days. Make sure to keep it in an airtight container. This helps keep the salad fresh and safe to eat. After three days, the flavor may fade and the textures can change.
Can I make this salad ahead of time?
Yes! You can make this salad a day ahead. Just prepare it and cover it well in the fridge. This gives the flavors more time to blend. I recommend adding the parsley right before serving. This keeps it fresh and vibrant.
What can I substitute for olives or feta?
If you don’t like olives, you can skip them. Try adding artichoke hearts or sun-dried tomatoes instead. For feta, you can use goat cheese or a dairy-free cheese. These options will still give you a nice flavor.
Is this salad healthy?
Greek Chicken Pasta Salad is quite healthy. It has lean protein from the chicken. The fresh veggies add fiber and vitamins. Feta cheese gives calcium, but you can skip it for fewer calories. Overall, this salad is a balanced and nutritious meal.
This Greek Chicken Pasta Salad is easy to make and packed with flavor. We covered the ingredients, step-by-step instructions, and helpful tips to ensure your salad shines. You can also explore variations and storage options for convenience. Remember, this dish is great for meal prep or gatherings. Enjoy experimenting with flavors and making it your own. With these techniques, your salad will impress every time. Dive in and savor each bit

Greek Chicken Pasta Salad
Ingredients
- 2 cups rotini or penne pasta
- 1 pound cooked chicken breast, diced
- 1 cup cherry tomatoes, halved
- 1 unit cucumber, diced
- 0.5 unit red onion, thinly sliced
- 1 cup Kalamata olives, pitted and halved
- 1 cup feta cheese, crumbled
- 0.25 cup fresh parsley, chopped
- 0.25 cup olive oil
- 2 tablespoons red wine vinegar
- 1 teaspoon dried oregano
- to taste salt and pepper
Instructions
- In a large pot of salted boiling water, cook the pasta according to package directions until al dente. Drain and rinse under cold water to cool.
- In a large mixing bowl, combine the cooled pasta, diced chicken, cherry tomatoes, cucumber, red onion, Kalamata olives, and crumbled feta cheese.
- In a small bowl, whisk together the olive oil, red wine vinegar, dried oregano, salt, and pepper. Adjust seasoning to taste.
- Drizzle the dressing over the pasta salad and toss gently until all ingredients are well coated.
- Lastly, add the chopped parsley and give the salad another gentle toss to incorporate.
- Cover and refrigerate the salad for at least 30 minutes to allow the flavors to meld before serving.
![- 2 cans (15 oz each) of white beans (cannellini or great northern), drained and rinsed - 1 medium onion, chopped - 4 cloves garlic, minced - 4 cups vegetable broth - 1 cup coconut milk (or heavy cream for a richer flavor) - 2 tablespoons olive oil - 1 teaspoon dried thyme - 1 teaspoon smoked paprika - Salt and pepper to taste - Fresh parsley, chopped (for garnish) When making creamy garlic white bean soup, you need simple and fresh ingredients. White beans serve as the base. They provide creaminess and protein. I prefer cannellini or great northern beans. Both are soft and smooth. A medium onion adds depth and sweetness to the soup. Garlic brings strong flavor. I use four cloves for a nice kick. Vegetable broth adds rich taste. You can use homemade or store-bought broth. Coconut milk gives the soup its creamy texture. For a richer taste, heavy cream works well too. Olive oil is essential for sautéing the onion and garlic. Dried thyme and smoked paprika add warmth and earthiness. Season with salt and pepper to make the flavors pop. Finally, fresh parsley brightens the dish when you serve it. This soup is easy to make and very satisfying. You can find the full recipe for this dish above. This soup is not only tasty but also healthy. It is high in fiber and protein due to the beans. The coconut milk adds healthy fats. Each serving provides a good balance of nutrients. You can change some ingredients to suit your taste. If you want a different bean, try chickpeas or navy beans. Red onion works well instead of yellow. For a spicy kick, add a pinch of red pepper flakes. If you need a dairy-free option, stick with coconut milk. This soup is flexible and can fit many diets. Start by gathering all your ingredients. You need two cans of white beans, an onion, garlic, vegetable broth, coconut milk, olive oil, dried thyme, smoked paprika, salt, and pepper. Chop the onion into small pieces. Mince the garlic cloves. Drain and rinse the beans well to remove excess sodium. This prep work makes cooking quick and easy. In a large pot, heat the olive oil over medium heat. Once hot, add the chopped onion. Sauté for about five minutes or until the onion turns clear. Next, add the minced garlic. Cook it for two more minutes. This helps to release the garlic’s flavor. Stir in the drained white beans, thyme, smoked paprika, salt, and pepper. Mix everything well to coat the beans in flavor. Now, pour in the vegetable broth. Bring the mixture to a boil. When it starts to boil, lower the heat and let it simmer for 15 to 20 minutes. This time allows the flavors to blend. After simmering, it’s time to blend the soup. I recommend using an immersion blender for this. Blend until the soup is smooth and creamy. If you want some texture, blend just half of the soup. This way, you still have chunks of beans to enjoy. Stir in the coconut milk and heat the soup for another five minutes. Taste it and adjust the seasoning if needed. Serve hot and garnish with fresh parsley. For the full recipe, check out the details above. Enjoy your creamy garlic white bean soup! To make your soup nice and creamy, blend well. I use an immersion blender. This tool lets you puree the soup right in the pot. If you want some texture, blend only half. For extra creaminess, add coconut milk or heavy cream. This makes the soup rich and smooth. Good seasonings can make a big difference. I love using dried thyme and smoked paprika. These give the soup depth and warmth. You can also add a pinch of cayenne for some heat. Don't forget to taste and adjust the salt and pepper. This will bring out all the flavors. Serve your soup hot, topped with fresh parsley. This adds color and a fresh taste. You can pair it with crusty bread or a light salad. For a complete meal, try adding grilled chicken or sautéed greens. Enjoy it with friends or family for a cozy meal. Check out the Full Recipe for more tips! {{image_2}} You can easily add protein to your creamy garlic white bean soup. For a heartier meal, try adding cooked chicken or turkey. Just shred the meat and stir it in during the last few minutes of cooking. If you want a plant-based option, add cooked quinoa or chickpeas. Both will blend well with the creamy texture of the soup without overpowering its flavor. This soup is naturally vegetarian. To make it vegan, simply use coconut milk instead of heavy cream. The coconut milk gives a rich taste and keeps it creamy. You can also add nutritional yeast for a cheesy flavor without dairy. This way, you can enjoy a warm, fulfilling dish that fits your dietary needs. To boost the flavor, try adding fresh herbs like rosemary or basil. They add a nice touch and aroma. You can also play with spices. A pinch of red pepper flakes gives a nice kick. If you love a smoky flavor, add more smoked paprika. For a fresh twist, squeeze a little lemon juice right before serving. These simple changes keep the soup exciting each time you make it. For the full recipe, check out the detailed cooking steps! Store any leftover creamy garlic white bean soup in an airtight container. Make sure it is cool before sealing the lid. You can keep it in the fridge for up to four days. If you want to enjoy it later, storing it properly will keep it fresh. You can freeze this soup for longer storage. Use freezer-safe containers or bags. Leave some space at the top, as the soup will expand when it freezes. The soup can last in the freezer for up to three months. When you're ready to eat it, thaw it in the fridge overnight. To reheat the soup, pour it into a pot over medium heat. Stir it gently as it warms. You can also microwave it in a safe bowl. Heat in short bursts, stirring in between. If the soup seems too thick, add a splash of vegetable broth or water to reach your desired consistency. Enjoy it warm for a cozy meal! For the full recipe, check out the link provided. Creamy garlic white bean soup lasts about 4 to 5 days in the fridge. Keep it in a sealed container. This way, it stays fresh and safe to eat. Always check for any off smells or changes in color before enjoying leftovers. Yes, you can use dried beans. Just soak them overnight before cooking. Use about 1 cup of dried beans for this soup recipe. After soaking, cook them until tender, then follow the recipe as usual. This adds a nice texture and flavor to your soup. You can serve white bean soup with crusty bread or a fresh salad. Grilled cheese sandwiches also pair nicely. For a heartier meal, try a side of roasted vegetables. These sides can bring out the yummy garlic flavor in the soup. Yes, you can make this soup ahead of time. It tastes even better the next day as the flavors blend. Just store it in the fridge after cooking. Reheat it on the stove when ready to serve. Absolutely! This soup is packed with fiber and plant-based protein. White beans are great for your heart. The garlic adds flavor and has health benefits too. It’s a wholesome choice for any meal. Yes, this soup freezes well. Let it cool completely before transferring it to freezer-safe containers. It can last for up to 3 months in the freezer. Just thaw in the fridge overnight and reheat when ready to eat. If you want a kick, add red pepper flakes or hot sauce. Stir in these spicy additions during cooking. This will give your creamy garlic white bean soup a warm, zesty flavor that wakes up your taste buds. For a richer flavor, you can use heavy cream instead of coconut milk. This will give the soup a creamier texture. You can also add more garlic for a stronger taste. Experiment with flavors to find your perfect mix. To make the soup more filling, add diced potatoes or carrots during cooking. You can also stir in cooked grains like quinoa or rice. These options will add bulk and nutrients to your meal. Yes! Fresh parsley adds a nice touch. You can also use croutons or a drizzle of olive oil for extra flavor. Garnishing makes the soup look appealing and adds a bit of crunch. For the full recipe, check out the [Full Recipe]. This blog post covered how to make creamy garlic white bean soup. We went through ingredients, nutritional info, and cooking steps. I shared tips for a creamy texture and flavor must-haves. You learned about serving options and variations too. In summary, this soup is easy and healthy. Feel free to customize it to fit your taste. Enjoy making it for friends, family, or yourself!](https://dailydishlab.com/wp-content/uploads/2025/07/b682e594-aaaa-4098-8015-8011c3b1faa4-768x768.webp)
![Here’s what you need for the Greek Yogurt Chicken Salad: - 2 cups cooked chicken breast, shredded - 1 cup plain Greek yogurt - 1/2 cup celery, diced - 1/2 cup red grapes, halved - 1/4 cup walnuts, toasted and chopped - 1/4 cup red onion, finely chopped - 2 tablespoons fresh dill, chopped - 1 tablespoon lemon juice - Salt and pepper to taste Each ingredient adds flavor and texture to this tasty salad. The chicken gives protein, while Greek yogurt makes it creamy. The celery brings crunch, and the grapes add a sweet touch. Walnuts give a nice bite, and dill adds freshness. I always prefer fresh ingredients for my salads. Fresh celery makes the dish crisp. Fresh dill offers a bright flavor that dried can't match. Use fresh grapes for sweetness. Dried ingredients can work in some recipes, but not here. They lack the same flavor and texture. You can swap some ingredients to fit your taste. Try using plain yogurt if you don't have Greek yogurt. For a nut-free version, leave out the walnuts. You can also use chicken thighs for a richer taste. Add other fruits like apples or berries to mix it up. This recipe is flexible, so feel free to get creative! Check the Full Recipe for more ideas. Start by gathering your ingredients. You need cooked chicken, Greek yogurt, and some fresh veggies. In a large bowl, add 2 cups of shredded chicken and 1 cup of plain Greek yogurt. Mix them well until the chicken gets fully coated. Next, toss in 1/2 cup of diced celery, 1/2 cup of halved red grapes, and 1/4 cup of toasted walnuts. Add 1/4 cup of finely chopped red onion and 2 tablespoons of fresh dill. Lastly, drizzle in 1 tablespoon of lemon juice and sprinkle with salt and pepper. Gently fold the mix together. Make sure everything is blended well. Shredding chicken can be simple. First, use cooked chicken breasts for the best taste. You can use two forks to pull apart the chicken. Alternatively, you can shred it with your hands for a quicker method. If you have a stand mixer, it can shred chicken in seconds. Just place the chicken in the bowl and mix on low speed. This will save time and give you perfect shreds. Chilling your chicken salad is key. After mixing, cover the bowl with plastic wrap or a lid. Place it in the refrigerator for at least 30 minutes. This helps the flavors blend well. The chill makes every bite refreshing. Once chilled, serve your salad on leafy greens. You can also wrap it in whole grain wraps. Enjoy your tasty Greek yogurt chicken salad! For the full recipe, check out the details above. To season your Greek yogurt chicken salad, start with salt and pepper. These basics bring out the flavors. You can add a squeeze of lemon juice for a fresh taste. Fresh dill adds a nice herby note. Mix and taste as you go. Adjust the seasoning to suit your preference. Remember, seasoning makes all the difference. For the best flavor, use fresh ingredients. Fresh celery and grapes add crunch and sweetness. Toast the walnuts before adding them. This step brings out their rich flavor. Mixing the salad and letting it chill helps the flavors blend. A cold salad is refreshing and tasty. Consider adding a splash of vinegar for extra zing. One common mistake is over-seasoning. It’s easy to add too much salt or spice. Start with a little, and taste it first. Another mistake is not chilling the salad long enough. The flavors need time to meld. Lastly, avoid using dry chicken. Always use moist, cooked chicken for a better texture. For the full recipe, check out the Greek Yogurt Chicken Salad with a Twist. {{image_2}} Greek yogurt is a great ingredient for this salad. It is thick and creamy. It has less sugar and more protein than regular yogurt. This means it helps you feel full longer. Greek yogurt also has probiotics. These good bacteria can aid digestion. Using Greek yogurt instead of mayo makes the dish healthier. It cuts down on fat while adding flavor. Plus, it adds calcium, which is good for bones. Each serving of Greek yogurt chicken salad gives you balanced nutrition. Here’s what you get: - Calories: About 300 - Protein: Around 30 grams - Fat: About 15 grams - Carbohydrates: Roughly 20 grams - Fiber: 2 grams The chicken provides lean protein. The yogurt adds healthy fats. The fruits and veggies offer fiber and vitamins. This makes it a nutritious choice for lunch or dinner. Traditional chicken salad often uses mayo. This adds more fat and calories. In contrast, Greek yogurt chicken salad is lighter. It has less saturated fat and more protein. This means it is better for your heart. You can enjoy it without feeling guilty. Greek yogurt chicken salad also has a fresh taste. It’s a fun twist on a classic dish. You get all the flavor without the heaviness. Try this recipe [Full Recipe] for a refreshing meal! You can change up your Greek yogurt chicken salad by adding more veggies. Try these options for a fresh twist: - Cucumbers: Diced cucumbers add crunch and hydration. - Bell Peppers: Use red, yellow, or green for color and sweetness. - Carrots: Grated carrots add a nice texture and a hint of sweetness. - Spinach: Chopped spinach can boost the nutrition and flavor. Mixing in different vegetables will keep your salad exciting and tasty. You can swap the chicken for other proteins too. Here are some ideas: - Turkey: Use shredded turkey for a leaner option. - Chickpeas: For a vegetarian choice, add canned chickpeas. They’re full of protein. - Tuna: Try canned tuna for a seafood twist. It pairs well with Greek yogurt. - Hard-Boiled Eggs: Chopped hard-boiled eggs can add creaminess and protein. These changes can make your dish unique and fun. Experimenting with flavors can elevate your Greek yogurt chicken salad. Here are some tasty combinations: - Curry Powder: Add a teaspoon for a warm and spicy kick. - Honey Mustard: Mix in a tablespoon for sweetness and tang. - Smoked Paprika: A pinch can add depth and a smoky flavor. - Fresh Herbs: Experiment with parsley, basil, or cilantro for freshness. These combinations can make your salad more exciting and delicious. For the full recipe, check out the Greek Yogurt Chicken Salad with a Twist. Yes, you can make Greek yogurt chicken salad ahead of time. This salad tastes even better after chilling. The flavors mix well when it sits. I suggest making it a day before you plan to serve it. Just keep it in the fridge until you're ready. You can serve Greek yogurt chicken salad in many ways. Here are some great ideas: - On a bed of leafy greens - In whole grain wraps - With whole-grain crackers - Alongside fresh veggies Each option adds a nice touch to your meal. Store any leftover Greek yogurt chicken salad in an airtight container. It can last up to three days in the fridge. If you see any signs of spoilage, like an off smell or change in texture, toss it out. Always check before eating to stay safe. For the best taste, enjoy it fresh! For the full recipe, check above. In this post, we explored the best ingredients for Greek yogurt chicken salad, differentiating between fresh and dried options. I shared step-by-step instructions for preparation. You learned tips for shredding chicken and chilling before serving. We discussed ways to season and enhance flavors, plus common mistakes to avoid. This salad is a healthy choice, thanks to Greek yogurt. With numerous variations, you can customize it to your taste. Now, you can create a delicious and nutritious meal that everyone will love. Enjoy your cooking!](https://dailydishlab.com/wp-content/uploads/2025/06/31d756a5-2ed8-48b3-ac28-3df00374ee45-768x768.webp)