Spicy Garlic Edamame Flavorful and Easy Appetizer

Looking for a tasty and easy appetizer? Spicy Garlic Edamame ticks all the boxes! With its bold flavors and simple steps, you can impress family and friends in no time. I’ll guide you through each stage—from boiling the edamame to creating a spicy garlic oil that packs a punch. It’s perfect for game nights or cozy dinners. Let’s dive into how to make this crowd-pleaser!
Why I Love This Recipe
- Quick and Easy: This recipe takes only 15 minutes from start to finish, making it a perfect snack or side dish for busy weeknights.
- Flavor Explosion: The combination of garlic, red pepper flakes, and sesame oil creates a deliciously spicy and savory flavor that will delight your taste buds.
- Nutritious Snack: Edamame is rich in protein, fiber, and essential nutrients, making this dish a healthy choice for any time of the day.
- Customizable Spice Level: You can easily adjust the amount of red pepper flakes to suit your personal heat preference, ensuring everyone can enjoy this dish.
Ingredients
List of Ingredients Required
To make Spicy Garlic Edamame, you need the following:
- 2 cups edamame (in pods)
- 3 tablespoons olive oil
- 5 cloves garlic, minced
- 1 teaspoon red pepper flakes
- 2 tablespoons soy sauce
- 1 tablespoon sesame oil
- 1 tablespoon lemon juice
- 1 teaspoon sesame seeds for garnish
- Salt to taste
Key Seasonings and Flavors
The main flavors in this dish come from garlic and red pepper flakes. Garlic gives a rich, savory taste. Red pepper flakes add heat and spice. The soy sauce brings umami, while sesame oil adds a nutty hint. Lemon juice brightens the dish and balances the flavors. You’ll also find a touch of salt to enhance everything.
Substitutions for Common Ingredients
If you run out of ingredients, here are some easy swaps:
- Edamame: You can use green peas or snap peas.
- Olive Oil: Use vegetable oil or avocado oil instead.
- Soy Sauce: Try tamari for a gluten-free option.
- Sesame Oil: Peanut oil can work well in a pinch.
- Red Pepper Flakes: Use sriracha for a different spice kick.
- Lemon Juice: Lime juice can give a nice twist.
These alternatives keep the dish tasty while fitting your needs.

Step-by-Step Instructions
Cooking the Edamame
To start, bring a pot of water to a boil. Add 2 cups of edamame pods. Boil them for 4-5 minutes. You want them tender but not mushy. Once done, drain the pods and set them aside. This step makes sure the edamame is cooked just right for your dish.
Preparing the Spicy Garlic Oil
Now, grab a large skillet and heat 3 tablespoons of olive oil over medium heat. Add 5 cloves of minced garlic and 1 teaspoon of red pepper flakes. Sauté this mix for 1-2 minutes. You want the garlic to smell great but not brown. The heat brings out the flavor in the garlic and adds a nice kick from the red pepper flakes.
Combining and Flavoring the Dish
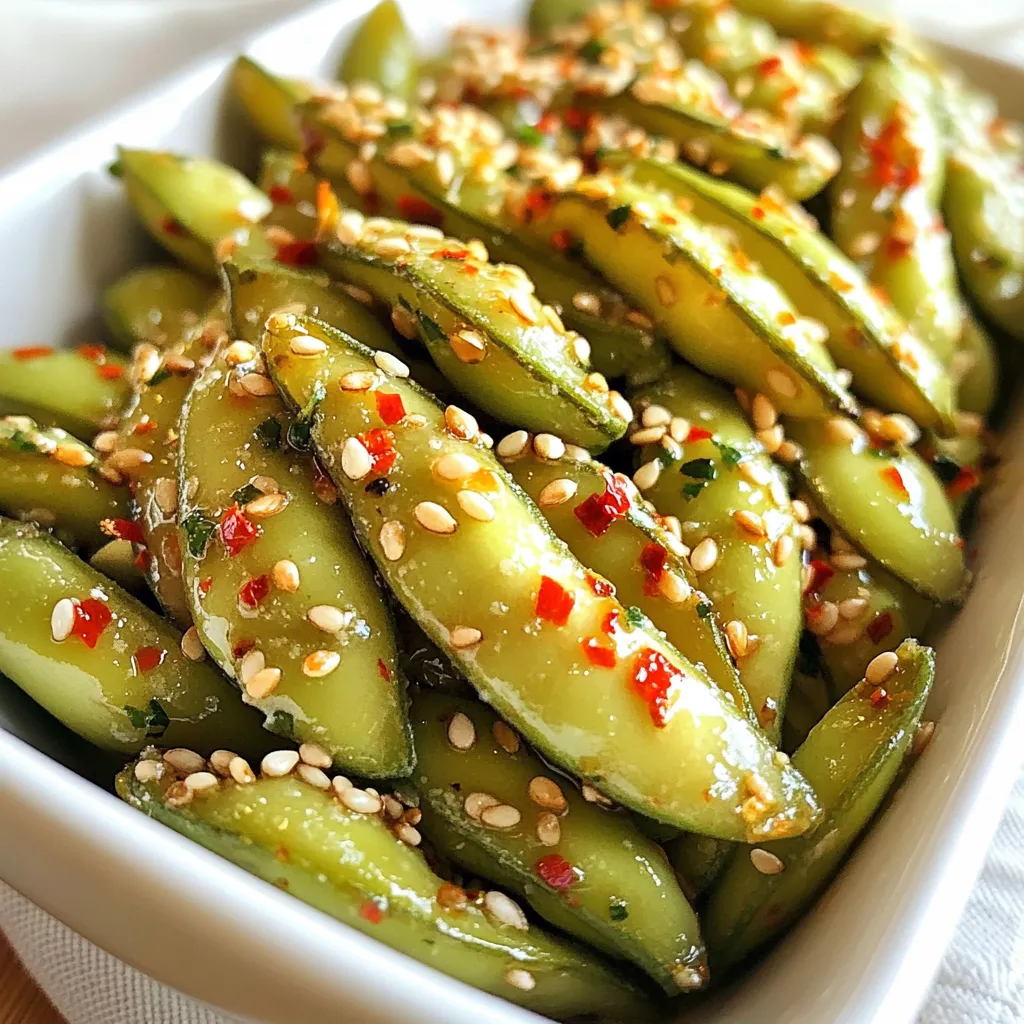
Next, add the cooked edamame pods to the skillet. Toss them well in the spicy garlic oil. This helps to coat each pod. Then, drizzle in 2 tablespoons of soy sauce and 1 tablespoon of sesame oil. Stir everything together for about 2 minutes. This allows the flavors to blend nicely. Finally, remove the skillet from the heat and add 1 tablespoon of lemon juice. Toss the edamame again and season with salt to taste. Transfer them to a serving bowl and sprinkle with 1 teaspoon of sesame seeds for a nice crunch. Enjoy your spicy garlic edamame!
Tips & Tricks
How to Perfectly Cook Edamame
To cook edamame well, start with fresh pods. Bring a pot of water to a boil. Add the pods and boil for 4-5 minutes. They should be tender but still firm. Drain them and set aside. This process keeps the beans bright green and tasty.
Adjusting Spice Levels to Taste
If you like heat, add more red pepper flakes. Start with 1 teaspoon. You can always add more, but you can’t take it away. Taste as you cook. This way, you find the right spice level for you. If you prefer less heat, reduce the flakes or skip them.
Serving Suggestions for Maximum Flavor
Serve your spicy garlic edamame in a nice bowl. Sprinkle sesame seeds on top for crunch. You can also pair it with a dipping sauce like soy sauce. Consider serving it with drinks or as part of a larger meal. This dish is great for sharing with friends!
Pro Tips
- Fresh Garlic is Key: Using fresh garlic instead of pre-minced will provide a more robust flavor to your edamame.
- Adjust Spice Level: Feel free to vary the amount of red pepper flakes based on your heat preference; start with less if uncertain.
- Perfectly Cooked Edamame: Ensure not to overcook the edamame; they should be tender yet still have a slight bite to them.
- Serving Suggestions: This dish pairs well with rice or can be served as a snack on its own; consider adding a squeeze of lime for extra brightness.

Variations
Different Flavor Combinations
You can mix up the flavor of your spicy garlic edamame. Try adding citrus zest for a bright kick. Lime or orange zest adds freshness. You can also swap the red pepper flakes for sriracha for more heat. If you love herbs, fresh cilantro or basil can add a unique twist. For extra umami, try adding miso paste. It gives a deep, savory flavor that pairs well.
Dietary Adaptations (Vegan, Gluten-Free)
This recipe is naturally vegan and gluten-free. All ingredients are plant-based and do not contain gluten. To keep it gluten-free, ensure your soy sauce is labeled as gluten-free. Tamari is a great alternative if needed. This way, everyone can enjoy the dish without worry.
Creative Serving Ideas
Serve your spicy garlic edamame in fun ways. Try using small bowls or ramekins for individual servings. You can also pair them with rice or noodles for a complete meal. They make a great side dish for grilled meats or fish. For a fun twist, serve them in lettuce cups for a crunchy wrap. Don’t forget to sprinkle on extra sesame seeds for a nice touch!
Storage Info
How to Store Leftovers Properly
After enjoying your spicy garlic edamame, you may have some left. Store the leftover edamame in an airtight container. This keeps them fresh and tasty. Place the container in the fridge. They will stay good for about 3 days. Make sure they cool down before sealing.
Reheating Tips for Best Results
To reheat the edamame, use a skillet on low heat. Add a splash of olive oil if needed. Stir them gently until warm. This helps keep them flavorful and soft. You can also microwave them. Place the edamame in a bowl and cover it. Heat for 30 seconds at a time until warm.
Freezing Options for Edamame
If you want to keep edamame for a longer time, freezing is a great option. First, let the cooked edamame cool completely. Then, place them in a freezer bag. Squeeze out all the air before sealing. They can last up to 3 months in the freezer. When ready to eat, thaw them in the fridge overnight. Reheat as mentioned earlier for the best taste.
FAQs
What is Edamame?
Edamame are young soybeans in pods. They are green, tender, and packed with protein. You usually find them steamed or boiled. They make a great snack or appetizer. Edamame is popular in Japanese cuisine. It’s not just tasty; it’s also fun to eat!
Can I Use Frozen Edamame?
Yes, you can use frozen edamame. They are convenient and easy to find. Just cook them as you would fresh ones. Boil them for about 4-5 minutes. This way, you get the same great taste and texture.
How Long Do Leftovers Last?
Leftovers can last 3 to 4 days in the fridge. Store them in an airtight container. Reheat them in the microwave or on the stove. They may lose some crunch but will still taste good.
Is This Recipe Healthy?
Yes, this recipe is healthy. Edamame is a good source of protein and fiber. Olive oil and garlic add healthy fats and flavor. The dish is low in carbs and high in nutrients. It’s a great option for a light snack or appetizer.
What Dishes Pair Well with Spicy Garlic Edamame?
Spicy garlic edamame pairs well with many dishes. Try it with sushi, rice bowls, or grilled meats. It also complements salads and stir-fries. The spicy and savory flavors enhance any meal. Enjoy it as a side or a snack at gatherings!
In this guide, we explored how to make spicy garlic edamame. We looked at key ingredients, essential cooking steps, and ways to adjust flavors. I shared tips for perfect edamame and fun variations to try. Remember to store leftovers properly to keep them fresh. This dish is not only tasty but also versatile. Use these tips to make your edamame unique. Enjoy cooking and experimenting with flavor


![- 4 cups fresh broccoli florets - 1 cup cherry tomatoes, halved - 1/2 cup red onion, finely chopped - 1/2 cup dried cranberries - 1/2 cup sunflower seeds - 1/2 cup shredded sharp cheddar cheese - 1/2 cup Greek yogurt - 2 tablespoons apple cider vinegar - 1 tablespoon honey - Salt and pepper to taste For this classic broccoli salad, you start with fresh produce. I love using bright green broccoli florets. They add a lovely crunch and color. Cherry tomatoes bring sweetness, while red onion adds a nice bite. Next, we add some fun components. Dried cranberries offer a sweet contrast. Sunflower seeds give a nutty flavor and crunch. Shredded sharp cheddar cheese adds richness. Now, let’s not forget about the dressing. I prefer Greek yogurt for creaminess. Apple cider vinegar adds a tangy kick. Honey sweetens the mix just right. Finally, a sprinkle of salt and pepper rounds it all out. With these ingredients, you create a dish that is both nutritious and refreshing! For the full recipe, check out the Broccoli Bliss Salad. To start, we need to blanch the broccoli florets. Blanching means cooking them quickly. Bring a pot of water to a boil. Add the florets and boil for just 2 to 3 minutes. This makes the broccoli bright green and keeps it crunchy. After boiling, drain the broccoli right away. Next, you should immerse it in ice water. This stops the cooking process and keeps the color bright. Once chilled, drain the broccoli well and pat it dry with a clean towel. Now, it's time to mix our salad. In a large bowl, combine the blanched broccoli, cherry tomatoes, red onion, dried cranberries, sunflower seeds, and shredded cheddar cheese. Each ingredient adds a unique flavor and texture. In a separate small bowl, prepare the dressing. Whisk together Greek yogurt, apple cider vinegar, honey, salt, and pepper until smooth. This dressing is creamy and tangy. Pour it over the salad mixture and toss gently. Make sure every piece is well coated in dressing. After mixing, taste the salad. Adjust the seasoning if needed. You might want to add more salt or pepper. This step is important for the best flavor. Once seasoned, let the salad chill in the fridge. Allow it to rest for at least 30 minutes. This helps the flavors blend nicely. When you serve it, the salad will be cool and refreshing, perfect for any meal. For the complete recipe, check out the [Full Recipe]. To make the best classic broccoli salad, start with fresh ingredients. Use crisp broccoli florets. They should be bright green and firm. This keeps the texture crunchy and fun to eat. Blanch the broccoli briefly, then cool it in ice water. This step locks in the vibrant color and taste. Chilling your salad is key to enhancing flavors. After mixing, let it sit in the fridge for 30 minutes. This waiting time allows the ingredients to meld. The flavors become richer and more balanced. For a beautiful display, serve the salad in a large glass bowl. This lets the vibrant colors shine. You can also layer the ingredients for a nice effect. Garnish with extra sunflower seeds or cranberries. A sprinkle of fresh herbs adds a pop of color. This makes the salad look even more inviting. Broccoli is packed with vitamins and minerals. It has vitamin C, vitamin K, and fiber. These nutrients support your immune system and digestion. The dried cranberries add antioxidants and a touch of sweetness. To make the salad even healthier, you can use plain Greek yogurt. It adds protein without extra calories. Swap out the cheddar for a lighter cheese, or leave it out. You can also add grilled chicken or chickpeas for protein. These changes can boost the nutrition of your dish. For the full recipe, check out the Broccoli Bliss Salad 🥦. {{image_2}} You can change the recipe to fit your needs. For a dairy-free version, use alternative yogurt. There are many options like almond or coconut yogurt. They add creaminess without dairy. If you want extra protein, try adding grilled chicken or chickpeas. Grilled chicken gives a nice smoky flavor. Chickpeas add a hearty texture and are great for plant-based diets. Want a kick? Add jalapeños or sriracha for spice. These ingredients can wake up the salad and bring heat. Just a little makes a big difference. If you prefer sweetness, try diced apples or pears. They add a crunchy texture and a hint of natural sugar. This balance of sweet and savory makes the salad even better. You can mix up the dressing too. A vinegar-based dressing is a fresh alternative. Combine vinegar with olive oil for a light and tangy taste. For a creamy twist, use dressings other than Greek yogurt. You might try ranch or a creamy tahini dressing. These options can change the flavor profile while keeping it delicious. For the complete recipe, check the Full Recipe section. To keep your classic broccoli salad fresh, store it in an airtight container. This helps to lock in flavor and crunch. Always place it in the fridge right after serving. The salad stays fresh for about 3 to 5 days. Check for any signs of wilting or spoilage before eating. Freezing broccoli salad is not ideal. The texture of fresh ingredients can change when thawed. If you must freeze it, separate the dressing from the salad mix. This helps to keep the veggies crisp. When ready to eat, thaw the salad in the fridge overnight. Add the dressing just before serving to restore its taste. You can make the salad ahead of time, but store parts separately. Keep the blanched broccoli, tomatoes, and other veggies in one container. Store the dressing in another. This keeps everything fresh and tasty. Combine right before serving for the best flavor. Always chill the salad for at least 30 minutes for the flavors to blend well. For the full recipe, check out the broccoli bliss salad. You can keep classic broccoli salad in the fridge for about 3 to 5 days. The salad stays fresh if stored in an airtight container. Over time, the vegetables may soften, but it will still taste good. Yes, you can make broccoli salad in advance. I often prepare it a day ahead. This allows the flavors to blend well. Just remember to keep it in the fridge until you’re ready to serve. You can add many tasty ingredients to broccoli salad. Some favorites include: - Cooked bacon pieces - Chopped apples for sweetness - Grated carrots for crunch - Chopped nuts like almonds or walnuts - Diced bell peppers for color Feel free to mix and match based on your taste! Using frozen broccoli is okay, but I recommend using fresh for the best taste and texture. If you choose frozen, make sure to thaw and drain it well. Blanching frozen broccoli briefly can help it stay vibrant and crisp. This blog post covered how to make a fresh and tasty broccoli salad. We highlighted ingredients such as broccoli, cherry tomatoes, and cheddar cheese. The steps included blanching broccoli, mixing everything, and perfecting the dressing. Remember, chilling the salad boosts its flavor. Plus, various tips helped enhance your dish. You can customize with lots of fun add-ins. Store it well, and enjoy each bite fresh. This salad is not just tasty; it’s also good for you. Get creative and make it your own!](https://dailydishlab.com/wp-content/uploads/2025/06/c30f1a23-0ac2-43f2-95bf-3ec2b469a032-768x768.webp)