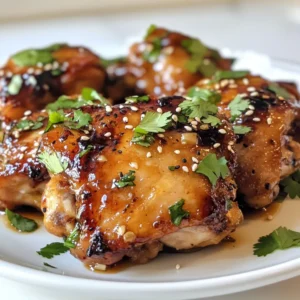
Honey Garlic Chicken Thighs Flavorful Dinner Delight


Are you ready to impress at dinner? Honey Garlic Chicken Thighs are your new go-to dish! This recipe combines sweet and savory flavors, making it a favorite for any table. I’ll guide you through simple steps, show you how to achieve crispy skin, and share tasty variations. Whether you’re a seasoned cook or just starting, this dinner delight is easy and fun to make. Dive into this recipe with me!
Why I Love This Recipe
- Delicious Sweet and Savory Flavor: The combination of honey and soy sauce creates a perfect balance of sweetness and umami that enhances the chicken’s natural flavors.
- Easy Preparation: This recipe requires minimal effort, with a simple marinade and straightforward cooking steps, making it perfect for busy weeknights.
- Versatile Serving Options: These honey garlic chicken thighs can be served with rice, noodles, or a fresh salad, allowing for endless meal possibilities.
- Impressive Presentation: The garnishes of cilantro and sesame seeds add a touch of elegance, making this dish perfect for entertaining guests.
Ingredients
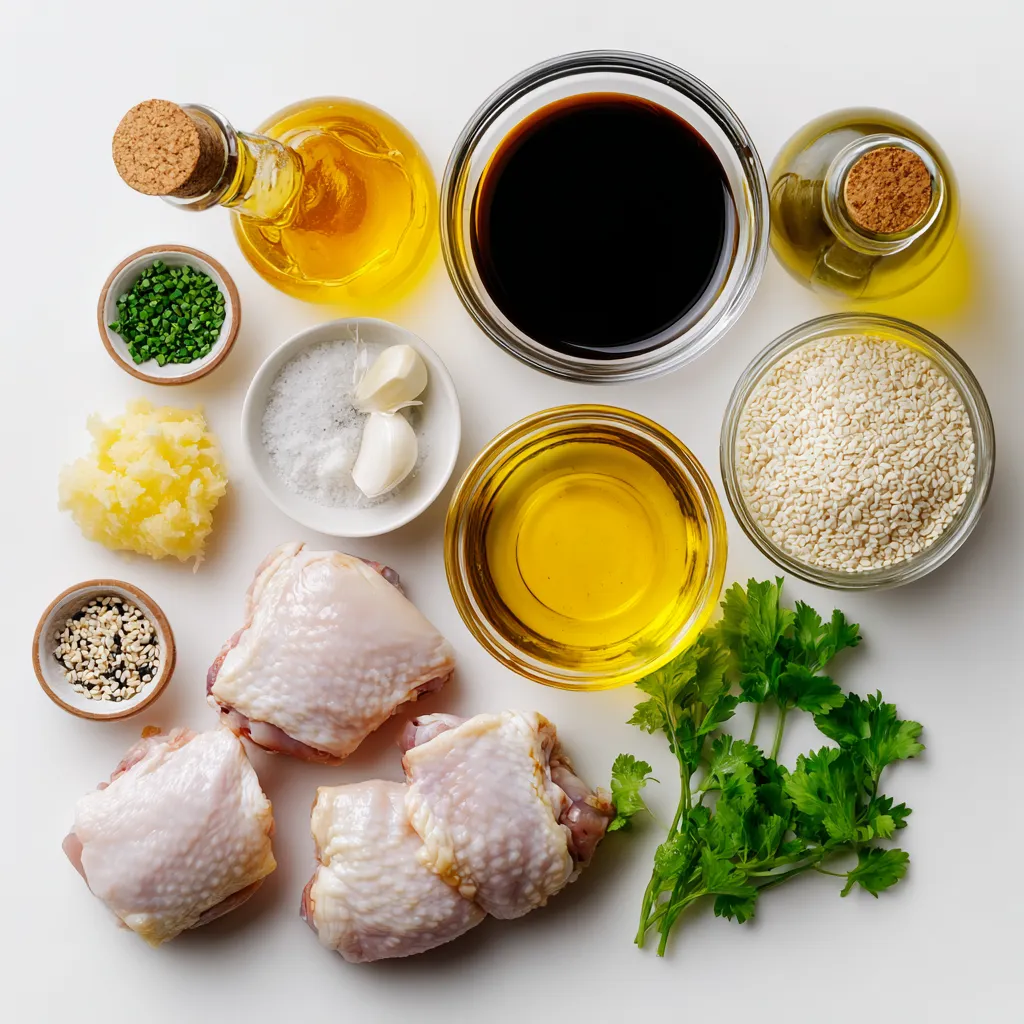
Chicken Thighs
- 4 chicken thighs (bone-in, skin-on)
Chicken thighs are my favorite for this dish. They stay juicy and full of flavor. The bone and skin add richness that makes every bite special.
Marinade Components
- 1/4 cup honey
- 3 tablespoons soy sauce (or tamari for gluten-free)
- 3 cloves garlic, minced
- 1 tablespoon fresh ginger, grated
- 1 tablespoon apple cider vinegar
- 1 teaspoon sesame oil
- Salt and pepper to taste
- 2 tablespoons olive oil
The marinade is the star of this recipe. Honey adds sweetness, while soy sauce gives a savory kick. Garlic and ginger make it fragrant and tasty. Apple cider vinegar adds a nice tang, and sesame oil brings depth. Don’t forget salt and pepper to enhance all the flavors!
Garnishing Options
- 1 tablespoon chopped fresh cilantro (for garnish)
- Sesame seeds (for garnish)
Garnishing is key to a great presentation. Fresh cilantro adds color and freshness. Sesame seeds provide a delightful crunch. Together, they make your dish look and taste amazing!
Step-by-Step Instructions
Mixing the Marinade
Start by gathering your ingredients. In a medium bowl, mix:
- 1/4 cup honey
- 3 tablespoons soy sauce
- 3 cloves garlic, minced
- 1 tablespoon fresh ginger, grated
- 1 tablespoon apple cider vinegar
- 1 teaspoon sesame oil
- Salt and pepper to taste
Stir the mixture well until it is smooth and blended. This marinade gives the chicken its sweet and savory flavor.
Marinating the Chicken
Now, take 4 chicken thighs and place them in a resealable plastic bag or a shallow dish. Pour the marinade over the chicken. Ensure each piece is well-coated. Seal the bag or cover the dish tightly. Refrigerate for at least 1 hour. If you can, let it marinate overnight. This step makes the chicken really tasty.
Searing and Baking the Chicken
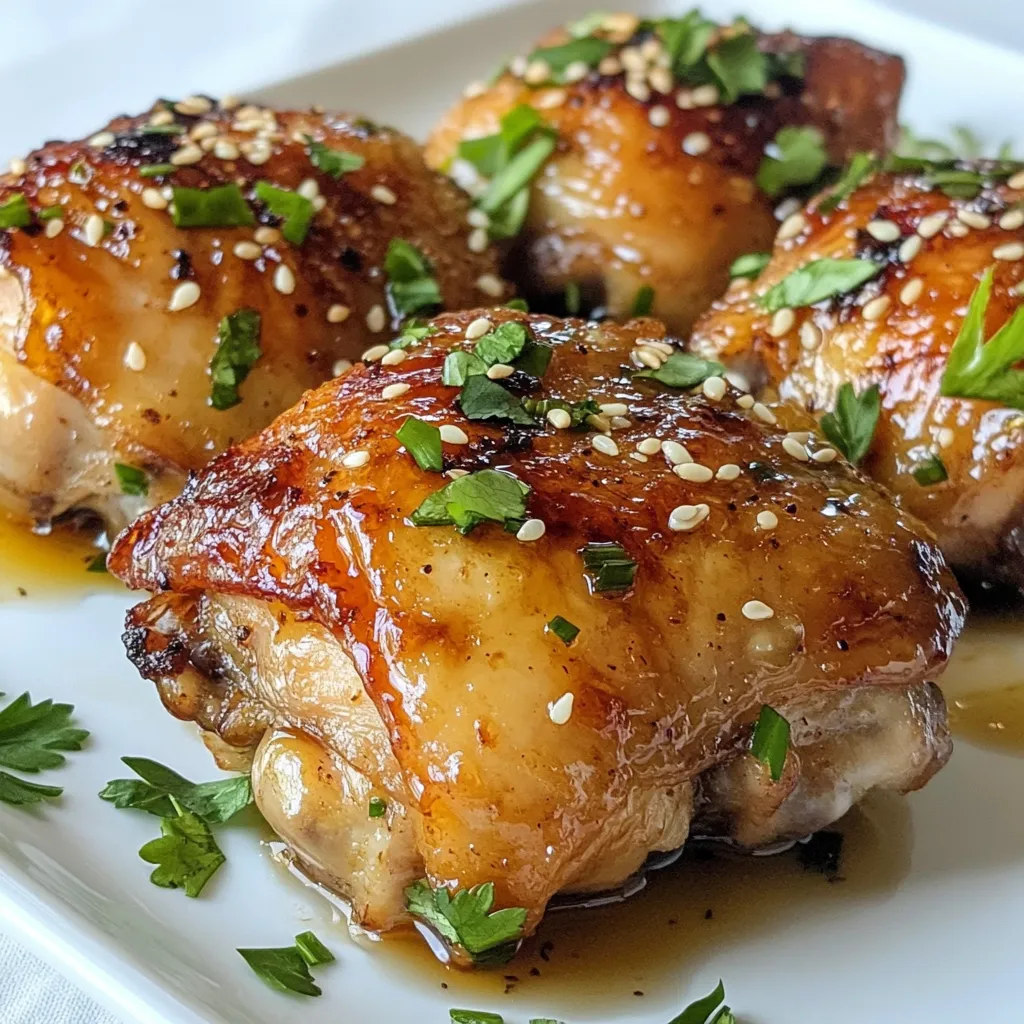
First, preheat your oven to 400°F (200°C). In a large oven-safe skillet, heat 2 tablespoons of olive oil over medium-high heat. Once hot, add the marinated chicken thighs, skin side down. Sear them for 5-7 minutes until the skin turns golden brown. This creates a crispy texture.
Next, flip the chicken thighs over and pour any remaining marinade on top. Transfer the skillet to your preheated oven. Bake for 25-30 minutes. The chicken should reach an internal temperature of 165°F (75°C). The sauce will become bubbly and delicious.
After baking, remove the skillet from the oven. Let the chicken sit for about 5 minutes. This resting time helps the juices settle. Enjoy your flavorful honey garlic chicken thighs!
Tips & Tricks
Achieving Crispy Skin
To get crispy skin on your chicken thighs, start by drying them. Pat them with a paper towel. This helps the skin to crisp up when you cook it. Next, use a hot skillet with olive oil. Sear the thighs skin side down for 5-7 minutes. Don’t move them too soon, or they won’t brown well. The key is to let them cook undisturbed. Once golden brown, flip them and pour the marinade over the top before baking.
Flavor Enhancements
You can boost the flavor in this dish in a few ways. First, consider adding a splash of lime juice to the marinade. This adds a nice zest. You can also mix in some red pepper flakes for heat. If you want a deeper taste, try adding a dash of smoked paprika. Each of these will give your chicken an extra kick. Use fresh herbs like thyme or rosemary in the marinade for a fragrant touch.
Recommended Cooking Tools
Having the right tools makes cooking easier. Use a large, oven-safe skillet for searing and baking. A meat thermometer is also great for checking doneness. It ensures your chicken reaches at least 165°F. A resealable plastic bag works well for marinating. It allows for even coating of the chicken. Lastly, keep a good set of tongs handy for flipping and serving.
Pro Tips
- Marinate Longer for More Flavor: For the best flavor, marinate the chicken thighs overnight. This allows the flavors to penetrate the meat, resulting in a more delicious dish.
- Use a Meat Thermometer: To ensure your chicken thighs are perfectly cooked, use a meat thermometer. The internal temperature should reach 165°F (75°C) for safe consumption.
- Optimal Searing: Make sure your skillet is hot enough before adding the chicken. This helps achieve a crispy skin. Let the chicken sear undisturbed to develop a golden crust.
- Garnish for Freshness: Adding fresh cilantro and sesame seeds not only enhances the presentation but also adds a burst of flavor. Don’t skip this step for a well-rounded dish!
Variations
Gluten-Free Modifications
You can easily make this dish gluten-free. Just swap the soy sauce with tamari. Tamari is a great choice. It has a similar taste but is free from gluten. Always check labels to avoid hidden gluten. You can enjoy the same great flavor without worry.
Spicy Honey Garlic Version
If you like heat, add some spice! Mix in red pepper flakes or sriracha into the marinade. Start with one teaspoon and taste. You can always add more if you want it hotter. This adds a nice kick to the sweet and savory sauce.
Substituting Proteins
Chicken thighs are perfect, but you can try other proteins too. Bone-in chicken breasts work well. They will stay juicy and tender. You can also use pork chops. They soak up the marinade nicely. If you want something lighter, try firm tofu. Just press the tofu to remove water before marinating. Each option brings a unique flavor to this dish.
Storage Info
Storing Leftovers
After enjoying your honey garlic chicken thighs, store leftovers in an airtight container. Place the container in the fridge. The chicken will stay fresh for up to three days. If you want to keep it longer, freeze the chicken in a freezer-safe bag. It can last up to three months in the freezer. Just remember to label the bag with the date.
Reheating Instructions
To reheat, you can use an oven or a microwave. For the oven, preheat it to 350°F (175°C). Place the chicken in a baking dish and cover it with foil to keep it moist. Heat for about 20 minutes. For the microwave, place the chicken on a microwave-safe plate. Heat for one to two minutes, checking every 30 seconds until warm.
Meal Prep Tips
Meal prepping with honey garlic chicken thighs is easy. Marinate the chicken the night before and store it in the fridge. This gives the meat more flavor. You can also cook a larger batch and store extra servings. Use them for quick lunches or dinners. Just make sure to separate the portions in airtight containers. This way, you can enjoy a tasty meal all week long.
FAQs
Can I use boneless chicken thighs?
Yes, you can use boneless chicken thighs. Boneless thighs cook faster. They may also be more tender. Keep an eye on cooking times. You want them juicy and flavorful.
How long should I marinate the chicken?
I recommend marinating for at least one hour. If you have more time, try overnight. Longer marinating gives better flavor. The honey and garlic will soak in well.
What should the internal temperature be for chicken thighs?
The internal temperature should reach 165°F (75°C). Use a meat thermometer to check this. Proper cooking ensures safety and flavor. Juicy chicken is the goal.
Can I grill the chicken thighs instead?
Yes, grilling is a great option. The smoky flavor adds depth. Use medium heat and grill for about 6-7 minutes per side. Brush with marinade for extra taste.
In this post, we covered how to cook tasty chicken thighs. We talked about ingredients, from marinades to garnishes. I shared step-by-step instructions that make cooking easy. Tips for crispy skin and flavor upgrades can really help. We explored fun variations and smart storage tips for leftovers.
Cooking chicken thighs offers a world of flavor. Now, it’s your turn to try the recipes and make your meals specia
Honey Garlic Chicken Thighs
Ingredients
- 4 pieces chicken thighs (bone-in, skin-on)
- 0.25 cup honey
- 3 tablespoons soy sauce
- 3 cloves garlic, minced
- 1 tablespoon fresh ginger, grated
- 1 tablespoon apple cider vinegar
- 1 teaspoon sesame oil
- to taste salt and pepper
- 2 tablespoons olive oil
- 1 tablespoon chopped fresh cilantro (for garnish)
- sesame seeds (for garnish)
Instructions
- In a medium bowl, mix together honey, soy sauce, minced garlic, grated ginger, apple cider vinegar, sesame oil, salt, and pepper until well combined. This will be your marinade.
- Place the chicken thighs in a resealable plastic bag or a shallow dish and pour the marinade over them. Seal the bag (or cover the dish) and refrigerate for at least 1 hour, or overnight for more flavor.
- Preheat your oven to 400°F (200°C).
- In a large oven-safe skillet, heat olive oil over medium-high heat. Once hot, add the marinated chicken thighs, skin side down. Sear them for about 5-7 minutes until the skin is golden brown and crispy.
- Flip the chicken thighs over and pour any remaining marinade on top. Transfer the skillet to the preheated oven.
- Bake for 25-30 minutes or until the chicken is cooked through (internal temperature should reach 165°F/75°C) and the sauce is bubbly.
- Remove the skillet from the oven and let the chicken rest for about 5 minutes.
- Serve the chicken thighs drizzled with the pan sauce, garnished with chopped cilantro and sesame seeds.
. To get crispy chickpeas, start by drying them well. Drain and rinse your chickpeas, then pat them with a kitchen towel. Removing moisture is key. If they are wet, they won't crisp up. For roasting, use olive oil and spices. Toss the dried chickpeas in a bowl with olive oil, smoked paprika, garlic powder, salt, and pepper. Spread them out on a baking sheet lined with parchment paper. Make sure they are in a single layer. Roast at 400°F for 25-30 minutes. Shake the pan halfway to ensure even cooking. Chickpeas are full of protein and fiber. They help keep you full and satisfied. They are low in fat and great for heart health. Including fresh veggies boosts the bowl's nutrition. Spinach adds iron, while tomatoes give antioxidants. Cucumbers add hydration and crunch. Avocados offer healthy fats, making this bowl a well-rounded meal. Pair your Buddha bowl with a side of whole grain bread for extra carbs. You can also serve it with a light soup to add warmth. For meal prep, make extra roasted chickpeas and quinoa. Store them separately in the fridge. Assemble your bowl right before eating. This way, everything stays fresh and crunchy. Try the Full Recipe to create your own delicious bowl! {{image_2}} You can add many protein sources to your Buddha bowl. Some great options are: - Grilled chicken or turkey - Tofu or tempeh - Cooked lentils - Hard-boiled eggs If you follow a vegan diet, chickpeas are perfect. For gluten-free options, choose quinoa or brown rice. These swaps help meet different dietary needs. Spices can change your Buddha bowl flavor. Here are some to try: - Cumin for a warm taste - Curry powder for a kick - Chili powder for heat Dressings can also enhance flavor. Try these: - Tahini dressing for creaminess - Lemon vinaigrette for brightness - A spicy yogurt sauce for tang You can easily swap greens and veggies in your bowl. Here are some ideas: - Kale instead of spinach - Arugula for a peppery taste - Roasted sweet potatoes instead of cucumber For vegan and gluten-free options, avoid dairy. Use avocado or hummus as creamy toppings. These swaps keep your bowl fresh and exciting. For the full recipe, check out the Crispy Chickpea Buddha Bowl. You can easily store leftover Buddha bowl ingredients. Start by placing the chickpeas, quinoa, and veggies in separate airtight containers. This keeps them fresh and tasty. Store them in the fridge for up to three days. If you want to keep them longer, freeze the chickpeas and quinoa. They can last for about two months in the freezer. Just remember to cool them down before sealing. To reheat the chickpeas and quinoa, use the oven or a skillet. For the oven, preheat it to 350°F (175°C). Spread the chickpeas on a baking sheet and heat for about 10 minutes. This keeps them crispy. For the quinoa, add a splash of water and cover with a lid in a skillet. Heat on low for a few minutes, stirring occasionally. This helps it stay fluffy. You can simplify your cooking by prepping ahead. Cook the quinoa and chickpeas in advance. Store them in the fridge to use later in your bowls. Chop the veggies and keep them ready too. Assemble your Buddha bowl just before serving. This keeps everything fresh and crunchy. You’ll enjoy a delicious meal without much hassle. For the full recipe, check out the details above! To make chickpeas crispy, start by drying them well. Use a clean kitchen towel to pat them dry. Moisture makes them soggy, so this step is key. Next, toss the chickpeas with olive oil and spices. I like using smoked paprika and garlic powder for flavor. Spread them out in a single layer on a baking sheet. This helps them cook evenly. Roast them in a preheated oven at 400°F for about 25-30 minutes. Shake the pan halfway to ensure they crisp up all over. Keep a close eye on them to avoid burning. Yes, you can make this Buddha bowl in advance. Prepare the chickpeas and cook the quinoa ahead of time. Store them separately in airtight containers. You can also chop the veggies and keep them in the fridge. This way, you save time on busy days. When it's time to eat, just warm up the chickpeas and quinoa. Assemble the bowl quickly for a fresh meal. You can add many ingredients to your Buddha bowl. Try roasted sweet potatoes for a sweet touch. Bell peppers add crunch and color. You can also include shredded carrots or sliced radishes. Nuts and seeds bring extra texture and nutrition. Consider using different greens like kale or arugula. For protein, add grilled chicken or tofu if you like. The options are endless, so mix and match to suit your taste! Making a Crispy Chickpea Buddha Bowl takes about 40 minutes total. You’ll need about 10 minutes to prep the ingredients. This includes drying the chickpeas and cooking the quinoa. The roasting time for the chickpeas is around 25-30 minutes. While they roast, you can chop veggies and prepare the bowl. This makes it easy to create a delicious meal without a lot of fuss. For the full recipe, check out the earlier section. This Buddha bowl blends tasty ingredients like chickpeas, quinoa, and fresh greens. You learn how to roast chickpeas to perfection and layer them with vibrant toppings. Feel free to explore variations and add your favorite proteins or spices. Remember, meal prep makes this dish quick and healthy. Enjoy your time creating a colorful bowl that’s packed with nutrition. You’ll love how simple it is to make a delicious meal that nourishes your body. Try it for lunch or dinner; it’s versatile and satisfying!](https://dailydishlab.com/wp-content/uploads/2025/06/d75a3dbd-2a4e-410e-b458-9a4c182386e3-768x768.webp)