Mango Chili Lime Popsicles Refreshing Summer Treat

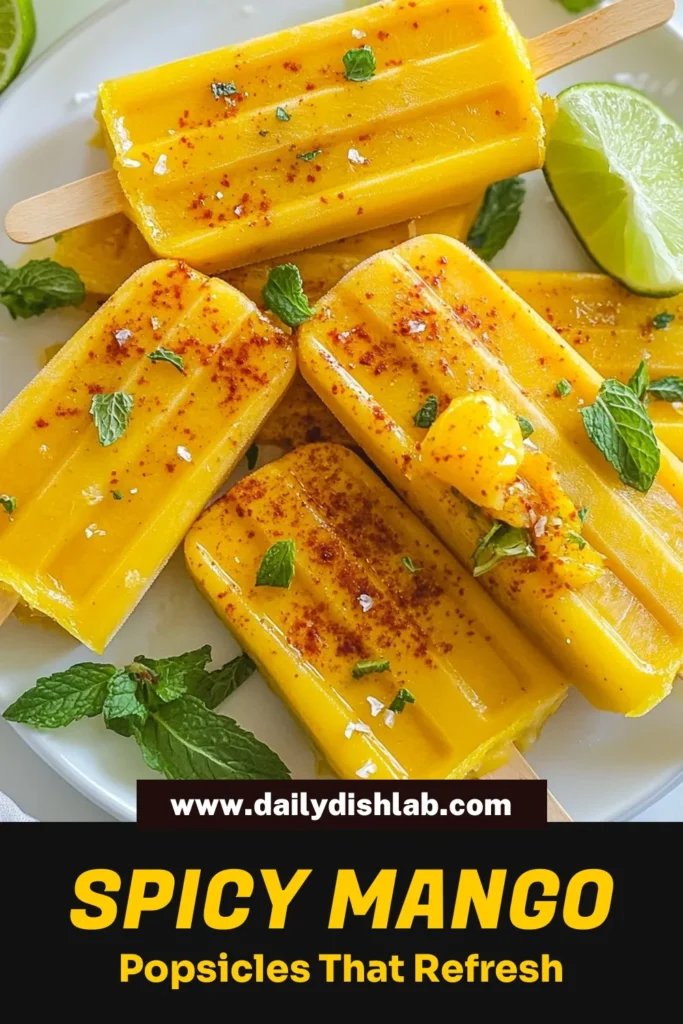
Looking for a fun and tasty way to beat the summer heat? Try my Mango Chili Lime Popsicles! This refreshing treat combines sweet mangoes, a zing of lime, and just the right amount of chili heat. You can enjoy these pops while cooling down on hot days. Follow my simple steps to create this perfect blend of fruity and spicy goodness at home. Let’s get started!
Why I Love This Recipe
- Bright and Refreshing Flavor: The combination of ripe mangos and zesty lime creates a vibrant, refreshing taste that’s perfect for hot days.
- Sweet and Spicy Kick: The addition of chili powder gives these popsicles an unexpected zing, balancing the sweetness of the mango beautifully.
- Easy to Make: With just a few simple ingredients and minimal prep time, these popsicles can be whipped up in no time.
- Healthy Treat: Made with natural ingredients like fruit and coconut water, these popsicles are a guilt-free way to satisfy your sweet tooth.
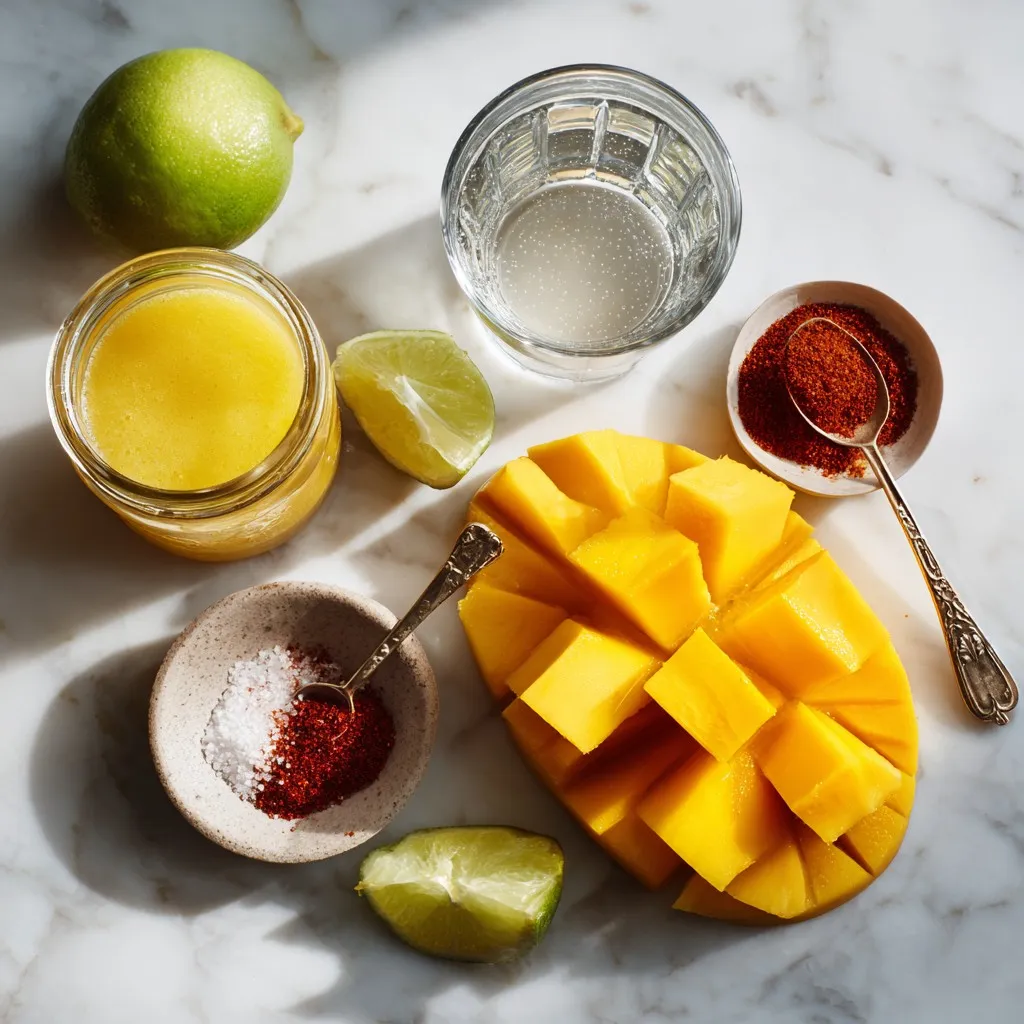
Ingredients
Fresh Ingredients
To make Mango Chili Lime Popsicles, you need the best fresh ingredients. Here’s what you’ll need:
- 2 ripe mangos, peeled and diced
- 1/2 cup coconut water
- 2 tablespoons fresh lime juice
- Zest of 1 lime
These ingredients give your popsicles a bright, fruity flavor. Ripe mangos are key. They should be soft and fragrant. Coconut water adds a nice tropical twist. Fresh lime juice makes everything pop!
Additional Flavorings
To enhance the flavor, you also need:
- 1-2 tablespoons honey or agave syrup (adjust to taste)
- 1 teaspoon chili powder (adjust to taste)
- Pinch of salt
Honey or agave syrup adds sweetness. You can adjust it to your taste. The chili powder gives a fun kick. You can use more or less based on your spice preference. A pinch of salt balances the sweetness.
Equipment Needed
You will also need some basic kitchen tools:
- Blender
- Popsicle molds
- Popsicle sticks
A blender blends the ingredients until smooth. Popsicle molds shape your treats. Make sure to have popsicle sticks ready for easy handling. This simple equipment makes the process easy and fun!
Step-by-Step Instructions
Preparation Steps
Start by gathering your ingredients. You need two ripe mangos, coconut water, fresh lime juice, honey or agave syrup, chili powder, lime zest, and a pinch of salt.
Next, peel and dice the mangos. This step makes it easier for the blender. Measure out half a cup of coconut water. Then, squeeze fresh lime juice until you have two tablespoons.
Blending the Mixture
Now, put all your ingredients into a blender. Add the diced mangos, coconut water, lime juice, honey or agave, chili powder, lime zest, and salt. Blend until smooth and creamy.
If you want some texture, set aside a few mango pieces. Fold these in after blending. Taste the mixture to check if you need more honey or chili powder. Adjust the flavor to suit your taste.
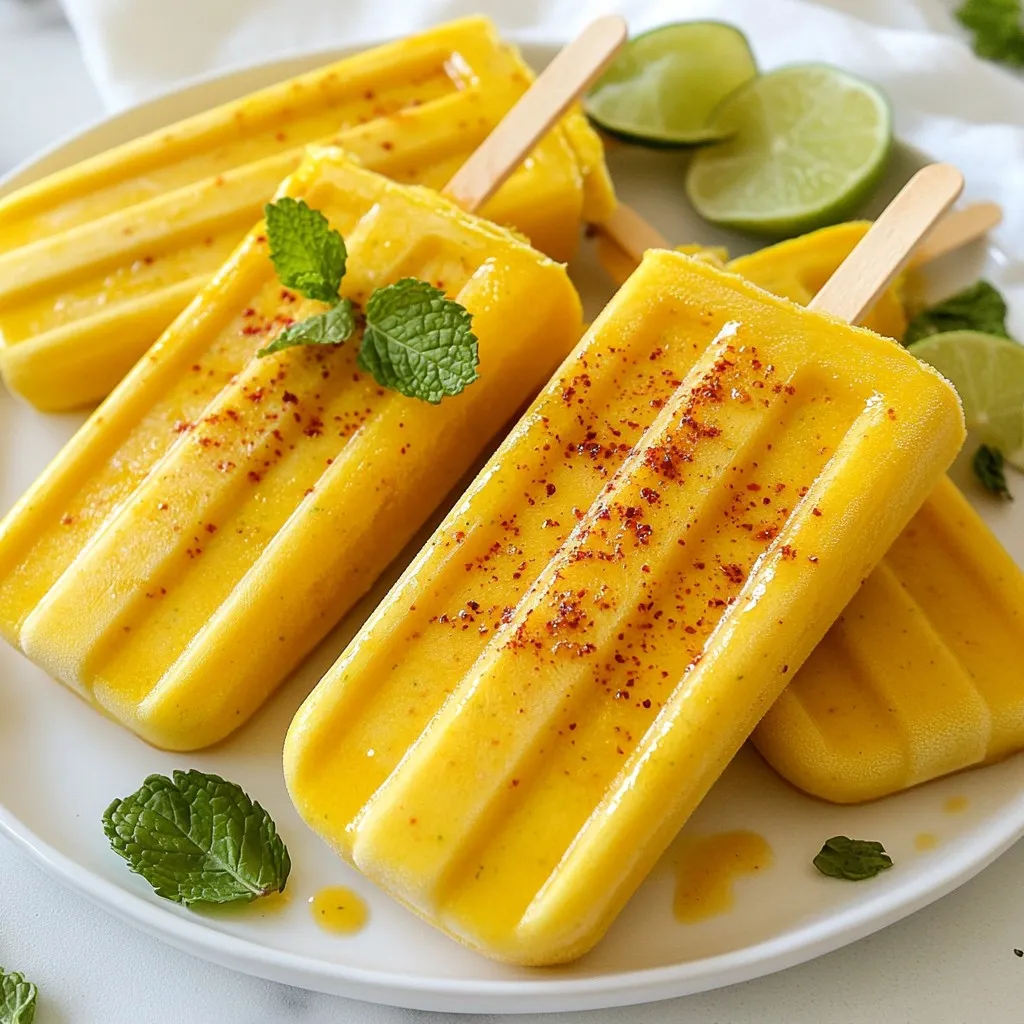
Freezing and Serving
Pour the mango mixture into popsicle molds. Leave a little space at the top for expansion during freezing. Then, insert popsicle sticks into each mold.
Now, place the molds in the freezer. Leave them for at least 4 to 6 hours until they are solid. To remove the popsicles, run warm water over the molds for a few seconds. This will help them release easily.
For serving, place the popsicles on a wooden platter. You can add lime wedges or fresh mint leaves for a nice touch. Sprinkle a dash of chili powder on top for extra flair right before serving.
Tips & Tricks
Adjusting Sweetness and Spice
You can easily adjust the sweetness and spice of your popsicles. Start with 1-2 tablespoons of honey or agave syrup. Taste the mix before freezing. If it needs more sweetness, add a bit more honey. For spice, begin with 1 teaspoon of chili powder. If you like it hotter, add more chili powder gradually. This way, you make the perfect popsicle for your taste.
Preventing Ice Crystals
To avoid ice crystals in your popsicles, use coconut water. It helps create a smoother texture. Blend the ingredients well until they are creamy. You can also add a pinch of salt. Salt can help improve flavor and texture. Don’t rush the freezing process. Freeze them for at least 4-6 hours to ensure they set properly.
Presentation Ideas
Presentation can make your popsicles even more fun. Serve them on a wooden platter. Add lime wedges or fresh mint leaves for color. Sprinkle a little chili powder on top for a nice touch. You can also use clear cups for serving. This way, everyone can see the vibrant colors inside. Enjoy your beautiful, tasty treats!
Pro Tips
- Choose Ripe Mangos: For the best flavor and sweetness, make sure to select ripe mangos that yield slightly to pressure when squeezed.
- Adjust Sweetness to Taste: Depending on the ripeness of the mangos, you may want to adjust the amount of honey or agave syrup for your desired sweetness level.
- Experiment with Spices: Feel free to add or reduce the chili powder based on your preference for spice. You can also try different spices like cayenne or paprika for a unique twist.
- Creative Presentation: For a fun presentation, dip the tops of the popsicles in melted chocolate and then in crushed nuts or coconut before freezing.
Variations
Dairy-Free Options
You can make these popsicles without dairy. Coconut water serves as a great base. It keeps the pops light and refreshing. If you like, try using almond milk instead. Almond milk gives a nutty taste that pairs well with mango. Both options are creamy and delicious without dairy.
Fruit Combinations
Mango is the star here, but feel free to mix it up! You can add pineapple for a tropical twist. Strawberries also work great and add a nice color. Just remember to keep the ratios right. Use about one cup of extra fruit for every two mangos. This way, your pops stay balanced and tasty.
Alternative Sweeteners
Honey and agave syrup are tasty, but there are other options. Try using maple syrup for a different flavor. Stevia or monk fruit sweetener can also work if you want less sugar. Just adjust the amount based on your taste. Each sweetener has its own unique flavor, so experiment to find what you like best.
Storage Info
How to Store Popsicles
Store your Mango Chili Lime Popsicles in an airtight container. This keeps them fresh and prevents ice crystals. You can also wrap them in plastic wrap for extra protection. Make sure to keep them in the freezer until you are ready to enjoy them.
Shelf Life
These popsicles can last up to two months in the freezer. After this time, they may lose flavor and texture. Always check for signs of freezer burn before eating. If they look icy or dry, it is best to discard them.
Freezing and Thawing Tips
Freeze the popsicles for at least 4-6 hours. This ensures they are solid and easy to remove from the molds. When you’re ready to eat, run warm water over the outside of the molds. This helps the popsicles release easily. Avoid using a microwave, as it can melt them unevenly. Enjoy your refreshing treat!
FAQs
How do I know when the popsicles are ready?
You can tell when the popsicles are ready by checking if they are solid. After freezing for at least 4-6 hours, they should feel firm to the touch. If they are still soft, give them more time. Once they are ready, you can easily remove them from the molds.
Can I use frozen mango instead of fresh?
Yes, you can use frozen mango. Frozen mango works well and saves time. Just make sure to let the mango sit for a few minutes to soften before blending. This helps create a smooth texture. The flavor will still be delicious!
Where can I buy pre-made Mango Chili Lime Popsicles?
You can find pre-made Mango Chili Lime Popsicles at many grocery stores. Look in the frozen dessert section. Some specialty stores may also carry them. If you want a unique taste, try local shops or farmers’ markets that make popsicles from fresh ingredients.
You learned how to make Mango Chili Lime popsicles from fresh ingredients. We explored key steps from preparing to blending and freezing. Tips help you adjust sweetness, prevent ice, and make popsicles look great. Variations let you try dairy-free options and different fruits. Finally, proper storage ensures your treats last longer. Enjoy your homemade popsicles and impress friends with these fun, tasty snack
Mango Chili Lime Popsicles
Ingredients
- 2 whole ripe mangos, peeled and diced
- 0.5 cup coconut water
- 2 tablespoons fresh lime juice
- 1 tablespoons honey or agave syrup (adjust to taste)
- 1 teaspoon chili powder (adjust to taste)
- 1 whole zest of lime
- 1 pinch salt
Instructions
- In a blender, combine the diced mangos, coconut water, fresh lime juice, honey (or agave syrup), chili powder, lime zest, and a pinch of salt.
- Blend until smooth and creamy, scraping down the sides of the blender as needed. If you prefer some texture, reserve a few mango pieces and fold them in after blending.
- Taste the mixture and adjust sweetness or spice level if necessary by adding more honey or chili powder.
- Pour the mango mixture into popsicle molds, leaving a little space at the top for expansion.
- Insert popsicle sticks and freeze for at least 4-6 hours or until completely solid.
- To remove the popsicles, run warm water over the outside of the molds for a few seconds until they release easily.
![- 2 cups fresh strawberries - 1/4 cup granulated sugar - 1 teaspoon vanilla extract - 2 cups whipped cream - 1 pound pound cake - 1 cup vanilla pudding - Mint leaves for garnish Fresh strawberries are the star of this dish. Choose ripe, sweet ones for the best flavor. The sugar helps draw out their juices, creating a tasty syrup. Vanilla extract adds depth to the whipped cream and pudding, enhancing the overall taste. I like to use a pound cake for its light, soft texture. You can buy it or make it from scratch. Vanilla pudding adds creaminess and richness to the layers. Finally, mint leaves add a pop of color and a refreshing touch on top. - Flavor variations for whipped cream - Additional fruits to mix in - Alternative cake options You can personalize your trifle with various options. For whipped cream, try adding lemon zest or almond extract for a new twist. Mix in more fruits like blueberries or raspberries for added flavor and color. If you want to change the cake, you could use angel food cake or sponge cake. Both options keep the dessert light and airy. Feel free to play with flavors and textures to make your own unique trifle. For the full recipe, check the earlier section. First, toss 2 cups of sliced strawberries with 1/4 cup of granulated sugar. This simple step helps bring out their sweet flavor. Let them sit for about 15 minutes. This process is called macerating. As the strawberries sit, they release their juices. These juices will add moisture and sweetness to your trifle. Grab your trifle dish or a large glass bowl. Start by layering the ingredients. Place cubes of pound cake at the bottom. Next, drizzle some of the strawberry juice over the cake. This makes the cake soft and tasty. Now, spread a layer of vanilla pudding over the soaked cake. Add the macerated strawberries on top. Make sure to distribute them evenly. Spoon a layer of whipped cream over the strawberries. Smooth it out gently. Repeat these layers until your dish is full. Finish with one last layer of whipped cream. To make your trifle look pretty, garnish the top. Place a few whole strawberries and some fresh mint leaves on the whipped cream. This adds a pop of color. Chill your trifle in the fridge for at least 1 hour. This helps the flavors blend together. For a fun twist, serve it in individual glass cups. It makes for a charming presentation. Enjoy your Strawberry Shortcake Trifle Delightful Summer Treat! For a stunning trifle, focus on layering. Start with a layer of pound cake cubes. Soak them with the juice from the strawberries. This adds flavor and keeps the cake moist. Next, pour a layer of vanilla pudding. It should be smooth but not too runny. If your pudding is too thick, add a splash of milk. This will help it spread easily. After pudding, add the strawberries. Place them evenly for a nice look. Finally, top with whipped cream. A gentle swirl makes it pretty. Repeat these steps until you fill your dish. End with whipped cream on top for a lovely finish. You can save time by using store-bought items. Grab pre-made vanilla pudding and whipped cream. This cuts down on prep time. You can also use ready-made pound cake. Just cube it, and you are set. If you're in a rush, layer ingredients in jars. This is fast and fun for serving. You can make individual servings quickly. Plus, it looks great at parties! Even with shortcuts, your trifle will taste amazing. You can still enjoy the full flavors of the Strawberry Shortcake Trifle with these easy steps. For the full recipe, check out the details above. {{image_2}} You can switch up the classic Strawberry Shortcake Trifle in fun ways. One tasty option is the Chocolate Strawberry Shortcake Trifle. Use chocolate cake instead of pound cake. Layer it with strawberries and chocolate pudding. Top it all with whipped cream. This twist adds rich flavors and a fun look. Another great choice is a lemon-infused variation. Substitute lemon pudding for vanilla pudding. You can also add lemon zest to the whipped cream. This will give the trifle a bright, zesty taste. It complements the strawberries nicely. You’ll have a refreshing treat perfect for hot days. If you need gluten-free options, use gluten-free cake. You can find mixes in stores or make your own. Just make sure the other ingredients are also gluten-free. This way, everyone can enjoy this dessert. For vegan adaptations, swap the whipped cream with a plant-based version. Use coconut cream or almond whipped cream. Replace the pudding with a vegan version too. You can make it with silken tofu and a bit of sweetener. These changes keep the trifle tasty while meeting dietary needs. For the full recipe, click here: [Full Recipe]. To store leftovers, cover the trifle with plastic wrap. Make sure it fits tightly to keep air out. You can also use a lid if your dish has one. This keeps the trifle fresh and tasty. The shelf life of the trifle is about 2-3 days in the fridge. After that, the layers may start to blend together. The strawberries can lose their texture, too. Always check for freshness before you dig in. If you want to refresh the trifle before serving, here are some tips. First, scoop out the top layer and set it aside. This lets you see if the layers need some help. Add fresh whipped cream to the top for a light touch. You can also add more sliced strawberries to make it look pretty. If the cake is too soft, consider adding a new layer of pound cake. This can help restore some of the texture and taste. Enjoy your delightful summer treat! Can I use frozen strawberries? Yes, you can use frozen strawberries. Thaw them first and drain any extra juice. This way, they still add great flavor to your trifle. How do I make it ahead of time? You can make your trifle a day before you serve it. Just layer everything and cover it well. Chill it in the fridge overnight. This helps the flavors mix nicely. What can I substitute for pound cake? If you don’t have pound cake, you can use angel food cake or sponge cake. Both options keep the trifle light and fluffy. You can also use cookies for a fun twist. For the full recipe, check the earlier section. Enjoy your delicious strawberry shortcake trifle! In this post, we covered how to make a delicious strawberry shortcake trifle. I shared the key ingredients, like fresh strawberries, whipped cream, and pound cake. You learned step-by-step instructions for preparation, assembly, and presentation. Tips helped you perfect your trifle and save time. Remember to explore flavor variations and dietary options. The trifle is easy to store and refresh, ensuring you enjoy every bite. Now, it's time to create your own tasty masterpiece!](https://dailydishlab.com/wp-content/uploads/2025/07/b9031d10-5e28-4fea-a2af-b8fc9fc435a5-768x768.webp)