Garlic Parmesan Roasted Carrots Flavorful Side Dish
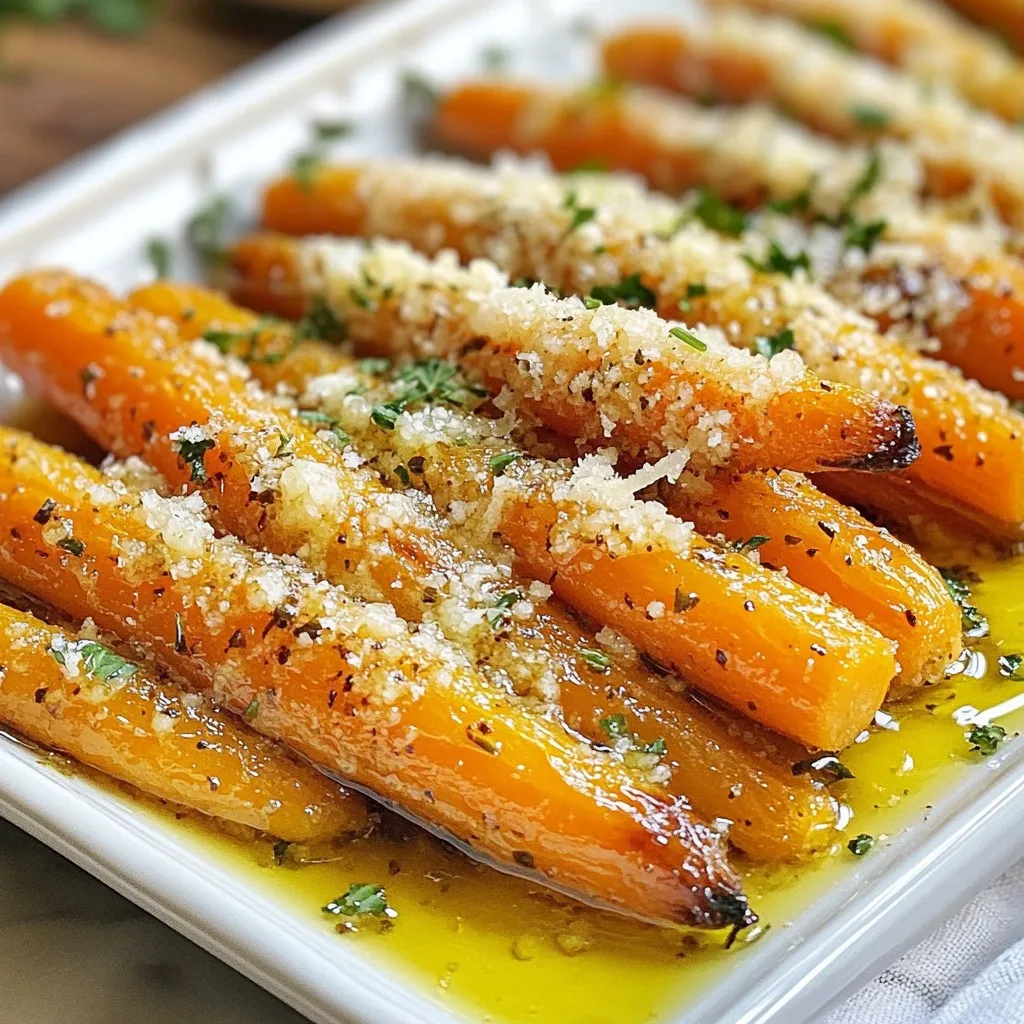

Are you ready to transform ordinary carrots into a mouthwatering side dish? My Garlic Parmesan Roasted Carrots are simple yet bursting with flavor. With just a handful of ingredients, you’ll create a dish that dazzles at any meal. Perfectly roasted, cheesy, and seasoned, these carrots will make your taste buds sing. Let’s dive into the recipe that will elevate your dinner table!
Why I Love This Recipe
- Simple Preparation: This recipe is quick and easy to prepare, making it perfect for busy weeknights.
- Flavorful Outcome: The combination of garlic and Parmesan creates a deliciously rich flavor that enhances the natural sweetness of the carrots.
- Healthy Side Dish: Roasting carrots retains their nutrients while adding a delightful caramelization, making them a healthy addition to any meal.
- Versatile Pairing: These Garlic Parmesan Roasted Carrots complement a wide range of main dishes, from chicken to fish to vegetarian options.
Ingredients
Main Ingredients
- 1 pound baby carrots
- 3 tablespoons olive oil
- 4 cloves garlic, minced
Seasoning and Garnish
- 1 teaspoon dried thyme
- 1 teaspoon sea salt
- ½ teaspoon black pepper
- ½ cup grated Parmesan cheese
- 2 tablespoons fresh parsley, chopped
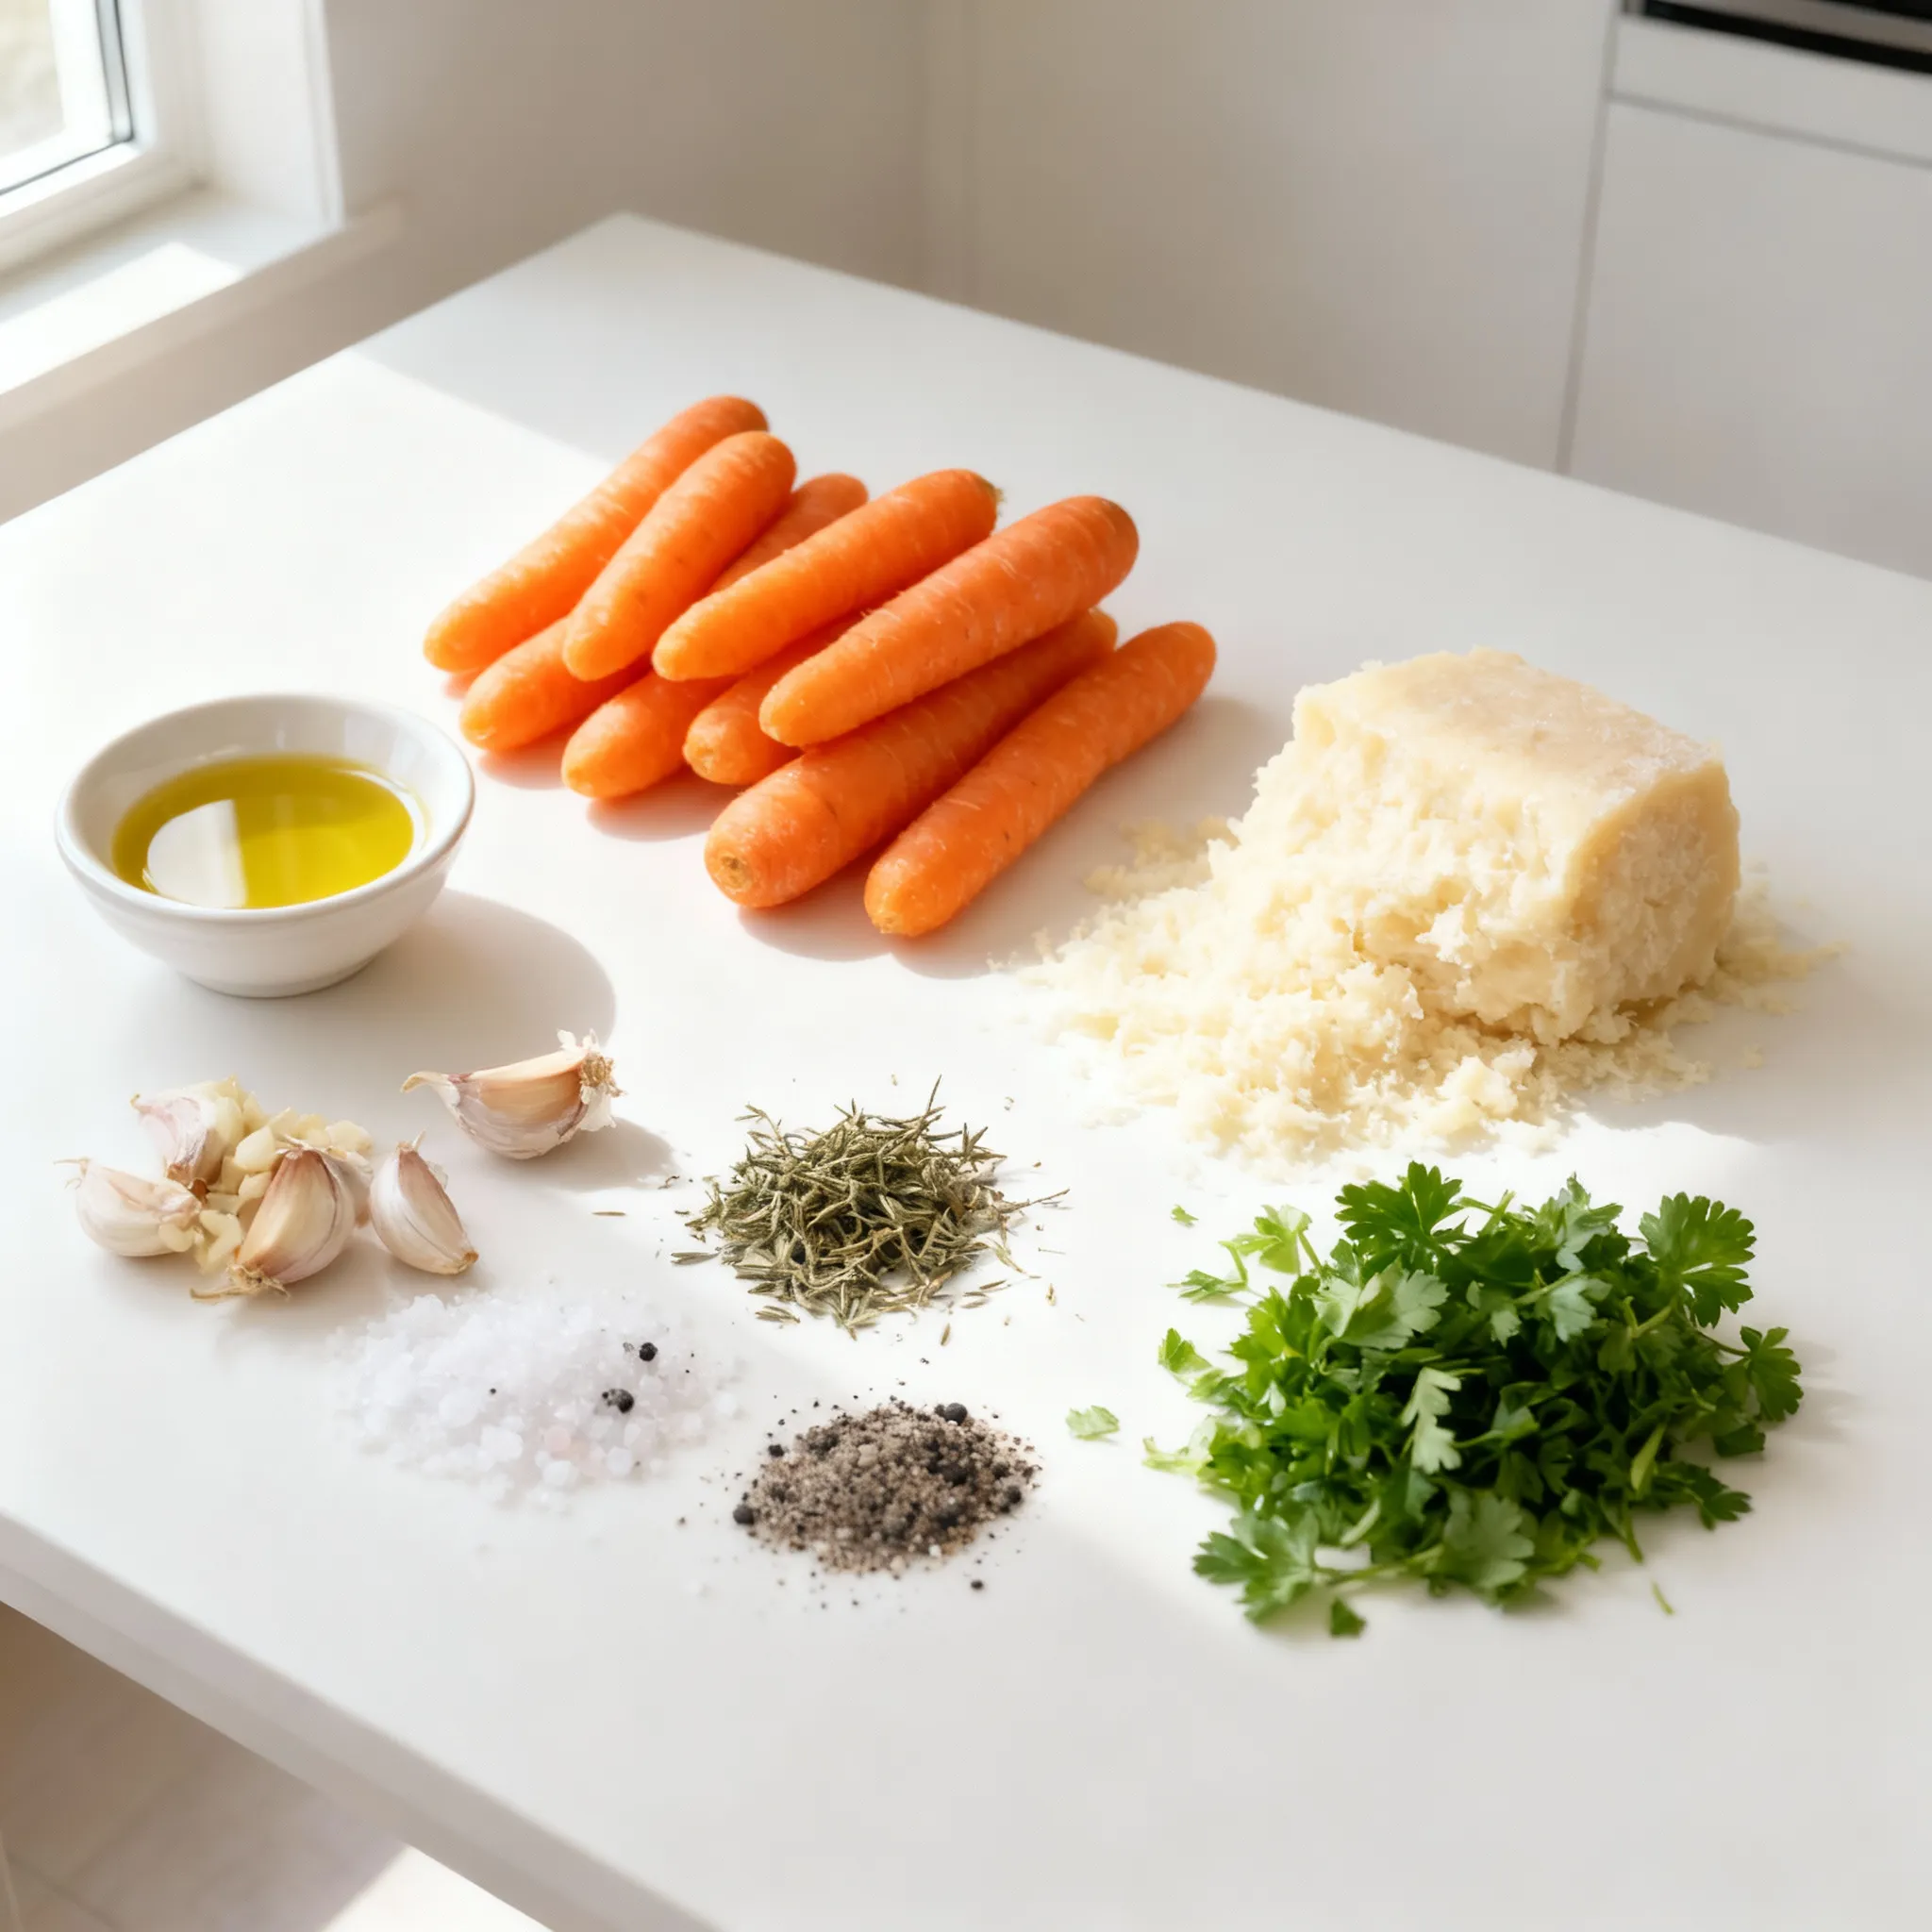
The key to this dish lies in its fresh, simple ingredients. Baby carrots are sweet and tender, which makes them perfect for roasting. The olive oil helps them crisp up nicely in the oven. Garlic adds a bold flavor that pairs perfectly with the natural sweetness of the carrots.
For seasoning, dried thyme brings an earthy note, while sea salt and black pepper enhance the overall taste. The Parmesan cheese adds richness and a savory touch that elevates these carrots to a new level. Finally, fresh parsley not only adds color but also a hint of brightness to the dish.
When you put all these ingredients together, you create a vibrant and tasty side dish. The balance of flavors and textures makes it a great addition to any meal.
Step-by-Step Instructions
Preparation
First, preheat your oven to 425°F (220°C). This ensures even cooking. While the oven heats, take 1 pound of baby carrots. Peel and trim them. In a large mixing bowl, add the carrots. Pour in 3 tablespoons of olive oil. Next, add 4 cloves of minced garlic, 1 teaspoon of dried thyme, 1 teaspoon of sea salt, and ½ teaspoon of black pepper. Toss everything well. You want the carrots to be evenly coated with the oil and spices.
Roasting Process
Now, spread the carrots on a baking sheet. Line the sheet with parchment paper to prevent sticking. Make sure the carrots are in a single layer. This helps them roast evenly. Place the baking sheet in your preheated oven. Roast for about 20 to 25 minutes. Stir the carrots halfway through for even roasting. Keep an eye on them. They should be tender and slightly caramelized when done.
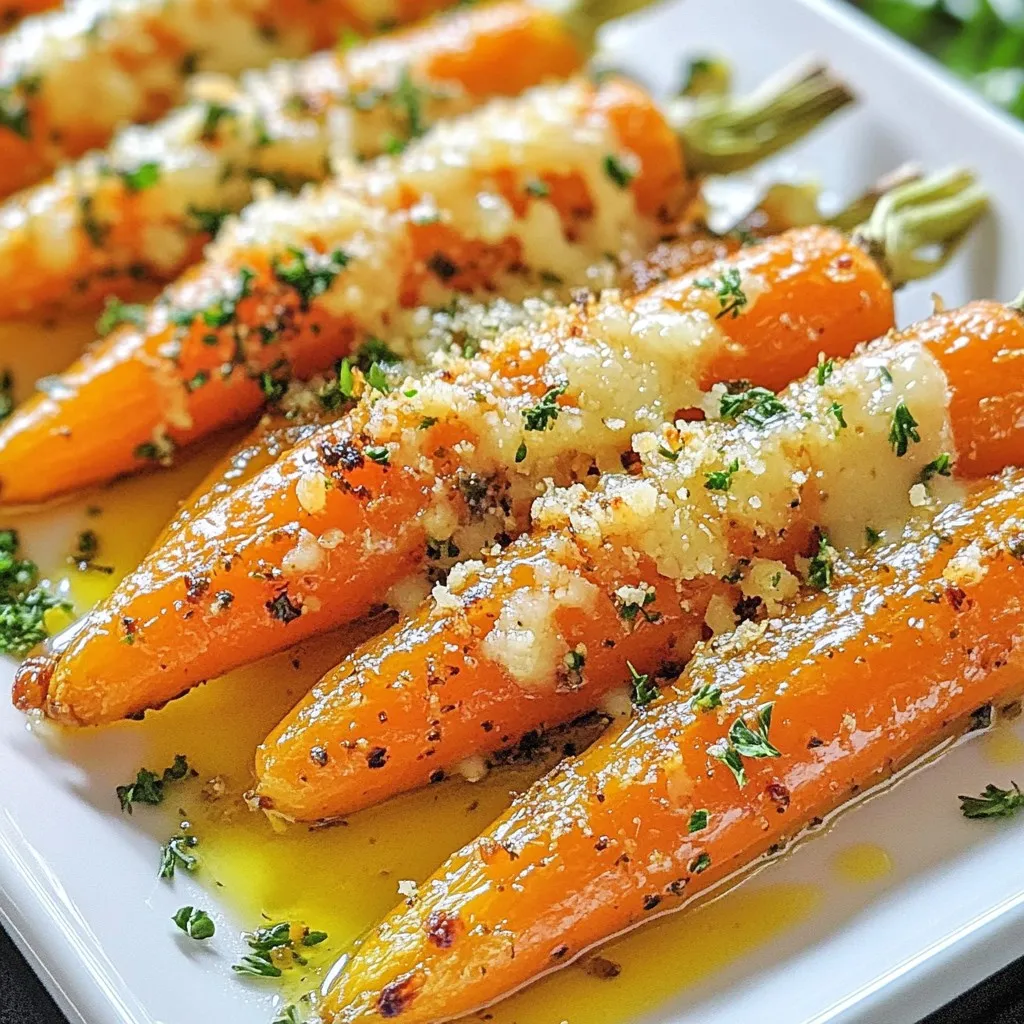
Finishing Touches
When the carrots are ready, take the baking sheet out of the oven. Sprinkle ½ cup of grated Parmesan cheese over the hot carrots. Let the cheese melt for 2 to 3 minutes. For extra flavor, return the baking sheet to the oven for another 2 to 3 minutes. This will make the cheese bubbly and lightly golden. Finally, remove the baking sheet and garnish with 2 tablespoons of chopped fresh parsley before serving. Enjoy your delicious garlic Parmesan roasted carrots!
Tips & Tricks
Perfecting the Roasted Carrots
To make your roasted carrots perfect, focus on even cooking. Cut the carrots into similar sizes. This helps them roast at the same time. Spread them out on the baking sheet. This allows hot air to circulate. Avoid overcrowding the pan, or they will steam instead of roast.
For seasoning, always coat the carrots well in olive oil. This adds flavor and helps the spices stick. Use fresh garlic for the best taste. Mixing in thyme brings a nice herb flavor. Adjust salt and pepper to your liking. Taste the mix before roasting. You can always add more later.
Enhancing Flavor
Want to switch things up? Try different herbs and spices! Rosemary or oregano can add a new twist. A pinch of cumin or smoked paprika gives a warm flavor. Feel free to experiment with what you have at home.
Using different cheeses can also change the game. Feta cheese adds a tangy bite. Cheddar provides a rich, creamy taste. Just sprinkle the cheese on top during the last few minutes of roasting. This lets it melt perfectly over the carrots.
Pro Tips
- Choose Fresh Carrots: Opt for vibrant, firm baby carrots for the best flavor and texture. Freshness enhances the sweetness of the dish.
- Adjust Seasoning: Feel free to adjust the sea salt and black pepper to your taste. A pinch of cayenne pepper can add a nice kick!
- Cheese Variations: Experiment with different types of cheese, such as feta or mozzarella, for a unique twist on the classic flavor.
- Perfecting Roasting: Stirring the carrots halfway through roasting ensures even cooking and caramelization, enhancing the overall flavor.
Variations
Dietary Adjustments
You can make this dish fit your needs. For a vegan alternative, skip the Parmesan cheese. Instead, try nutritional yeast. It gives a cheesy flavor without dairy. You will love the taste and texture.
If you need gluten-free options, this recipe is already safe. All the ingredients are gluten-free. Just check the labels on your seasonings to be sure.
Flavor Combinations
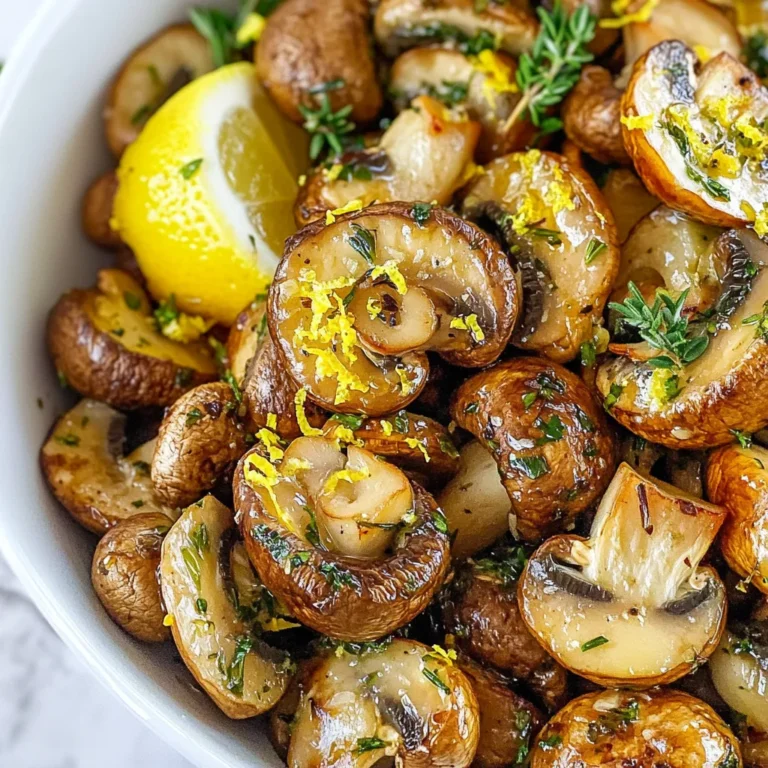
Adding citrus flavors can brighten this dish. Try squeezing fresh lemon juice over the carrots before serving. The tartness balances the savory taste. You can also zest a lemon for extra zing.
Incorporating other vegetables is fun too. Mix in bell peppers or zucchini for more color. Just chop them to the same size as the carrots. This way, all the veggies cook evenly.
Storage Info
Making Ahead
You can prep these garlic Parmesan roasted carrots in advance. Start by washing and peeling the baby carrots. Trim the ends to keep them neat. Toss the carrots with olive oil, minced garlic, thyme, salt, and pepper. You can place this mixture in a bowl or a sealed bag. Store it in the fridge for up to 24 hours. When you are ready to cook, just spread them out on a baking sheet and roast. This saves time and gets you a tasty side dish fast.
Storing Leftovers
If you have any leftovers, you can store them easily. Let the roasted carrots cool down before putting them away. Use an airtight container for the best results. They will stay fresh in the fridge for about 3 days. When reheating, place them in the oven for a few minutes. This will help them stay crisp.
If you want to freeze them, it is best to do this before adding cheese. Spread the cooled carrots on a baking sheet and freeze them for about 1 hour. Once frozen, transfer them to a freezer bag. They will keep well for up to 3 months. To use, just thaw them in the fridge overnight, then roast as needed.
FAQs
Common Questions
How long to roast carrots?
Roast the carrots for about 20-25 minutes. This time gives them a nice, tender bite. Check for doneness by piercing them with a fork. You want them soft but not mushy!
Can I use regular carrots instead of baby carrots?
Yes, you can use regular carrots. Just cut them into similar-sized pieces. Aim for 1-inch chunks for even cooking. This way, you’ll still enjoy that great flavor and texture!
Recipe Adaptations
How to adjust for larger servings?
To serve more people, simply double the recipe. Use 2 pounds of carrots and adjust the other ingredients accordingly. Make sure to spread them out on two baking sheets for even roasting.
Substituting ingredients?
You can swap olive oil for another oil, like avocado oil. If you don’t have Parmesan, try nutritional yeast for a vegan twist. Fresh herbs can replace dried thyme. Use what you have!
This article covered how to make delicious roasted baby carrots. We explored main ingredients, like olive oil and garlic, and went through a simple roasting process. I shared tips for even cooking and added flavor suggestions with different herbs and cheeses. You can adapt this recipe for dietary needs and learn how to store leftovers properly. Remember, roasted carrots are versatile and easy to make. Enjoy experimenting with flavors to suit your tast

Garlic Parmesan Roasted Carrots
Ingredients
- 1 pound baby carrots, peeled and trimmed
- 3 tablespoons olive oil
- 4 cloves garlic, minced
- 1 teaspoon dried thyme
- 1 teaspoon sea salt
- 0.5 teaspoon black pepper
- 0.5 cup grated Parmesan cheese
- 2 tablespoons fresh parsley, chopped (for garnish)
Instructions
- Preheat your oven to 425°F (220°C).
- In a large mixing bowl, combine the baby carrots, olive oil, minced garlic, dried thyme, sea salt, and black pepper. Toss until the carrots are evenly coated.
- Spread the dressed carrots in a single layer on a baking sheet lined with parchment paper.
- Roast the carrots in the preheated oven for about 20-25 minutes or until they are tender and slightly caramelized, stirring halfway through for even roasting.
- Remove the baking sheet from the oven and sprinkle the grated Parmesan cheese over the hot carrots. Allow the cheese to melt for 2-3 minutes.
- Once the cheese is melted, return the baking sheet to the oven for an additional 2-3 minutes until the cheese is bubbly and lightly golden.
- Remove from the oven and garnish with fresh parsley before serving.

![For my Zucchini Quiche Muffins, I use these key ingredients: - 2 medium zucchinis, grated - 4 large eggs - 1 cup milk (dairy or plant-based) - 1 cup all-purpose flour (or whole wheat) - 1 cup shredded cheese (cheddar or feta) - 1/2 teaspoon baking powder - 1/2 teaspoon salt - 1/4 teaspoon black pepper - 1/2 teaspoon garlic powder - 1/4 cup green onions, finely chopped - 1/4 cup bell pepper, finely diced (any color) - Olive oil for greasing muffin tin You can swap out some ingredients for variety. Here are my favorites: - Instead of all-purpose flour, try almond flour for a nutty taste. - Use turkey bacon or cooked sausage for added protein. - If you want a dairy-free option, use nutritional yeast instead of cheese. - For extra greens, add chopped spinach or kale. - You can replace green onions with chives for a milder flavor. These muffins are not just tasty; they are also good for you. Here are some details: - Each muffin has about 120 calories. - They provide a good source of protein from eggs and cheese. - Zucchini adds fiber and vitamins A and C. - These muffins are low in carbs if you choose whole wheat flour. - They make a great snack or meal option for all ages. For the full recipe, check out the detailed instructions and tips! 1. Preheat your oven to 375°F (190°C). Grease a muffin tin with olive oil or use muffin liners. 2. In a large bowl, whisk together four large eggs and one cup of milk. Mix until they are well blended. 3. Grate two medium zucchinis and add them to the egg mixture. If needed, use a sieve to drain excess liquid. This step keeps your muffins from being soggy. 4. Add one cup of all-purpose flour, half a teaspoon of baking powder, and half a teaspoon of salt. Also, include a quarter teaspoon of black pepper and half a teaspoon of garlic powder. Stir gently until just mixed. Don’t overmix; the batter should be a bit lumpy. 5. Fold in one cup of shredded cheese, a quarter cup of chopped green onions, and a quarter cup of diced bell pepper. Mix until everything is evenly distributed. 6. Use a spoon to fill each muffin cup about three-quarters full with the batter. 7. Place the muffin tin in the preheated oven. Bake for 20 to 25 minutes. You want them golden brown on top. 8. About halfway through baking, check on them. This way, you can ensure they rise evenly. 9. To check if the muffins are done, insert a toothpick into the center. If it comes out clean, they are ready. If not, give them a few more minutes. 10. Once baked, let the muffins cool for a few minutes in the tin. Then, transfer them to a wire rack to cool completely. For the full recipe and further details, check the [Full Recipe]. Enjoy these tasty muffins as a snack or a side! To get the best texture in your zucchini quiche muffins, use fresh zucchinis. Grate them finely, and squeeze out any extra water. This keeps the muffins from being soggy. Mix the batter gently. A few lumps are okay; overmixing can make them tough. Use a blend of cheese for more flavor. Cheddar and feta work great together. Store any leftovers in an airtight container. They stay fresh in the fridge for up to three days. For longer storage, freeze them. Place muffins in a freezer bag, and they will last up to three months. Thaw in the fridge overnight before enjoying again. Serve these muffins warm or at room temperature. They pair well with a fresh salad or soup. Top with herbs like parsley for a burst of flavor. You can also sprinkle extra cheese on top before serving. For a fun twist, serve with a dollop of sour cream or yogurt. Enjoy them as a snack, breakfast, or side dish! For the full recipe, check out the detailed instructions above. {{image_2}} You can easily make these muffins vegetarian. Just skip the cheese, or use a plant-based one. Add more veggies like spinach, mushrooms, or kale for a tasty twist. You can even mix in some sun-dried tomatoes for extra color and flavor. This way, you keep the muffins light and fresh! To make these muffins gluten-free, swap the all-purpose flour for a gluten-free blend. Many blends work well in baking. Just make sure to check the labels to avoid any hidden gluten. You can also use almond flour or oat flour for a nutty taste. Both will give you a nice texture. Herbs and spices can make these muffins pop. Try adding thyme, rosemary, or dill for a fragrant touch. You can also mix in a pinch of chili flakes if you like heat. Another idea is to add a sprinkle of smoked paprika for a unique flavor. Don't be afraid to get creative! To keep your zucchini quiche muffins fresh, place them in an airtight container. This helps to keep moisture out. You can store them at room temperature for up to two days. If you want them to last longer, consider the fridge. In the fridge, they can stay fresh for up to a week. Freezing is a great option if you want to save muffins for later. To freeze, first let them cool completely. Then, wrap each muffin tightly in plastic wrap. After that, place them in a freezer bag. Label the bag with the date. You can freeze them for up to three months. When you’re ready to eat, just take out what you need. Reheating zucchini quiche muffins is easy. For the best results, use an oven. Preheat your oven to 350°F (175°C). Place the muffins on a baking sheet. Heat them for about 10-15 minutes. You can also use a microwave. Just heat them for 20-30 seconds. This warms them but may not keep them crisp. Enjoy your muffins warm! For the full recipe, check out the earlier section. Yes, you can use other vegetables! Carrots, spinach, or mushrooms work well. Just remember to chop them small. If you want a burst of flavor, add some sun-dried tomatoes. The key is to keep the total vegetable amount similar to the zucchini. This keeps the muffins tasty and moist. Feel free to mix and match according to what you have at home. It makes cooking fun and creative! Zucchini quiche muffins last about four days in the fridge. To store them, place them in an airtight container. This keeps them fresh and tasty. If you notice any change in smell or texture, it’s best to toss them. You can enjoy them cold or warm them up in the microwave. They make a quick snack or breakfast option! Absolutely! Mini zucchini quiche muffins are a great idea. Use a mini muffin tin instead of a regular one. Just reduce the baking time to about 12-15 minutes. Keep an eye on them, as they cook faster. These bite-sized treats are perfect for parties or snacks. Plus, they are easy to grab and eat on the go. Try making them for your next gathering! For the full recipe, check out the complete instructions above. In this post, we covered how to make delicious zucchini quiche muffins. We explored key ingredients and their substitutions. I shared easy preparation steps and baking tips to ensure perfect results. You learned how to store and reheat your muffins and enjoyed ideas for tasty variations. Embrace these tips to make your own muffin masterpiece. Enjoy experimenting and savor every bite!](https://dailydishlab.com/wp-content/uploads/2025/06/fed823f9-c559-4a2e-ba47-9f1169717efa-768x768.webp)
![- 1 cup canned chickpeas, rinsed and drained - 1 large red bell pepper - 2 tablespoons tahini - 3 tablespoons olive oil - 2 tablespoons fresh lemon juice - 2 cloves garlic, minced - 1 teaspoon ground cumin - Salt and black pepper to taste - 2 tablespoons water (adjust for consistency) - Fresh parsley, chopped (for garnish) - Pita chips or fresh vegetables (for serving) To make the best roasted red pepper hummus, you need a few simple ingredients. The chickpeas form the base. They are creamy and full of protein. A large red bell pepper adds a sweet taste and vibrant color. Tahini, made from sesame seeds, gives a rich, nutty flavor. You will also need olive oil to make it smooth. Fresh lemon juice adds a tart kick. Garlic brings a strong taste that pairs well. Ground cumin adds warmth. Don't forget salt and black pepper to enhance all the flavors. You can adjust the hummus's texture with water. This helps it become creamy or thick, depending on your liking. For a lovely finish, use chopped parsley to garnish. Serve with pita chips or fresh vegetables for dipping. You can find the full recipe in the earlier section. 1. Preheat your oven to 450°F (230°C). 2. Cut the large red bell pepper in half. Remove the seeds and stems. 3. Place the pepper halves skin-side up on a baking sheet. 4. Roast them in the oven for about 20-25 minutes. The skin should blister and blacken. 5. Once done, remove the peppers and let them cool for about 10 minutes. 6. Peel off the skin and chop the flesh. This adds a sweet and smoky taste to your hummus. 1. In a food processor, combine: - 1 cup canned chickpeas, rinsed and drained - Chopped roasted red pepper - 2 tablespoons tahini - 3 tablespoons olive oil - 2 tablespoons fresh lemon juice - 2 cloves garlic, minced - 1 teaspoon ground cumin 2. Blend the mixture until smooth. 3. If the hummus is too thick, add water a tablespoon at a time. Adjust until you reach your desired consistency. 4. Season with salt and black pepper. Taste and adjust as needed. 1. Transfer the smooth hummus to a serving bowl. 2. Drizzle with additional olive oil for richness. 3. Garnish with chopped fresh parsley for a pop of color. This recipe is easy and a delight for your taste buds. You’ll find it perfect for parties or a healthy snack. Enjoy with pita chips or fresh veggies. For the full recipe, check out [Full Recipe]. To get the right hummus texture, adjust the water. Start with two tablespoons, then add more if needed. Blend well. The longer you blend, the smoother your hummus will be. This step is key to a creamy result. Boost the taste by adding spices or herbs. Try smoked paprika for warmth or fresh basil for a twist. Fresh lemon juice adds zing. It brightens the flavors and makes the hummus pop. Serve your hummus in a shallow bowl. Create a swirl on top with a spoon. Drizzle olive oil in the center for shine. Arrange pita chips and fresh veggies around the bowl. This makes your dish look colorful and inviting. For the full recipe, check the link above. {{image_2}} You can make this hummus even more fun. Try adding some heat with spicy roasted red pepper hummus. Just toss in a pinch of cayenne or some chopped jalapeños for that extra kick. If you love herbs, mix in fresh basil or cilantro. These add a bright flavor that makes your hummus pop. Want to keep it vegan? This recipe is already vegan-friendly! If you like, you can swap the tahini for sunflower seed butter. This change keeps the taste yummy. For those who need gluten-free options, pair your hummus with veggie sticks or gluten-free crackers. They will make a great snack! Sometimes, you just need hummus fast! When you're in a rush, grab a store-bought option. Look for brands that use real ingredients and no added preservatives. Some of the best brands are Sabra and Cedarlane. They have great roasted red pepper hummus that can save you time while still tasting good. To keep your hummus fresh, use an airtight container. Glass jars work great. Make sure the lid seals tightly. It helps to keep air out. For added freshness, drizzle a little olive oil on top. This layer forms a barrier against air. Homemade hummus lasts about a week in the fridge. Store it at a temperature below 40°F (4°C). If you want to keep it longer, you can freeze it. Hummus can stay good in the freezer for up to three months. To thaw frozen hummus, move it to the fridge overnight. If you're in a hurry, you can use the microwave. Heat it in small bursts, stirring in between. Don't overheat, as it can change the texture. Enjoy your hummus with pita chips or fresh veggies just like in the Full Recipe! If you don’t have tahini, use peanut butter or sunflower seed butter. You can also blend soaked cashews or almonds for a nutty taste. These options give your hummus a creamy texture. Each will add a unique flavor twist to the dish. Homemade hummus lasts about 5 to 7 days in the fridge. Store it in an airtight container. Check for signs of spoilage, like a sour smell or mold on top. If it smells fresh, it’s still good to eat. Yes, you can make roasted red pepper hummus a day in advance. Just store it in the fridge. Let it sit at room temperature for about 30 minutes before serving. This helps the flavors blend better. This blog post covered how to make delicious hummus with roasted red pepper. You learned about the main ingredients, step-by-step instructions, and helpful tips. We also explored fun variations and storage tips. Remember, perfecting your hummus takes practice, so don’t hesitate to experiment. Enjoy your tasty snack with pita or fresh veggies. With these methods, you can create hummus that shines at any gathering!](https://dailydishlab.com/wp-content/uploads/2025/07/83ccc056-5a58-4bcc-806c-3c7123215f8b-768x768.webp)