
BBQ Jackfruit Sandwiches Flavorful and Easy Recipe


Looking for a delicious, plant-based sandwich option? BBQ jackfruit sandwiches are your answer! With their meaty texture and smoky flavor, they make for an easy and satisfying meal. In this article, I’ll guide you through a simple recipe, share tips for perfecting your flavors, and offer fun variations to try. Get ready to impress your taste buds and your friends with this tasty, vegan delight!
Why I Love This Recipe
- Delicious Flavor Profile: The combination of spices and BBQ sauce creates a rich, smoky flavor that satisfies cravings without the meat.
- Easy to Prepare: This recipe is simple and quick, making it perfect for weeknight dinners or a casual gathering with friends.
- Healthy Alternative: Jackfruit is a nutritious, plant-based option that is low in calories and high in fiber, making it a guilt-free indulgence.
- Customizable: You can easily modify the toppings and sides to suit your taste, whether you prefer extra pickles, coleslaw, or a different type of bun.
Ingredients
Main Ingredients
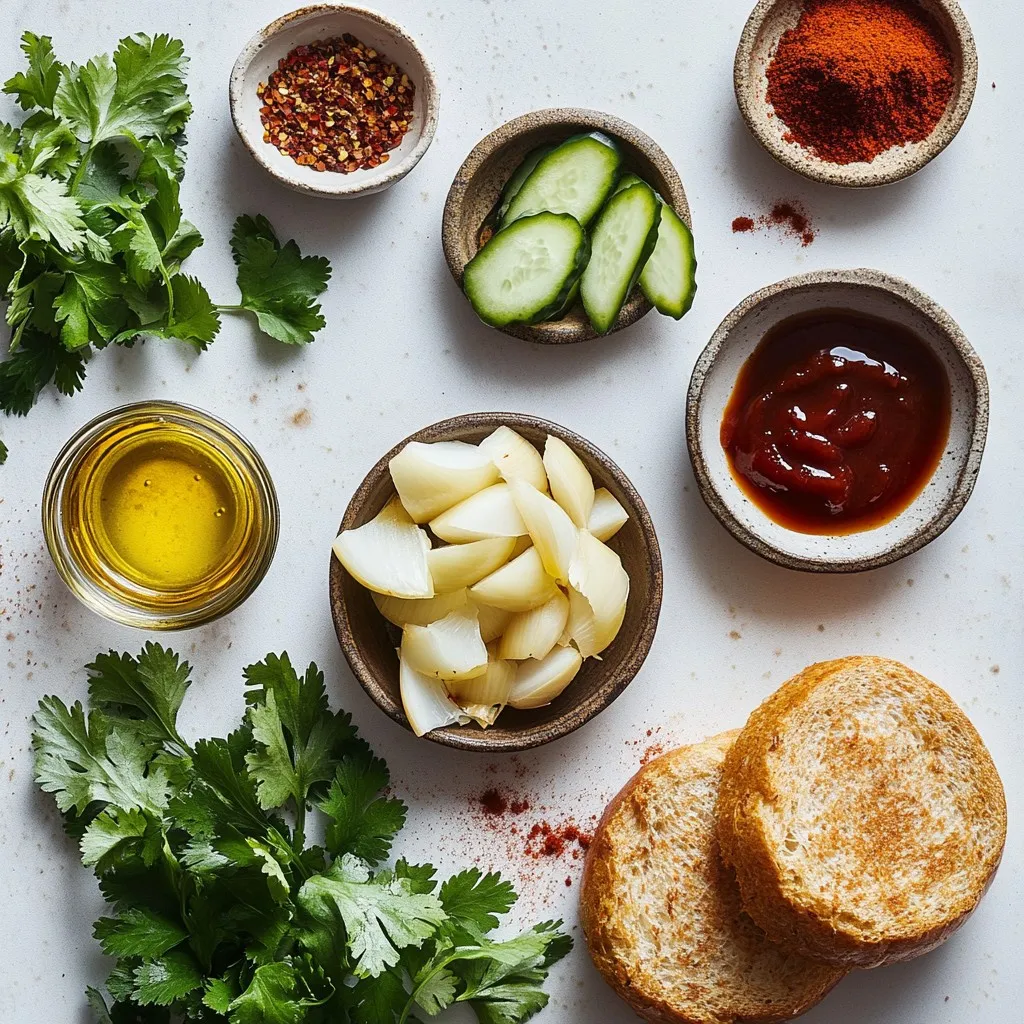
- 2 cans young green jackfruit in water
- 1 tablespoon olive oil
- 1 small onion
- 3 cloves garlic
Spices and Flavorings
- 1 teaspoon smoked paprika
- 1 teaspoon ground cumin
- 1 teaspoon brown sugar
- 1 teaspoon chili powder
Additional Components
- 1 cup BBQ sauce
- Whole grain burger buns
- Fresh cilantro or parsley
Jackfruit is the star of this dish. It has a unique texture that mimics meat. Young green jackfruit works best for this recipe. You need to drain and rinse it first.
Next, you’ll want to gather your spices. Smoked paprika adds a nice depth. Ground cumin gives warmth. Brown sugar balances the flavors, and chili powder adds a little kick.
Don’t forget the BBQ sauce! You can use store-bought or homemade. Whole grain burger buns are great for holding all that goodness. Fresh cilantro or parsley adds a pop of color and freshness.
These simple ingredients come together to create a flavorful meal. The best part? You can easily customize this recipe to match your taste!
Step-by-Step Instructions
Preparing the Jackfruit
To start, you need to prepare the jackfruit. Take two cans of young green jackfruit and drain them well. Rinse them under cold water. Use your hands or two forks to shred the jackfruit into pulled-like strands. Be sure to discard any hard core pieces. This step helps create that meaty texture.
Cooking the Mixture
Next, grab a large skillet and heat one tablespoon of olive oil over medium heat. Add one small chopped onion and sauté it for about five minutes. You want it to be soft and clear. Then, add three minced garlic cloves to the skillet. Sauté for one more minute to bring out the garlic’s flavor.
After that, add the shredded jackfruit to the skillet. Sprinkle in one teaspoon each of smoked paprika, ground cumin, brown sugar, chili powder, salt, and pepper. Stir everything well so the jackfruit gets coated in those spices.
Simmering and Assembling
Now, pour in one cup of BBQ sauce. Mix it all together until the jackfruit is fully covered. Lower the heat and let it simmer for 15 to 20 minutes. Stir occasionally. This allows the jackfruit to soak up all that delicious flavor.
While the jackfruit simmers, toast four whole grain burger buns in a toaster or on a pan until they turn golden brown.
Once the jackfruit is tender and well-coated, take it off the heat. To assemble your sandwiches, place a generous scoop of the BBQ jackfruit on the bottom half of each bun. If you like, add some pickles and fresh cilantro or parsley on top. Finally, put the other half of the bun on top. Your BBQ Jackfruit Sandwiches are now ready to enjoy!
Tips & Tricks
Perfecting Flavor
To make your BBQ Jackfruit Sandwiches shine, choose a BBQ sauce that you love. If you want a sweet kick, go for a honey BBQ sauce. For a tangy touch, try apple cider vinegar-based sauce. You can also mix sauces to find your favorite blend.
Adjust the spice levels to fit your taste. If you like heat, add more chili powder or fresh jalapeños. For a smoky taste, use extra smoked paprika. This will give your jackfruit a deeper flavor.
Cooking Techniques
Shredding jackfruit can be a bit tricky. Use your hands or two forks to pull it apart. Focus on breaking the pieces into strands that mimic pulled pork. Discard any hard core pieces as you shred.
When it comes to the bun, aim for a good ratio of jackfruit to bun. A generous scoop of jackfruit on the bottom half works best. You want the bun to hold the jackfruit without falling apart. This way, every bite is flavorful and satisfying.
Serving Suggestions
Serve your BBQ Jackfruit Sandwiches with colorful sides. Sweet potato fries or coleslaw add a nice contrast. The bright colors make your meal more inviting.
For garnishing, sprinkle fresh cilantro or parsley on top. You can also add pickles for a tangy crunch. These simple touches elevate your dish and make it look great on the table.
Pro Tips
- Choose the Right Jackfruit: Make sure to use young green jackfruit in water for the best texture; avoid ripe jackfruit as it is too sweet for savory dishes.
- Enhance the Flavor: For a deeper flavor, marinate the shredded jackfruit in the spices and BBQ sauce for at least 30 minutes before cooking.
- Texture Matters: Shredding the jackfruit well can mimic the texture of pulled pork, so take your time to ensure it’s finely shredded.
- Perfect Pairings: Serve with coleslaw or pickles to add a crunchy contrast to the soft sandwich, enhancing the overall flavor experience.

Variations
Vegan Options
You can switch up your BBQ sauce for a vegan brand. Many store-bought options fit this need. Look for sauces that use plant-based ingredients without added sugars. You can also make your own sauce for a fun twist.
Besides pickles, try adding coleslaw or avocado slices. Sliced jalapeños add spice, while red onion gives a nice crunch. Fresh herbs like basil or cilantro can add a bright flavor too.
Flavor Variations
Want some heat? Add jalapeños to the jackfruit while it cooks. You can also mix in hot sauce for an extra kick. Try spices like cayenne or crushed red pepper for more depth.
Experiment with different spices to change the taste. Swap the chili powder for curry powder or add a dash of cinnamon. Each choice can create a new flavor profile for your sandwich.
Sides and Complements
Sweet potato fries are a great side. Their sweetness pairs well with the savory jackfruit. Bake or fry them for a crispy texture.
Coleslaw is another tasty option. It adds crunch and creaminess. You can also mix in fruits like apples or raisins for sweetness. Both sides make your meal colorful and fun!
Storage Info
Refrigeration Guidelines
To store leftovers, place the jackfruit mixture in a container. Make sure it cools before sealing. Use airtight containers for the best results. This keeps the flavors fresh. Store it in the fridge for up to four days.
Freezing Instructions
Yes, you can freeze BBQ jackfruit. To do this, let it cool completely. Then, pack it in a freezer-safe container. It can last up to three months in the freezer. When you’re ready to eat, thaw it overnight in the fridge. Reheat the jackfruit in a skillet on low heat until warm.
Freshness Tips
The shelf life of ingredients varies. Fresh jackfruit can last for about a week in the fridge. Cooked jackfruit can stay good for about four days. Signs of spoilage include a sour smell or discoloration. Always check before using to ensure freshness.
FAQs
What is jackfruit and why is it used?
Jackfruit is a large tropical fruit. It grows on trees and has a unique texture. Young green jackfruit is often used in cooking. It acts like pulled pork in many dishes.
Nutritional benefits of jackfruit
Jackfruit is low in calories and high in fiber. It also has vitamins A and C. This fruit is great for digestion and heart health. Plus, it is a good option for plant-based diets.
Taste profile comparison to meat
When cooked, jackfruit has a mild flavor. It absorbs spices well, making it very tasty. Many say it mimics the texture of shredded meat. This quality makes it a popular choice for BBQ dishes.
Can I prepare the jackfruit in advance?
Yes, you can prepare jackfruit ahead of time. This saves time on busy days. Just store the cooked jackfruit in the fridge.
Tips for meal prep
Shred the jackfruit and mix it with BBQ sauce. Place it in an airtight container. It can last in the fridge for up to three days.
How long can it sit before serving
You can keep the prepared jackfruit for a few hours. Just reheat it gently before serving. This keeps the flavor and texture fresh.
Can I use other fruits or veggies for this recipe?
Yes, you can use other fruits or veggies if you like. Some options include mushrooms or cauliflower. These can also create great textures in a sandwich.
Exploring potential substitutes
Mushrooms can be a good choice. They have a meaty texture and absorb flavors well. Cauliflower is also a great option. It adds a different taste and can be shredded like jackfruit.
Adapting to dietary preferences
Feel free to adjust based on your needs. If you want a gluten-free option, use gluten-free buns. You can also try different sauces to fit various diets.
You learned about making tasty BBQ jackfruit sandwiches. We covered the main ingredients, instructions, and great tips. Remember, choosing the right BBQ sauce and spices can enhance flavor. Experiment with sides and toppings for a fun twist. Feel free to prep jackfruit in advance, making mealtime easier. Store leftovers correctly to enjoy later. This dish is not only delicious but also healthy. Embrace the joy of cooking with jackfruit and enjoy every bit

BBQ Jackfruit Sandwiches
Ingredients
- 2 cans young green jackfruit in water (drained and rinsed)
- 1 tablespoon olive oil
- 1 small onion, finely chopped
- 3 cloves garlic, minced
- 1 teaspoon smoked paprika
- 1 teaspoon ground cumin
- 1 teaspoon brown sugar
- 1 teaspoon chili powder
- 1 cup BBQ sauce (homemade or store-bought)
- to taste salt and pepper
- 4 whole grain burger buns
- for garnish fresh cilantro or parsley
- optional pickles (for topping)
Instructions
- Begin by preparing the jackfruit. Using your hands or two forks, shred the jackfruit pieces into pulled-like strands, discarding any hard core pieces.
- In a large skillet, heat the olive oil over medium heat. Add the finely chopped onion and sauté until translucent, about 5 minutes.
- Add the minced garlic to the skillet and sauté for an additional minute until fragrant.
- Incorporate the shredded jackfruit to the skillet, followed by the smoked paprika, ground cumin, brown sugar, chili powder, salt, and pepper. Stir well to coat the jackfruit with the spices.
- Pour in the BBQ sauce and stir until all the ingredients are fully combined. Reduce the heat to low and allow to simmer for 15-20 minutes, stirring occasionally. This will allow the jackfruit to absorb the flavors.
- While the jackfruit is simmering, lightly toast the whole grain buns in a toaster or on a pan until golden brown.
- Once the jackfruit is tender and well-coated in BBQ sauce, remove from heat.
- To assemble the sandwiches, place a generous scoop of the BBQ jackfruit mixture on the bottom half of each bun. Add optional pickles if desired, and garnish with fresh cilantro or parsley.
- Top with the other half of the bun, press gently, and your BBQ Jackfruit Sandwiches are ready to serve!
![- 1 pound rainbow carrots, peeled and cut into even-sized pieces - 3 tablespoons olive oil - 3 cloves garlic, minced - 1 teaspoon fresh rosemary, chopped - 1 teaspoon fresh thyme, chopped - 1 teaspoon fresh parsley, chopped - 1 tablespoon honey or maple syrup - Zest of 1 lemon - Salt and pepper to taste This dish shines with the bright colors of rainbow carrots. Using fresh herbs adds a wonderful touch. The garlic gives it a robust flavor, while honey or maple syrup adds sweetness. Don't forget the lemon zest; it gives a great citrus kick! Each ingredient plays a role in making this dish special. You can find the full recipe for Garlic Herb Roasted Rainbow Carrots to create this vibrant side dish. - Preheat the oven to 425°F (220°C). - Prepare the baking sheet with parchment paper. First, I love to start by preheating the oven. This step ensures that the carrots roast evenly. Parchment paper helps the carrots not stick to the baking sheet. It also makes cleanup easier. - Combine olive oil, garlic, herbs, honey, lemon zest, salt, and pepper in a bowl. - Toss rainbow carrots in the herb mixture until coated. Next, I mix my ingredients. In a bowl, I combine olive oil, minced garlic, fresh herbs, honey, lemon zest, salt, and pepper. The mix adds great flavor to the carrots. After mixing, I add the rainbow carrots to the bowl. I toss them until they're evenly coated. Each carrot gets a nice layer of the herb mix. - Arrange carrots on the baking sheet in a single layer. - Roasting time and temperature: 20-25 minutes at 425°F (220°C). Now, I arrange the carrots on the baking sheet. I place them in a single layer for even roasting. I roast them for 20 to 25 minutes at 425°F (220°C). Halfway through, I turn the carrots to help them caramelize. They will be tender and slightly sweet when done. This simple dish is a true delight! If you want the full recipe, check it out here. To ensure even roasting, cut your rainbow carrots into similar sizes. This way, they cook at the same rate. Spread them out on the baking sheet, leaving space between each piece. This helps warm air circulate, making them cook nicely. Turn the carrots halfway through roasting. This step adds flavor and helps them caramelize. When you flip them, use a spatula to avoid breaking them. You want each piece to stay whole for a great look. Want a tangy kick? Add balsamic vinegar or a touch of mustard to your mix. This gives depth and a nice contrast to the sweetness of the carrots. You can also try different herbs like dill or oregano for a fun twist. The key is to explore flavors you enjoy. Serving your roasted carrots on a nice platter makes a big difference. Arrange them in a circle or a line for an eye-catching display. Drizzle any glaze left on the baking sheet over the top for extra shine. To make your dish pop, garnish with fresh herbs. A sprinkle of parsley or thyme adds color and freshness. You can even add a squeeze of lemon for brightness. This simple touch makes your dish look gourmet. Check out the [Full Recipe] for more details on making these tasty carrots! {{image_2}} You can switch up the recipe using other root veggies. Try adding parsnips or beets for a colorful twist. These vegetables offer unique tastes and textures. You can also use baby carrots. They make for a cute presentation and cook quickly. Want to change the flavor? Add spices like cumin or paprika. These spices give the dish warmth and depth. You can also add citrus. A bit of orange zest brings a bright touch to the carrots. This zest pairs well with the garlic and herbs. If you want a vegan dish, simply skip the honey and use maple syrup. This keeps the sweetness while keeping it plant-based. For gluten-free diets, this recipe is already safe. Just ensure all your ingredients are gluten-free. Enjoy the dish without worry! For the full details on making Garlic Herb Roasted Rainbow Carrots, check the [Full Recipe]. To keep your garlic herb roasted rainbow carrots fresh, store them in the fridge. Place the cooled carrots in an airtight container. This keeps out moisture and air, which can spoil them. Use them within three to five days for the best taste. If you have leftovers, you can freeze them, but note that the texture may change. To freeze, spread the cooled carrots on a baking sheet. Freeze them for about an hour, then transfer them to a freezer bag. This method prevents them from sticking together. When it’s time to enjoy your carrots again, reheating is key. The best way is to use the oven. Preheat it to 350°F (175°C). Spread the carrots on a baking sheet in a single layer. Heat them for about 10 to 15 minutes, or until warm. This method keeps them crisp. Avoid microwaving them if you can. Microwaving can make the carrots soggy and lose their nice texture. If you must use a microwave, place a damp paper towel over the carrots to help retain moisture without making them mushy. Can I use regular carrots instead of rainbow carrots? Yes, you can use regular carrots. However, rainbow carrots add color and fun to your dish. Their taste is sweeter and richer. You can mix and match if you like. Regular carrots work well in this recipe. How can I make the recipe ahead of time? You can prep the carrots and the herb mix a day early. Just cut the carrots and mix them with the herbs. Store them in the fridge. When you're ready to cook, just roast them as directed in the full recipe. What should I do if my carrots aren’t tender after roasting? If your carrots aren't tender, they may need more time. Check them at 5-minute intervals. Add some water to the baking sheet if they look dry. This steam can help soften them. How do I know when the carrots are done? The carrots are done when they are tender and slightly caramelized. You can test them with a fork. They should be easy to pierce. Look for a golden-brown color on the edges for that perfect finish. Are roasted carrots healthy? Yes, roasted carrots are healthy. They are low in calories and high in fiber. This makes them great for digestion. They also contain vitamins like A and C, which help your immune system. What nutritional benefits do rainbow carrots provide? Rainbow carrots have many health benefits. They provide antioxidants that fight free radicals. The different colors show various nutrients. For example, orange carrots are high in beta-carotene, while purple carrots contain anthocyanins. These nutrients help keep you healthy and strong. This blog post covered a simple and tasty roasted rainbow carrots recipe. You learned about key ingredients like olive oil, fresh herbs, and flavor enhancers. I shared step-by-step instructions to achieve perfect roasting. You also got tips for storage and reheating, along with fun variations. The beauty of this dish lies in its versatility and vibrant colors. Enjoy making it your own, and bring joy to your meals with these delicious carrots. Eating well can also be fun and easy!](https://dailydishlab.com/wp-content/uploads/2025/06/d72d9d4c-d28b-4e8c-993a-1734cc17a3d6-768x768.webp)
![To make Easy Vegetable Pad Thai, you need just a few key items. Here’s what you’ll need: - 8 oz rice noodles - 2 tablespoons vegetable oil - 1 red bell pepper, julienned - 1 green bell pepper, julienned - 1 carrot, shredded - 3 green onions, chopped (whites and greens separated) - 2 cloves garlic, minced - 1 cup bean sprouts - 2 large eggs (optional for non-vegetarians) - 3 tablespoons soy sauce - 1 tablespoon tamarind paste - 1 tablespoon brown sugar - 1 tablespoon lime juice - Salt and pepper to taste - Crushed peanuts and lime wedges for garnish These ingredients create a bright and fresh flavor. Each one adds its own twist to the dish. You can easily change this recipe to fit your taste. Here are some optional ingredients you might like: - Tofu or tempeh for protein - Broccoli or snap peas for more veggies - Chili flakes for heat - Cilantro for extra flavor - Sesame oil for a nutty taste These additions help you make the dish your own. Feel free to mix and match based on what you have at home. For this recipe, you want to use the right rice noodles. Here are the best types to choose from: - Flat rice noodles: These are the most common for Pad Thai. They soak up flavors well. - Thin rice vermicelli: Great for a lighter dish, but cook them less time. - Thick rice noodles: Chewy and satisfying, but they may need longer cooking. I recommend going for flat rice noodles. They give you that authentic flavor and texture you crave. For the full recipe, check out the details above. To start, cook the rice noodles. Follow the package instructions closely. Usually, this means boiling them in water for about 5 to 7 minutes. You want them soft but not mushy. Once they are ready, drain them in a colander. Rinse with cold water to stop the cooking. Set the noodles aside. Next, let's prepare the vegetables. Take your red and green bell peppers and slice them into thin strips, called julienne. Shred the carrot finely using a grater or a sharp knife. For the green onions, chop them into small pieces but keep the white and green parts separate. Mince the garlic into tiny bits. Once you finish, everything will be ready to cook. Now, it's time to bring everything together. In a large wok or skillet, heat the vegetable oil over medium-high heat. Add the minced garlic first and stir for about 30 seconds. It should smell great! Then, toss in the julienned peppers and shredded carrot. Stir-fry these for about 3 to 4 minutes. They should soften but still have a little crunch. If you want eggs, push the veggies to one side of the pan. Crack the eggs in the empty space and scramble them. Mix the cooked eggs with the veggies. Add the drained rice noodles to the wok. Next, add the chopped green onion whites, bean sprouts, soy sauce, tamarind paste, brown sugar, and lime juice. Toss everything together until well mixed and heated through. Taste and add salt and pepper as needed. Your Easy Vegetable Pad Thai is ready! Serve it hot, garnished with crushed peanuts and lime wedges. For the full recipe, check out the details above. Enjoy! To get great flavor in your Easy Vegetable Pad Thai, focus on the sauce. Use fresh ingredients like lime juice and tamarind paste. They add a nice tang. Make sure to taste as you mix. Adjust the soy sauce and sugar to your liking. If you want more heat, add some chili flakes. This will make your dish pop! Cooking your veggies just right is key. Start with high heat in your wok or skillet. This helps keep them crisp. Cut your vegetables into thin strips for even cooking. Stir-fry them quickly. This usually takes just a few minutes. Add bean sprouts last, as they need only a brief cook. This way, they stay crunchy. For the best experience, serve your Pad Thai hot. Top it with crushed peanuts; they add a nice crunch. A squeeze of lime juice brightens the flavors too. You can also add fresh herbs like cilantro for a fresh touch. Serve it with lime wedges on the side for extra zing. For a fun twist, pair it with spring rolls or a light salad. To see the full details, check the Full Recipe. {{image_2}} You can easily make this dish gluten-free. Use rice noodles, which are naturally gluten-free. Instead of soy sauce, try tamari. Tamari tastes similar but has no gluten. Always check labels to be sure. Tofu is a great option for plant-based protein. It adds texture and absorbs flavors well. Use firm tofu for the best results. Cut it into cubes and sauté until golden. If you eat eggs, they work too. Just scramble them before mixing with the veggies. Both choices are tasty and filling. Want more heat? Add red pepper flakes or chili paste. Start with a small amount; you can always add more. If you like it mild, skip the spicy ingredients. The beauty of this dish is you can customize it to your taste. Enjoy experimenting with flavors! To keep your leftover Pad Thai fresh, place it in an airtight container. Make sure to cool it down first. Store it in the fridge. It should last for about three days. Reheat your Pad Thai in a pan for the best texture. Add a splash of water or soy sauce. This helps make it moist again. Heat it on low, stirring gently. You can also use the microwave. Just cover it to keep moisture in. If you want to save Pad Thai for later, freezing is a good option. Cool it completely before packing it. Use freezer-safe containers or bags. It can last up to three months in the freezer. When ready to eat, thaw it in the fridge overnight before reheating. For best results, eat it within a month. For the full recipe, check out the Easy Vegetable Pad Thai. To make the sauce, mix soy sauce, tamarind paste, brown sugar, and lime juice. This blend gives the dish a sweet and tangy flavor. You want to balance these ingredients to your taste. I suggest starting with the amounts listed in the Full Recipe. Adjust to make it perfect for you! Absolutely! You can swap in any veggies you like. Broccoli, snap peas, and zucchini work great. Use what you have on hand. Just remember to cut them into small pieces for even cooking. The goal is to keep a nice crunch while adding color to your dish! If you can't find tamarind paste, you can use lime juice or a mix of vinegar and sugar. This will mimic the tangy flavor of tamarind. Another option is to use a store-bought pad Thai sauce that contains tamarind. Experiment to find what you enjoy best! To make this dish shine, you need fresh and colorful ingredients. Here’s what you’ll need: - 8 oz rice noodles - 2 tablespoons vegetable oil - 1 red bell pepper, julienned - 1 green bell pepper, julienned - 1 carrot, shredded - 3 green onions, chopped (whites and greens separated) - 2 cloves garlic, minced - 1 cup bean sprouts Feel free to tweak this recipe to fit your taste. Here are some extras: - 2 large eggs (optional for non-vegetarians) - Crushed peanuts for garnish - Lime wedges for garnish For the best texture, I suggest flat rice noodles. Look for the wide ones labeled as "Pad Thai noodles." They soak up flavors well and make the dish more satisfying. If you prefer thinner noodles, rice vermicelli works too. Just keep an eye on cooking time, as they cook faster. Check out the [Full Recipe] for detailed steps. You now have all you need for an Easy Vegetable Pad Thai. You learned about key ingredients, cooking steps, and how to customize your dish. Remember to use fresh veggies for great taste. Adjust flavors to fit your style, whether that’s adding spice or protein. Store any leftovers properly for a tasty meal later. Enjoy creating this dish and impressing yourself with your cooking skills. Now, grab your ingredients and get started on this delightful, vibrant meal!](https://dailydishlab.com/wp-content/uploads/2025/06/ea2fad35-4884-4485-94ec-1f29792ad057-768x768.webp)