Teriyaki Meatball Rice Bowls Savory and Easy Recipe

Craving a dish that’s both savory and simple to make? Look no further! My Teriyaki Meatball Rice Bowls blend juicy meatballs with a rich teriyaki sauce, making dinner a breeze. With just a handful of ingredients and easy steps, you’ll impress your family or friends in no time. Let’s dive into this delicious recipe to elevate your weeknight meals! You won’t want to miss it!
Why I Love This Recipe
- Quick and Easy: This recipe is perfect for busy weeknights, taking only about 40 minutes from start to finish, allowing you to serve a delicious meal without spending hours in the kitchen.
- Healthy Ingredients: With ground chicken or turkey, fresh vegetables, and a homemade teriyaki sauce, this dish is packed with nutrients and is a healthier option compared to takeout.
- Customizable: You can easily switch up the veggies based on what you have on hand or your family’s preferences, making it a versatile dish that can be tailored to your taste.
- Delicious Flavor: The combination of savory teriyaki sauce, ginger, and garlic creates an irresistible flavor that will have everyone asking for seconds!
Ingredients
Main Ingredients
- 1 lb ground chicken or turkey
- 1/2 cup breadcrumbs
- 1/4 cup green onions, sliced
- 1 large egg
- 2 cloves garlic, minced
- 1 tablespoon fresh ginger, grated
- 1/4 cup soy sauce (or tamari for gluten-free)
- 1/4 cup brown sugar
- 2 tablespoons sesame oil
- 2 cups cooked white or brown rice
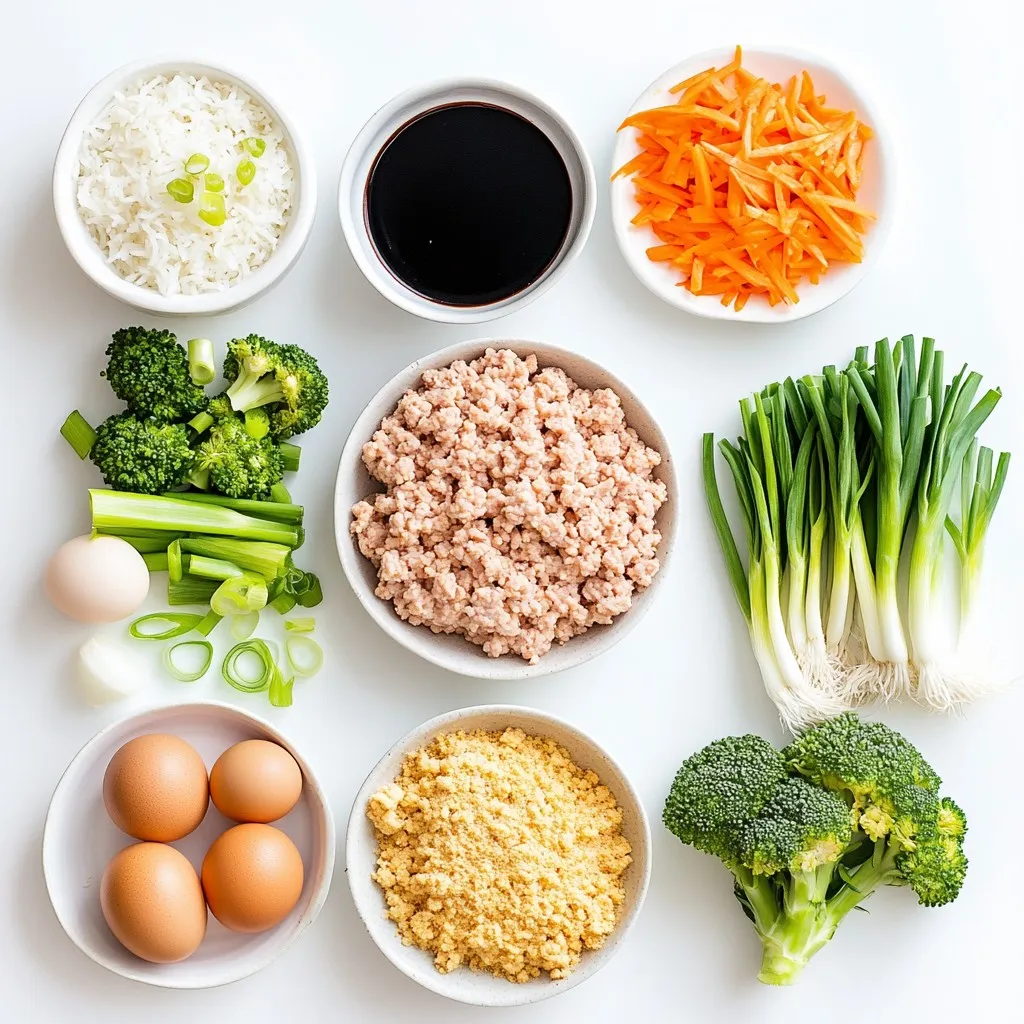
The heart of this dish is the meatballs. I use ground chicken or turkey for a lighter option. You can also try beef if you prefer. Mixing in breadcrumbs helps bind them together and keeps them moist. Green onions add a fresh crunch and great flavor.
For seasoning, minced garlic and grated ginger work wonders. They give the meatballs a punch. The egg acts as a binder, helping everything stick together.
The teriyaki sauce is simple yet full of flavor. I combine soy sauce, brown sugar, and sesame oil. This mix creates a sweet and savory glaze for the meatballs. You can switch to tamari to make it gluten-free if needed.
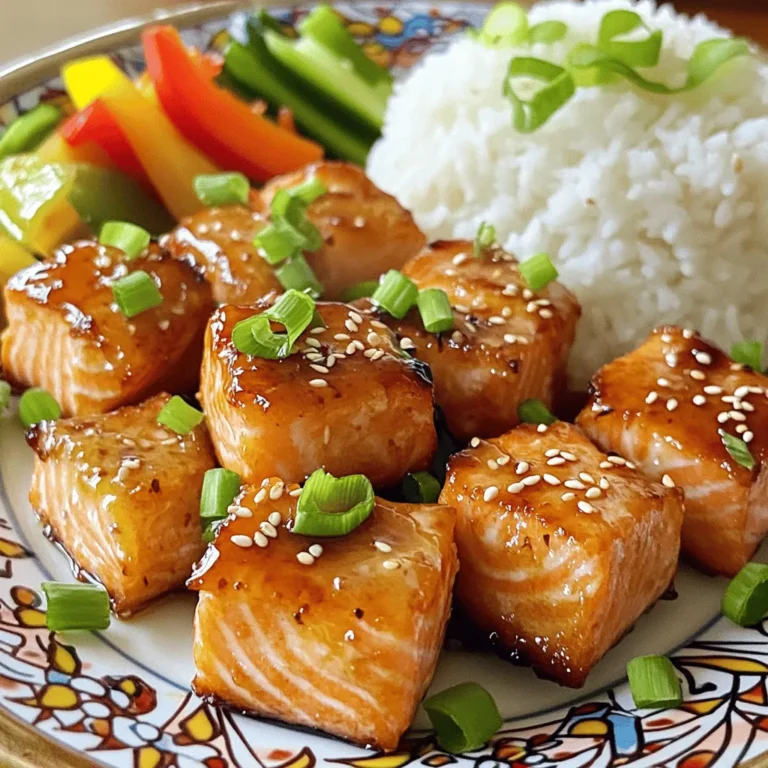
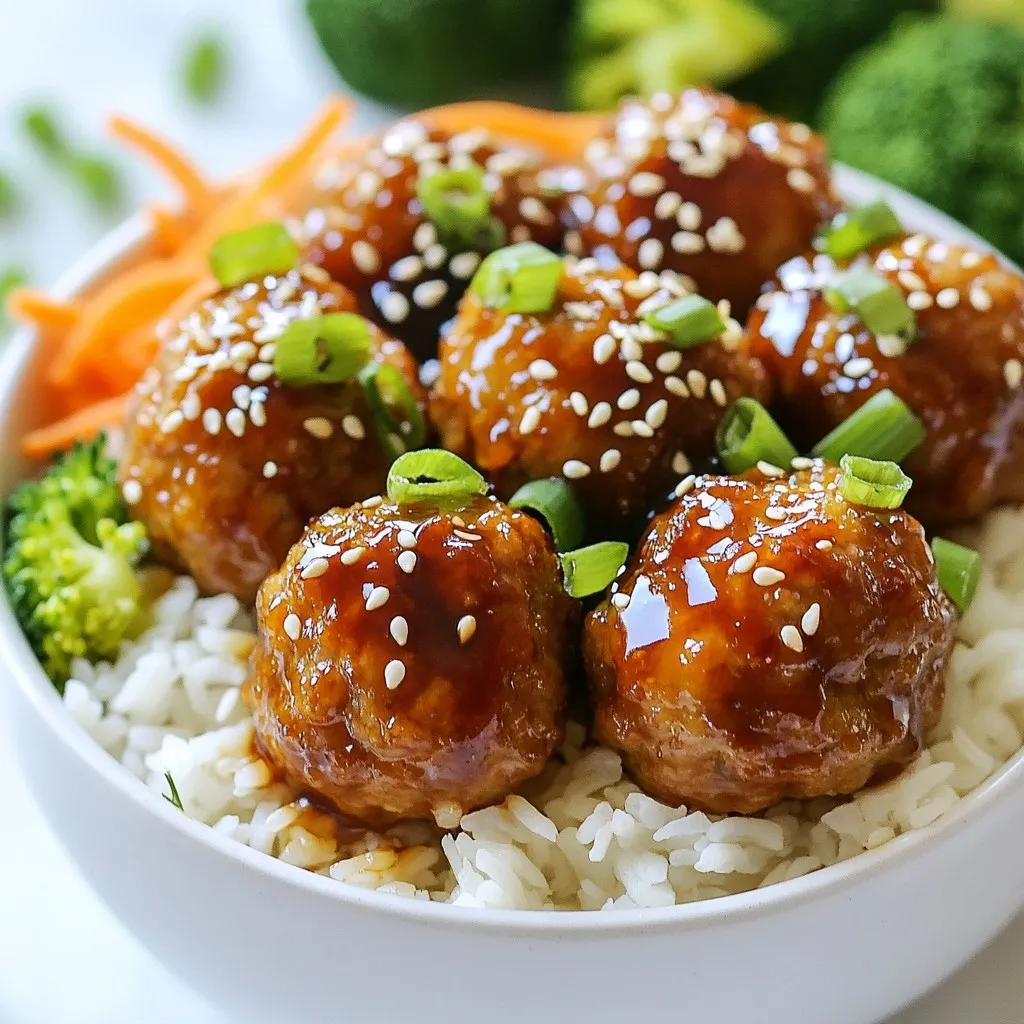
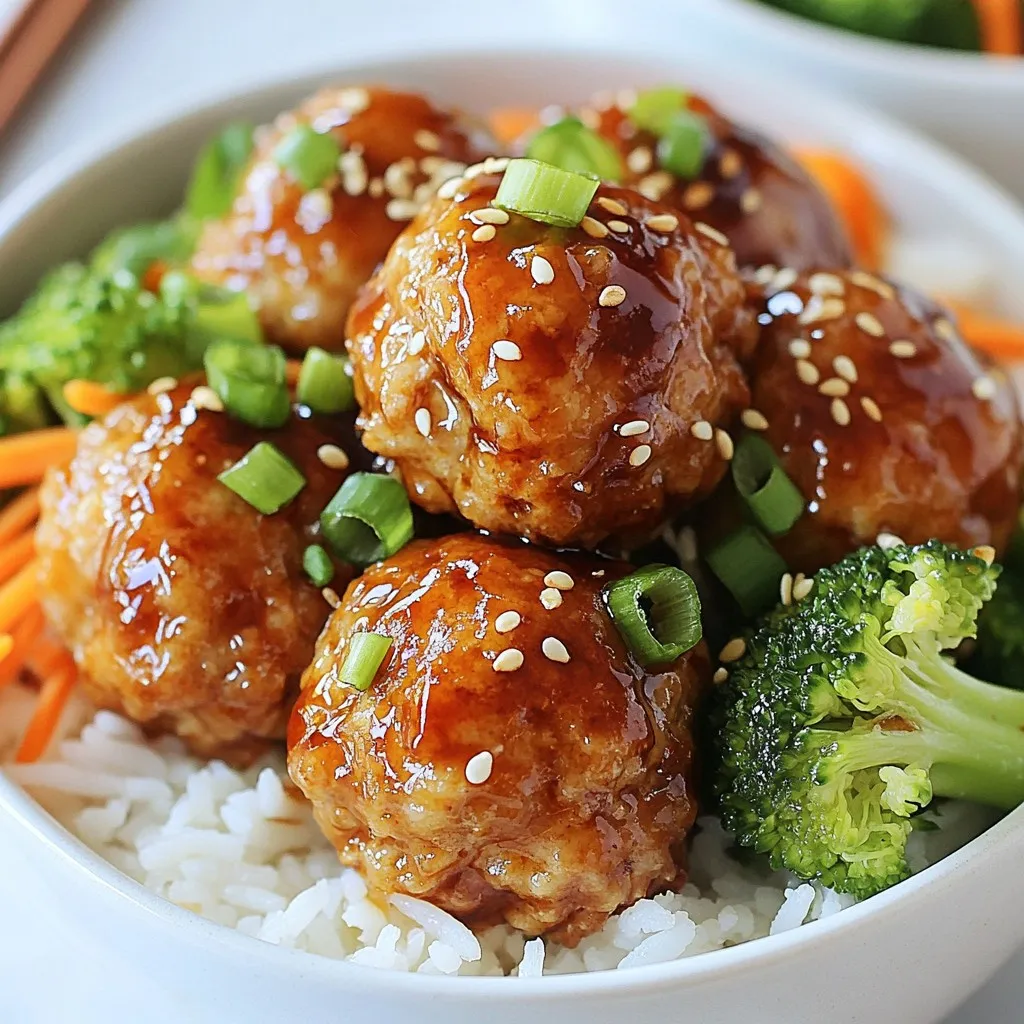
Finally, serve the meatballs over cooked rice. You can use white or brown rice, depending on your preference. The rice soaks up the teriyaki sauce well, making each bite delicious.
Add broccoli and shredded carrots for extra color and nutrition. These veggies not only taste great but also look good on the plate. Don’t forget sesame seeds and green onions for garnish!
Step-by-Step Instructions
Preparing the Meatballs
1. First, preheat your oven to 400°F (200°C). Line a baking sheet with parchment paper. This step helps keep the meatballs from sticking.
2. In a large mixing bowl, combine the ground chicken or turkey, breadcrumbs, sliced green onions, egg, minced garlic, and grated ginger. Add a pinch of salt and pepper. Mix everything until it blends well.
3. Now, shape the mixture into 1.5-inch meatballs. Place each meatball on the lined baking sheet, leaving some space between them.
Baking the Meatballs
1. Bake the meatballs for 20-25 minutes. You want them to be golden brown and cooked through.
2. To check for doneness, cut one meatball in half. The inside should be no longer pink.
Making the Teriyaki Sauce
1. For the sauce, gather soy sauce, brown sugar, and sesame oil. Combine these in a small saucepan.
2. Heat the mixture over medium-low heat. Stir until the sugar dissolves. Let it simmer for a few minutes until the sauce thickens slightly. If you want a thicker sauce, simmer it a bit longer.
Preparing Additional Ingredients
1. Steam the broccoli florets in a separate pot. Cook them for about 5-7 minutes. They should be tender and bright green.
2. While the broccoli steams, shred the carrots. Set them aside for later.
Assembling the Bowls
1. Take a portion of cooked rice and place it in each bowl.
2. Top the rice with 3-4 meatballs, some steamed broccoli, and a handful of shredded carrots.
3. Drizzle the teriyaki sauce over each bowl.
4. Finally, garnish with sesame seeds and extra green onions for a nice touch.
Tips & Tricks
Perfecting the Meatballs
To make tender meatballs, use ground chicken or turkey. Mixing in breadcrumbs helps keep them soft. Don’t overwork the meat; just mix until combined. To add flavor, try adding fresh herbs like basil or cilantro. You can also swap half of the meat with finely chopped mushrooms for extra moisture.
Customizing the Teriyaki Sauce
For a sweeter sauce, add more brown sugar. If you like it saltier, increase the soy sauce. To give your sauce a kick, add a pinch of red pepper flakes or a dash of sriracha. If garlic is your thing, toss in some minced garlic while cooking the sauce for a deeper flavor.
Bowl Assembly Guidance
Lay your rice in the bowl first; it acts as a base. Then, add the meatballs and veggies on top. For more crunch, sprinkle some sliced almonds or crispy onions. Don’t forget to drizzle the teriyaki sauce evenly over everything. This way, each bite is full of flavor!
Pro Tips
- Use Fresh Ingredients: Fresh garlic and ginger will enhance the flavor of your meatballs and sauce immensely. If you can, avoid using pre-minced versions.
- Customize Your Vegetables: Feel free to mix in other vegetables like bell peppers or snap peas for added color and nutrients in your rice bowls.
- Make Ahead: You can prepare the meatballs and teriyaki sauce ahead of time and store them in the fridge for up to 2 days before assembling your bowls.
- Garnish Generously: Don’t skimp on garnishes like sesame seeds and extra green onions; they add a nice crunch and flavor that elevate the dish.
Variations
Vegetarian Option
You can make teriyaki meatballs without meat. Use lentils or chickpeas instead. They give protein and flavor. For binding, use flour or oats. They hold the mix together well.
For the sauce, consider plant-based options. Use tamari for gluten-free or coconut aminos for a sweet touch. These options keep the taste vibrant without meat.
Different Grain Options
White rice is classic, but try quinoa or cauliflower rice. Quinoa adds protein and fiber. It’s also gluten-free. Cauliflower rice is low in carbs. It’s a great option for lighter meals.
Different grains have unique benefits. Brown rice offers more fiber than white rice. It helps with digestion and keeps you full longer. Explore these healthy choices for a tasty bowl.
Seasonal Vegetable Additions
Add seasonal vegetables for color and nutrition. Think bell peppers, snap peas, or zucchini. They bring freshness and crunch to your bowl.
For cooking, roasting or steaming works best. Roasting enhances the flavor, while steaming keeps veggies crisp. Aim for bright colors; they make the dish more appealing. Enjoy the taste and health benefits seasonal veggies bring!
Storage Info
Storing Leftovers
To keep your teriyaki meatballs fresh, store them correctly. Place the meatballs and sauce in separate containers. This helps keep the meatballs from getting soggy. Use airtight containers to keep out air and moisture. You can also use glass or BPA-free plastic containers. Make sure to cool them to room temperature before putting them in the fridge. Store the meatballs and sauce for up to three days.
Reheating Guidelines
When you want to enjoy your leftovers, reheating is key. Use the microwave for quick warming. Place the rice and meatballs in a bowl. Add a splash of water to keep it moist. Cover with a damp paper towel. Heat for one to two minutes, stirring halfway through. If you prefer the oven, preheat it to 350°F (175°C). Place the meatballs and rice in an oven-safe dish, cover with foil, and heat for about 15 minutes. This way, you avoid drying out the meatballs.
Freezing Instructions
Freezing is a great option for longer storage. To freeze the meatballs, let them cool completely. Place them in a single layer on a baking sheet. Freeze for about an hour until firm. Then, transfer them to a freezer bag. For the teriyaki sauce, pour it into a freezer-safe container. Label with the date. When you’re ready to eat, thaw the meatballs and sauce in the fridge overnight. Reheat them as needed for a quick meal.
FAQs
How long do teriyaki meatballs last in the fridge?
Teriyaki meatballs can last about 3 to 4 days in the fridge. To keep them fresh, store them in an airtight container. Make sure the meatballs cool down before you seal the container. This helps prevent moisture buildup that can spoil your food.
Can I use a different type of meat?
Yes, you can use other meats. Ground beef, pork, or lamb works well too. You can also try plant-based meat for a great veggie option. Just keep in mind that cooking times may vary based on the meat you choose.
What can I serve with teriyaki meatball rice bowls?
You can pair the bowls with several side dishes. Steamed edamame or a fresh salad makes a great complement. You could also serve pickled vegetables for a tangy crunch. For a complete meal, add some miso soup or seaweed salad.
Is teriyaki sauce gluten-free?
Teriyaki sauce can be gluten-free. Look for soy sauce labeled gluten-free, like tamari. Always check the label to ensure there are no gluten ingredients. This way, you can enjoy your meal without worry.
This blog post shared all you need for a tasty teriyaki meatball rice bowl. We covered the key ingredients, step-by-step directions, and best tips for juicy meatballs.
Creating this dish is easy and fun. You can tailor the flavors and enjoy various grains or veggies. Whether you’re feeding friends or meal-prepping, this recipe fits all needs. Make it yours, and enjoy every bit

Teriyaki Meatball Rice Bowls
Ingredients
- 1 lb ground chicken or turkey
- 0.5 cup breadcrumbs
- 0.25 cup green onions, sliced
- 1 large egg
- 2 cloves garlic, minced
- 1 tablespoon fresh ginger, grated
- 0.25 cup soy sauce
- 0.25 cup brown sugar
- 2 tablespoons sesame oil
- 2 cups cooked white or brown rice
- 1 cup broccoli florets
- 1 cup shredded carrots
- sesame seeds for garnish
- additional green onions for garnish
Instructions
- Preheat the oven to 400°F (200°C) and line a baking sheet with parchment paper.
- In a large mixing bowl, combine the ground chicken (or turkey), breadcrumbs, sliced green onions, egg, minced garlic, grated ginger, and a pinch of salt and pepper. Mix until well incorporated.
- Using your hands, shape the mixture into 1.5-inch meatballs, placing them on the prepared baking sheet.
- Bake the meatballs in the preheated oven for 20-25 minutes, or until they’re golden brown and cooked through.
- While the meatballs are baking, prepare the teriyaki sauce: In a small saucepan, combine soy sauce, brown sugar, and sesame oil. Heat over medium-low heat, stirring until the sugar dissolves. Allow to simmer for a few minutes until the sauce thickens slightly.
- In a separate pot, steam the broccoli florets for about 5-7 minutes until tender and bright green.
- Place a portion of cooked rice in each bowl. Top with 3-4 meatballs, steamed broccoli, and a handful of shredded carrots.
- Drizzle the teriyaki sauce over the top of each bowl.
- Garnish with sesame seeds and additional green onions.
![To make Easy Vegetable Pad Thai, you need just a few key items. Here’s what you’ll need: - 8 oz rice noodles - 2 tablespoons vegetable oil - 1 red bell pepper, julienned - 1 green bell pepper, julienned - 1 carrot, shredded - 3 green onions, chopped (whites and greens separated) - 2 cloves garlic, minced - 1 cup bean sprouts - 2 large eggs (optional for non-vegetarians) - 3 tablespoons soy sauce - 1 tablespoon tamarind paste - 1 tablespoon brown sugar - 1 tablespoon lime juice - Salt and pepper to taste - Crushed peanuts and lime wedges for garnish These ingredients create a bright and fresh flavor. Each one adds its own twist to the dish. You can easily change this recipe to fit your taste. Here are some optional ingredients you might like: - Tofu or tempeh for protein - Broccoli or snap peas for more veggies - Chili flakes for heat - Cilantro for extra flavor - Sesame oil for a nutty taste These additions help you make the dish your own. Feel free to mix and match based on what you have at home. For this recipe, you want to use the right rice noodles. Here are the best types to choose from: - Flat rice noodles: These are the most common for Pad Thai. They soak up flavors well. - Thin rice vermicelli: Great for a lighter dish, but cook them less time. - Thick rice noodles: Chewy and satisfying, but they may need longer cooking. I recommend going for flat rice noodles. They give you that authentic flavor and texture you crave. For the full recipe, check out the details above. To start, cook the rice noodles. Follow the package instructions closely. Usually, this means boiling them in water for about 5 to 7 minutes. You want them soft but not mushy. Once they are ready, drain them in a colander. Rinse with cold water to stop the cooking. Set the noodles aside. Next, let's prepare the vegetables. Take your red and green bell peppers and slice them into thin strips, called julienne. Shred the carrot finely using a grater or a sharp knife. For the green onions, chop them into small pieces but keep the white and green parts separate. Mince the garlic into tiny bits. Once you finish, everything will be ready to cook. Now, it's time to bring everything together. In a large wok or skillet, heat the vegetable oil over medium-high heat. Add the minced garlic first and stir for about 30 seconds. It should smell great! Then, toss in the julienned peppers and shredded carrot. Stir-fry these for about 3 to 4 minutes. They should soften but still have a little crunch. If you want eggs, push the veggies to one side of the pan. Crack the eggs in the empty space and scramble them. Mix the cooked eggs with the veggies. Add the drained rice noodles to the wok. Next, add the chopped green onion whites, bean sprouts, soy sauce, tamarind paste, brown sugar, and lime juice. Toss everything together until well mixed and heated through. Taste and add salt and pepper as needed. Your Easy Vegetable Pad Thai is ready! Serve it hot, garnished with crushed peanuts and lime wedges. For the full recipe, check out the details above. Enjoy! To get great flavor in your Easy Vegetable Pad Thai, focus on the sauce. Use fresh ingredients like lime juice and tamarind paste. They add a nice tang. Make sure to taste as you mix. Adjust the soy sauce and sugar to your liking. If you want more heat, add some chili flakes. This will make your dish pop! Cooking your veggies just right is key. Start with high heat in your wok or skillet. This helps keep them crisp. Cut your vegetables into thin strips for even cooking. Stir-fry them quickly. This usually takes just a few minutes. Add bean sprouts last, as they need only a brief cook. This way, they stay crunchy. For the best experience, serve your Pad Thai hot. Top it with crushed peanuts; they add a nice crunch. A squeeze of lime juice brightens the flavors too. You can also add fresh herbs like cilantro for a fresh touch. Serve it with lime wedges on the side for extra zing. For a fun twist, pair it with spring rolls or a light salad. To see the full details, check the Full Recipe. {{image_2}} You can easily make this dish gluten-free. Use rice noodles, which are naturally gluten-free. Instead of soy sauce, try tamari. Tamari tastes similar but has no gluten. Always check labels to be sure. Tofu is a great option for plant-based protein. It adds texture and absorbs flavors well. Use firm tofu for the best results. Cut it into cubes and sauté until golden. If you eat eggs, they work too. Just scramble them before mixing with the veggies. Both choices are tasty and filling. Want more heat? Add red pepper flakes or chili paste. Start with a small amount; you can always add more. If you like it mild, skip the spicy ingredients. The beauty of this dish is you can customize it to your taste. Enjoy experimenting with flavors! To keep your leftover Pad Thai fresh, place it in an airtight container. Make sure to cool it down first. Store it in the fridge. It should last for about three days. Reheat your Pad Thai in a pan for the best texture. Add a splash of water or soy sauce. This helps make it moist again. Heat it on low, stirring gently. You can also use the microwave. Just cover it to keep moisture in. If you want to save Pad Thai for later, freezing is a good option. Cool it completely before packing it. Use freezer-safe containers or bags. It can last up to three months in the freezer. When ready to eat, thaw it in the fridge overnight before reheating. For best results, eat it within a month. For the full recipe, check out the Easy Vegetable Pad Thai. To make the sauce, mix soy sauce, tamarind paste, brown sugar, and lime juice. This blend gives the dish a sweet and tangy flavor. You want to balance these ingredients to your taste. I suggest starting with the amounts listed in the Full Recipe. Adjust to make it perfect for you! Absolutely! You can swap in any veggies you like. Broccoli, snap peas, and zucchini work great. Use what you have on hand. Just remember to cut them into small pieces for even cooking. The goal is to keep a nice crunch while adding color to your dish! If you can't find tamarind paste, you can use lime juice or a mix of vinegar and sugar. This will mimic the tangy flavor of tamarind. Another option is to use a store-bought pad Thai sauce that contains tamarind. Experiment to find what you enjoy best! To make this dish shine, you need fresh and colorful ingredients. Here’s what you’ll need: - 8 oz rice noodles - 2 tablespoons vegetable oil - 1 red bell pepper, julienned - 1 green bell pepper, julienned - 1 carrot, shredded - 3 green onions, chopped (whites and greens separated) - 2 cloves garlic, minced - 1 cup bean sprouts Feel free to tweak this recipe to fit your taste. Here are some extras: - 2 large eggs (optional for non-vegetarians) - Crushed peanuts for garnish - Lime wedges for garnish For the best texture, I suggest flat rice noodles. Look for the wide ones labeled as "Pad Thai noodles." They soak up flavors well and make the dish more satisfying. If you prefer thinner noodles, rice vermicelli works too. Just keep an eye on cooking time, as they cook faster. Check out the [Full Recipe] for detailed steps. You now have all you need for an Easy Vegetable Pad Thai. You learned about key ingredients, cooking steps, and how to customize your dish. Remember to use fresh veggies for great taste. Adjust flavors to fit your style, whether that’s adding spice or protein. Store any leftovers properly for a tasty meal later. Enjoy creating this dish and impressing yourself with your cooking skills. Now, grab your ingredients and get started on this delightful, vibrant meal!](https://dailydishlab.com/wp-content/uploads/2025/06/ea2fad35-4884-4485-94ec-1f29792ad057-768x768.webp)
![To make Buffalo Chicken Zucchini Boats, you need the right ingredients. Here’s what you’ll gather: - 4 medium zucchinis - 2 cups cooked shredded chicken - ½ cup buffalo sauce - 1 cup shredded cheddar cheese - ½ cup cream cheese - 1 tablespoon olive oil - ½ teaspoon garlic powder - ¼ teaspoon onion powder - Salt and pepper to taste - Green onions for garnish These ingredients blend together to create a dish bursting with flavor. The zucchinis serve as the perfect base for the savory buffalo chicken filling. You can easily adjust the buffalo sauce to fit your spice level. If you want a milder taste, use less sauce. Cream cheese adds a rich and creamy texture. It balances the heat from the buffalo sauce. Shredded cheddar cheese on top melts beautifully, adding a delicious finish. Green onions provide a fresh touch and a nice color contrast. By using cooked shredded chicken, you save time. You can use leftovers or rotisserie chicken, making this dish quick to prepare. This recipe is not just tasty; it is simple too. You can find the full recipe to guide you through the cooking steps. Enjoy cooking! 1. Preheat the oven Set your oven to 375°F (190°C). This step warms the oven for baking. 2. Prepare the zucchinis Slice the zucchinis in half lengthwise. Use a spoon to scoop out seeds and flesh. You want to create small boats. Save that zucchini flesh for later. 3. Sauté zucchini flesh Heat one tablespoon of olive oil in a skillet over medium heat. Add the chopped zucchini flesh. Sauté for 2-3 minutes until it softens. This adds flavor and texture to your dish. 1. Combine ingredients in a bowl In a large mixing bowl, add the cooked shredded chicken, buffalo sauce, cream cheese, garlic powder, onion powder, salt, and pepper. Stir well until everything is mixed. 2. Add sautéed zucchini flesh Take the sautéed zucchini flesh you set aside. Add it to the bowl with the chicken mixture. Stir until all ingredients are evenly combined. This makes your filling rich and tasty. 1. Fill zucchini boats Grab your zucchini boats and fill each one with the buffalo chicken mixture. Press down gently to pack it in well. This step ensures every bite is full of flavor. 2. Bake until tender Place the filled zucchini boats on a baking sheet. Sprinkle shredded cheddar cheese on top. Bake for 25-30 minutes until the zucchini is tender and the cheese is bubbly and golden. Enjoy the aroma while it bakes! For the complete recipe, refer to the Full Recipe. - Selecting the best zucchinis: Choose medium-sized zucchinis. They should feel firm and heavy. Look for smooth skin without blemishes. This ensures a great texture and taste. - Adjusting buffalo sauce to taste: Buffalo sauce can be spicy. Start with half a cup and taste the mix. If you want more heat, add more sauce slowly. Balance the flavor as you like. - Optimal baking time: Bake your zucchini boats for 25-30 minutes. This gives them a tender texture and melts the cheese. Keep an eye on them to avoid overcooking. - Checking for doneness: To check if they are done, poke a fork into the zucchini. It should be soft but not mushy. The cheese should be bubbly and slightly golden. {{image_2}} You can change this dish to fit your taste. Here are some fun ideas: - Adding different cheeses: Try mozzarella or pepper jack cheese. Both melt well and add unique flavors. You can even mix cheeses for depth. - Using other sauces: Swap buffalo sauce for barbecue or ranch dressing. Each sauce gives a different twist. Experiment and find your favorite! - Vegetarian option: Use beans or lentils instead of chicken. This makes a hearty and tasty dish for vegetarians. Add more veggies for extra flavor and nutrition. Pair your buffalo chicken zucchini boats with tasty sides. Here are some great combos: - Pairing with sides: Serve with a fresh salad or crunchy coleslaw. These add crispness and balance the spicy flavor. You can also include sweet potato fries for a fun twist. - Garnishing ideas: Top with chopped green onions or cilantro. These herbs add color and a burst of fresh taste. A drizzle of ranch dressing can also cool down the heat! For the complete recipe, check out the [Full Recipe]. To store leftovers, place them in an airtight container. Keep the container in the fridge. The dish stays fresh for up to three days. Make sure to cool the zucchini boats before sealing them. This helps prevent moisture buildup. You can freeze buffalo chicken zucchini boats for later. Wrap each boat tightly in plastic wrap. Then, place them in a freezer-safe bag. They stay good for about two months. To reheat, let them thaw in the fridge overnight. Then, bake at 350°F (175°C) for 15-20 minutes. This keeps them warm and tasty. If you want, top with extra cheese before baking. Enjoy your meal! For the full recipe, check the earlier section. Can I use raw chicken? No, using raw chicken is not safe. Always cook your chicken first. You can use leftover chicken or rotisserie chicken. This saves time and adds flavor to the dish. What can I substitute for buffalo sauce? If you want a milder sauce, use barbecue sauce or ranch dressing. You can also mix hot sauce with butter for a homemade version. Adjust the spice level to fit your taste. How do I know when zucchini boats are done? Zucchini boats are done when they are tender. You can test this with a fork. The cheese should also be bubbly and slightly golden. What to do if the zucchini is too soggy? If your zucchini turns soggy, try salting them before baking. This helps remove excess water. You can also bake them a bit longer to dry them out. Solutions for insufficient cheese melting If your cheese doesn't melt well, check your oven temperature. Make sure it's hot enough. You can also cover the dish with foil for part of the bake time to help it melt evenly. For the full recipe and more tips, check the [Full Recipe]. Zucchini boats are a simple and tasty dish. This recipe combines zucchini, chicken, and buffalo sauce for flavor. You learned how to prepare, fill, and bake zucchini until tender. I shared tips for choosing ingredients and cooking. You can customize with different toppings or sauces. Remember, storing leftovers properly keeps them fresh. Whether you try variations or follow the recipe, enjoy your delicious zucchini boats!](https://dailydishlab.com/wp-content/uploads/2025/06/166bac25-20b4-473a-a87e-2d394f6df926-768x768.webp)