
Mango Chili Sorbet Refreshing and Easy Frozen Treat
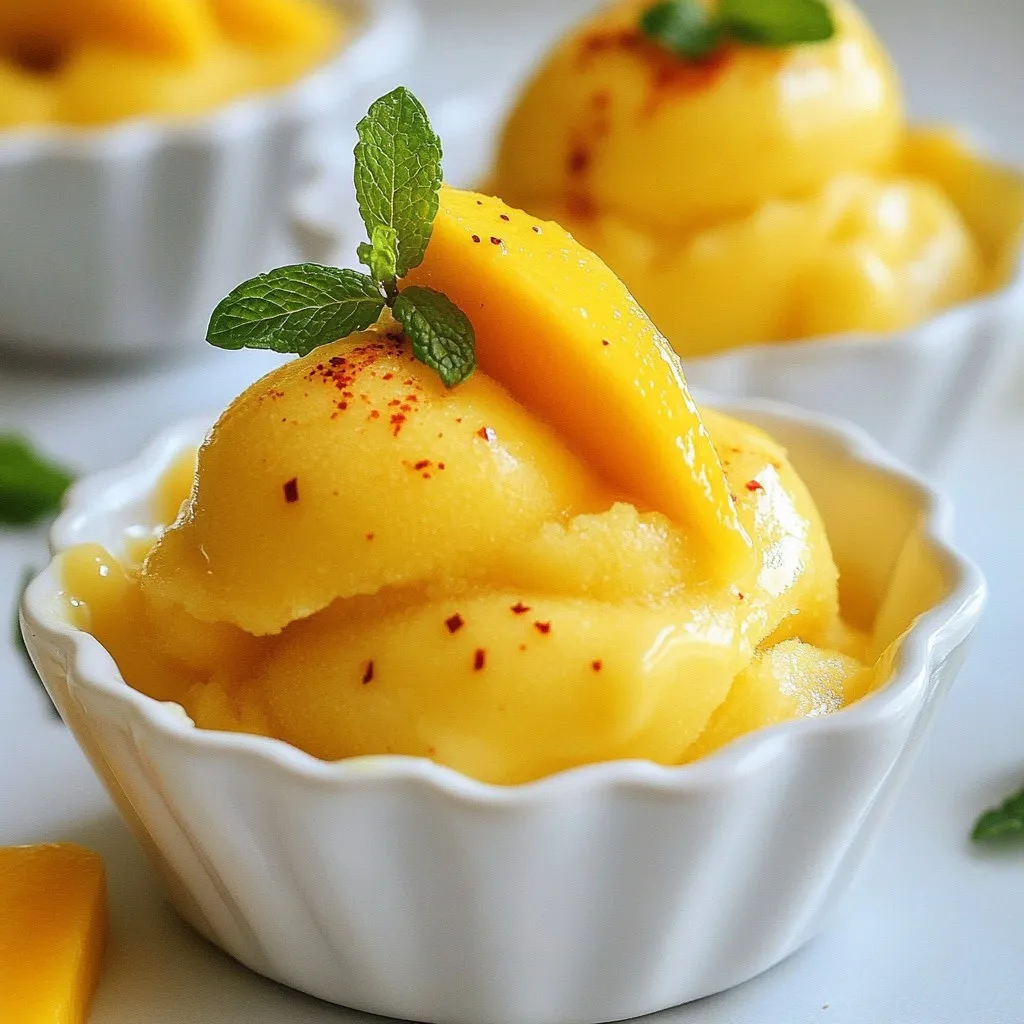

Craving a cool treat that packs a punch? Mango Chili Sorbet is your answer! This refreshing dessert pairs sweet mangoes with a spicy kick for a taste sensation. It’s easy to make, and I’ll guide you through every step. From picking the best mangoes to mastering the right sweetness and heat levels, you’ll impress your friends and family with this unique frozen delight. Let’s dive into the recipe!
Why I Love This Recipe
- Unique Flavor Combination: The sweetness of ripe mangoes perfectly balances the heat of chili powder, creating a delightful and unexpected treat.
- Refreshing Dessert: This sorbet is incredibly refreshing, making it the ideal dessert for hot summer days or tropical-themed gatherings.
- Simple Ingredients: With just a handful of ingredients, this recipe is easy to whip up, ensuring you spend less time in the kitchen and more time enjoying your sorbet.
- Customizable Heat: You can easily adjust the chili powder to suit your heat preference, making it a versatile treat for all palates.
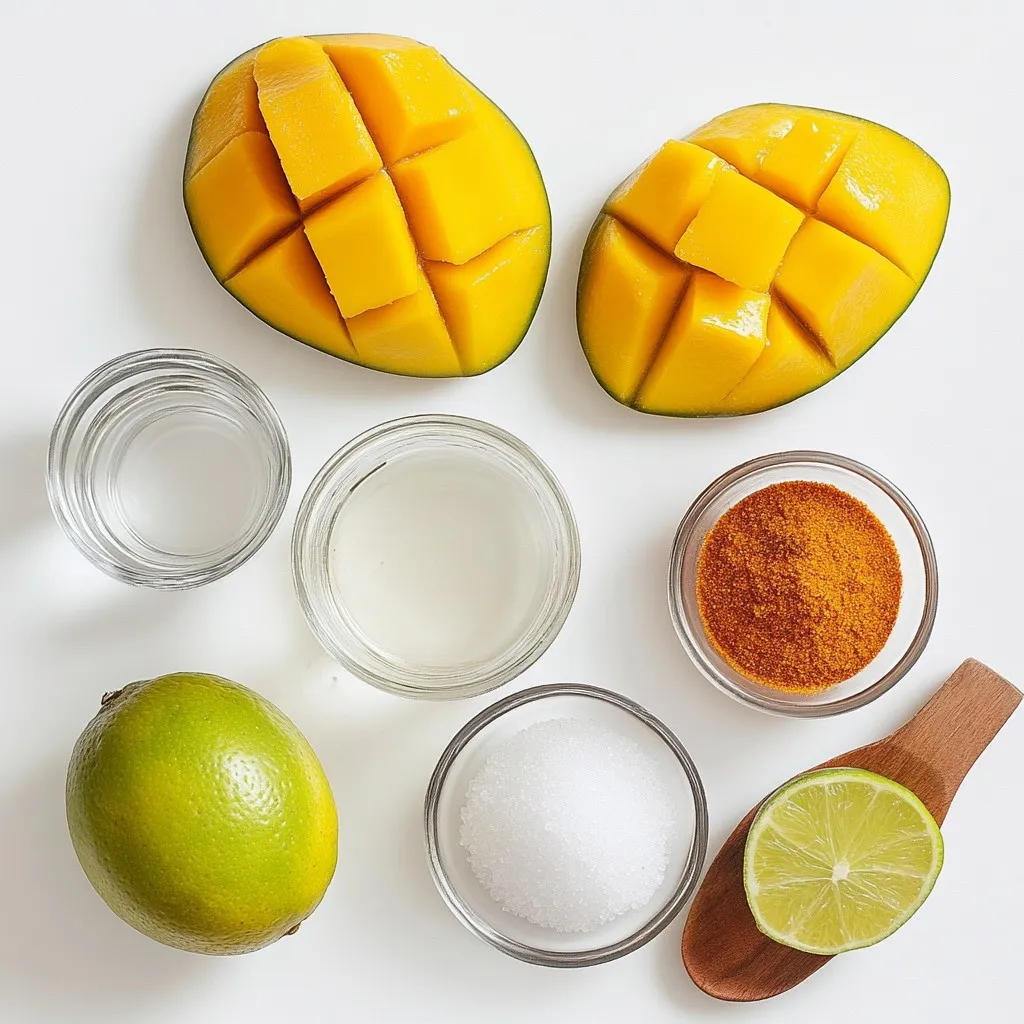
Ingredients
Mangoes
Mangoes are the star of this sorbet. Use three ripe mangoes for the best flavor. Look for mangoes that give slightly when you press them. They should smell sweet too. Peel and dice them to prepare for blending.
Sugar and Sweetness Adjustment
I use 1/2 cup of granulated sugar. This adds sweetness to balance the mango’s taste. However, you can adjust the sugar based on your preference. If you like it sweeter, add more sugar. If you want it less sweet, use less sugar. Always taste the mix before freezing.
Other Essential Ingredients
You’ll also need 1 cup of water and 1 tablespoon of fresh lime juice. The lime juice brings a nice tang. For heat, add 1-2 teaspoons of chili powder. Adjust this based on your spice level. A pinch of salt enhances the flavors too. Each ingredient plays a key role in making the perfect Mango Chili Sorbet.
Step-by-Step Instructions
Making the Sugar Syrup
To start, grab a medium saucepan. Add 1 cup of water and 1/2 cup of granulated sugar. Heat this mixture over medium heat. Stir it until the sugar dissolves fully. This takes just a few minutes. Once it dissolves, remove it from the heat. Let the syrup cool to room temperature. This sugar syrup adds sweetness to the sorbet.
Preparing the Mango Puree
Now, let’s prepare the mango puree. Take 3 ripe mangoes, peel and dice them. Place the diced mangoes in a blender or food processor. Blend until the mangoes are smooth. You want a silky texture. This puree will be the star of your sorbet.
Mixing the Ingredients
In a large mixing bowl, combine the mango puree and cooled sugar syrup. Add 1 tablespoon of fresh lime juice. This adds brightness to the flavor. Next, sprinkle in 1-2 teaspoons of chili powder. Adjust this based on how spicy you want it. Don’t forget a pinch of salt to enhance the taste. Mix everything thoroughly, so the chili spreads evenly. Taste the mixture. If it needs more sweetness or heat, add more sugar or chili powder. Once you’re happy with the flavor, pour the mixture into a shallow dish or an ice cream maker. If using a shallow dish, freeze it. Stir every 30 minutes for about 3 hours. If using an ice cream maker, churn it per the instructions. After churning, transfer it to a freezer-safe container. Let it harden for at least 2 hours. Enjoy your delicious Mango Chili Sorbet!
Tips & Tricks
Adjusting Sweetness and Heat
You can change the sweetness and heat of your Mango Chili Sorbet. Start with half a cup of sugar. Taste the mix before freezing. If it’s not sweet enough, add more sugar. You can also change the chili powder. Start with one teaspoon for a mild heat. Add more if you want it spicier. Always taste as you mix. This lets you find the perfect balance for your palate.
Churning Methods: Ice Cream Maker vs. Shallow Dish
You have two great ways to churn your sorbet. If you own an ice cream maker, use it! It makes the sorbet smooth and creamy. Follow the machine’s instructions for the best results. If you don’t have one, don’t worry. Pour the mixture into a shallow dish. Freeze it, then stir every 30 minutes. This helps break up ice crystals. Keep stirring for about three hours until it’s fluffy.
Serving Suggestions
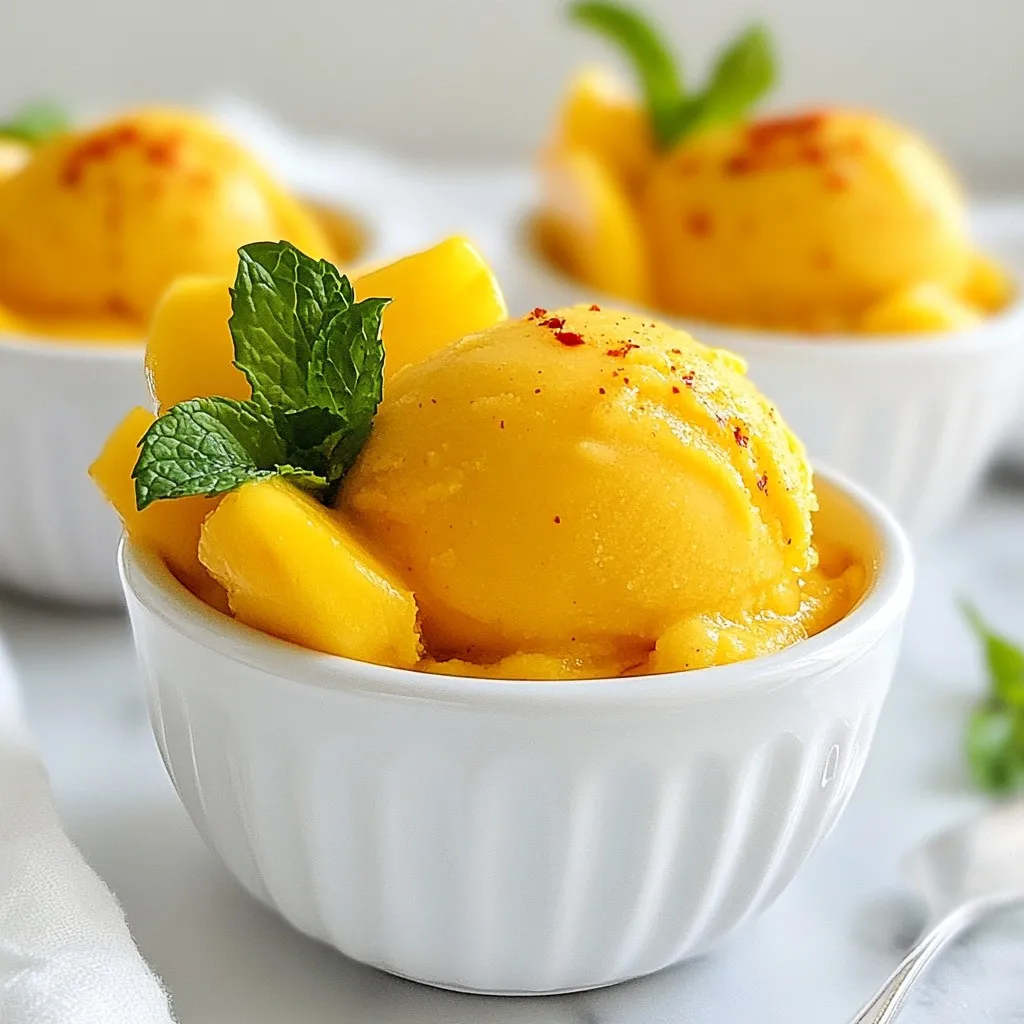
When serving your Mango Chili Sorbet, make it special. Use chilled bowls or glasses to keep it cold. Garnish each serving with a slice of fresh mango. A sprinkle of chili powder adds a fun touch. For a refreshing look, add mint leaves on top. These little details make your sorbet inviting and delicious!
Pro Tips
- Choose Ripe Mangoes: Ensure your mangoes are fully ripe for the best flavor. They should be slightly soft to the touch and emit a sweet aroma.
- Adjust Sweetness and Heat: Taste the mixture before freezing. You can always add more sugar or chili powder to suit your taste preferences.
- Use an Ice Cream Maker for Creaminess: If you have an ice cream maker, use it for a smoother texture. It incorporates air into the mixture, making it light and fluffy.
- Serve with Style: For an impressive presentation, serve the sorbet in chilled glasses and garnish with fresh mint leaves and a slice of lime.
Variations
Adding Different Fruits
You can switch up the mango in this sorbet. Try using ripe peaches or juicy pineapples. These fruits add a sweet touch and keep the sorbet fresh. You can blend in a mix of these fruits for a fun twist. Just keep the same amount as the mango for a great taste.
Alternative Spices for Flavor
Chili powder gives the sorbet a kick, but you can play with flavors. Use cayenne pepper for more heat. If you like a smokier taste, try smoked paprika. For a sweet touch, sprinkle in some cinnamon or nutmeg. Mix and match spices to find your favorite flavor combo!
Dairy-Free Options
This sorbet is naturally dairy-free, making it great for everyone. If you want to make it creamier, add coconut milk. This adds a nice richness without dairy. Just mix it in with the mango puree. You still get that fruity flavor with a new twist!
Storage Info
Best Practices for Freezing
To keep your Mango Chili Sorbet fresh, store it in an airtight container. This helps prevent ice crystals from forming. If you use a shallow dish, cover it tightly with plastic wrap. This will protect the sorbet from freezer odors and help maintain its flavor. Make sure your freezer is set to a consistent temperature. A stable cold helps the sorbet freeze evenly.
How to Thaw Before Serving
Before you serve the sorbet, take it out of the freezer. Let it sit at room temperature for about 5 to 10 minutes. This softening makes it easier to scoop. If it’s still too hard, try using a warm spoon to help scoop it out. Just be careful not to let it melt too much!
Shelf Life of Sorbet
Mango Chili Sorbet stays good for about 1 to 2 weeks in the freezer. After that, it may lose its texture and flavor. To enjoy it at its best, try to eat it within the first week. If you notice any ice crystals or freezer burn, it’s time to toss it. Always trust your senses!
FAQs
Can I use frozen mangoes?
Yes, you can use frozen mangoes for this sorbet. Just let them thaw a bit. This will help them blend smoothly. They should be ripe and sweet for the best taste.
What if I don’t have an ice cream maker?
No ice cream maker? No problem! You can still make delicious sorbet. Just pour the mixture into a shallow dish. Freeze it and stir every 30 minutes. Do this for about 3 hours, and you’ll have a tasty treat.
How can I make it less spicy?
To lessen the spice, use less chili powder. Start with just one teaspoon. Taste the mixture before freezing. You can always add more if you want it spicier later.
Is Mango Chili Sorbet vegan?
Yes, this sorbet is vegan! It only contains fruit, water, sugar, lime juice, and spices. There are no animal products at all.
What is the nutritional content of Mango Chili Sorbet?
This sorbet is low in fat and has natural sugars from mangoes. Each serving has about 100 calories. It’s also rich in vitamin C and fiber, making it a healthy choice for a dessert.
Mango Chili Sorbet is a fun treat. We covered the key ingredients like mangoes, sugar, and spices. I walked you through making the syrup and mango puree, along with mixing everything together. You learned tips for adjusting sweetness and heat, plus the best methods to churn your sorbet. Explore variations with fruits and spices, and don’t forget the storage tips.
In conclusion, making Mango Chili Sorbet is easy and rewarding. Enjoy tailored flavors and have fun creatin
Mango Chili Sorbet
Ingredients
- 3 whole ripe mangoes, peeled and diced
- 0.5 cup granulated sugar
- 1 cup water
- 1 tablespoon fresh lime juice
- 1-2 teaspoons chili powder
- 1 pinch salt
Instructions
- In a medium saucepan, combine water and sugar. Heat over medium heat, stirring until the sugar is completely dissolved. Remove from heat and let cool to room temperature.
- Blend the diced mangoes in a blender or food processor until smooth.
- In a large mixing bowl, combine the mango puree, cooled sugar syrup, lime juice, chili powder, and a pinch of salt. Mix thoroughly to ensure the chili is evenly distributed.
- Taste the mixture and adjust the sweetness or heat by adding more sugar or chili powder if desired.
- Pour the mixture into a shallow dish or an ice cream maker if you have one.
- If using a shallow dish, place it in the freezer. Every 30 minutes, stir the mixture with a fork for about 3 hours until it reaches the desired sorbet consistency.
- If using an ice cream maker, churn according to the manufacturer's instructions until it reaches a soft-serve consistency, then transfer to a freezer-safe container to harden for at least 2 hours.
- Before serving, let the sorbet sit at room temperature for a few minutes to soften slightly.


![To make no-bake chocolate oat bars, you need simple and wholesome ingredients. Here’s what you will need: - 2 cups rolled oats - 1 cup natural peanut butter (or almond butter) - 1/2 cup honey or maple syrup - 1/2 cup unsweetened cocoa powder - 1/4 teaspoon salt - 1 teaspoon vanilla extract - 1/2 cup mini chocolate chips (plus more for topping) - Optional: 1/4 cup chopped nuts (e.g., walnuts or almonds) These ingredients create a rich and tasty treat. The oats provide fiber and good nutrients. Peanut butter adds protein and healthy fats. Honey or maple syrup gives sweetness, while cocoa powder delivers that chocolate flavor we all love. Salt enhances the taste, making it all balanced. I love how easy it is to mix these ingredients together. You can customize it, too! Add nuts for crunch or swap the nut butter based on your taste. This recipe is perfect for snacks or dessert. You can find the full recipe with instructions to create these bars. Making no-bake chocolate oat bars is simple and fun. You only need a few basic steps. First, gather your ingredients. This recipe makes 16 bars, perfect for snacks or dessert. Start with a large bowl. Add 2 cups of rolled oats, 1/2 cup of cocoa powder, and 1/4 teaspoon of salt. Mix these dry ingredients well. This mixture gives the bars structure and rich flavor. In a small saucepan, add 1 cup of peanut butter and 1/2 cup of honey. Heat over low heat. Stir until smooth. This step helps the two ingredients blend nicely. Once mixed, take the pan off the heat and add 1 teaspoon of vanilla extract. Stir well to combine. Pour the warm peanut butter mix over your oat mixture. Stir until all the oats get coated. Fold in 1/2 cup of mini chocolate chips and optional chopped nuts if you like. Next, line an 8-inch square baking dish with parchment paper. Leave some paper hanging over the edges. This makes it easy to lift out the bars later. Transfer the oat mixture into the dish. Press it down firmly with a spatula or your hands. Sprinkle more mini chocolate chips on top and press them lightly into the mixture. Now, place the dish in the fridge for at least 2 hours. This will help the bars set. When ready, lift them out using the parchment paper. Cut into squares or rectangles. Enjoy your no-bake chocolate oat bars! For the full recipe, check out the complete list of steps above. To get the right texture for your no-bake chocolate oat bars, focus on the oats. Use rolled oats, not instant oats. Rolled oats give you that chewy bite. Make sure to mix the wet ingredients well. A smooth peanut butter blend helps to bind everything. Press the mixture firmly into your dish. This will help the bars set better. You can make these bars your own with toppings. Add different nuts for crunch, like walnuts or almonds. You can also sprinkle coconut flakes for a tropical twist. If you love chocolate, add more mini chocolate chips on top. Feel free to get creative! Use dried fruit or seeds for added flavor and nutrients. Avoid using too much liquid. This can make your bars too soft. If they don't hold together, they won't slice well. Also, don't skip chilling them long enough. They need at least two hours in the fridge. This helps them set properly. Lastly, always line your baking dish with parchment paper. This makes removing the bars easy and mess-free. For the full recipe, check out the [Full Recipe]. {{image_2}} You can make this treat even healthier. Try using whole grain oats instead of rolled oats. They add more fiber and nutrients. You can swap honey for agave syrup or use mashed bananas for sweetness. Both options lower the glycemic index. If you want a lower-fat option, use a nut butter with less oil. This keeps the flavor while cutting some calories. Let your taste buds explore! You can add spices like cinnamon or nutmeg to the oat mixture. This gives the bars a warm, cozy flavor. Try mixing in dried fruits like raisins or cranberries for a chewy texture. You can also switch up the chocolate chips. Use white chocolate or butterscotch chips for a fun twist. Each change makes the bars unique! Making these bars vegan or nut-free is easy. To go vegan, use maple syrup instead of honey. Replace peanut butter with sunflower seed butter. This keeps the bars nut-free and still delicious. You can also use pumpkin seed butter for a different flavor. Both options are rich in protein and healthy fats. Enjoy your tasty treat without worry! Check out the Full Recipe to see how easy these variations are to make. To keep your no-bake chocolate oat bars fresh, store them in an airtight container. Use parchment paper between layers to prevent sticking. This way, they stay nice and tasty for longer. If you have a big batch, you can also wrap them individually in plastic wrap. This makes it easy to grab one on the go. When stored properly, these bars last about one week at room temperature. You can keep them in the fridge for up to two weeks. The cool air helps keep them firm and tasty. Just make sure they stay in a sealed container to avoid moisture. You can freeze these bars for even longer storage. They freeze well for up to three months. To do this, wrap each bar in plastic wrap. Then, place them in a freezer-safe bag. When you want one, take it out and let it thaw in the fridge. This way, you’ll always have a treat ready to enjoy! For the full recipe, check out the detailed steps above. Yes, you can use other nut butters. Almond butter works well and has a nice flavor. Cashew butter is another tasty choice. Just make sure it is natural and creamy. Each nut butter may change the taste a little. Feel free to experiment with your favorite! To make this recipe gluten-free, choose certified gluten-free oats. Most rolled oats contain gluten. So, look for oats labeled as gluten-free. This small step ensures your tasty bars are safe for gluten-free diets. You can enjoy these bars without worry! If you want to substitute honey or maple syrup, try agave syrup or brown rice syrup. Both options add sweetness and keep the bars moist. You can also use date syrup for a fruity flavor. Just remember, these swaps may slightly change the taste. In this blog post, we covered a delicious recipe for oat bars. You learned about key ingredients like oats, nut butter, and cocoa powder. I shared step-by-step instructions to guide your cooking process. Tips for perfect texture and common mistakes were also discussed. Variations let you customize flavors and ensure everyone can enjoy these bars. Remember to follow storage tips for freshness. Baking these oat bars is fun and rewarding. They make a great snack for everyone. Enjoy your tasty creation!](https://dailydishlab.com/wp-content/uploads/2025/07/967f7db3-ab0b-4ab4-b9dd-ccfa3a2c04e2-768x768.webp)
