Pumpkin Spice Chocolate Chip Muffins Delightful Treat
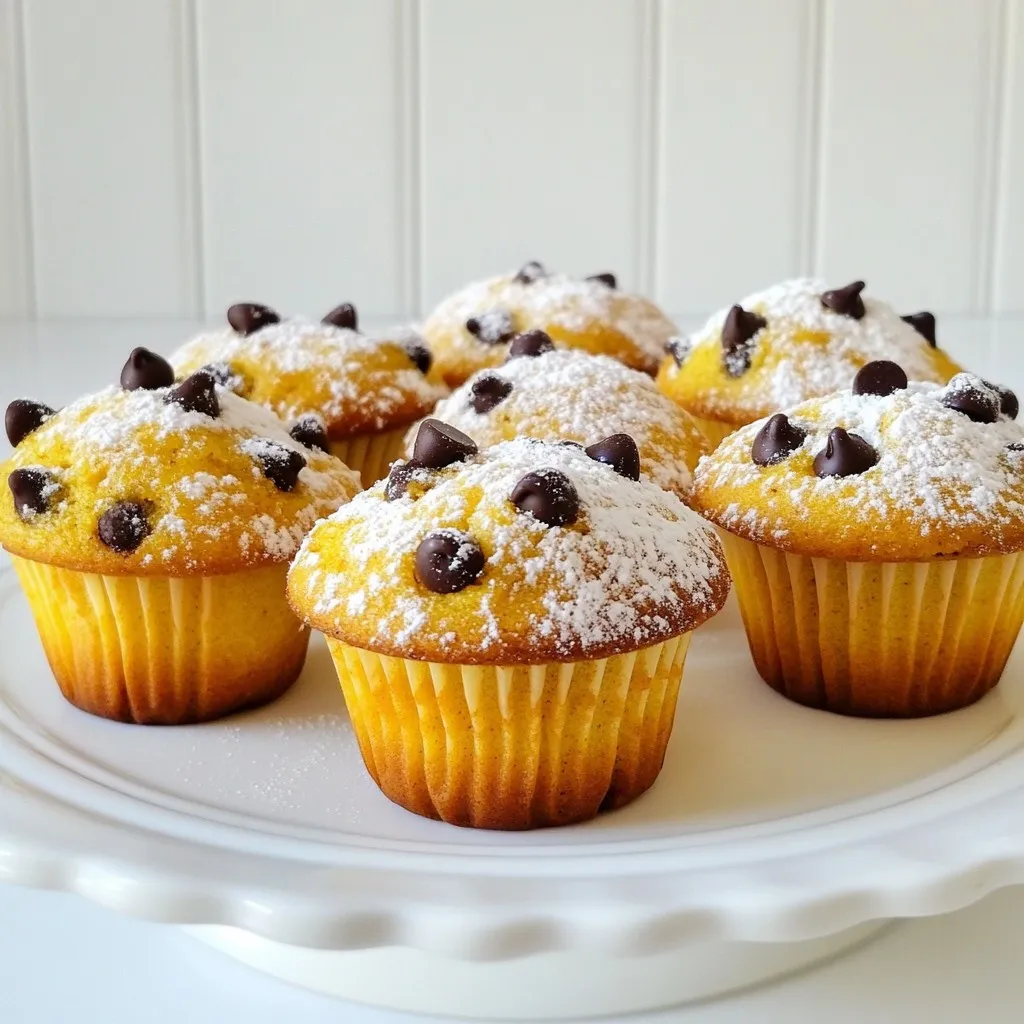

Get ready to fall in love with pumpkin spice in a whole new way! My Pumpkin Spice Chocolate Chip Muffins blend warm spices with sweet chocolate for a treat you can’t resist. Whether you’re cozying up at home or sharing with friends, these muffins are sure to impress. Let’s dive into the ingredients and steps to create this delightful snack! Your taste buds will thank you!
Why I Love This Recipe
- Delicious Flavor Combination: The warm spices of pumpkin pie and rich chocolate create a delightful contrast that is perfect for fall.
- Healthy Twist: Using whole wheat flour boosts the fiber content, making these muffins a more wholesome treat.
- Easy to Make: This recipe is straightforward and quick, allowing you to whip up a batch in no time.
- Perfect for Sharing: With 12 muffins, it’s a great recipe to share with friends and family during gatherings.
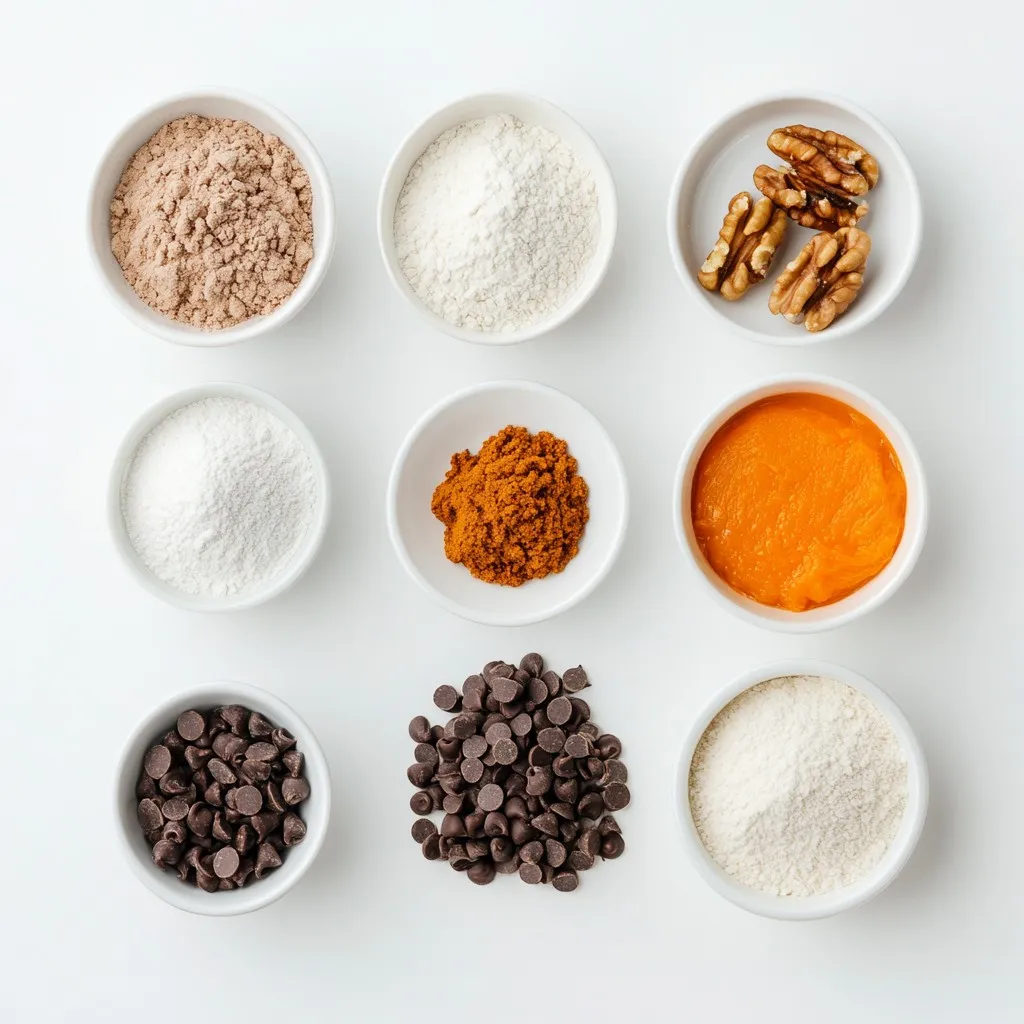
Ingredients
To make these delightful Pumpkin Spice Chocolate Chip Muffins, gather the following ingredients:
- 1 cup all-purpose flour
- 1 cup whole wheat flour
- 1 teaspoon baking powder
- 1 teaspoon baking soda
- 1 tablespoon pumpkin pie spice
- ½ teaspoon salt
- 1 cup canned pumpkin puree
- ½ cup brown sugar, packed
- ½ cup granulated sugar
- ½ cup vegetable oil
- 2 large eggs
- 1 teaspoon vanilla extract
- 1 cup semi-sweet chocolate chips
- ½ cup chopped walnuts (optional)
Each ingredient plays a key role in making these muffins tasty. The all-purpose flour and whole wheat flour give the muffins a nice texture. Baking powder and baking soda help them rise.
Pumpkin pie spice brings that warm, cozy flavor we love. Canned pumpkin puree adds moisture and a rich, sweet taste. The sugars balance the flavors and make them sweet.
Vegetable oil keeps the muffins soft. Eggs help bind everything together. Vanilla extract adds a lovely aroma. Semi-sweet chocolate chips bring a sweet surprise in every bite. Lastly, walnuts add a nice crunch, but they are optional.
With these ingredients ready, you are all set to create a batch of these yummy muffins!
Step-by-Step Instructions
Preheat and Prepare Muffin Tin
Start by preheating your oven to 350°F (175°C). This helps the muffins bake evenly. Next, grab a muffin tin. Line it with paper liners or grease it with cooking spray. This makes for easy muffin removal later.
Mix Dry Ingredients
Take a medium bowl and add these dry ingredients:
- 1 cup all-purpose flour
- 1 cup whole wheat flour
- 1 teaspoon baking powder
- 1 teaspoon baking soda
- 1 tablespoon pumpkin pie spice
- ½ teaspoon salt
Whisk the dry mix together until well blended. Set this bowl aside. This step builds the base for your muffins.
Combine Wet Ingredients
In a large mixing bowl, combine:
- 1 cup canned pumpkin puree
- ½ cup brown sugar, packed
- ½ cup granulated sugar
Mix these together until smooth. Then, add:
- ½ cup vegetable oil
- 2 large eggs
- 1 teaspoon vanilla extract
Beat this mixture until it looks smooth and creamy. This keeps the muffins moist.
Fold Ingredients Together
Now, gently fold the dry ingredients into the wet mix. Use a spatula and be careful not to overmix. Stir just until combined. This helps keep the muffins light and fluffy.
Next, fold in:
- 1 cup semi-sweet chocolate chips
- ½ cup chopped walnuts (optional)
Make sure they are evenly spread throughout the batter.
Bake the Muffins
Using a spoon, divide the batter into each muffin cup. Fill each about ¾ full. This gives them room to rise. Bake in your preheated oven for 18-20 minutes. To check if they are done, insert a toothpick into the center. If it comes out clean, they are ready!
After baking, let the muffins cool in the pan for 5 minutes. Then, move them to a wire rack to cool completely. Enjoy your delicious pumpkin spice chocolate chip muffins!
Tips & Tricks
How to Make Muffins Moist
To make your muffins moist, use canned pumpkin puree. It adds moisture and flavor. Choose pure pumpkin, not pumpkin pie filling. The brown sugar also helps keep them soft. It adds a rich taste and draws in moisture.
Avoiding Overmixing
Mixing too much can make muffins tough. When you combine dry and wet ingredients, stir gently. You want them just blended. A few lumps are okay. The goal is to keep the batter light and airy.
Perfecting the Chocolate Chip Distribution
To evenly distribute chocolate chips, fold them in gently. This ensures each muffin has a good amount of chocolate. You can sprinkle a few chips on top before baking for a nice look. If you add walnuts, do this too.
Pro Tips
- Use Fresh Pumpkin Spice: For a more vibrant flavor, consider using freshly ground spices instead of pre-mixed pumpkin pie spice.
- Don’t Overmix: Gently folding the dry ingredients into the wet mixture ensures that your muffins remain light and fluffy.
- Experiment with Mix-Ins: Try adding dried cranberries or pecans for a twist on the classic recipe and to enhance the texture.
- Check for Doneness: Use a toothpick to test for doneness; it should come out clean or with a few moist crumbs for perfectly baked muffins.
Variations
Vegan Pumpkin Spice Muffins
You can easily make vegan pumpkin spice muffins. Replace the eggs with flaxseed meal. Mix 1 tablespoon of flaxseed meal with 3 tablespoons of water. Let it sit for five minutes. This mix acts like an egg. Use a plant-based oil, like coconut or canola oil, instead of vegetable oil. Make sure your chocolate chips are dairy-free. These changes keep the muffins fluffy and tasty.
Gluten-Free Options
For gluten-free muffins, use gluten-free flour blends. Many brands offer these blends, and they work well. You can also use almond flour or oat flour. Just mix in a bit of xanthan gum to help with texture. The muffins will stay moist and soft. Be sure to check that your baking powder is also gluten-free.
Nut-Free Alternatives
If you want nut-free muffins, skip the walnuts. You can add more chocolate chips for flavor. Sunflower seeds are a great option too. They add a nice crunch without nuts. These muffins still taste great without nuts, so don’t worry! Just keep your toppings safe for everyone.
Storage Info
Storing Leftover Muffins
After making these delicious muffins, you may have some left. To store them, let the muffins cool completely. Place them in an airtight container at room temperature. They will stay fresh for up to three days. If you want to keep them a bit longer, you can place them in the fridge. They will last for up to a week in the fridge.
Freezing Muffins
Freezing muffins is a great way to save them for later. To freeze, wrap each muffin tightly in plastic wrap. Then, place the wrapped muffins in a freezer bag or container. This keeps them fresh and prevents freezer burn. They can be frozen for up to three months. When you want to enjoy one, just take it out and let it thaw at room temperature.
Reheating Instructions
Reheating muffins is simple. If you want a warm muffin, preheat your oven to 350°F (175°C). Place the muffin on a baking sheet. Heat for about 5 to 10 minutes. This method keeps the muffin soft. If you prefer, you can microwave a muffin for about 15 to 20 seconds. This will warm it up quickly. Enjoy your tasty treat!
FAQs
Can I substitute ingredients?
Yes, you can. You can use almond flour for a gluten-free option. Applesauce can replace oil for a lighter muffin. For the sugars, you can try coconut sugar or honey. Just note that these changes may affect the taste and texture.
How long will the muffins stay fresh?
These muffins stay fresh for about three days at room temperature in an airtight container. If you want them to last longer, store them in the fridge for up to a week. For the best taste, eat them fresh!
Can I make mini muffins with this recipe?
Absolutely! To make mini muffins, fill the mini muffin cups about halfway. Bake for 10 to 12 minutes. Keep an eye on them to avoid overbaking. These bite-sized treats are perfect for snacks or brunch!
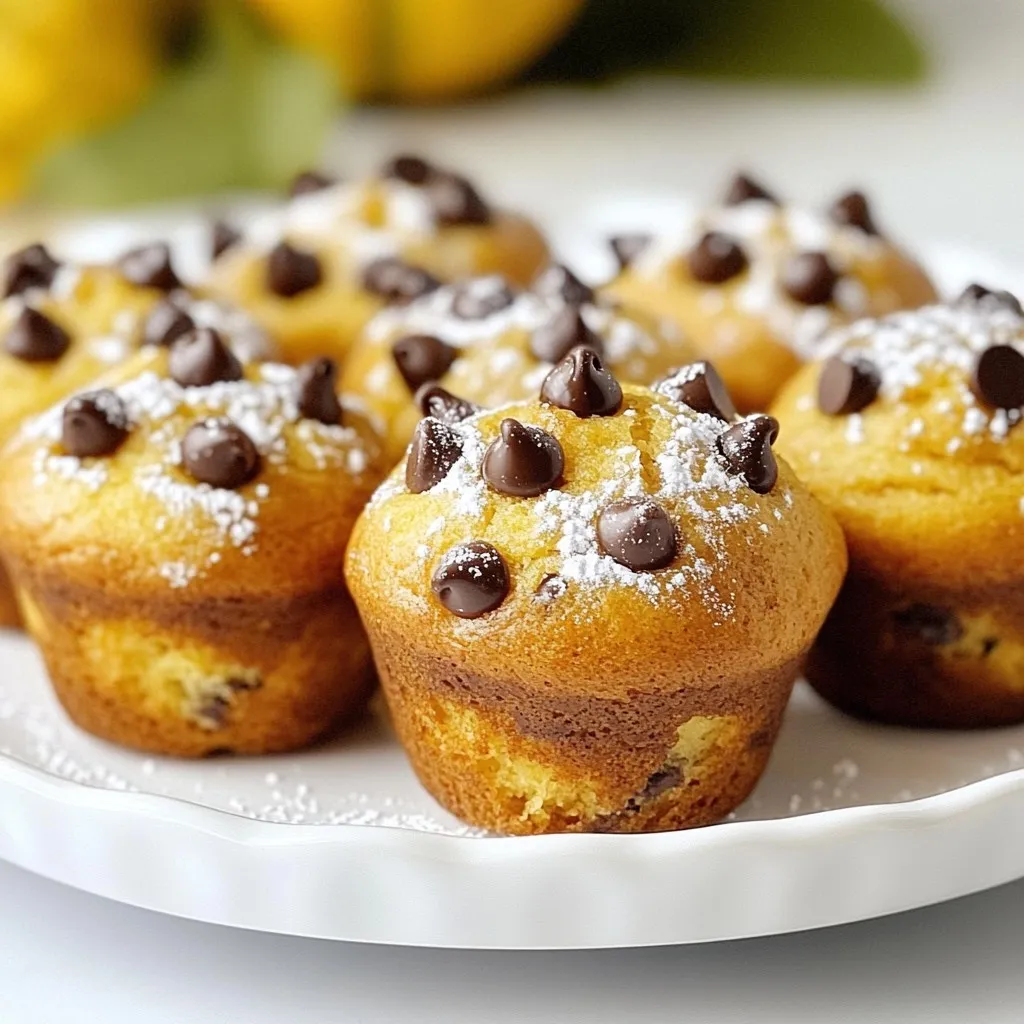
We covered the key ingredients and simple steps to make delicious pumpkin spice muffins. You learned tips for moist muffins and how to avoid overmixing. We also explored tasty variations, storage options, and answers to common questions. Remember, these muffins are easy to customize for your taste. Enjoy your baking and savor every bit

Pumpkin Spice Chocolate Chip Muffins
Ingredients
- 1 cup all-purpose flour
- 1 cup whole wheat flour
- 1 teaspoon baking powder
- 1 teaspoon baking soda
- 1 tablespoon pumpkin pie spice
- 0.5 teaspoon salt
- 1 cup canned pumpkin puree
- 0.5 cup brown sugar, packed
- 0.5 cup granulated sugar
- 0.5 cup vegetable oil
- 2 large eggs
- 1 teaspoon vanilla extract
- 1 cup semi-sweet chocolate chips
- 0.5 cup chopped walnuts (optional)
Instructions
- Preheat your oven to 350°F (175°C) and line a muffin tin with paper liners or grease with cooking spray.
- In a medium bowl, whisk together the all-purpose flour, whole wheat flour, baking powder, baking soda, pumpkin pie spice, and salt. Set this dry mixture aside.
- In a large mixing bowl, combine the canned pumpkin puree, brown sugar, and granulated sugar. Mix until well blended.
- Add the vegetable oil, eggs, and vanilla extract to the pumpkin mixture, beating until smooth.
- Gradually fold the dry ingredients into the wet mixture using a spatula, being careful not to overmix. Stir until just combined.
- Gently fold in the semi-sweet chocolate chips and walnuts (if using) until evenly distributed.
- Divide the batter evenly among the prepared muffin cups, filling each about ¾ full.
- Bake in the preheated oven for 18-20 minutes or until a toothpick inserted into the center of a muffin comes out clean.
- Once baked, allow the muffins to cool in the pan for 5 minutes before transferring them to a wire rack to cool completely.
![- 1 cup ricotta cheese - 2 large eggs - 1/4 cup granulated sugar - Zest of 1 lemon - 1/4 cup fresh lemon juice I love using ricotta cheese in these pancakes. It makes them soft and creamy. The eggs add richness and help the pancakes rise. Granulated sugar gives just the right hint of sweetness. Zest and juice from the lemon bring a bright, fresh flavor. - 1 cup all-purpose flour - 2 teaspoons baking powder - 1/4 teaspoon salt All-purpose flour gives the pancakes structure. Baking powder lifts the batter and keeps it light. A pinch of salt balances the sweetness and enhances the lemon's flavor. - 1/4 cup milk (or a dairy-free alternative) - Butter or oil for cooking Milk helps adjust the batter's consistency. You can use dairy-free milk if you prefer. Butter or oil is essential for cooking the pancakes. It prevents sticking and adds a nice golden color. For the full recipe, check out the details above. To start, grab a large mixing bowl. Add 1 cup of ricotta cheese, 2 large eggs, and 1/4 cup of granulated sugar. Use a whisk to mix these until smooth. It's important to blend well so your pancakes turn out fluffy. Next, add the zest of 1 lemon and 1/4 cup of fresh lemon juice. The zest gives a bright flavor, while the juice adds a nice tang. Mix again until everything is well combined. Now, take another bowl for the dry mix. Combine 1 cup of all-purpose flour, 2 teaspoons of baking powder, and 1/4 teaspoon of salt. Stir until it looks even. This blend helps the pancakes rise and stay light. Gradually add the dry mix to the wet mix. Use a spatula to fold the ingredients together. Be careful not to over-mix; some lumps are okay. If the batter seems too thick, pour in 1/4 cup of milk. This will help reach the right consistency for pouring. It's time to cook! Preheat a non-stick skillet over medium heat. Lightly grease it with butter or oil. Pour about 1/4 cup of batter for each pancake onto the skillet. Cook for 2-3 minutes. You'll see small bubbles form on the surface when they're ready to flip. Carefully turn the pancakes and cook for another 2-3 minutes until golden brown and fluffy. Repeat this with the remaining batter. Enjoy your Lemon Ricotta Pancakes warm! For the full recipe, check the section above. To make the best Lemon Ricotta Pancakes, start with the right skillet temperature. Preheat your non-stick skillet over medium heat. This helps the pancakes cook evenly and become fluffy. If the skillet is too hot, the pancakes can burn on the outside while staying raw inside. Next, avoid over-mixing your batter. Gently fold the wet and dry ingredients together until just combined. A few lumps are okay. Over-mixing can make the pancakes tough instead of light and airy. When it comes to toppings, get creative! Fresh fruit like berries or sliced bananas pairs well with the zesty lemon flavor. You can also drizzle maple syrup or honey on top for added sweetness. For an appealing look, stack the pancakes high on a plate. Add a dollop of whipped cream and sprinkle powdered sugar on top. This adds a nice touch and makes them even more tempting. If you need a gluten-free option, swap out the all-purpose flour for a gluten-free blend. Many brands offer good alternatives that work just as well. For a dairy-free version, use a plant-based ricotta and a non-dairy milk. Almond or oat milk works great here. These changes still keep the pancakes tasty and fluffy. For the full recipe, check the previous section. {{image_2}} You can make these pancakes even better with some fun additions. Try adding blueberries or chocolate chips to the batter before cooking. This small change adds bursts of flavor and sweetness to each bite. Another option is to switch up the citrus flavor. Instead of lemon, you can use orange zest. This will give your pancakes a bright and fresh taste, perfect for a sunny breakfast. Garnishing your pancakes can take them to the next level. Fresh fruits like strawberries, bananas, or raspberries pair nicely. Just slice them up and place them on top for a colorful look. Drizzling maple syrup or honey adds a nice touch of sweetness. You can also add a dollop of whipped cream for some extra creaminess. It makes your pancakes look fancy and taste even better. You can serve these pancakes in different ways. Stacking them high on a plate looks impressive and makes for a fun meal. Don’t forget to add your favorite toppings! If you want to try something new, consider a pancake waffle hybrid. Use the batter in a waffle maker instead. This gives you a crispy outside and fluffy inside, making for a great breakfast treat. For the full recipe, check out the detailed steps above. Enjoy these tasty lemon ricotta pancakes! To keep your pancakes fresh, follow these steps: - Refrigeration: Place leftover pancakes in an airtight container. They stay good for 3-4 days in the fridge. You can also stack them with parchment paper between layers to prevent sticking. - Freezer Tips: For long-term storage, freeze pancakes in a single layer first. Then, transfer them to a freezer bag or container. They can last up to 2 months. Label the bag with the date for easy tracking. You have a couple of options for reheating: - Microwave: This method is quick. Just place a pancake on a microwave-safe plate. Heat for 20-30 seconds. Add a damp paper towel on top to keep them moist. - Stovetop Reheating: This keeps the texture better. Heat a skillet over low heat. Add a small amount of butter or oil, then place the pancake in the skillet. Heat for about 1-2 minutes on each side until warm. To maintain the fluffy texture, avoid overheating. Check often to prevent drying out. Enjoy your pancakes warm! To make Lemon Ricotta Pancakes from scratch, you need simple ingredients. Here’s what you need: - 1 cup ricotta cheese - 2 large eggs - 1/4 cup granulated sugar - 1 teaspoon vanilla extract - Zest of 1 lemon - 1/4 cup fresh lemon juice - 1 cup all-purpose flour - 2 teaspoons baking powder - 1/4 teaspoon salt - 1/4 cup milk (or a dairy-free alternative) - Butter or oil for the skillet Start by whisking the ricotta, eggs, sugar, vanilla, lemon zest, and juice until smooth. In another bowl, mix the flour, baking powder, and salt. Combine the wet and dry ingredients gently to keep the batter light. If the batter is thick, add milk until it feels right. For the cooking, heat a skillet, pour the batter, and cook until fluffy. Check the [Full Recipe] for exact steps! Yes, you can substitute ricotta cheese. Some good options include: - Cottage cheese (blend for a smoother texture) - Cream cheese (soften it first) - Greek yogurt (adds protein and tang) These alternatives will change the flavor slightly but can still taste great. You can make Lemon Ricotta Pancakes even better with fun mix-ins and toppings. Consider these ideas: - Fresh blueberries or raspberries - Chocolate chips for sweetness - Chopped nuts for crunch - Honey or maple syrup for drizzling You can also top them with whipped cream, fresh fruit, or a sprinkle of powdered sugar. To keep your pancakes fluffy, follow these tips: - Avoid over-mixing the batter; lumps are okay. - Use a light hand when folding in the dry ingredients. - Ensure your skillet is at the right temperature; too hot can burn them. - Let the batter rest for a few minutes before cooking. These steps will help you achieve fluffy and light pancakes every time. In this post, we covered how to make delicious Lemon Ricotta Pancakes. You learned about the key ingredients, like ricotta, eggs, and sugar, and how to prepare them. I shared tips on cooking, serving, and even storing leftover pancakes. You can mix in fruits or switch up flavors to make them your own. Remember, with the right cooking methods, you can create light and fluffy pancakes every time. Enjoy your cooking adventure; these pancakes are sure to impress!](https://dailydishlab.com/wp-content/uploads/2025/06/08a6d73f-3236-4643-afc4-ab19070334e6-768x768.webp)