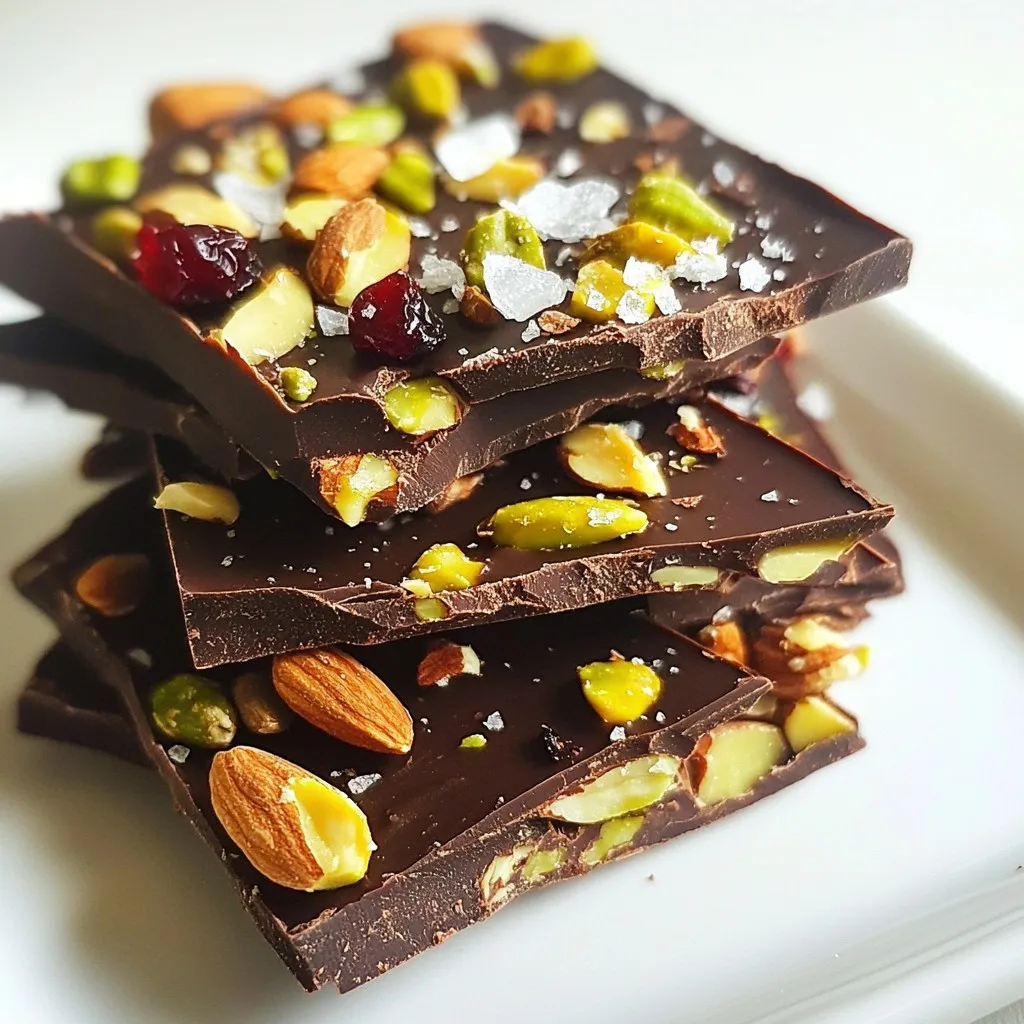
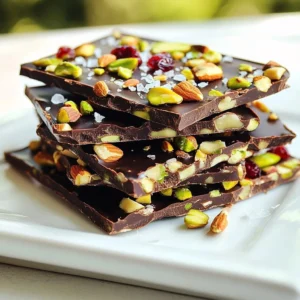
Dark Chocolate Sea Salt Bark Irresistible Treat
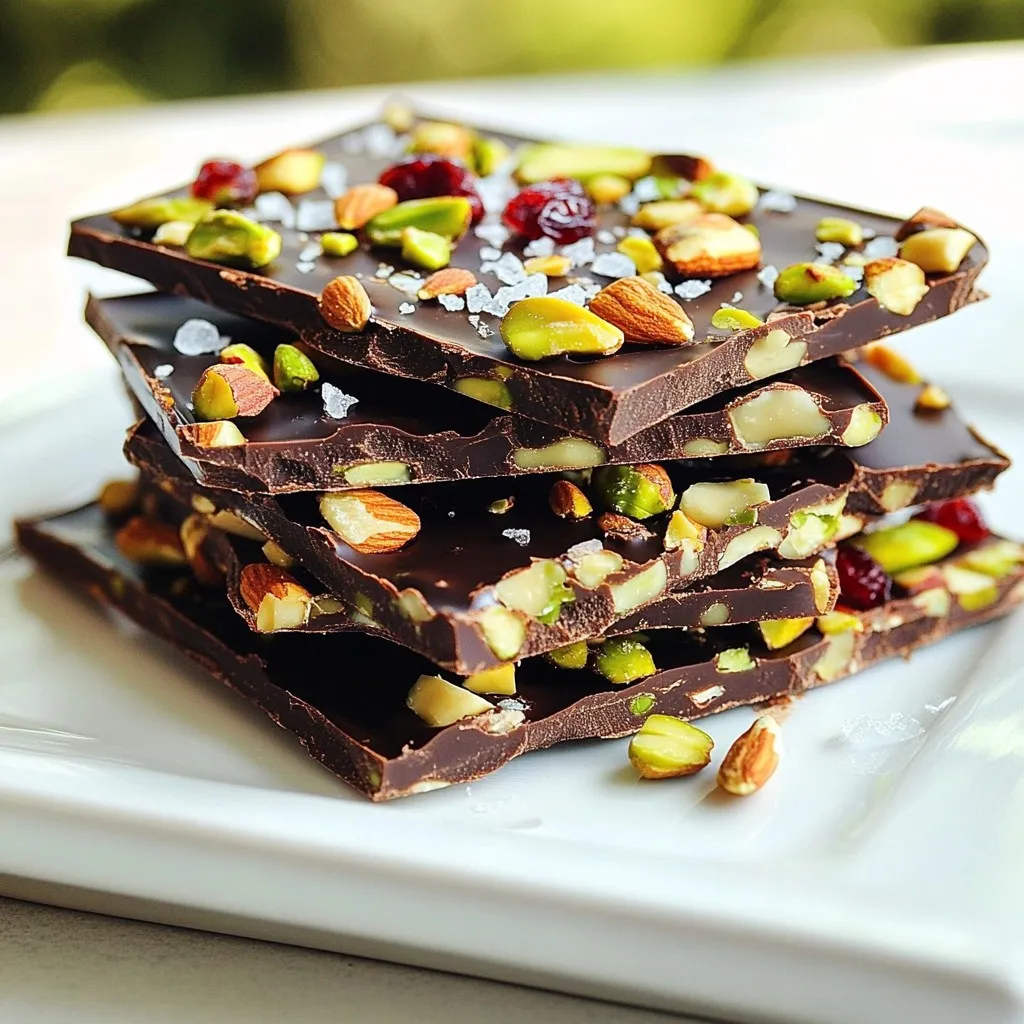
If you love sweet and salty treats, you’re in for a delight! Dark Chocolate Sea Salt Bark is simple to make and tastes amazing. You’ll enjoy rich dark chocolate mixed with crunchy nuts and tart dried fruits. This easy recipe will impress your friends and satisfy your cravings. Ready to whip up this irresistible snack? Let’s dive into the ingredients and get started!
Why I Love This Recipe
- Decadent Flavor: The rich dark chocolate combined with the crunch of mixed nuts creates a luxurious treat that’s hard to resist.
- Perfect Balance: The addition of flaky sea salt enhances the sweetness of the chocolate, making every bite a delightful experience.
- Customizable: You can easily swap out the nuts and dried fruits to suit your taste or dietary needs, making it versatile for everyone.
- Simple to Make: With minimal ingredients and straightforward steps, this recipe is perfect for both novice and experienced bakers.
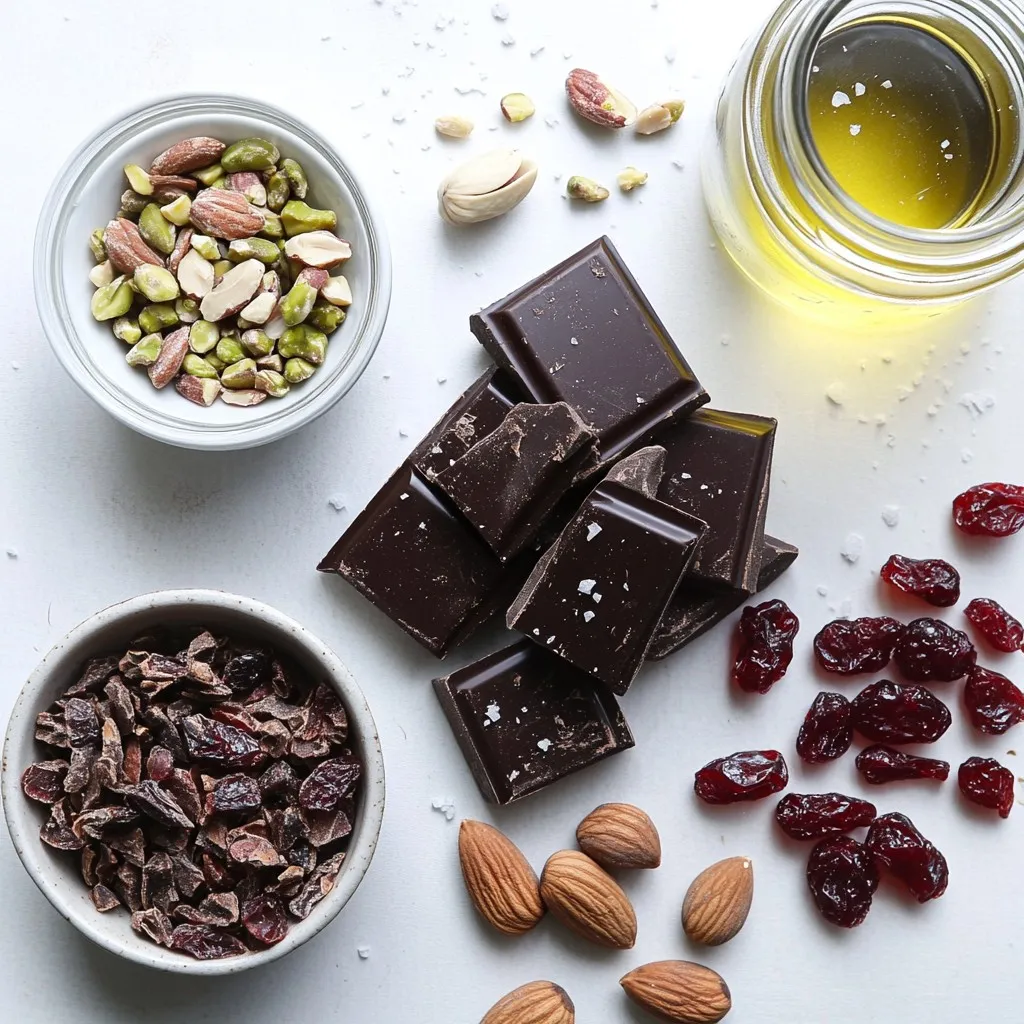
Ingredients
List of Required Ingredients
- 8 oz dark chocolate (70% cocoa or higher), chopped
- 1/2 cup mixed nuts (such as almonds, pistachios, and walnuts), roughly chopped
- 1/4 cup dried cranberries or cherries, chopped
- 1 tablespoon coconut oil (optional, for a glossier finish)
- Flaky sea salt, for sprinkling
Gathering the right ingredients is key to making the best dark chocolate sea salt bark. You want high-quality dark chocolate, so choose a bar that has 70% cocoa or higher. This gives your bark a rich flavor. Chop it into small pieces to help it melt evenly.
Next, I like to use a mix of nuts. You can use almonds, pistachios, or walnuts. They add texture and crunch. Be sure to chop them into small bits, so they blend well with the chocolate.
Dried fruits like cranberries or cherries add a nice touch of sweetness. Chop them up too, so they mix evenly with the chocolate.
If you want a shiny finish on your bark, consider adding coconut oil. It’s optional, but it makes the chocolate look great.
Finally, don’t forget flaky sea salt. It balances the sweetness of the chocolate. A sprinkle on top gives your bark that sweet and salty kick we all love.
With these ingredients ready, you’re set to create a delicious treat!
Step-by-Step Instructions
Preparing the Baking Sheet
First, grab a baking sheet. You will need to line it with parchment paper. Make sure to leave some paper hanging over the edges. This makes it easy to lift the bark later.
Melting the Dark Chocolate
Next, get a heatproof bowl. Place the chopped dark chocolate in the bowl. If you want a shinier look, add the coconut oil. Now, set the bowl over a pot of simmering water. This is called a double boiler. Stir the chocolate until it melts and is smooth. You can also use a microwave. Heat for 30 seconds at a time. Stir between each interval.
Mixing in Nuts and Dried Fruits
When the chocolate is melted, take it off the heat. Add the chopped nuts and dried cranberries. Stir well to mix everything evenly. This helps you get a nice blend of flavors in every bite.
Spreading and Salting the Bark
Now, pour the chocolate mixture onto the lined baking sheet. Use a spatula to spread it out evenly. Aim for your desired thickness. While the chocolate is still warm, sprinkle a good amount of flaky sea salt on top. This adds a nice salty crunch to your sweet treat.
Chilling and Breaking into Pieces
Put the baking sheet in the fridge for about 30 to 45 minutes. You want the chocolate to set completely. Once it’s firm, grab the edges of the parchment paper. Lift the bark out of the pan. Break it into irregular pieces for a fun look. Enjoy your dark chocolate sea salt bark!
Tips & Tricks
How to Achieve a Glossy Finish
To get a shiny look, use high-quality dark chocolate. I suggest chocolate with 70% cocoa or more. Adding a tablespoon of coconut oil helps too. Melt the chocolate gently, either in a double boiler or microwave. Stir until smooth. The key here is to avoid overheating, as it can dull the shine.
Best Chocolate for Bark
The best chocolate for bark is dark chocolate. Look for chocolate with a cocoa percentage of 70% or higher. This chocolate gives a rich flavor and a nice snap. Brands like Ghirardelli or Callebaut work great. Always check the label for quality to ensure a delicious bark.
Ensuring Even Distribution of Mix-ins
Mix-ins like nuts and dried fruit add texture and flavor. To ensure even distribution, chop them into small pieces. After melting the chocolate, stir in the mix-ins right away. This keeps them from sinking to the bottom. Spread the mixture quickly on the baking sheet to keep it even.
Pro Tips
- Use Quality Chocolate: The flavor of your bark heavily relies on the chocolate you choose. Opt for high-quality dark chocolate with at least 70% cocoa for the best taste and texture.
- Mix-In Variations: Feel free to experiment with different nuts, seeds, or dried fruits to customize your bark. Consider adding toasted coconut or a sprinkle of espresso powder for added depth.
- Chill for Perfect Texture: Make sure to chill the bark until completely set. This ensures a nice snap when you break it into pieces, giving you that perfect chocolate bark texture.
- Storing Tips: Store your chocolate bark in an airtight container at room temperature away from direct sunlight. If you live in a warm climate, consider refrigerating to prevent melting.
Variations
Adding Different Nuts and Seeds
You can change the nuts in your bark to fit your taste. Try cashews for creamy bites or pecans for a rich flavor. Seeds like sunflower or pumpkin can add crunch. Mix and match to create your own blend. Each nut and seed adds its own twist to the bark.
Using Other Dried Fruits
Dried fruits can give your bark a fruity kick. Use apricots for a tangy taste or mango for sweetness. Raisins and figs also work well. You can chop them up and mix them into the melted chocolate. This way, each piece of bark has a burst of flavor.
Flavoring Options
Adding flavor can make your bark special. A drop of vanilla extract can enhance the chocolate. For a zesty twist, try orange zest. Just a little brings a fresh taste that balances the sweet and salty. Experiment with different flavors to find your favorite combination.
Storage Info
Best Practices for Storing Sea Salt Bark
To keep your dark chocolate sea salt bark fresh, use an airtight container. Choose a cool, dry place away from sunlight. Avoid areas with high heat, as this can cause the chocolate to bloom. If you live in a hot climate, consider refrigerating the bark. Just remember to let it sit at room temperature before eating. This helps restore its smooth texture.
Shelf Life of Dark Chocolate Sea Salt Bark
Dark chocolate sea salt bark lasts up to two weeks when stored properly. If you keep it in a cool, dry place, it stays fresh longer. If you notice any off smells or changes in texture, it’s best to toss it out. Always trust your senses. If it looks or smells unusual, it’s not worth the risk.
How to Keep Bark Fresh
To keep your bark fresh, avoid exposing it to air. Always seal it tightly in a container. You can also separate layers with parchment paper. This prevents them from sticking together. If you want to keep it longer, you can freeze it. Just wrap it well in plastic wrap and then place it in a freezer-safe bag. When you’re ready to enjoy it, let it thaw in the fridge. This keeps the texture nice and smooth.
FAQs
Can I make Dark Chocolate Sea Salt Bark without nuts?
Yes, you can make this bark without nuts. Just skip the nuts and add more dried fruit or seeds. This change still gives you a tasty treat. You can use pumpkin seeds or sunflower seeds for crunch.
What is the health benefit of dark chocolate?
Dark chocolate has many health benefits. It is rich in antioxidants, which help fight free radicals. It can also improve heart health by lowering blood pressure. Eating dark chocolate may boost mood too. Just remember to enjoy it in moderation!
How do I melt chocolate without a double boiler?
You can melt chocolate in the microwave. Place chopped chocolate in a bowl. Heat it in 30-second bursts. Stir between each burst until smooth. This method works well and is quick. Just be careful not to overheat it!
Can I use milk chocolate instead of dark chocolate?
Yes, you can use milk chocolate, but the flavor will change. Milk chocolate is sweeter and creamier. If you enjoy it, go ahead! Just remember to adjust the sea salt to balance the sweetness.
How do I know when the chocolate bark is set?
You will know the bark is set when it feels firm to touch. It should not be sticky or soft. Chill it in the fridge for about 30-45 minutes. Once it is hard, you can break it into pieces.
You learned how to make dark chocolate sea salt bark using simple steps. We covered ingredients, instructions, and tips to ensure success. I shared variations to suit your taste and storage tips to keep it fresh. Remember, you can customize this treat easily. Enjoy crafting your own unique bark! Experiment with flavors and enjoy the proces
Decadent Dark Chocolate Sea Salt Bark
Ingredients
- 8 oz dark chocolate (70% cocoa or higher), chopped
- 0.5 cup mixed nuts (such as almonds, pistachios, and walnuts), roughly chopped
- 0.25 cup dried cranberries or cherries, chopped
- 1 tablespoon coconut oil (optional, for a glossier finish)
- to taste flaky sea salt, for sprinkling
Instructions
- Prepare the Baking Sheet: Line a baking sheet with parchment paper, allowing some overhang for easy removal later.
- Melt the Chocolate: In a heatproof bowl, combine the chopped dark chocolate and coconut oil (if using). Place the bowl over a pot of simmering water (double boiler method) and melt, stirring until smooth. Alternatively, use a microwave in 30-second intervals, stirring between each until melted and fully combined.
- Add Mix-ins: Once melted, remove the chocolate from heat and stir in the chopped nuts and dried cranberries until evenly distributed.
- Spread on the Sheet: Pour the chocolate-nut mixture onto the prepared baking sheet. Using a spatula, spread it into an even layer, smoothing the top to your desired thickness.
- Sprinkle with Sea Salt: While the chocolate is still warm, sprinkle a generous amount of flaky sea salt on top for that perfect balance of sweet and salty.
- Chill: Place the baking sheet in the refrigerator for about 30-45 minutes, or until the chocolate is completely set and firm.
- Break into Pieces: Once set, remove the bark from the baking sheet using the parchment paper overhang. Break it into irregular pieces for a rustic look.
- Store: Transfer the pieces to an airtight container. This bark can be stored in a cool, dry place for up to two weeks.


![To make a tasty Mint Chocolate Chip Cheesecake, you need these main items: - 16 oz cream cheese, softened - 1 cup granulated sugar - 2 large eggs - 1 teaspoon peppermint extract These ingredients create a rich and creamy filling. The cream cheese gives the cheesecake its smooth texture. Sugar adds sweetness, while eggs help it set. Peppermint extract brings that fresh mint taste. The crust is simple and delicious. For it, gather: - 1 ½ cups chocolate sandwich cookie crumbs - ½ cup unsalted butter, melted Combining these makes a crunchy base. The chocolate crumbs add flavor, and the melted butter helps bind them together. You can add a few fun touches if you want: - Green food coloring (optional, for a minty hue) - Whipped cream (for topping) The green food coloring makes your cheesecake look extra festive. Whipped cream adds a nice finish on top, making it even more appealing. You can use the full recipe to guide you in making this delightful dessert. Start by preheating your oven to 325°F (160°C). In a medium bowl, combine 1 ½ cups of chocolate sandwich cookie crumbs with ½ cup of melted unsalted butter. Mix until the crumbs are coated well. Press this mixture evenly into the bottom of a 9-inch springform pan. Bake the crust for 10 minutes. Once done, take it out and let it cool. In a large mixing bowl, beat 16 ounces of softened cream cheese with a hand mixer until smooth. Gradually add 1 cup of granulated sugar, mixing until combined. Next, add 1 teaspoon of vanilla extract and 1 teaspoon of peppermint extract. If you want a fun minty color, add a few drops of green food coloring. Mix for another minute. Now, add 2 large eggs one at a time. Mix just until combined after each egg. Be careful not to overmix. Then, add 1 cup of sour cream and mix until smooth. Gently fold in 1 cup of mini chocolate chips. Pour the cheesecake mixture over the cool crust. Smooth the top with a spatula. Bake it in your preheated oven for 45-50 minutes. Look for the edges to be set, while the center has a slight jiggle. After baking, turn off the oven and crack the door. Let the cheesecake cool gradually for about an hour. Once it cools, cover it with plastic wrap. Refrigerate for at least 4 hours, or overnight for the best flavor and texture. Before serving, top with whipped cream and sprinkle more mini chocolate chips on top. Enjoy your Mint Chocolate Chip Cheesecake! For the complete recipe, check out the [Full Recipe]. To get a smooth texture, start with room temperature ingredients. Cold cream cheese can clump up. Mix the cream cheese slowly. Avoid overmixing. If you mix too fast, air bubbles can form. Those bubbles can crack your cheesecake. When baking, look for a slight jiggle in the center. This means it's not overcooked. Use an oven thermometer to check the heat. Ovens can be off by a few degrees. If you bake at the wrong temp, your cheesecake may not set right. Serve your cheesecake with a swirl of whipped cream. Sprinkle extra mini chocolate chips on top. This makes your cake look fancy and delicious. You can also add fresh mint leaves for a pop of color. Enjoy every creamy bite! For the full recipe, revisit the ingredients and instructions above. {{image_2}} You can make your mint chocolate chip cheesecake even better by adding extra flavors. A drop of vanilla or almond extract can change the taste. Vanilla adds warmth and depth, while almond gives a nice nutty touch. Use about half a teaspoon to start. Taste as you go to find your perfect mix. If you want a different crust, try using graham cracker crumbs instead of chocolate cookies. This gives a nice contrast to the minty filling. For gluten-free options, use gluten-free cookie crumbs. Just make sure the crumbs are finely crushed, so they hold together well. You can even use nuts for a crunchy and fun twist. Serving your cheesecake can be as fun as making it! Instead of cutting it into slices, try serving it in individual cups. This makes for a cute and easy dessert for parties. You can also use decorative plates. Add a sprig of mint or a drizzle of chocolate sauce on top for a fancy touch. These small details can impress your guests and make your dessert stand out. For the full recipe, check the link above. To keep your Mint Chocolate Chip Cheesecake fresh, cover it tightly. Use plastic wrap or foil. This keeps moisture in and prevents odors from other foods. Store it in the fridge for up to five days. The cheesecake tastes best after it chills overnight. This time lets the flavors blend well. You can freeze slices of cheesecake for later. Wrap each slice in plastic wrap. Then, place the wrapped slices in a freezer bag. Press out as much air as you can. This helps avoid freezer burn. To enjoy, thaw the slices in the fridge overnight. This keeps the texture smooth and creamy. In the fridge, your cheesecake lasts about five days. In the freezer, it can last up to three months. After this time, the taste and texture may change. Enjoy your Mint Chocolate Chip Cheesecake while it’s fresh for the best flavor. Making Mint Chocolate Chip Cheesecake takes about 5 hours in total. This includes: - Prep time: 30 minutes to gather and mix ingredients. - Bake time: 45-50 minutes in the oven. - Cooling time: 1 hour in the oven after baking. - Chilling time: At least 4 hours in the fridge for the best flavor. This breakdown helps you plan your day for this creamy delight. Yes, you can make this cheesecake in advance! In fact, it tastes better after chilling overnight. Here are some benefits of making it ahead: - Flavor develops: Chilling allows the mint and chocolate flavors to blend. - Convenience: You can serve it fresh without last-minute stress. - Storage: Wrap it well in plastic wrap to keep it fresh in the fridge. You can make this cheesecake up to 2 days ahead of when you plan to serve it. If you need a cream cheese substitute, you have options! Here are some alternatives: - Greek yogurt: Use plain Greek yogurt for a tangy flavor and creamy texture. - Ricotta cheese: This gives a lighter texture but still creamy. - Tofu: Silken tofu can work for a dairy-free option. Blend until smooth. Each option changes the taste a bit, but they all work in this recipe. This blog post covered how to make a delicious Mint Chocolate Chip Cheesecake. We explored the ingredients needed, including cream cheese and chocolate cookies. You learned the step-by-step method, from prepping the crust to baking and cooling. We shared tips for a smooth texture and perfect bake. Consider trying different flavors or crusts for variety. Lastly, we discussed how to store your cheesecake for freshness. Enjoy your homemade treat, and impress friends with your baking skills!](https://dailydishlab.com/wp-content/uploads/2025/07/65fe9dc3-6e9f-4190-956f-c2db90901af1-768x768.webp)