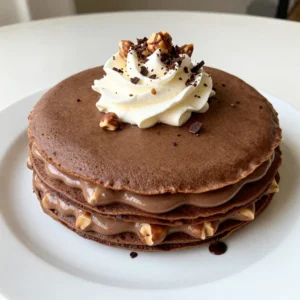
Chocolate Hazelnut Crepe Cake Indulgent Delight Recipe

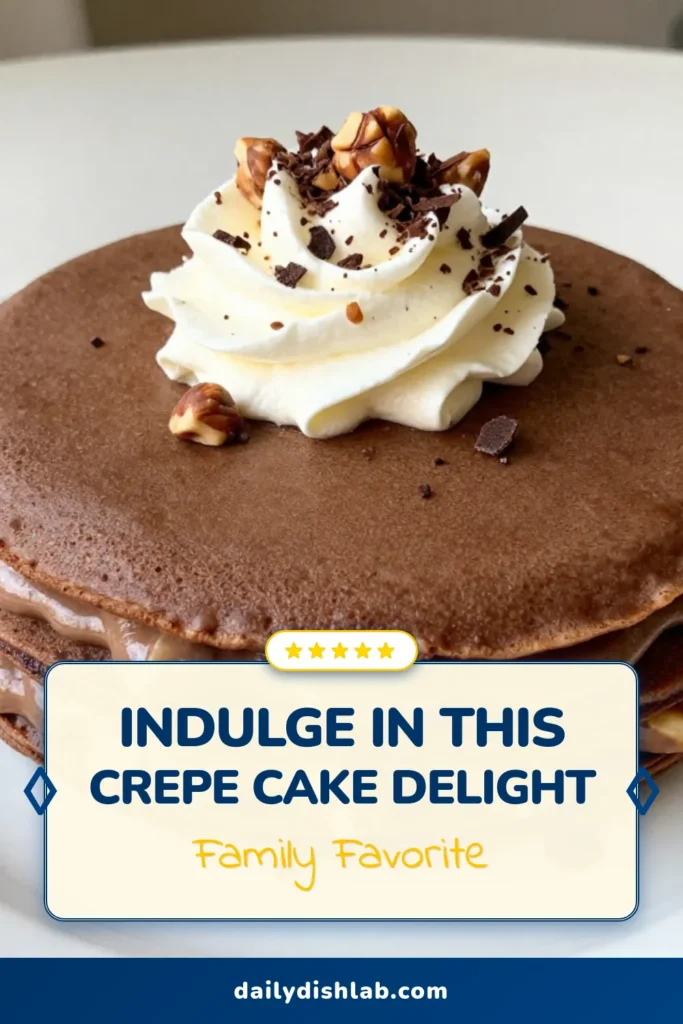
Indulge your taste buds with a Chocolate Hazelnut Crepe Cake that’s simply irresistible! This layered delight is not just a dessert; it’s an experience you’ll want to share. With rich chocolate, creamy hazelnut filling, and a light crepe texture, every bite is pure joy. I’ll walk you through each step, from mixing the batter to chilling the cake. Get ready to impress everyone at your next gathering with this elegant treat!
Why I Love This Recipe
- Decadent Flavor Combination: The rich chocolate and nutty hazelnut flavors create a delightful harmony that is simply irresistible.
- Stunning Presentation: This crepe cake is not only delicious but also looks impressive, making it perfect for special occasions.
- Layered Delight: Each slice reveals beautiful layers of crepes, hazelnut spread, and whipped cream, making every bite a treat.
- Make Ahead Option: This cake can be prepared in advance, allowing the flavors to meld and saving you time on the day of your event.
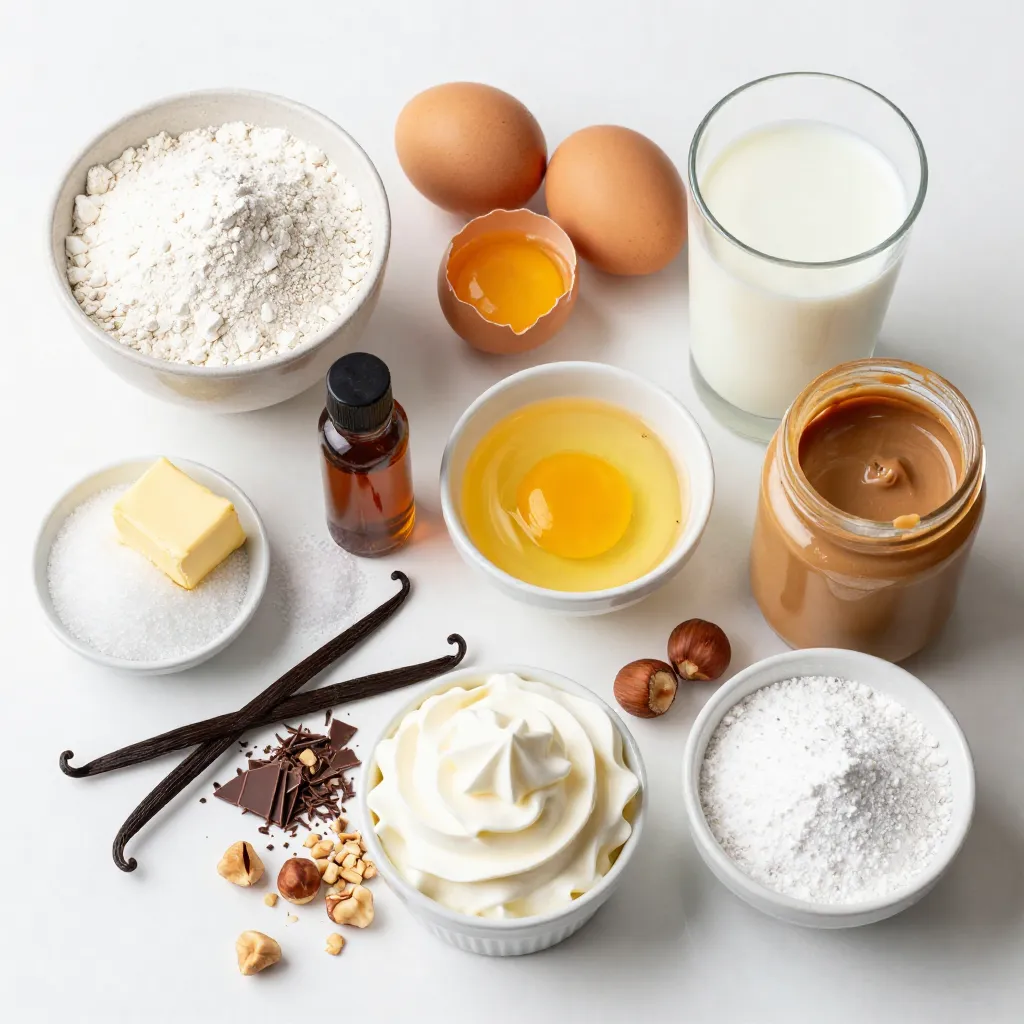
Ingredients
To make a delicious Chocolate Hazelnut Crepe Cake, you will need the following ingredients:
- 1 cup all-purpose flour
- 3 large eggs
- 2 cups milk
- 2 tablespoons melted butter
- 1 tablespoon sugar
- 1 teaspoon vanilla extract
- 1/2 teaspoon salt
- 1 cup hazelnut spread (like Nutella)
- 1 cup heavy whipping cream
- 3 tablespoons powdered sugar
- 1 teaspoon vanilla extract (for whipped cream)
- Chopped hazelnuts for garnish
- Dark chocolate shavings for decoration
These ingredients work together to create a rich and creamy dessert. The all-purpose flour serves as the base for the crepes. Eggs add structure and richness. Milk creates a smooth batter, while melted butter adds flavor and moisture. Sugar and vanilla give sweetness and aroma.
Hazelnut spread is the star filling, bringing a nutty sweetness. Heavy whipping cream, mixed with powdered sugar, transforms into a light and airy whipped topping. Finally, the chopped hazelnuts and dark chocolate shavings add a crunchy texture and visual appeal. Each layer brings a unique taste that makes this cake truly special.

Step-by-Step Instructions
Making the Crepe Batter
To start, gather your ingredients. You need flour, eggs, milk, melted butter, sugar, vanilla extract, and salt. In a bowl, whisk these items together until smooth. Make sure there are no lumps. This is key for great crepes. After mixing, let the batter rest for 30 minutes. This resting time helps make your crepes tender and easy to flip.
Cooking the Crepes
Next, it’s time to cook. Heat a non-stick skillet over medium heat. Lightly grease it with butter or oil. Pour about 1/4 cup of batter into the skillet. Quickly swirl it to coat the bottom. Cook the crepe for 1-2 minutes. When the edges lift slightly, it’s time to flip. Cook for another minute on the other side. Repeat this process. You want about 12-15 crepes for the cake.
Preparing the Whipped Cream
For the whipped cream, you need heavy whipping cream, powdered sugar, and more vanilla extract. In a mixing bowl, combine these ingredients. Use a mixer to whip until you see stiff peaks form. This will give your cake a light and fluffy texture. Set the whipped cream aside for later.
Assembling the Cake
Now, it’s time to build the cake. Start with one crepe on a serving plate. Spread a layer of hazelnut spread over it. Then, add a layer of whipped cream. Repeat this layering process. Keep adding crepes, hazelnut spread, and whipped cream until you use all the crepes. Finish with a layer of whipped cream on top. This will create a beautiful tower of flavors.
Chilling the Cake
Cover the assembled cake with plastic wrap. Refrigerate it for at least 4 hours, or overnight if you can. Chilling is important because it helps the layers set and makes cutting easier. The cake will taste even better after it chills. Enjoy your delicious creation!
Tips & Tricks
Perfecting Crepe Texture
To make your batter smooth, mix the flour with eggs in a bowl. Then, slowly add milk while whisking. This helps prevent lumps. Let the batter rest for at least 30 minutes. This step makes the crepes tender and easy to cook.
To avoid tearing, use a non-stick skillet. Heat it over medium heat and grease it lightly. Pour enough batter to cover the bottom. Cook until the edges lift, then flip gently. If a crepe tears, try a thinner layer of batter next time.
Enhancing Whipped Cream
If you want alternatives to heavy cream, try coconut cream or whipped topping. Both can give you a light texture. You can also use Greek yogurt for a different flavor and texture.
For flavor variations, mix in cocoa powder for chocolate whipped cream. Adding a splash of coffee or almond extract can also change the taste. Just remember to keep it balanced.
Presentation Suggestions
To serve, use a decorative cake stand. This adds height and beauty. You can drizzle melted chocolate around the base for extra flair.
For garnishing, sprinkle chopped hazelnuts and dark chocolate shavings on top. This makes the cake look fancy and appealing. You can also add fresh berries for color and freshness.
Pro Tips
- Rest the Batter: Letting the crepe batter rest for at least 30 minutes helps to relax the gluten, resulting in more tender and delicate crepes.
- Use a Non-Stick Skillet: A good quality non-stick skillet ensures that your crepes cook evenly and release easily, preventing any tearing.
- Layering Technique: For a beautiful finish, make sure each layer of hazelnut spread and whipped cream is spread evenly and thinly to avoid a heavy cake.
- Chill Before Serving: Allowing the cake to chill for several hours or overnight helps the layers set, making it easier to slice and enhancing the flavors.
Variations
Flavor Variations
You can make this cake even more fun by adding different extracts. Try using almond or orange extract in the crepe batter. This will bring a new twist to the flavors. You can also mix in fruit layers. Adding fresh strawberries or bananas between the crepes adds a burst of flavor and color. These fruits pair nicely with hazelnut spread, making each bite exciting.
Dietary Modifications
If you need gluten-free options, swap all-purpose flour with gluten-free flour. Look for blends that work well for baking. They will give you a similar texture. For dairy-free choices, use coconut milk instead of regular milk. Replace heavy whipping cream with coconut cream for a rich and creamy layer. These swaps keep the cake delicious while meeting dietary needs.
Alternative Fillings
You can switch the hazelnut spread for chocolate ganache. Just melt chocolate with cream and let it cool before spreading. This gives a rich flavor that is hard to resist. You can also experiment with fruit preserves, like raspberry or apricot. Spread them between the crepes for a sweet and tangy surprise. Each of these filling options will create a unique cake.
Storage Info
Storing the Cake
To keep your Chocolate Hazelnut Crepe Cake fresh, proper storage is key. First, cover the cake tightly with plastic wrap or place it in an airtight container. This helps prevent the cake from drying out. Refrigerating it is the best method. The cool air will keep the flavors intact.
If you want to save it for later, freezing is an option. Wrap the whole cake in plastic wrap, then place it in a freezer bag. This will help keep it fresh for up to two months. When you’re ready to enjoy it, thaw it in the fridge overnight.
Shelf Life
In the fridge, your cake will last for about five days. Make sure to check it often. If you notice any changes in smell or texture, it may be time to toss it. Signs of spoilage include a sour smell or a change in color. If it looks dry or has spots, it’s best to throw it away. Enjoy your cake while it’s fresh for the best taste!
FAQs
How do you make the crepe batter less lumpy?
To make the batter smooth, whisk the flour and eggs first. Then, slowly add the milk while whisking. This helps blend the ingredients better. Let the batter rest for 30 minutes after mixing. This rest time helps the flour absorb moisture, reducing lumps.
Can I prepare the cake a day in advance?
Yes, you can! Make the cake a day before serving. Just follow the recipe and chill it overnight. This allows the flavors to blend well. It also makes the cake easier to slice.
What can I use instead of hazelnut spread?
If you don’t have hazelnut spread, try using chocolate spread. You can also use peanut butter or almond butter. For a healthier option, consider using fruit preserves or a layer of chocolate ganache.
How to prevent the whipped cream from deflating?
To keep the whipped cream stable, use cold heavy cream. Whip it until stiff peaks form. Adding a bit of powdered sugar also helps. For extra stability, mix in a little cream cheese or gelatin.
Can I use a different type of flour for the crepes?
Yes, you can! Use whole wheat flour for a nuttier taste. Gluten-free flour works too, but the texture may change. Experiment with different flours and find the one you like best.
You now have the tools to create a delicious crepe cake. With simple ingredients and clear steps, making this treat is easy. Remember to enjoy the process, from whisking the batter to layering the cake. Feel free to experiment with flavors and fillings that suit your taste. Store it well to keep it fresh longer. Use the tips shared to perfect your crepes and whipped cream. Dive in and create something special that everyone will lov
Chocolate Hazelnut Crepe Cake
Ingredients
- 1 cup all-purpose flour
- 3 large eggs
- 2 cups milk
- 2 tablespoons melted butter
- 1 tablespoon sugar
- 1 teaspoon vanilla extract
- 1/2 teaspoon salt
- 1 cup hazelnut spread (such as Nutella)
- 1 cup heavy whipping cream
- 3 tablespoons powdered sugar
- 1 teaspoon vanilla extract (for whipped cream)
- to taste chopped hazelnuts for garnish
- to taste dark chocolate shavings for decoration
Instructions
- Make the Crepe Batter: In a bowl, whisk together the flour, eggs, milk, melted butter, sugar, vanilla extract, and salt until smooth. Let the batter rest for 30 minutes to ensure the crepes are tender.
- Cook the Crepes: Heat a non-stick skillet over medium heat and lightly grease it with a little butter or oil. Pour about 1/4 cup of batter into the skillet and swirl it to coat the bottom evenly. Cook for 1-2 minutes until the edges lift slightly, then flip and cook for another minute. Transfer to a plate and repeat with the remaining batter. You should have about 12-15 crepes.
- Prepare the Whipped Cream: In a mixing bowl, combine the heavy whipping cream, powdered sugar, and vanilla extract. Whip until you achieve stiff peaks. Set aside.
- Assemble the Cake: Place one crepe on a serving plate. Spread a layer of hazelnut spread over it, followed by a layer of whipped cream. Repeat this process, layering crepes, hazelnut spread, and whipped cream until you’ve used all the crepes, finishing with a layer of whipped cream on top.
- Chill the Cake: Cover the assembled cake with plastic wrap and refrigerate for at least 4 hours or overnight to set properly.
- Garnish and Serve: Before serving, sprinkle chopped hazelnuts and dark chocolate shavings on top for an elegant finish. Slice into wedges and serve chilled.
Notes
Chocolate Hazelnut Crepe Cake
Ingredients
- 2 cups all-purpose flour
- 4 large eggs
- 2 cups milk
- 1 cup Nutella
- 1 cup heavy cream
- 1 cup chopped hazelnuts
- 1 tablespoon vanilla extract
- 1 pinch salt
Instructions
- In a bowl, whisk together flour, eggs, and milk until smooth.
- Heat a non-stick skillet over medium heat and pour in a small amount of batter, swirling to coat the bottom.
- Cook for 1-2 minutes until the edges lift, then flip and cook for another minute.
- Repeat until all batter is used, stacking crepes on a plate.
- In a separate bowl, whip the heavy cream until soft peaks form.
- Fold in Nutella and vanilla extract until well combined.
- To assemble, spread a layer of the Nutella cream between each crepe.
- Top with chopped hazelnuts and refrigerate for at least 2 hours before serving.
![To make the best ever blueberry pancakes, you'll need some simple and fresh ingredients. Each one plays an important role in making these pancakes fluffy and delicious. - Overview of fresh blueberries Fresh blueberries are the star of this dish. They add natural sweetness and a lovely burst of flavor. Look for plump, firm berries without any wrinkles. Rinse them gently before using. - Essential dry ingredients You will need: - 1 cup all-purpose flour - 2 tablespoons sugar - 2 teaspoons baking powder - 1/2 teaspoon baking soda - 1/4 teaspoon salt These ingredients help create the perfect pancake base. The baking powder and baking soda give the pancakes their light, airy texture. - Important wet ingredients The wet ingredients are just as crucial: - 1 cup buttermilk (you can use milk with vinegar as a substitute) - 1 large egg - 2 tablespoons melted butter (plus some for cooking) - Zest of 1 lemon - 1 teaspoon vanilla extract These help bind the mixture and add flavor. Buttermilk makes the pancakes tender and rich. You can find the full recipe at the end of this article. Enjoy making these delightful pancakes! 1. Mixing dry ingredients: Start by sifting together the flour, sugar, baking powder, baking soda, and salt in a large bowl. This step helps to break up any lumps and ensures the ingredients blend well. 2. Combining wet ingredients: In a separate bowl, whisk the buttermilk, egg, melted butter, lemon zest, and vanilla extract. Whisk until everything is smooth and well-mixed. The lemon zest adds a fresh taste. 3. Folding in blueberries: Pour the wet mix into the dry mix. Gently fold the two together. Remember, do not overmix! A few lumps are okay. Now, fold in the fresh blueberries. Save a few for garnishing later. 1. Heating the pan: Heat a non-stick skillet or griddle over medium heat. Add a little melted butter to coat the surface. This helps the pancakes cook evenly and prevents sticking. 2. Pouring the batter: Use a 1/4 cup measure to pour the batter onto the skillet. Space them out to give each pancake room to spread as they cook. 3. Checking for doneness: Cook the pancakes until bubbles form on the surface, about 2-3 minutes. Flip them and cook for another 1-2 minutes until golden brown. This ensures a fluffy inside and a nice crust outside. 1. Plating the pancakes: Stack the pancakes neatly on a plate. A tall stack looks impressive and inviting. 2. Topping ideas: Top with additional blueberries, a drizzle of maple syrup, or a dollop of whipped cream. These toppings add flavor and make the dish more fun. 3. Presentation tips: For a beautiful finish, sprinkle some lemon zest on top. It adds color and a lovely aroma. Enjoy your best ever blueberry pancakes! Check the [Full Recipe] for more details. When you pick blueberries, fresh is best. Fresh blueberries are plump and juicy. They burst with flavor in each bite. Frozen blueberries can work too, but they may be mushy. If you want the best taste, choose fresh. To find ripe blueberries, look for a deep blue color. Avoid any that are red or green. Check for firmness; soft berries may be overripe. Smell them too, as ripe blueberries have a sweet scent. Store your blueberries in the fridge. Keep them in their original container. This helps them stay fresh for longer. If you wash them, dry them well before storing. Mixing the batter is key for fluffy pancakes. Avoid overmixing. Stir just enough to combine the wet and dry ingredients. Some lumps are okay! Overmixing makes pancakes tough, not fluffy. For fluffier pancakes, use buttermilk. The acidity helps create air bubbles. You can also add baking powder for extra lift. After mixing, let the batter rest for about 5 minutes. This allows the ingredients to hydrate. Resting makes your pancakes rise better. Choose a non-stick skillet or griddle for cooking. These surfaces help prevent sticking. Make sure to heat it over medium heat. Too hot can burn your pancakes, while too low can make them soggy. Use a little melted butter on the pan to coat it. This adds flavor and helps with browning. Watch for common pitfalls. Don’t flip too soon; wait for bubbles to form. If you flip too early, your pancakes may be raw inside. Flip only once for the best texture. {{image_2}} To make your blueberry pancakes even better, try adding some spices. A pinch of cinnamon or nutmeg can warm up the flavor. You can also add lemon or orange zest for a bright, fresh taste. Using different extracts like almond or coconut can add a unique twist too. These small changes can change your pancake game completely. For those who need to avoid gluten, you can use gluten-free flour options. These flours work well and keep the pancakes fluffy. If you want to make your pancakes vegan, use substitutes like flax eggs and plant-based milk. You can also reduce sugar by using mashed bananas or applesauce. These swaps keep your pancakes tasty while meeting dietary needs. Pancakes are fun to serve in many ways. Stack them high with a colorful fruit compote on top. You can add nuts or even chocolate chips for extra flavor. If you want something different, try savory pancake variations. Adding cheese or herbs can turn your sweet pancakes into a hearty meal. Enjoy exploring all these tasty options! To keep your pancakes fresh, store them properly. Place leftover pancakes in an airtight container. If you plan to eat them soon, refrigerate them. - Refrigeration: Leftover pancakes last up to 3 days in the fridge. Make sure they are cool before sealing the container. This helps prevent sogginess. - Freezing Guidelines: For longer storage, freeze pancakes. Stack them with parchment paper in between each one. Use a freezer-safe bag or container. They can last up to 2 months in the freezer. When you’re ready to enjoy your pancakes again, reheating is simple. Here are the best methods: - Best Methods for Reheating: Use a microwave or a skillet. For the microwave, heat on medium power for 20-30 seconds. If using a skillet, warm them on low heat for a few minutes until hot. - Tips for Maintaining Texture: To keep pancakes fluffy, cover them with a damp paper towel in the microwave. This helps steam them. If using a skillet, add a little butter before reheating. Knowing how long your pancakes last ensures you enjoy them at their best. - Shelf Life in the Fridge: Pancakes keep well for up to 3 days in the fridge. After that, they may dry out or lose flavor. - Shelf Life in the Freezer: In the freezer, pancakes last up to 2 months. For best taste, eat them within the first month. To make blueberry pancakes from scratch, follow these steps: 1. Mix Dry Ingredients: Start by sifting together 1 cup of all-purpose flour, 2 tablespoons of sugar, 2 teaspoons of baking powder, 1/2 teaspoon of baking soda, and 1/4 teaspoon of salt in a large bowl. 2. Combine Wet Ingredients: In another bowl, whisk together 1 cup of buttermilk, 1 large egg, 2 tablespoons of melted butter, the zest of 1 lemon, and 1 teaspoon of vanilla extract until smooth. 3. Combine Mixtures: Pour the wet ingredients into the dry mixture. Gently fold until just mixed. A few lumps are fine, so don't overdo it. 4. Add Blueberries: Carefully fold in 1 cup of fresh blueberries. Save some for the top later. 5. Heat the Pan: Heat a non-stick skillet over medium heat. Add a bit of melted butter to coat it. 6. Cook Pancakes: Pour 1/4 cup of batter for each pancake. Cook until bubbles form, then flip and cook until golden. 7. Serve: Stack the pancakes, add more blueberries, and drizzle with maple syrup or honey. Yes, you can use frozen blueberries. Here are some tips: - Do not thaw the blueberries before using them. This helps keep them intact during cooking. - Add them directly to the batter. This way, they will stay cold and firm. - You might need to cook the pancakes a little longer to ensure they are done. Pancakes stick for a few reasons: - The pan may not be hot enough. Make sure your skillet is at medium heat. - You might not be using enough butter. Add more butter to the pan before cooking. - Using a non-stick pan is key. If your pan isn’t non-stick, consider switching. Here are some tasty ideas to serve with pancakes: - Maple syrup is a classic choice. - Fresh fruit like sliced bananas or strawberries adds color. - A dollop of whipped cream makes it extra special. - You can also try yogurt for a creamy texture. Yes, you can adapt this recipe for gluten-free pancakes. Use gluten-free flour blends that substitute for all-purpose flour. - Look for blends that include xanthan gum for better texture. - You can also use almond flour or coconut flour with some adjustments to liquid. To keep your pancakes light and fluffy, follow these tips: - Avoid overmixing the batter; mix until just combined. - Let the batter rest for a few minutes. This helps with texture. - Ensure you use fresh baking powder for the best rise. This blog post covered everything you need for perfect blueberry pancakes. We explored key ingredients, step-by-step instructions, and tips for the best texture. You learned how to enhance flavors and adapt the recipe for dietary needs. We also discussed storing and reheating leftover pancakes. With these insights, you can create fluffy, delicious pancakes that everyone will love. Enjoy making them again and again!](https://dailydishlab.com/wp-content/uploads/2025/06/88cf7048-30d4-446e-9952-44c38fb788a9-768x768.webp)