Grilled Halloumi Greek Salad Fresh and Tasty Meal
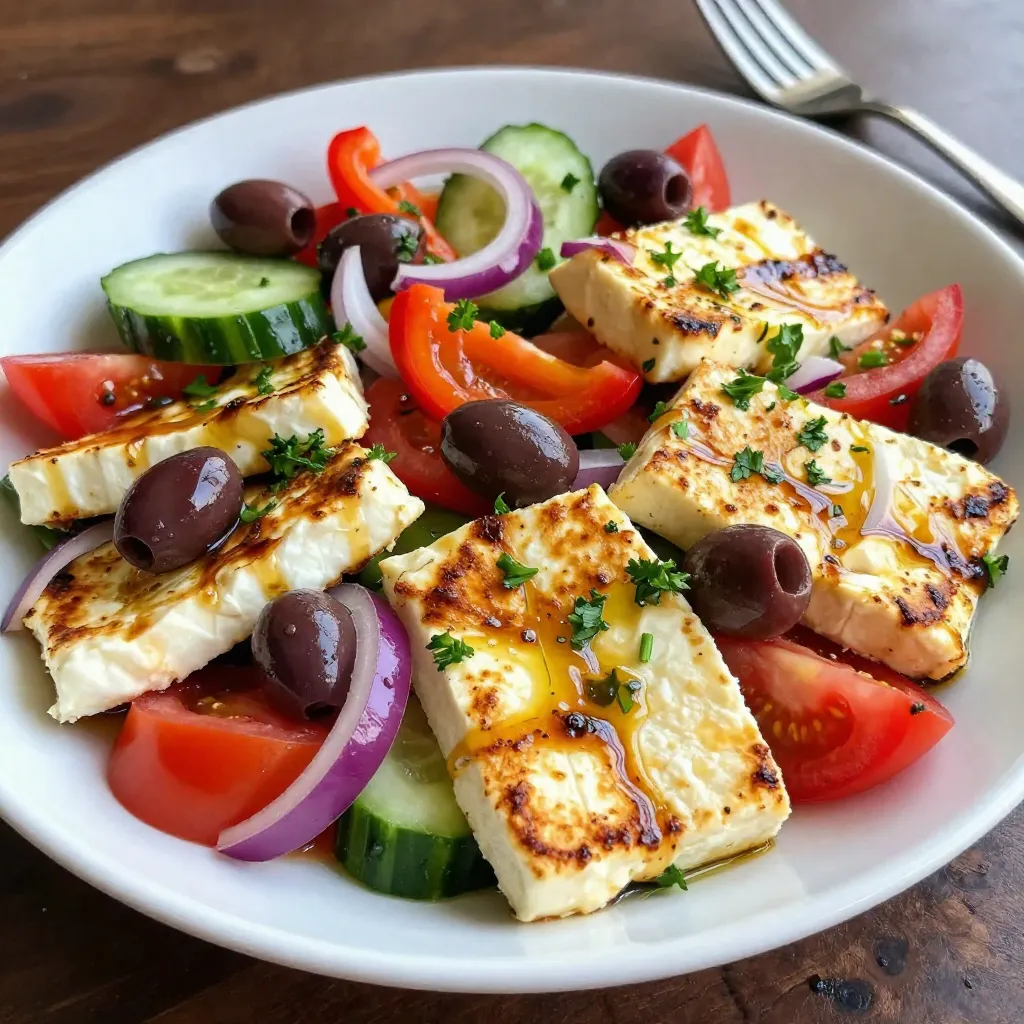

Are you ready to whip up a dish that’s both fresh and delicious? The Grilled Halloumi Greek Salad is a perfect choice! This colorful meal combines golden grilled halloumi with crisp veggies and a zesty dressing. It’s easy to make and great for any occasion. Join me as I guide you through every step, including tips to enhance flavor and interesting variations to try. Let’s dive in!
Why I Love This Recipe
- Flavorful Combination: The mix of grilled halloumi with fresh veggies creates a delightful medley of flavors that burst in your mouth.
- Quick and Easy: This salad can be prepared in just 20 minutes, making it a perfect option for busy weeknights or last-minute gatherings.
- Healthy Ingredients: Packed with fresh vegetables and protein-rich halloumi, this salad is both nutritious and satisfying.
- Versatile Dish: Whether as a main course or a side, this salad adapts well to any meal and is great for picnics or barbecues.
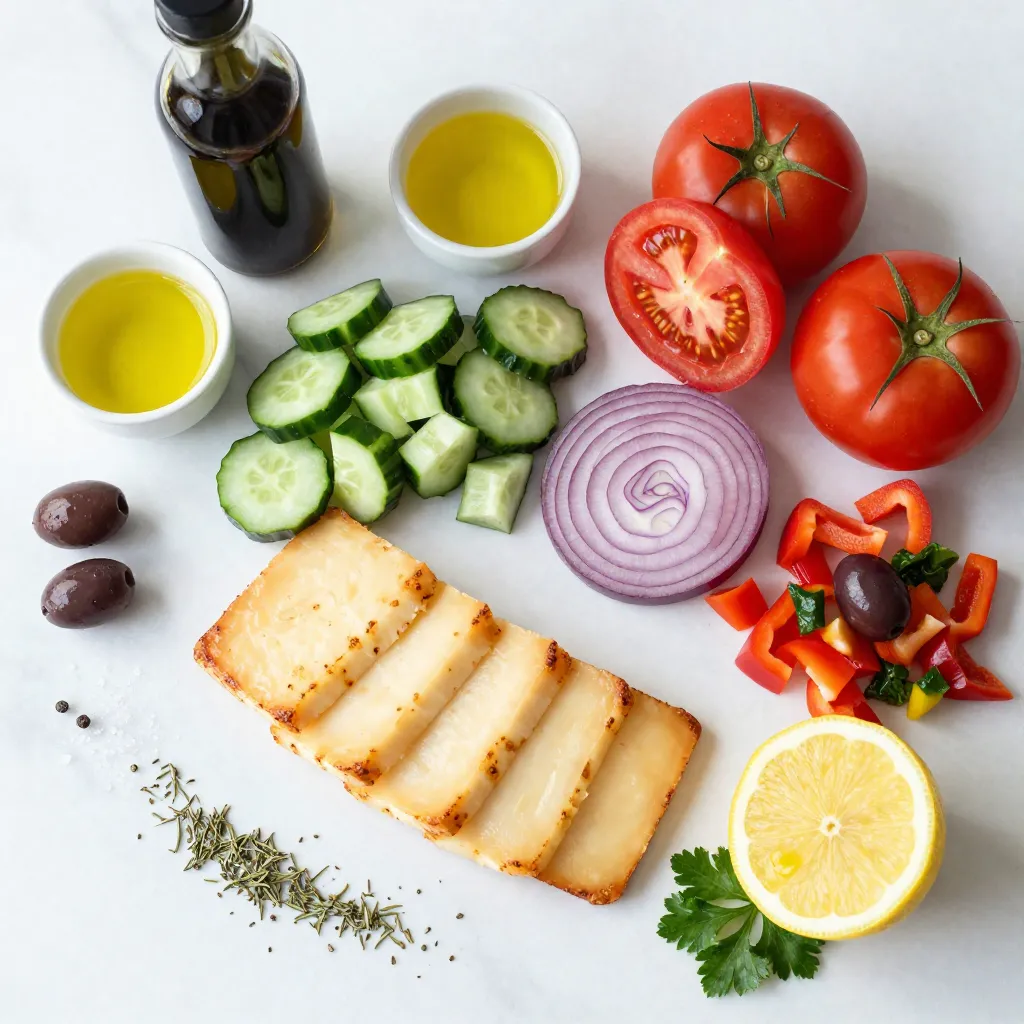
Ingredients
Main Ingredients
- 250g halloumi cheese, sliced thick
- 1 medium cucumber, diced
- 2 ripe tomatoes, diced
- 1 small red onion, thinly sliced
- 1 bell pepper (any color), diced
- 100g kalamata olives, pitted
- 2 tablespoons olive oil
- 1 tablespoon balsamic vinegar
- Juice of 1 lemon
- 1 teaspoon dried oregano
- Salt and pepper to taste
The main star of this dish is halloumi cheese. It has a unique texture and can be grilled to perfection. The fresh vegetables, like cucumber and tomatoes, add color and crunch. Each bite bursts with flavor. The olives bring a nice briny taste, which works well with the cheese.
The dressing is simple yet bold. Olive oil, lemon juice, and balsamic vinegar make it zesty. Dried oregano adds an earthy aroma. Salt and pepper enhance all the flavors. You will love how everything blends together!
Optional Garnishes
- Fresh parsley, chopped, for garnish
If you want to elevate your salad, add fresh herbs. Chopped parsley adds a bright touch. You can also experiment with other toppings. Consider nuts or seeds for crunch. Cheese lovers might sprinkle feta on top. These garnishes make your salad even more special!
Step-by-Step Instructions
Prepping the Halloumi
To grill halloumi, start by preheating your grill or grill pan over medium heat. This step is key to getting a nice char. While the grill heats, brush both sides of the halloumi slices with olive oil. This helps prevent sticking. Place the halloumi on the grill and cook it for 2-3 minutes on each side. You want it golden brown and slightly charred. Once done, remove the cheese and set it aside to cool.
Assembling the Salad
Next, grab a large salad bowl. Dice the cucumber and tomatoes, then thinly slice the red onion. Dice the bell pepper and add it all to the bowl. Toss in the kalamata olives for a briny kick. In a separate small bowl, whisk together olive oil, balsamic vinegar, lemon juice, dried oregano, salt, and pepper. This dressing brings all the flavors together.
Combining Everything
Now, it’s time to combine everything. Cut the grilled halloumi into bite-sized pieces. Add it to the salad with the veggies. Toss everything gently to avoid breaking the halloumi too much. This salad looks great on a large platter. Arrange the halloumi pieces nicely on top. For an extra touch, drizzle some olive oil over the salad and garnish with fresh parsley. Enjoy your tasty creation!
Tips & Tricks
Perfecting the Grilling
Grilling halloumi takes a bit of skill.
- Timing for the halloumi: Grill the halloumi for 2-3 minutes on each side. This time gives it a nice golden color. Check for slight charring before flipping.
- Achieving the best char: Use medium heat to prevent burning. A hot grill creates those beautiful grill marks. Brush olive oil on both sides of the cheese to keep it from sticking.
Dressing Enhancements
The dressing makes a big impact.
- Alternative dressings: You can switch the dressing for a lemon vinaigrette or a yogurt-based one. Both add a fresh twist.
- Seasoning adjustments: Feel free to adjust the salt and pepper to your taste. Adding a pinch of red pepper flakes can bring some heat. Mixing in fresh herbs like basil or mint will brighten the flavors even more.
Pro Tips
- Use Fresh Ingredients: For the best flavor, choose ripe, seasonal vegetables and high-quality halloumi cheese.
- Grill in Batches: If making for a crowd, grill halloumi in batches to ensure even cooking and prevent overcrowding the grill.
- Customize the Dressing: Feel free to add herbs like basil or mint to the dressing for an extra flavor boost.
- Serve Immediately: Grilled halloumi is best enjoyed fresh off the grill while it’s warm and slightly melty.
Variations
Ingredient Swaps
You can easily change ingredients in this salad. If you want a different taste, swap out the halloumi. Feta cheese works well. It gives a nice creamy texture.
You can also add other vegetables. Try adding avocado for creaminess. Radishes add a nice crunch. You can include arugula for a peppery flavor. The options are endless!
Dietary Modifications
If you follow a vegan diet, use grilled tofu instead of halloumi. Tofu absorbs flavors well and adds protein. You can also use chickpeas for a hearty option.
For low-carb diets, skip the tomatoes. Focus on cucumbers and bell peppers instead. You can also add more leafy greens. They keep it light and refreshing.
Storage Info
How to Store Leftovers
To keep your grilled halloumi Greek salad fresh, place it in an airtight container. Chill it in the fridge right away. This salad is best when eaten fresh, but you can store it for later. If you have extra halloumi, store it separately. This helps keep the cheese firm.
For reheating, avoid microwaving the salad. Instead, warm the grilled halloumi in a skillet. Use low heat to prevent it from becoming rubbery. You can also enjoy the salad cold straight from the fridge.
Shelf Life
The grilled halloumi Greek salad stays fresh for about 3 days in the fridge. After this time, the veggies may get mushy and lose flavor. Always check for off smells or changes in texture before eating leftovers. If it looks or smells wrong, it’s best to toss it out.
FAQs
What can I substitute for halloumi?
If you can’t find halloumi, try using these cheese alternatives:
- Feta cheese: Crumbled feta adds a salty taste.
- Paneer: This Indian cheese has a similar texture.
- Queso blanco: This cheese works well in salads.
Each of these will give your salad a unique twist.
Can I make this salad ahead of time?
Yes, you can prep parts of this salad ahead. Here are some tips for prepping in advance:
- Cut the veggies and store them in the fridge.
- Grill the halloumi a few hours before serving.
- Keep the dressing separate until you’re ready to eat.
This way, your salad stays fresh and tasty.
How do I keep the salad fresh?
To keep your salad fresh, follow these storage tips:
- Store leftovers in an airtight container.
- Keep the salad in the fridge for up to 2 days.
- If the salad has dressing, consume it sooner.
These steps help maintain the flavor and crunch.
This blog post discussed how to create a tasty halloumi salad. You learned about the main ingredients like halloumi cheese, fresh veggies, and dressings. I shared step-by-step instructions to grill halloumi and assemble your salad. You also found helpful tips on cooking, dressing options, and ingredient swaps.
In conclusion, this salad is easy to make, healthy, and full of flavor. Enjoy experimenting with the ingredients and make it your ow

Grilled Halloumi Greek Salad
Ingredients
- 250 g halloumi cheese, sliced thick
- 1 medium cucumber, diced
- 2 ripe tomatoes, diced
- 1 small red onion, thinly sliced
- 1 bell pepper any color, diced
- 100 g kalamata olives, pitted
- 2 tablespoons olive oil
- 1 tablespoon balsamic vinegar
- 1 juice of lemon
- 1 teaspoon dried oregano
- to taste salt and pepper
- for garnish fresh parsley, chopped
Instructions
- Preheat a grill pan or outdoor grill over medium heat.
- Brush the halloumi slices lightly with olive oil on both sides to prevent sticking.
- Grill the halloumi for about 2-3 minutes on each side, or until golden brown and slightly charred. Remove from the grill and set aside.
- In a large salad bowl, combine the cucumber, tomatoes, red onion, bell pepper, and kalamata olives.
- In a small bowl, whisk together olive oil, balsamic vinegar, lemon juice, dried oregano, salt, and pepper.
- Pour the dressing over the salad mixture and toss gently to combine.
- Cut the grilled halloumi into bite-sized pieces and add it to the salad.
- Toss everything together carefully to avoid breaking the halloumi too much.
- Garnish with chopped fresh parsley before serving.

![When making Pickle Ranch Chicken and Broccoli Casserole, you need some key ingredients. Here’s what you will need: - 2 cups cooked chicken, shredded - 3 cups broccoli florets, steamed - 1 cup pickles, chopped (dill works best) - 1 cup ranch dressing - 1 cup shredded cheddar cheese - 1/2 cup cream cheese, softened - 1 teaspoon garlic powder - 1 teaspoon onion powder - 1/2 teaspoon salt - 1/4 teaspoon black pepper - 1/4 cup breadcrumbs (optional, for topping) These ingredients create a tasty and rich flavor. The pickles add a fun twist that makes this dish special. You can add your own flair to this casserole. Here are some ideas: - Use rotisserie chicken for quick prep. - Swap broccoli for green beans or spinach. - Try ranch dip instead of ranch dressing for a thicker mix. - Change the cheese! Use mozzarella or pepper jack for more kick. These optional ingredients can help you customize the dish to your taste. Understanding the nutrition in your meal is key. Here’s a simple breakdown per serving: - Calories: About 320 - Protein: 24g - Carbohydrates: 10g - Fat: 20g - Fiber: 2g This casserole is not just tasty, but it also gives you good protein and flavor. Enjoy the Full Recipe to see how simple it is to make this dish. To start, gather all your ingredients. You will need: - 2 cups cooked chicken, shredded - 3 cups broccoli florets, steamed - 1 cup pickles, chopped - 1 cup ranch dressing - 1 cup shredded cheddar cheese - 1/2 cup cream cheese, softened - 1 teaspoon garlic powder - 1 teaspoon onion powder - 1/2 teaspoon salt - 1/4 teaspoon black pepper - 1/4 cup breadcrumbs (optional) Make sure the chicken is cooked and shredded. Steam the broccoli until it is bright green and tender. Chop the pickles into small pieces. This blend of flavors is what makes this casserole special. Now, let's mix everything together. In a large bowl, combine the shredded chicken, steamed broccoli, and chopped pickles. In another bowl, mix the ranch dressing, softened cream cheese, garlic powder, onion powder, salt, and black pepper. Blend them well until smooth. Pour this creamy mixture over the chicken, broccoli, and pickles. Stir gently to coat all the pieces evenly. Next, transfer everything to a greased 9x13 inch baking dish. Top with shredded cheddar cheese for a cheesy finish. If you like a crunchy topping, sprinkle breadcrumbs over the cheese. Preheat your oven to 350°F (175°C) and bake the casserole for 25-30 minutes. It’s ready when the cheese is bubbly and golden brown. Let it cool for a few minutes before serving. For a creamy and rich texture, use softened cream cheese. This helps it blend smoothly with the ranch dressing. Make sure to steam the broccoli just right. Overcooking can make it mushy. If you want a crispy topping, bake the casserole without covering it. This allows the cheese to brown nicely. You can also add more cheese for an extra gooey texture. If you follow these tips, your Pickle Ranch Chicken and Broccoli Casserole will turn out delicious every time! For the full recipe, check out the [Full Recipe]. When making Pickle Ranch Chicken and Broccoli Casserole, avoid undercooking your broccoli. Cook it until it is tender but still bright green. If you skip this step, the broccoli may turn mushy in the oven. Another mistake is not mixing the ranch dressing well. Make sure the cream cheese blends completely for a smooth taste. Lastly, don’t use stale breadcrumbs if you decide to add a topping. Fresh breadcrumbs give a better crunch. You can easily change the flavor of your casserole. Want it spicy? Add some diced jalapeños or a dash of hot sauce. For a tangy twist, try using sweet pickles instead of dill. You can also swap ranch dressing for blue cheese or a yogurt-based dressing. If you love herbs, mix in fresh dill or parsley. Each twist adds a new element and keeps it exciting! Serve your casserole hot and bubbly right from the oven. Garnish with fresh parsley for a pop of color. You can also add extra pickle slices on top for a fun look and flavor. This dish pairs well with a fresh garden salad or crusty bread. For a complete meal, serve it with rice or quinoa on the side. For the full recipe, check out the details above! {{image_2}} You can switch chicken for other proteins. Try turkey or pork for a new taste. These meats blend well with the pickles and ranch dressing. If you want a lighter option, use shredded rotisserie chicken. It adds great flavor with less work. Each protein brings its own flavor twist to the dish. If you want a meat-free meal, go for a vegetarian version. Replace the chicken with chickpeas or white beans. They add protein and fiber. You can also use mushrooms for a savory bite. Make sure to keep the broccoli and pickles for that crunch and tang. This version tastes great and is filling. You can easily swap ingredients to fit your diet. If you're dairy-free, try plant-based cream cheese and cheese alternatives. For gluten-free options, use gluten-free breadcrumbs. You can also use Greek yogurt instead of ranch dressing for a healthier twist. These swaps keep the casserole tasty while meeting your needs. For the full recipe, check out the details above. Enjoy making it your own! After enjoying your casserole, let it cool first. Place any leftovers in an airtight container. Store it in the fridge. This dish stays fresh for up to three days. If you want to keep it longer, try freezing it. To reheat, take the casserole out of the fridge. Preheat your oven to 350°F (175°C). Cover the dish with aluminum foil. Heat for about 20-25 minutes. Check if it's hot all the way through before serving. You can also use a microwave for quicker reheating. Just heat one serving at a time. If you want to freeze the casserole, cool it completely first. Place it in a freezer-safe dish. Wrap it tightly with plastic wrap and foil. It can last for up to three months in the freezer. When ready to eat, let it thaw in the fridge overnight before reheating. This way, you still get that great taste from the Full Recipe. Yes, you can use frozen broccoli in this dish. Just thaw it first and drain any extra water. Frozen broccoli can save time and still taste great in the casserole. It adds a nice texture and flavor. If you don’t have ranch dressing, try using a mix of sour cream and herbs. You can also use yogurt mixed with garlic and dill. These options give a similar creamy texture and taste. You can even experiment with your favorite dressings. This casserole will last about three to four days in the fridge. Just cover it tightly with plastic wrap or foil. For the best taste, eat it within this time frame. Always check for any off smells or changes in texture before eating. Yes, you can prepare this casserole ahead of time. Just assemble it and cover it. You can store it in the fridge for up to a day before baking. This makes it easy for busy nights. Just pop it in the oven when you’re ready to eat. For the full recipe, check the details above. In this article, we explored the tasty Pickle Ranch Chicken and Broccoli Casserole. We covered key ingredients and shared optional swaps for your needs. You learned how to prepare and cook the dish for the best texture. I also shared tips to avoid common mistakes and ways to customize flavors. Finally, we discussed variations, storage tips, and answered common questions. This casserole offers great flavor and is easy to make. Enjoy crafting your perfect dish!](https://dailydishlab.com/wp-content/uploads/2025/07/cf154b41-3af7-41bb-b9a3-230edc58aa3b-768x768.webp)