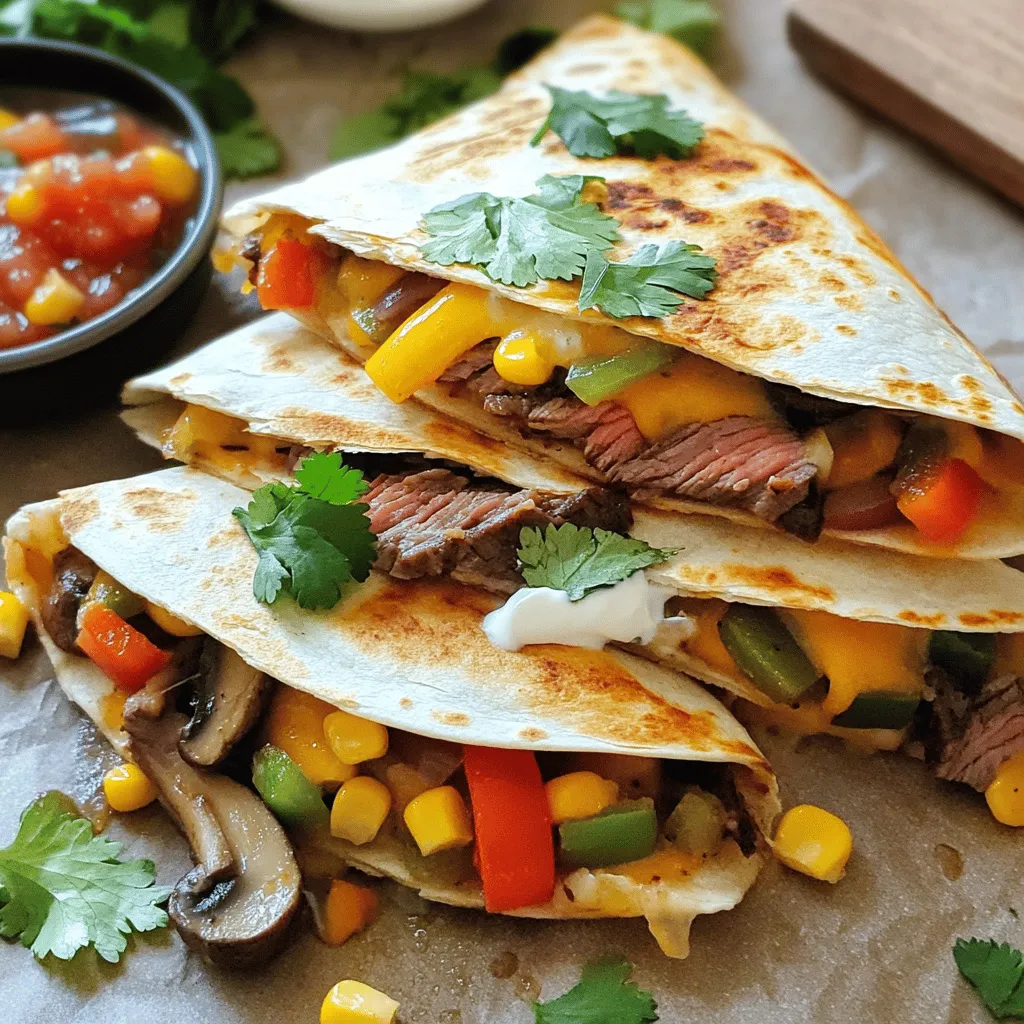
Loaded Steak Quesadillas Flavorful and Easy Recipe
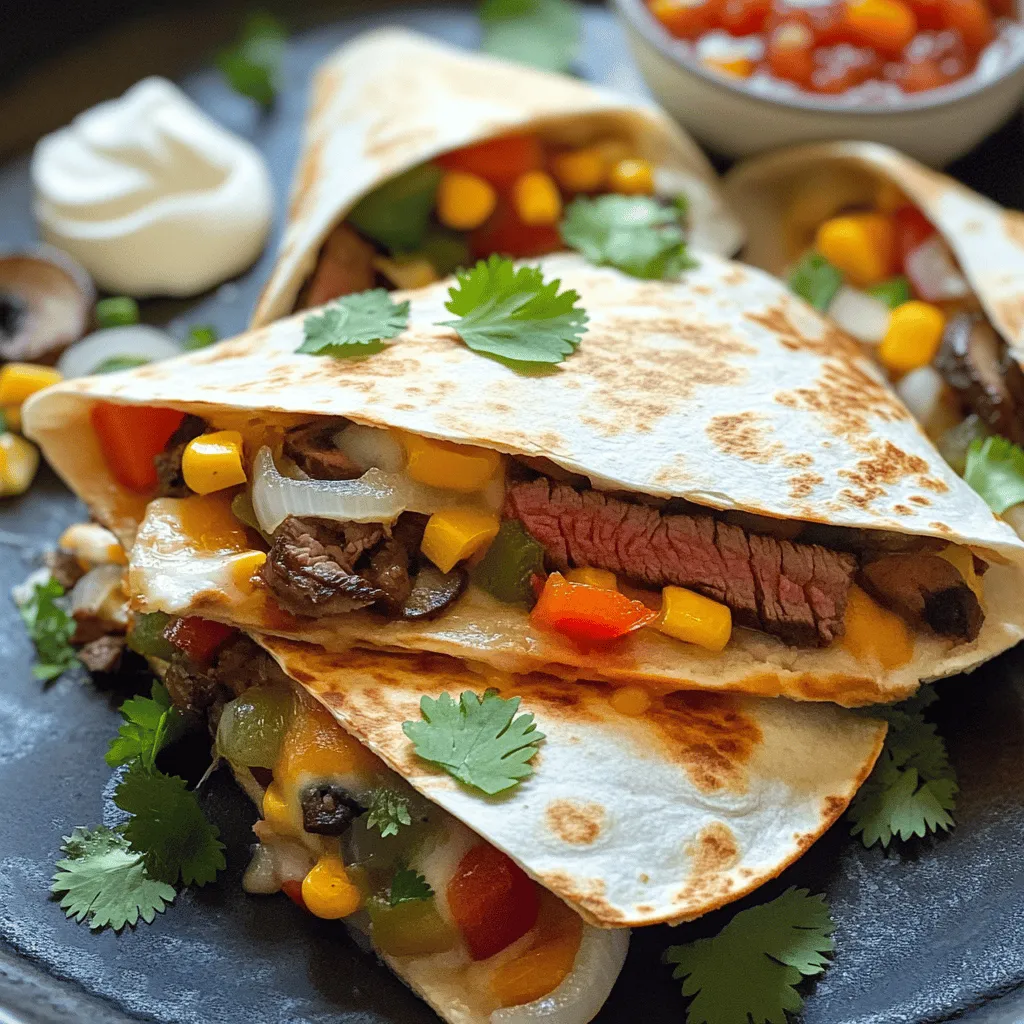
Are you ready to spice up your dinner routine? I’m excited to share my Loaded Steak Quesadillas recipe that is both flavorful and simple to make. Packed with juicy steak, fresh veggies, and gooey cheese, these quesadillas will quickly become a family favorite. Whether you’re a cooking novice or a seasoned pro, this easy guide will walk you through each step. Let’s dive into this mouthwatering meal that promises satisfaction with every bite!
Ingredients
List of Required Ingredients
To make loaded steak quesadillas, gather these items:
- 1 lb flank steak, thinly sliced
- 2 tablespoons olive oil
- 1 tablespoon taco seasoning
- 1 bell pepper, sliced (any vibrant color)
- 1 small red onion, thinly sliced
- 1 cup shredded cheese (a delightful blend of cheddar and Monterey Jack)
- 4 large flour tortillas
- 1 cup mushrooms, sliced
- ½ cup corn (can be canned or frozen)
- Salt and freshly cracked pepper to taste
- Fresh cilantro leaves, for garnish
- Sour cream and vibrant salsa, for serving
Optional Ingredients for Customization
You can tweak your loaded steak quesadillas with these extras:
- Avocado slices for creaminess
- Jalapeños for some heat
- Black beans for added protein
- Spinach or kale for extra greens
- Lime juice for a zesty kick
Recommended Cooking Tools
Having the right tools helps make cooking easier. Here are my top picks:
- A large skillet for sautéing
- A sharp knife for slicing
- A cutting board for prep work
- A spatula for flipping quesadillas
- A serving platter to display your finished dish
These ingredients and tools help create a dish that is both tasty and easy to make.
Step-by-Step Instructions
Preparing the Steak
First, gather your ingredients. You’ll need flank steak, olive oil, taco seasoning, salt, and pepper. Heat the olive oil in a large skillet over medium-high heat. Once it’s hot, add the thinly sliced flank steak. Sprinkle the taco seasoning, salt, and pepper on top. Cook the steak for about 3-4 minutes. Look for a nice brown color and make sure it’s cooked through. After cooking, take the steak out and set it aside on a plate.
Sautéing the Vegetables
In the same skillet, no need to clean it, add sliced bell pepper, red onion, mushrooms, and corn. This mix adds great flavor and color to your quesadillas. Sauté these veggies for about 5-6 minutes. Stir them occasionally until they are tender and vibrant. The smell will be amazing!
Assembling and Cooking the Quesadillas
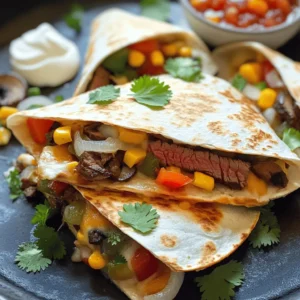
Now, let’s make the quesadillas. Place a large flour tortilla in the skillet over medium heat. On one half of the tortilla, sprinkle half of the shredded cheese evenly. This will create a cheesy base. Next, layer half of the cooked steak on top of the cheese. Then, add half of the sautéed vegetables. For extra cheesiness, put another layer of cheese on top. Carefully fold the tortilla in half over all the yummy fillings.
Cook the quesadilla for 2-3 minutes on each side. You want the tortilla to turn golden brown and the cheese to melt. Once done, take it out and let it cool for a minute. This makes slicing easier! Cut each quesadilla into wedges for perfect bites. If you want to impress, garnish with fresh cilantro. Serve with sour cream and salsa for a tasty dip. Enjoy your loaded steak quesadillas!
Tips & Tricks
How to Achieve the Perfect Crispiness
To get that perfect crispiness, use medium heat. High heat can burn the quesadilla. A non-stick skillet works best. Use enough oil to coat the pan. This gives a nice golden color. Flip the quesadilla carefully to keep the filling inside. Let it cook for about 2-3 minutes on each side. You want it golden and crispy!
Recommended Cheese Combinations
Cheese is key for flavor and texture. I love using a blend of cheddar and Monterey Jack. This mix melts well and adds great taste. You can also try pepper jack for some heat. Or use gouda for a smoky flavor. Feel free to experiment with your favorites. A good cheese makes every bite cheesy and delightful.
Garnishing Ideas for Presentation
Garnishing makes your dish look amazing. Fresh cilantro adds color and taste. Chop it finely and sprinkle over the quesadillas. You can also add sliced jalapeños for a kick. Serve with sour cream and salsa on the side. This adds flavor and makes it more fun to eat. A colorful plate makes everyone want to dig in!
Variations
Vegetarian Loaded Quesadillas
You can easily make a tasty vegetarian version of loaded quesadillas. Instead of flank steak, use hearty ingredients like black beans, zucchini, or even roasted sweet potatoes. These veggies add flavor, texture, and nutrition. You can follow the same cooking steps, just swap the steak for your chosen vegetables. A blend of cheeses can also enhance the flavor, making your quesadillas cheesy and delicious.
Spicy Loaded Steak Quesadillas
If you love heat, try making spicy loaded steak quesadillas. Use the same flank steak, but add jalapeños or diced green chilies. You can also mix in some hot sauce with the taco seasoning for extra kick. Adjust the level of spice to your liking. The combination of savory steak and spicy elements will give your quesadillas a delightful twist.
Gluten-Free Alternatives
For a gluten-free option, simply swap the flour tortillas for corn tortillas. Corn tortillas work well and offer a slightly different texture. Just make sure to check the labels for any added ingredients. You can still use all the same fillings and enjoy every bit of flavor in your loaded quesadillas. This way, everyone can savor this tasty meal!
Feel free to explore all these options to create your perfect loaded steak quesadillas.
Storage Info
How to Store Leftover Quesadillas
To keep your leftover quesadillas fresh, wrap them tightly in plastic wrap. You can also use foil for an extra layer. Place them in an airtight container. This helps prevent drying out. Store them in the fridge for up to three days. If you want to enjoy them later, freezing is a great option.
Reheating Tips for Best Results
For the best taste, reheat quesadillas in a skillet. Heat it over medium heat. This helps restore the crispiness. Cook each side for about 2-3 minutes. You can also use an oven. Preheat it to 350°F (175°C). Place the quesadillas on a baking sheet for about 10-15 minutes. This method makes them warm and crispy again.
Freezing Quesadillas for Future Meals
To freeze your quesadillas, let them cool completely. Then, wrap each one in plastic wrap or foil. Place them in a freezer-safe bag or container. Be sure to label them with the date. You can freeze them for up to three months. When you are ready to eat, thaw in the fridge overnight before reheating. Enjoy your loaded steak quesadillas anytime!
FAQs
What type of steak is best for quesadillas?
For quesadillas, flank steak is my go-to. It has great flavor and cooks fast. You can also use skirt steak, sirloin, or even leftover steak if you have some. Just slice it thinly for the best texture. Each type gives a tasty bite, but flank steak shines here.
Can I make loaded steak quesadillas ahead of time?
Yes, you can prepare them ahead! Cook the steak and veggies, then let them cool. You can store them in the fridge for a day. When you’re ready to eat, just assemble and cook them. This saves time and still gives you fresh, hot quesadillas.
How to make quesadillas crispy without frying?
To make your quesadillas crispy, use a hot skillet. Add a touch of oil before cooking. This helps the outside get golden brown. You can also use a non-stick pan or a cast iron skillet. If you want more crispiness, press down gently while they cook.
This blog post covered everything you need for loaded steak quesadillas. We discussed the key ingredients, cooking steps, and tips for crispiness. You can also explore fun variations, from vegetarian options to gluten-free recipes. Storing and reheating your quesadillas is easy, too. Remember to choose the right steak and cheese for the best taste. Enjoy your culinary adventure with these delicious quesadillas!
![- 6 large eggs - 1 ripe avocado, peeled and pitted - 2 tablespoons lime juice - 1 teaspoon lime zest - 1 teaspoon Dijon mustard - Salt and pepper to taste - 1 tablespoon fresh cilantro, chopped (for garnish) - A pinch of chili powder (optional, for a hint of spice) These ingredients make your Avocado Lime Deviled Eggs fresh and tasty. The eggs provide a great base. The creamy avocado adds richness. Lime juice and zest give a bright flavor. Dijon mustard adds a gentle tang. Adjust salt and pepper to your taste. The cilantro adds a fresh touch. If you like spice, sprinkle in some chili powder. You can find the Full Recipe for step-by-step guidance. Enjoy making these delightful bites! To boil eggs perfectly, start with cold water. Place your eggs in a pot and fill it with water. Make sure the water covers the eggs by about an inch. Heat the pot over medium-high heat until it boils. When it starts to boil, cover the pot and turn off the heat. Let the eggs sit for 10-12 minutes. This method keeps them tender and easy to peel. Timing is key, as undercooked eggs will be runny, while overcooked eggs will turn green. Next, prepare the avocado filling. Halve the ripe avocado and take out the pit. Scoop the flesh into a mixing bowl. Mash it until it is smooth and creamy. To avoid browning, add lime juice right away. The acid in lime helps keep the green color. Mix in the egg yolks, lime zest, and Dijon mustard for flavor. The right texture is creamy but not too runny. Now it's time to fill the egg whites. After peeling and halving the boiled eggs, remove the yolks. Add the yolks to the avocado mixture and stir well. Use a piping bag for neat filling. This allows for even distribution. If you don’t have a piping bag, a spoon works too. Just make sure the filling is heaped nicely in each half. This step makes them look beautiful and appetizing. For a complete recipe, check out the [Full Recipe]. To make your avocado lime deviled eggs shine, you need to balance the lime and avocado perfectly. The lime adds a bright taste, while the avocado brings creaminess. I suggest starting with two tablespoons of lime juice. You can add more if you prefer a stronger lime flavor. Adjusting seasonings is key. After mixing the filling, taste it. If it needs more zing, add a pinch of salt or a dash of pepper. If you like a kick, consider a sprinkle of chili powder. These small tweaks can elevate your dish. Garnishing enhances the look of your deviled eggs. Fresh cilantro adds a lovely green touch. A sprinkle of chili powder not only adds color but also hints at spice. When serving, arrange the eggs on a bright platter. This will catch the eye at any party. You can also place them in an egg carton for a fun and unique display. One common mistake is overcooking the eggs. This can make the yolks dry and crumbly. Follow the cooking time closely for perfect results. Another mistake is not mixing the filling well. Ensure all ingredients blend smoothly. This makes a creamy, cohesive filling that tastes great. You want every bite to be delicious. {{image_2}} For a kick, add jalapeños or hot sauce. This spice brings a nice heat to the creamy filling. Start with a small amount of diced jalapeños. You can always add more if you like it spicier. A few drops of your favorite hot sauce can also do the trick. Mix it into the avocado filling for heat in every bite. You can make your deviled eggs even better by adding veggies. Chopped bell peppers, diced tomatoes, or shredded carrots can give a nice crunch. You can also use fresh herbs like dill or basil. They add unique flavors and brighten up your eggs. Just mix them into the filling for an extra layer of taste. If you need to make this dish vegan, swap the eggs for chickpeas. Mash cooked chickpeas with the avocado and lime. This keeps the creamy texture and adds protein. For a low-carb option, skip the eggs altogether. Use avocado, lime, and your choice of herbs. These modifications keep the flavors fresh and tasty. Use the Full Recipe to try these variations and discover your favorite twist on this classic dish! To keep your Avocado Lime Deviled Eggs fresh, store them in the fridge. Place them in an airtight container. This helps prevent the eggs from drying out or absorbing other smells. If you don’t have a container, cover the eggs tightly with plastic wrap. Aim to eat them within two days for the best taste and texture. Can you freeze Avocado Lime Deviled Eggs? No, you should not freeze these deviled eggs. The avocado can change texture when frozen. It may become grainy and lose its creamy flavor. How to properly freeze and thaw Since freezing is not a good option, focus on eating your deviled eggs fresh. If you want to make them ahead, prepare the filling and store it separately. You can fill the egg whites just before serving. How long do they last in the fridge? These eggs will last up to two days in the fridge. After that, they may start to lose their fresh taste. Signs of spoilage Look for changes in color or texture. If the filling turns brown or smells off, it’s best to discard the eggs. Always trust your senses when it comes to food safety. Yes, you can use different types of avocados. Hass avocados are creamy and rich, making them perfect for this recipe. Florida avocados are larger and milder in flavor. They can work too but may change the taste and texture slightly. If you want a rich, smooth filling, go with Hass. If you prefer a lighter flavor, choose Florida avocados. You can use other citrus fruits instead of lime. Lemon juice is a great option and adds a nice tang. Grapefruit juice can also work well if you want a unique twist. Just remember to adjust the amount to your taste. Each citrus fruit brings its own flavor and can change the dish's overall taste. You can make these deviled eggs ahead of time. Prepare the filling and store it in the fridge. Fill the egg whites just before serving to keep them fresh. This method ensures the eggs stay firm and the filling remains vibrant. You can also boil the eggs a day before and store them in the fridge. These deviled eggs pair well with many dishes. They make a great starter for brunch or a party. You can serve them with cocktails like margaritas or mojitos. They also go well with fresh salads or light soups. Feel free to be creative and mix them with your favorite dishes! Yes, you can make these deviled eggs gluten-free. All the ingredients in this recipe are naturally gluten-free. Just ensure that the Dijon mustard you use is also gluten-free. Most brands offer gluten-free options, so check the label to be sure. Enjoy this tasty treat without any worries! In this post, we explored Avocado Lime Deviled Eggs, covering ingredients, tips, and variations. You learned how to boil eggs perfectly, prepare the filling, and assemble the dish. We also discussed storage methods and answers to common questions. Remember, balancing flavors and avoiding overcooking are key. With a few simple tweaks or additions, you can make this dish your own. Enjoy this tasty twist on a classic!](https://dailydishlab.com/wp-content/uploads/2025/07/08a04e97-d91e-4bc2-a0e0-9f1f6250904f-768x768.webp)