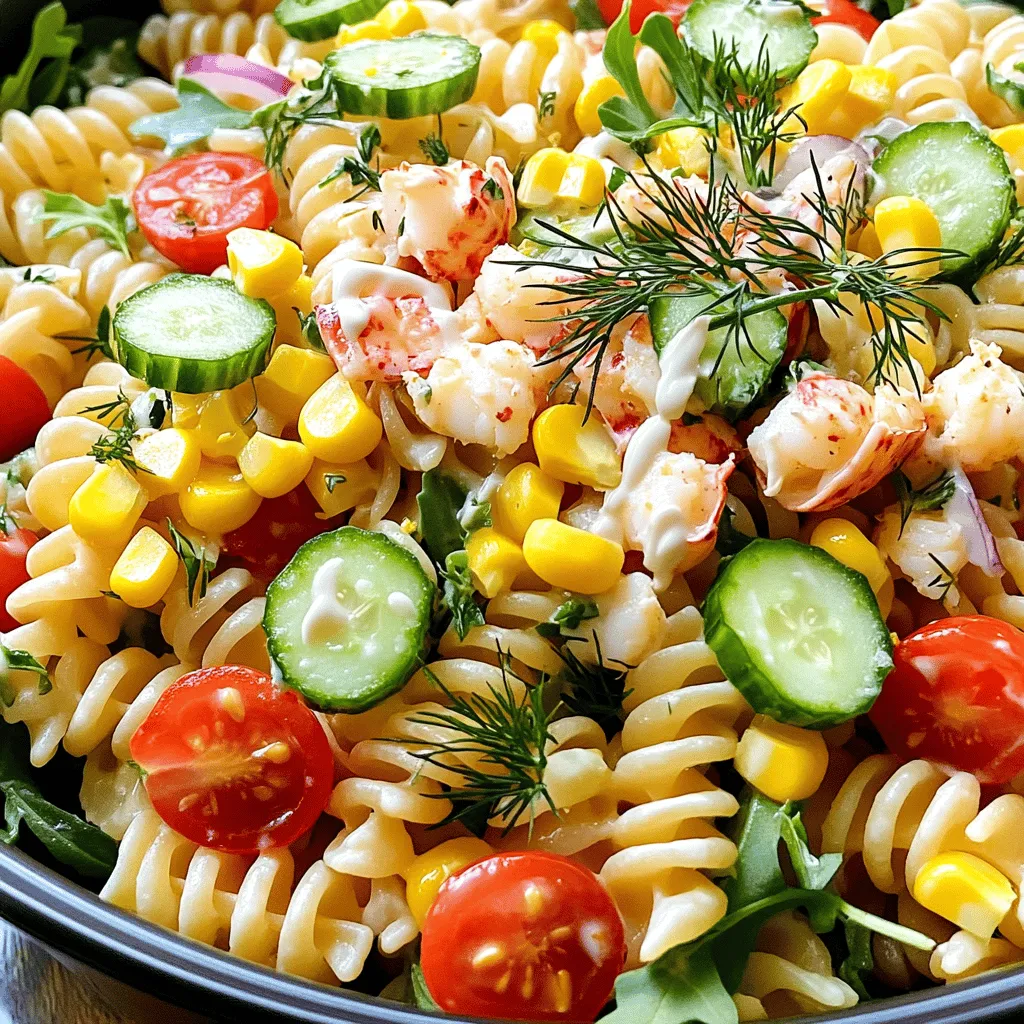
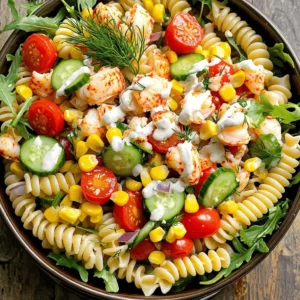
Lobster Pasta Salad Fresh and Flavorful Delight

Looking for a refreshing meal that impresses? Lobster pasta salad is your answer. This dish blends sweet lobster meat with fresh veggies and creamy dressing to create a flavorful delight. Whether you’re hosting a summer barbecue or needing a quick dinner option, this salad will shine. Let me guide you through every step, from gathering ingredients to mastering the perfect mix. Dive in and discover how to make this tasty dish!
Ingredients
Complete List of Ingredients
For the perfect lobster pasta salad, you will need:
- 8 oz. fusilli pasta
- 1 lb. cooked lobster meat, chopped into bite-sized pieces
- 1 cup cherry tomatoes, halved
- ½ cup cucumber, diced into small cubes
- ¼ cup red onion, finely chopped
- ½ cup corn kernels (fresh off the cob or canned)
- 1 cup fresh arugula or baby spinach
- 1/3 cup mayonnaise
- 2 tablespoons fresh lemon juice
- 1 tablespoon Dijon mustard
- 1 tablespoon extra virgin olive oil
- Salt and freshly ground black pepper, to taste
- Fresh dill, for garnish
Nutritional Information Breakdown
This lobster pasta salad is not just tasty; it’s also quite healthy! Here’s a quick look at what you get in each serving:
- Calories: Around 400
- Protein: About 30 grams
- Carbohydrates: Roughly 40 grams
- Fat: Approximately 15 grams
- Fiber: 3 grams
- Vitamin C: High due to the tomatoes and lemon juice
- Omega-3 Fatty Acids: From the lobster, promoting heart health
This dish gives you protein and healthy fats while keeping carbs moderate. It’s a balanced meal for any day!
Suggested Alternatives for Ingredients
If you want to switch things up, here are some ideas:
- Pasta: Use whole grain or gluten-free pasta for a different texture.
- Lobster: Shrimp or crab can work well if lobster isn’t available.
- Mayonnaise: Greek yogurt offers a lighter option with added protein.
- Vegetables: Add bell peppers or radishes for extra crunch and color.
- Greens: Kale or mixed salad greens can replace arugula or spinach.
Feel free to customize the recipe to fit your taste. Cooking should be fun and flexible!
Step-by-Step Instructions
Preparing the Pasta
To start, boil a large pot of salted water. Once it reaches a rolling boil, add 8 oz. of fusilli pasta. Cook it until al dente, following the package instructions. This usually takes about 8-10 minutes. After cooking, drain the pasta in a colander. Rinse it under cold water to stop the cooking. Allow it to cool completely before moving on.
Combining Salad Ingredients
In a large mixing bowl, place the cooled pasta. Add 1 lb. of chopped cooked lobster meat, 1 cup of halved cherry tomatoes, and ½ cup of diced cucumber. Toss in ¼ cup of finely chopped red onion and ½ cup of corn kernels. Gently mix these ingredients until they are well combined.
Making the Dressing and Mixing
In a small bowl, whisk together ⅓ cup of mayonnaise, 2 tablespoons of fresh lemon juice, 1 tablespoon of Dijon mustard, and 1 tablespoon of extra virgin olive oil. Stir until the dressing is smooth. Season it with salt and freshly ground black pepper to taste. Drizzle the dressing over the lobster pasta mixture. Using a spatula, gently toss everything together to coat the salad evenly. Finally, fold in 1 cup of fresh arugula or baby spinach. This adds color and nutrition. Place the salad in the fridge for at least 30 minutes to let the flavors blend. When ready to serve, toss the salad again and garnish with fresh dill. Enjoy this fresh and flavorful delight!
Tips & Tricks
Common Mistakes to Avoid
When making lobster pasta salad, a few mistakes can ruin your dish. First, do not overcook the pasta. It should be al dente, which means firm when bitten. If you cook it too long, the pasta will become mushy.
Another mistake is not cooling the pasta properly. Rinse it under cold water to stop the cooking. This step helps keep the salad fresh and prevents clumping.
Lastly, be careful with the dressing. If you add too much, it can drown out the flavors of the lobster and veggies. Start with a little and adjust to taste.
Best Practices for Cooking Pasta
To cook pasta perfectly, always use a large pot with plenty of water. This helps the pasta cook evenly. Add salt to the water; it enhances the flavor.
Follow the package instructions for cooking times. Check the pasta a minute before the suggested time. Taste it!
Once cooked, drain and rinse with cold water. This helps keep the pasta from sticking together. If you plan to serve the salad later, toss the cooled pasta with a bit of olive oil. This will keep it fresh and tasty.
How to Select Fresh Lobster Meat
Choosing fresh lobster meat is key for great flavor. Buy lobster from a trusted source. Look for bright shells with no cracks. If you can, ask to smell the meat; it should smell like the ocean, not fishy.
If you buy pre-cooked lobster, check the color. Fresh lobster meat should be a nice white with hints of red. Avoid any that looks gray or has an off smell.
For the best taste, try to use lobster that is still in the shell. It will stay fresher longer.
Variations
Different Dressings to Try
You can change the flavor of your lobster pasta salad with different dressings. Try a creamy avocado dressing for a rich taste. A light vinaigrette made with balsamic vinegar adds a sweet tang. A zesty lemon-herb dressing can brighten the dish. Experiment with these options to find your favorite!
Additional Ingredients for Flavor
Adding extra ingredients can make your salad even tastier. Consider including diced bell peppers for crunch. Avocado adds creaminess and healthy fats. Fresh herbs like basil or parsley can boost flavor. A sprinkle of feta cheese brings a salty kick. You can also add capers for a briny touch.
Seasonal Variations to Consider
You can adapt this salad to fit the seasons. In summer, add fresh berries for sweetness. Fall is perfect for roasted butternut squash or pumpkin seeds. In winter, toss in some cooked Brussels sprouts for a hearty touch. Each season brings unique flavors, making your lobster pasta salad exciting all year round.
Storage Info
How to Store Leftovers
To store your lobster pasta salad, first let it cool completely. Place the salad in an airtight container. This keeps it fresh and prevents it from drying out. Store it in the fridge for up to three days. Make sure to label the container with the date. This helps you keep track of how long it’s been stored.
Best Practices for Reheating
Reheating lobster pasta salad is simple. However, you should be careful not to overdo it. Heat gently in the microwave for about 30 seconds. Stir the salad halfway through to ensure even heating. Add a splash of olive oil or a squeeze of lemon juice to refresh the flavors. Avoid reheating multiple times, as this can change the texture of the lobster.
Freezing Guidelines for Lobster Pasta Salad
Freezing lobster pasta salad is not recommended. The texture of the lobster and pasta can become rubbery when thawed. However, if you must freeze it, remove any greens first. Place the salad in a freezer-safe container or bag. Use it within one month for the best taste. When ready to eat, thaw in the fridge overnight. After thawing, add fresh greens and a drizzle of dressing to revive the dish.
FAQs
Can I make this dish ahead of time?
Yes, you can make this dish ahead of time. It tastes even better after chilling. Prepare the salad and dressing, then mix them together. Let it sit in the fridge for at least 30 minutes. You can also make it one day prior. Just keep it covered to stay fresh.
What can I substitute for mayonnaise?
If you prefer not to use mayonnaise, try Greek yogurt. It gives a creamy texture with less fat. You can also use sour cream or a vinaigrette for a lighter option. Just adjust the seasoning to taste. Experiment with these substitutes to find your favorite.
How do I know if my lobster is fresh?
Fresh lobster should smell like the sea, not fishy or sour. Look for a firm shell and bright color. The meat should feel firm and springy when you press it. If buying whole lobsters, opt for those that move. For cooked lobster, check for a sweet aroma and a moist texture.
This blog post covered everything you need to make a great lobster pasta salad. We detailed the ingredients, shared step-by-step instructions, and provided tips to help you avoid common mistakes. Variations let you customize your dish, while storage info keeps leftovers fresh. In the end, this dish shines as a delightful meal for any occasion. With these tips and tricks, you can create your own perfect lobster pasta salad, filled with flavor and joy. Enjoy your cooking adventure!
![- 1 pound gnocchi (store-bought or homemade) - 1 cup cherry tomatoes, halved - 1 zucchini, sliced into half-moons - 1 bell pepper (red or yellow), chopped - 1 cup broccoli florets - 2 tablespoons olive oil - 2 cloves garlic, minced - 1 teaspoon Italian seasoning - Salt and pepper to taste - 1/4 cup grated Parmesan cheese (optional) - Fresh basil leaves for garnish To make Easy Sheet Pan Gnocchi Primavera, gather these simple ingredients. Start with gnocchi, which you can find at any store. The cherry tomatoes add sweetness. Zucchini and bell pepper give texture and color. Broccoli adds a crunch, balancing the dish. For seasoning, olive oil helps cook the veggies and gnocchi. Garlic brings a bold flavor. Italian seasoning adds a classic taste. Salt and pepper enhance all the flavors. Don’t forget the Parmesan cheese for creaminess! Fresh basil leaves make a lovely garnish. Once you have all your ingredients, you’re ready to create a delicious meal! For the complete recipe, check out the [Full Recipe]. - Step 1: Preheat your oven to 425°F (220°C). This helps cook the gnocchi right. - Step 2: Combine gnocchi, cherry tomatoes, zucchini, bell pepper, and broccoli on a baking sheet. Make sure they mix well for even cooking. - Step 3: Drizzle olive oil and add minced garlic, Italian seasoning, salt, and pepper. This adds great flavor to the dish. - Step 4: Toss and spread everything evenly on the baking sheet. This helps all the ingredients cook at the same time. - Step 5: Roast for 20-25 minutes, stirring halfway through. This step ensures a nice golden color. - Step 6: Sprinkle with Parmesan cheese and garnish with basil before serving. This makes your dish look and taste amazing. Follow these steps closely for a delicious Easy Sheet Pan Gnocchi Primavera. For the full recipe, check out the section above. - Cook gnocchi until golden brown and vegetables are tender. This adds great flavor. - Use parchment paper for easier cleanup. It saves time and keeps your pan clean. - Add red pepper flakes for heat. It gives a nice kick to the dish. - Try different herbs like thyme or rosemary for varied flavor. Fresh herbs can brighten your meal. - Serve directly from the sheet pan for a casual meal. This makes for easy serving and a fun vibe. - Pair with a side salad for a balanced dinner. A light salad complements the warm gnocchi well. For the complete details, check out the Full Recipe. {{image_2}} You can change up the veggies based on your taste. Try replacing the broccoli with asparagus or green beans. These veggies add crunch and flavor. For more greens, toss in baby spinach or kale. They cook down nicely and boost nutrition. Want more protein? You can add cooked chicken, shrimp, or tofu. These ingredients make the dish heartier. If you prefer a vegetarian option, mix in cannellini beans. They are creamy and fill you up. If you want a healthier twist, consider using cauliflower gnocchi. Whole wheat gnocchi is another great option. If gnocchi is not available, try other types of dumplings. They can add a fun new taste to your meal. For the full recipe, check out the Easy Sheet Pan Gnocchi Primavera. To store leftovers, place them in an airtight container. This keeps them fresh. You can keep them in the fridge for up to three days. If you want to save them longer, freeze portions. Use freezer-safe bags or containers. Label them with the date. They can last up to three months in the freezer. To reheat gnocchi, use the oven for best texture. Preheat the oven to 350°F (175°C). Place the gnocchi on a baking sheet. Heat for about 10-15 minutes. Stir halfway through to warm evenly. If you use a microwave, put the gnocchi in a bowl. Heat for 1-2 minutes, stirring once. Be careful not to overheat, as it can change the texture. For easy weeknight meals, prepare ingredients in advance. Chop vegetables and store them in the fridge. You can also cook the gnocchi ahead of time. Keep sauces and garnishes separate to keep them fresh. This way, you can mix and match ingredients as needed. Use these tips to enjoy quick meals all week. If you want to see the full recipe, check the link. Can I use frozen gnocchi for this recipe? Yes, you can use frozen gnocchi. Just toss them straight on the sheet pan. They will cook well and taste great. No need to thaw them first. How can I make this vegan-friendly? To make this dish vegan, skip the Parmesan cheese. You can use nutritional yeast for a cheesy flavor. Also, check that your gnocchi is egg-free. What’s the best way to tell when the vegetables are done? The best way is to check their color and texture. They should be bright and tender, but not mushy. You can poke them with a fork to test. Can I add more vegetables or change the quantities? Absolutely! Feel free to add more veggies like carrots or mushrooms. Just remember to keep the total amount similar so everything cooks evenly. What can I serve with Easy Sheet Pan Gnocchi Primavera? This dish goes well with a fresh salad. You can also serve garlic bread or a light soup. They add flavors and make the meal more filling. How do I store leftovers for the next day? To store leftovers, place them in an airtight container. Keep them in the fridge for up to three days. Reheat in the oven or microwave before serving. This recipe shows how to make a simple sheet pan gnocchi dish. We covered all the main ingredients, seasonings, and step-by-step cooking directions to ensure success. Remember to customize your meal with different veggies, proteins, or gnocchi types. After a quick roast, you can have a delicious dinner ready. Keep it fresh with storage tips for leftovers. Enjoy your cooking and make this dish your own. Each bite is packed with flavor and fun. Happy cooking!](https://dailydishlab.com/wp-content/uploads/2025/07/51139aef-520e-4271-91ea-5c6754dfc759-768x768.webp)