Classic Shrimp Scampi Tasty and Quick Dinner Recipe
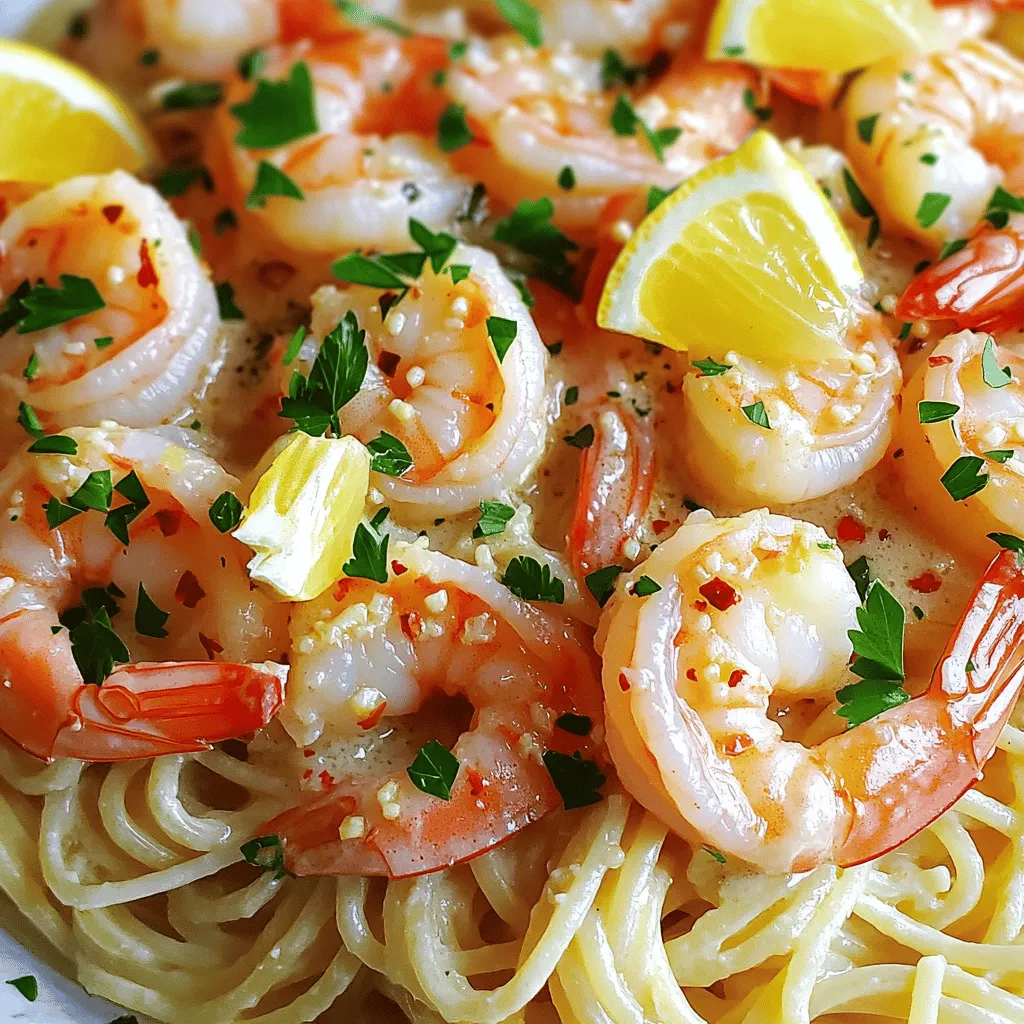
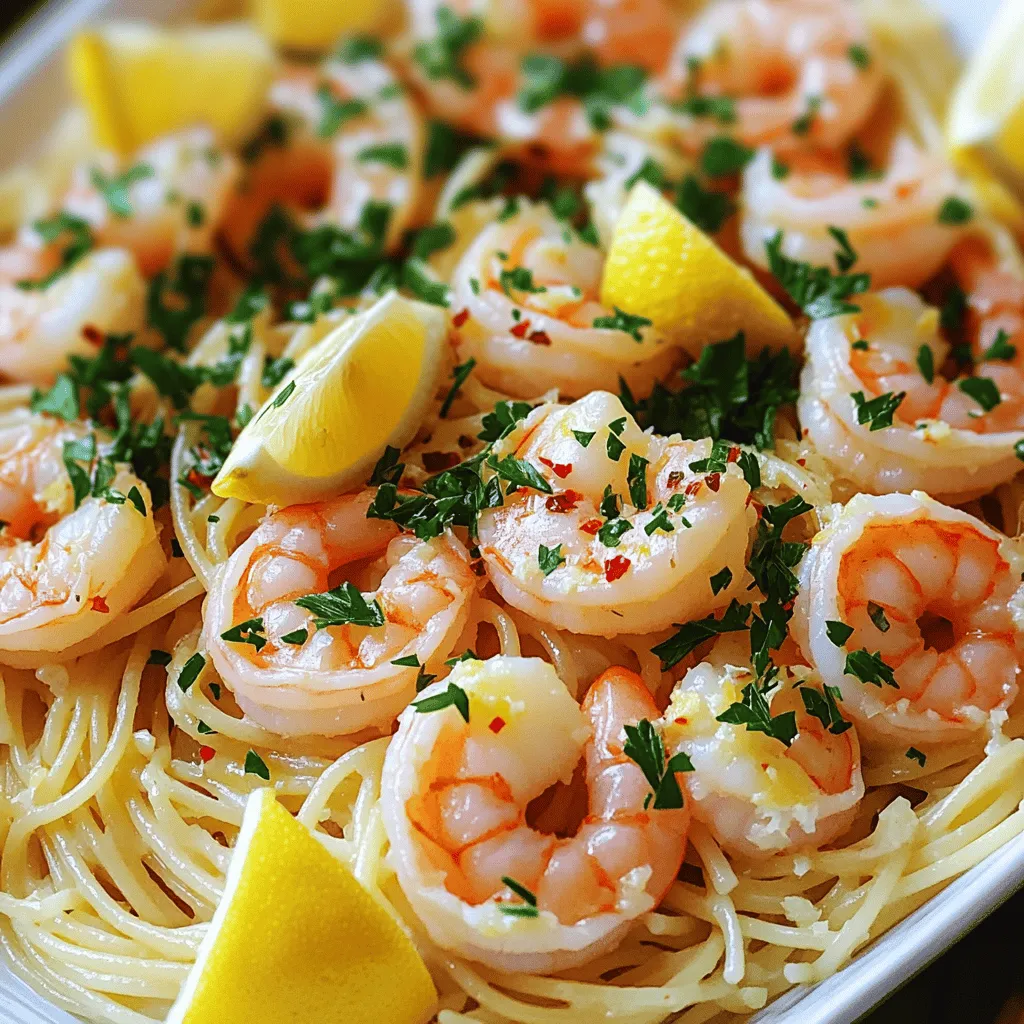
Looking for a quick and tasty dinner? Classic Shrimp Scampi is your answer! This simple dish combines succulent shrimp, garlic, and fresh lemon for a burst of flavor. In just a few steps, you’ll have a meal that impresses your family or guests. Trust me, once you try this recipe, you’ll keep it in your dinner rotation. Let’s dive into the delicious world of shrimp scampi and get cooking!
Why I Love This Recipe
- Quick and Easy: This recipe comes together in just 20 minutes, making it perfect for a weeknight dinner.
- Bold Flavors: The combination of garlic, lemon, and red pepper flakes creates a deliciously vibrant sauce.
- Fresh Ingredients: Using fresh shrimp and herbs elevates the dish, ensuring a delightful seafood experience.
- Versatile Dish: Pair it with spaghetti or linguine, and customize the spice level to suit your taste!
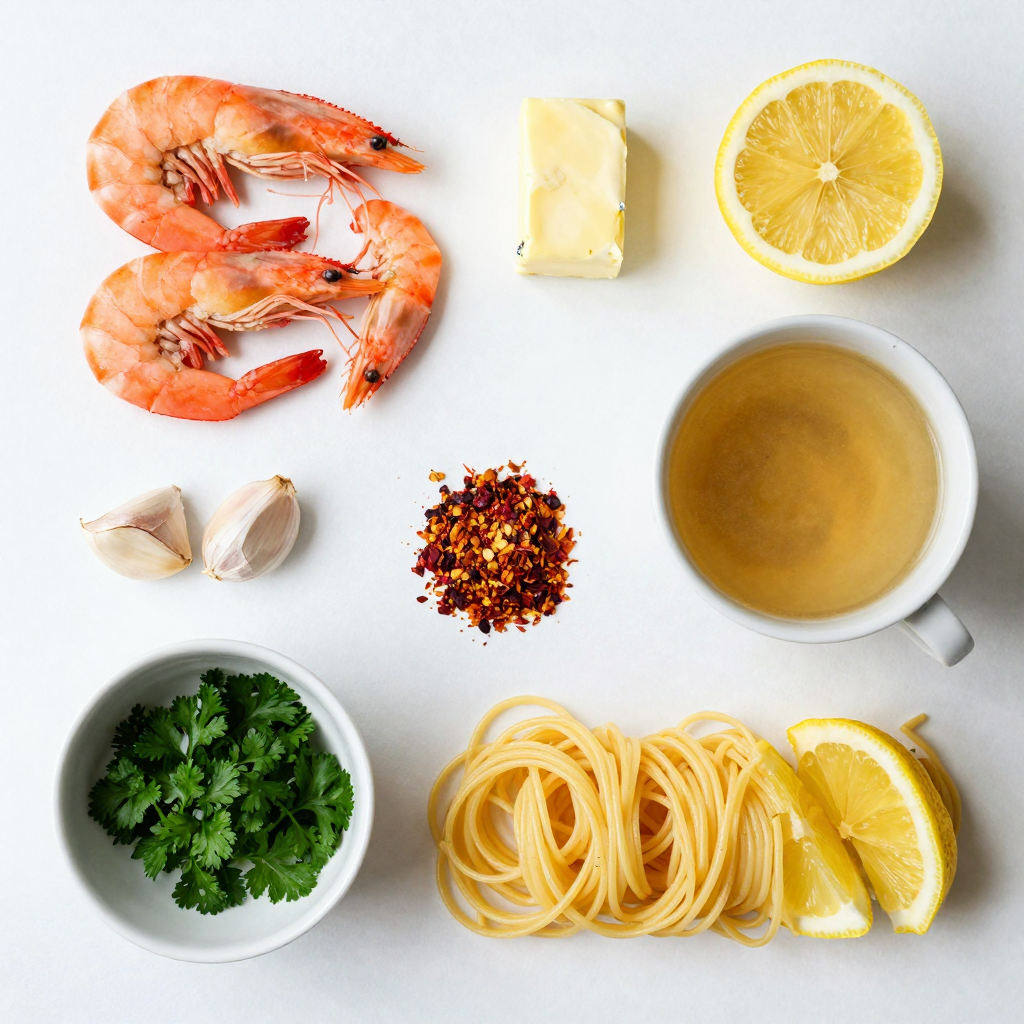
Ingredients
Cooking classic shrimp scampi is all about simple, fresh ingredients. Here’s what you need:
- 1 lb large shrimp, peeled and deveined
- 4 tablespoons unsalted butter
- 4 cloves garlic, minced
- 1 lemon (zested and juiced)
- 1 teaspoon crushed red pepper flakes (adjust for spice preference)
- 1/2 cup chicken or vegetable broth
- 1/2 cup fresh parsley, chopped
- Salt and pepper to taste
- 8 oz spaghetti or linguine, cooked according to package instructions
These ingredients create a dish full of flavor and texture. The shrimp gives a nice, juicy bite. The butter and garlic create a rich sauce. Fresh lemon and parsley add brightness. You can adjust the heat with red pepper flakes. This dish is quick and perfect for a weeknight meal.
Step-by-Step Instructions
Preparation of Shrimp
To start, you need to clean and devein the shrimp. First, rinse them under cold water. Remove the shell, leaving the tails on for a nice look. Use a small knife to make a shallow cut along the back. This cut will let you see the dark vein. Gently pull it out with the knife.
Next, season the shrimp. A little salt and pepper go a long way. You can also sprinkle some lemon juice for extra flavor. This simple step makes the shrimp taste fresh and bright.
Cooking Process
Now, let’s cook! Heat a large skillet over medium heat and melt two tablespoons of butter. Once melted, add minced garlic and crushed red pepper flakes. Stir for one to two minutes. You want the garlic fragrant, but be careful not to burn it.
Next, raise the heat to medium-high and add the shrimp. Cook for two to three minutes until they turn pink and opaque. When done, remove the shrimp and set them aside.
In the same skillet, pour in the chicken or vegetable broth. This helps lift the tasty bits stuck to the pan. Let it simmer for a moment. Stir in the lemon juice and zest. Then, return the shrimp to the skillet. Cook for another one to two minutes to heat through.
Finally, remove the skillet from the heat. Stir in the remaining two tablespoons of butter and chopped parsley. This gives the sauce a rich flavor and a lovely green color.
Combining with Pasta
While you cook the shrimp, prepare the spaghetti or linguine according to the package instructions. Drain the pasta but save a little pasta water. This water can help the sauce cling to the noodles.
Now, toss the cooked pasta into the skillet with the shrimp and sauce. Mix well until the pasta is evenly coated. If the sauce seems too thick, add a splash of the reserved pasta water.
Serve your shrimp scampi hot. Garnish with extra parsley and lemon wedges for a bright touch. Enjoy this easy and tasty meal!
Pro Tips
- Use Fresh Shrimp: For the best flavor and texture, opt for fresh shrimp whenever possible. Frozen shrimp can be used, but make sure to thaw them properly before cooking.
- Adjust Spice Level: The crushed red pepper flakes can be adjusted based on your spice tolerance. Start with less and add more if you prefer a spicier dish!
- Don’t Overcook the Shrimp: Keep an eye on the shrimp while cooking; they only need a few minutes until they turn pink and opaque. Overcooking will make them tough.
- Garnish for Freshness: Don’t skip the fresh parsley and lemon wedges for garnish. They add a burst of color and freshness that elevates the dish.
Tips & Tricks
Achieving the Best Flavor
Using fresh ingredients is key. Fresh shrimp brings a sweet taste that frozen shrimp lacks. Look for shrimp that smells clean and has a shiny look. Use fresh garlic and lemon too, for a bright flavor.
To adjust the spiciness, play with the crushed red pepper flakes. Start with less if you prefer milder heat. You can always add more later, but you can’t take it out once it’s in!
Cooking Techniques
Cooking shrimp just right is crucial. Cook them for only 2-3 minutes. They should turn pink and opaque. If you cook them too long, they will be tough and rubbery.
Keep an eye on the shrimp as they cook. When they curl up, they are almost done. Remove them from the heat right away to avoid overcooking.
Plating Suggestions
Presentation matters! Use a large bowl or plate to serve the shrimp scampi. Twirl the pasta for a nice, neat look.
For garnishing, sprinkle fresh parsley on top. Add lemon wedges on the side for a pop of color. It makes the dish look fresh and inviting.Enjoy your cooking adventure!
Variations
Alternative Ingredients
You can switch up the seafood in shrimp scampi. Try using scallops or clams instead of shrimp. Both options add unique flavors and textures. For a healthier twist, consider swapping pasta with zucchini noodles. Zucchini noodles are light and soak up the sauce nicely. This keeps the dish fresh and low-carb.
Sauce Modifications
To make the sauce richer, add cream. It gives the dish a smooth, creamy texture that many enjoy. You can also incorporate white wine into the recipe. A splash of white wine enhances the flavors and adds depth. Just let it simmer a bit to cook off the alcohol. These sauce modifications can elevate your shrimp scampi experience to a whole new level.
Storage Info
Storing Leftovers
To keep your shrimp scampi fresh, place it in an airtight container. This helps prevent air from drying it out. You can store it in the fridge for up to three days. When reheating, I suggest using a skillet over low heat. This method warms it gently, keeping the shrimp tender. Stir in a splash of broth or water to add moisture. Avoid using the microwave, as it can make the shrimp tough.
Freezing Shrimp Scampi
If you want to freeze shrimp scampi, use a freezer-safe container. Make sure to leave some space at the top for expansion. It can last up to three months in the freezer. When you’re ready to eat, defrost it overnight in the fridge. For best results, reheat it in a skillet on low heat. This preserves the flavor and texture. Enjoy your shrimp scampi like it was freshly made!
FAQs
How long does it take to make Classic Shrimp Scampi?
Making Classic Shrimp Scampi is quick! It takes about 10 minutes to prep. Cooking takes around 10 minutes too. In total, you can enjoy this dish in just 20 minutes. That’s fast for a gourmet meal!
Can I make Classic Shrimp Scampi ahead of time?
Yes, you can prepare some parts ahead. Cook the shrimp and sauce, then store them in the fridge. When you are ready to eat, just reheat and toss with fresh pasta. This way, you save time on busy nights!
What can I serve with Classic Shrimp Scampi?
Pairing your shrimp scampi with tasty sides makes it shine! Here are some great options:
- Garlic bread
- Steamed broccoli
- Caesar salad
- A fresh green salad
For drinks, a crisp white wine like Sauvignon Blanc works well. It balances the garlic and lemon flavors.
In this blog post, we explored how to make classic shrimp scampi. We covered key ingredients, step-by-step cooking instructions, and helpful tips for great flavor. You learned how to adjust the spice level and plate your dish nicely. Variations and storage tips ensured you can enjoy the meal later.
These methods can help you create a delicious shrimp scampi, perfect for any occasion. Cooking is fun, so don’t be afraid to experiment with flavors and ingredients! Enjoy your tasty meal!

Classic Shrimp Scampi
Ingredients
1 lb large shrimp, peeled and deveined
4 tablespoons unsalted butter
4 cloves garlic, minced
1 lemon (zested and juiced)
1 teaspoon crushed red pepper flakes (adjust for spice preference)
1/2 cup chicken or vegetable broth
1/2 cup fresh parsley, chopped
Salt and pepper to taste
8 oz spaghetti or linguine, cooked according to package instructions
Lemon wedges for garnish
Instructions
In a large skillet over medium heat, melt 2 tablespoons of butter.
Add minced garlic and crushed red pepper flakes. Sauté for 1-2 minutes until fragrant, being careful not to burn the garlic.
Increase the heat to medium-high and add the shrimp to the skillet. Season with salt and pepper, and cook for about 2-3 minutes until the shrimp are pink and opaque.
Remove the cooked shrimp from the skillet and set aside.
In the same skillet, pour in the chicken or vegetable broth and scrape up any bits stuck to the pan. Bring the mixture to a simmer.
Stir in the lemon juice and zest, and then return the shrimp back into the skillet. Cook for an additional 1-2 minutes until heated through.
Remove from heat and stir in the remaining 2 tablespoons of butter and chopped parsley until the butter is melted and the sauce is well combined.
Toss the cooked spaghetti or linguine in the sauce until evenly coated.
Serve immediately, garnished with extra parsley and lemon wedges on the side.
Prep Time: 10 minutes | Total Time: 20 minutes | Servings: 4
Classic Shrimp Scampi
Ingredients
- 1 lb large shrimp, peeled and deveined
- 4 tablespoons unsalted butter
- 4 cloves garlic, minced
- 1 lemon zested and juiced
- 1 teaspoon crushed red pepper flakes
- 1 2 chicken or vegetable broth
- 1 2 fresh parsley, chopped
- to taste Salt and pepper
- 8 oz spaghetti or linguine, cooked
- for garnish Lemon wedges
Instructions
- In a large skillet over medium heat, melt 2 tablespoons of butter.
- Add minced garlic and crushed red pepper flakes. Sauté for 1-2 minutes until fragrant, being careful not to burn the garlic.
- Increase the heat to medium-high and add the shrimp to the skillet. Season with salt and pepper, and cook for about 2-3 minutes until the shrimp are pink and opaque.
- Remove the cooked shrimp from the skillet and set aside.
- In the same skillet, pour in the chicken or vegetable broth and scrape up any bits stuck to the pan. Bring the mixture to a simmer.
- Stir in the lemon juice and zest, and then return the shrimp back into the skillet. Cook for an additional 1-2 minutes until heated through.
- Remove from heat and stir in the remaining 2 tablespoons of butter and chopped parsley until the butter is melted and the sauce is well combined.
- Toss the cooked spaghetti or linguine in the sauce until evenly coated.
- Serve immediately, garnished with extra parsley and lemon wedges on the side.

![To make this easy chicken fried rice, gather these key ingredients: - 2 cups cooked rice (preferably day-old for best texture) - 1 cup cooked chicken, diced - 2 tablespoons vegetable oil - 2 eggs, lightly beaten - 1 cup mixed vegetables (carrots, peas, and corn) - 3 green onions, sliced - 2 cloves garlic, minced - 2 tablespoons soy sauce - 1 tablespoon sesame oil - Salt and pepper to taste These ingredients blend perfectly to create a tasty meal. Day-old rice gives the best texture. Freshly cooked rice can be too sticky. You can add personal touches to your chicken fried rice with these options: - Bell peppers for crunch - Broccoli for added nutrition - Shrimp or tofu for different proteins - Ginger for extra flavor - Chili flakes for heat Feel free to mix and match based on what you love. This dish is perfect for using up leftovers. If you have allergies, consider these swaps: - Use tamari instead of soy sauce for gluten-free needs. - Replace eggs with scrambled tofu for a vegan option. - Swap the vegetable oil for olive oil or avocado oil. - Use coconut aminos in place of soy sauce for a soy-free option. These substitutions help you enjoy the dish safely. Always check labels to ensure they meet your dietary needs. For the full recipe, check our detailed guide. To make this easy chicken fried rice, first gather your ingredients. You will need: - 2 cups cooked rice (preferably day-old for best texture) - 1 cup cooked chicken, diced - 2 tablespoons vegetable oil - 2 eggs, lightly beaten - 1 cup mixed vegetables (carrots, peas, and corn) - 3 green onions, sliced - 2 cloves garlic, minced - 2 tablespoons soy sauce - 1 tablespoon sesame oil - Salt and pepper to taste Make sure your rice is cold. This makes it easier to fry. Diced chicken should be ready to go. Slice your green onions and mince the garlic. These steps save time during cooking. Heat the vegetable oil in a large skillet or wok over medium-high heat. Once hot, add the minced garlic. Sauté for about 30 seconds, until fragrant. This adds great flavor to your dish. Next, push the garlic to one side of the skillet. Pour the beaten eggs into the other side. Scramble the eggs until fully cooked. Then mix them with the garlic. Now, add the diced chicken and mixed vegetables to the pan. Stir-fry for about 2-3 minutes. This allows everything to heat through and blend. Add the cooked rice next. Break up any clumps as you add it to the skillet. Stir well to combine with the other ingredients. Drizzle the soy sauce and sesame oil over the rice mixture. Stir-fry for an additional 3-4 minutes. This helps the rice absorb all the tasty flavors. Season with salt and pepper to taste. Then add the sliced green onions, saving some for garnish. Toss everything together until it is evenly mixed and heated through. For a great presentation, serve the fried rice in a large bowl. Garnish with the remaining green onions and a drizzle of sesame oil. This adds a nice touch to your dish. Enjoy your meal with chopsticks for an authentic experience. You can find the full recipe above for a detailed guide. For fried rice, use day-old rice. It dries out a bit in the fridge. This helps it fry better. Fresh rice can be too sticky. If you don’t have day-old rice, cook some and spread it on a tray to cool. This will help it dry. To boost flavors, use good soy sauce. Dark soy sauce gives a richer taste. Add sesame oil for a nice nutty flavor. You can also toss in some ginger or chili paste. Fresh herbs like cilantro add a fresh touch. A squeeze of lime brightens everything up too. Don’t overcrowd the pan. This makes food steam instead of fry. Always heat your skillet well before adding ingredients. Avoid using too much liquid; it can make the rice soggy. Lastly, don’t skip the garlic. It brings great flavor but should be cooked just right, not burnt. {{image_2}} You can easily make chicken fried rice vegetarian or vegan. Instead of chicken, use tofu or tempeh. Both add great texture and protein. For a vegan option, skip the eggs and use an egg substitute, like silken tofu. You can also add extra veggies like bell peppers or mushrooms for more flavor. Chicken is a favorite, but you can try other proteins too. Shrimp, beef, or pork all work well. For a fun twist, use leftover rotisserie chicken for quick prep. If you like a spicy kick, add diced sausage. Just remember to adjust cooking times based on the protein you choose. Enhancing flavor is key to great fried rice. Soy sauce is essential, but you can add more. Try hoisin sauce or oyster sauce for depth. For a kick, add chili paste or sriracha. Fresh herbs like cilantro or basil can brighten the dish. Finally, sesame seeds give a nice crunch. For a full guide on these variations, check out the Full Recipe. To store your leftover chicken fried rice, place it in an airtight container. Make sure the rice cools to room temperature first. This helps to keep it fresh. Store it in the fridge for up to three days. You can also divide it into smaller portions for easy access. If you want to save it longer, freezing works great. Use a freezer-safe bag or container. Press out as much air as you can before sealing. Chicken fried rice can be frozen for up to three months. When you're ready to eat, thaw it in the fridge overnight. Reheat it in a skillet over medium heat. Add a splash of water to help steam it and keep it moist. Chicken fried rice does not last forever. In the fridge, it stays good for about three days. After that, it may spoil. If you notice any off smells or colors, toss it. Always check before eating. Proper storage helps keep your meals tasty and safe! Check the [Full Recipe] for more tips on making this dish. Yes, leftover rice is perfect for chicken fried rice. Day-old rice has less moisture. This helps it fry better and gives a nice texture. Fresh rice can be too sticky and clump together. If you have leftover rice, use it! To reduce oil, use less vegetable oil. You can also add more veggies. They will add moisture and flavor without extra oil. Another tip is to cook over high heat. This helps to fry the rice quickly and keeps it from getting greasy. Great veggies for this dish include: - Carrots - Peas - Corn - Bell peppers - Broccoli These add color and crunch. You can mix and match based on what you have. Yes, you can make chicken fried rice gluten-free. Just use gluten-free soy sauce. There are many brands available now. You can also use coconut aminos as a tasty alternative. Yes, using frozen vegetables is a smart choice! They are easy and save time. Just add them straight to the pan. They will heat up quickly and keep their nutrients. Using frozen veggies also makes this dish even faster to prepare. For the full recipe, check the recipe section. Easy chicken fried rice combines simple ingredients and cooking steps. You can customize your dish with optional flavors or different proteins. I shared tips to boost taste and avoid common mistakes. Storage advice ensures you can enjoy leftovers safely. Remember, you can always use leftover rice and frozen veggies for convenience. Experiment with variations to find your favorite. This dish is fun and easy to make, perfect for any meal!](https://dailydishlab.com/wp-content/uploads/2025/06/7a871d5a-324a-485e-b6c8-e68637190de3-768x768.webp)