
Quick and Easy Veggie Frittata Savory and Simple Dish
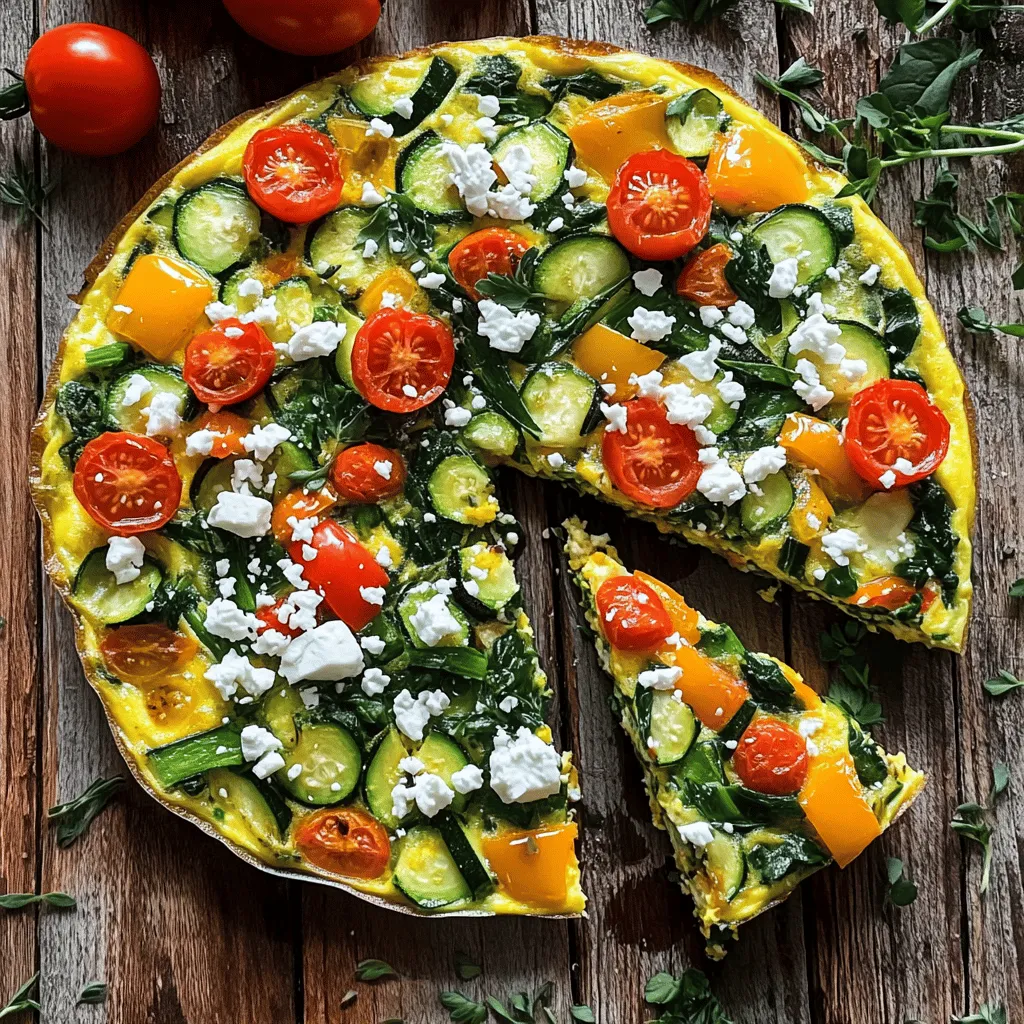
Looking for a quick and easy dish that’s packed with veggies? You’ve come to the right place! My veggie frittata is not only simple to make, but it’s also flavorful and filling. Perfect for breakfast, lunch, or dinner, it uses easy ingredients you already have at home. Let’s dive into this savory dish and uncover the secrets to making a tasty frittata that everyone will love!
Why I Love This Recipe
- Quick Preparation: This frittata comes together in just 30 minutes, making it a perfect choice for busy mornings or last-minute gatherings.
- Versatile Ingredients: Feel free to customize with your favorite vegetables or leftovers, making it a flexible dish that suits any palate.
- Healthy and Nutritious: Packed with protein and vitamins, this frittata is a wholesome option that’s both filling and satisfying.
- Beautiful Presentation: With colorful vegetables and an optional sprinkle of feta, this dish is as visually appealing as it is delicious.
Ingredients
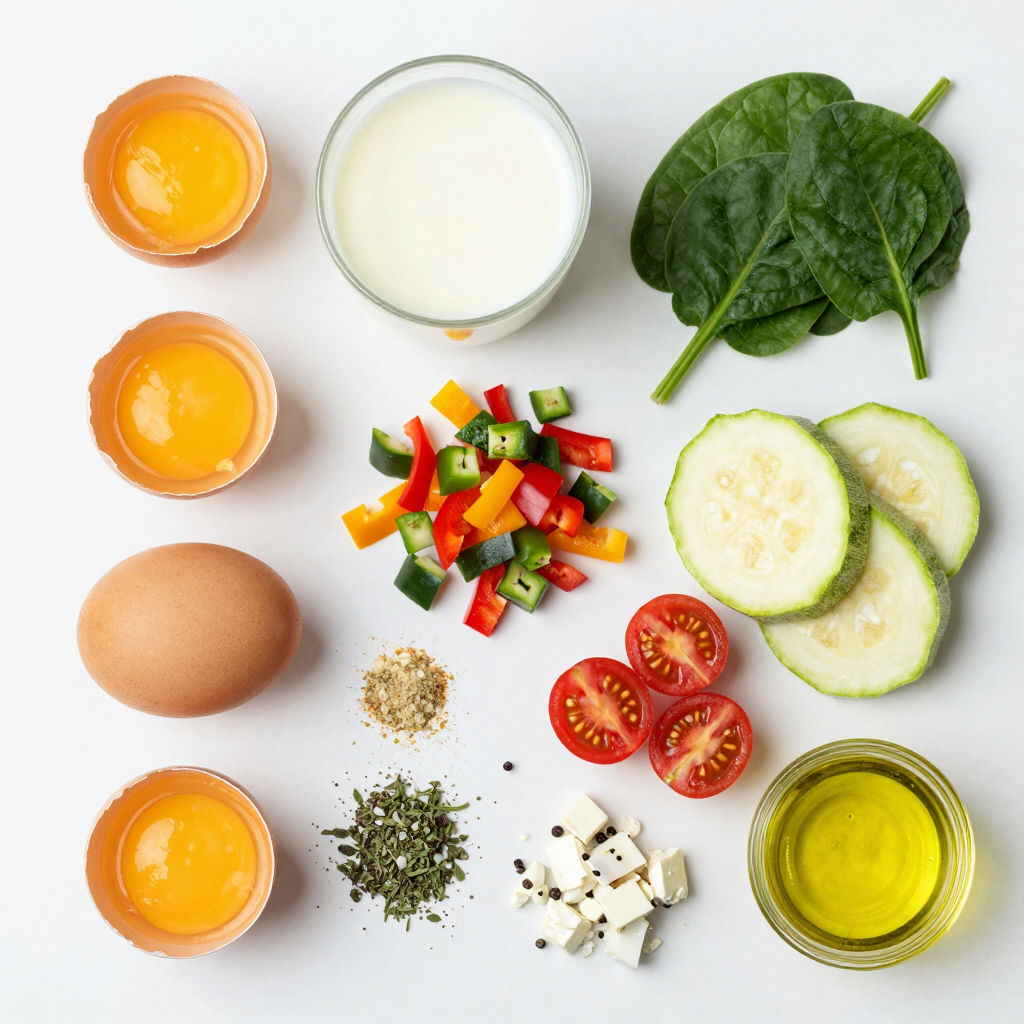
Essential Ingredients for Quick and Easy Veggie Frittata
To make a tasty veggie frittata, gather these key ingredients:
- 6 large eggs
- 1/2 cup milk (dairy or non-dairy)
- 1 cup spinach, chopped
- 1/2 cup bell peppers, diced (any color)
- 1/2 cup zucchini, diced
- 1/4 cup red onion, finely chopped
- 1/2 cup cherry tomatoes, halved
- 1 teaspoon garlic powder
- 1 teaspoon dried oregano
- Salt and pepper to taste
- 2 tablespoons olive oil
These ingredients form the base of your frittata. The eggs provide protein, while the veggies add color and flavor.
Optional Ingredients for Extra Flavor
Feel free to enhance your frittata with these optional ingredients:
- 1/4 cup feta cheese, crumbled
- Fresh herbs like parsley or basil
- A sprinkle of red pepper flakes
Feta cheese adds a creamy texture and tangy taste. Fresh herbs make your dish pop with freshness.
Substitutions for Dietary Preferences
You can easily swap ingredients to fit your needs:
- Use egg whites instead of whole eggs for a lighter frittata.
- Choose dairy-free milk for a vegan option.
- Replace feta with nutritional yeast for a dairy-free cheese flavor.
- Add other veggies like mushrooms, broccoli, or kale based on your preference.
These substitutions keep the dish tasty while catering to different diets. Remember, cooking is all about making it your own!
Step-by-Step Instructions
Preheating the Oven and Preparing the Skillet
You start by preheating your oven to 375°F (190°C). This temperature helps the frittata cook evenly. While the oven heats, grab your oven-safe skillet. I like to use a cast-iron skillet for great heat retention. Add two tablespoons of olive oil and heat it over medium heat.
Whisking Eggs and Combining Ingredients
In a large bowl, whisk together six large eggs and half a cup of milk. This mix creates a creamy base. Next, add garlic powder, dried oregano, salt, and pepper to taste. Stir until everything is well combined. Now, it’s time to add the veggies. Chop one cup of spinach, half a cup of bell peppers, half a cup of zucchini, and a quarter cup of red onion. Toss them into the egg mix. If you want, add half a cup of cherry tomatoes and a sprinkle of feta cheese for extra flavor.
Cooking the Vegetables and Baking the Frittata
Once your skillet is hot, add the chopped red onion and bell peppers. Sauté them for about 3 to 4 minutes. You want them to soften but not brown. Then, add the zucchini and spinach to the skillet. Cook for an additional 2 to 3 minutes until the spinach wilts. Now, pour the egg and veggie mix evenly over the sautéed vegetables. Let it sit for 2 to 3 minutes on the stovetop. This time allows the edges to start setting. Finally, move the skillet to the preheated oven. Bake for 15 to 20 minutes until the frittata is puffed and the center is set. Enjoy your delicious creation!
Pro Tips
- Fresh Ingredients: Using fresh, seasonal vegetables will enhance the flavor and nutrition of your frittata.
- Even Cooking: Ensure the egg mixture is evenly distributed over the vegetables for consistent cooking and texture.
- Mix it Up: Feel free to substitute or add other vegetables like mushrooms or broccoli for a different flavor profile.
- Perfectly Baked: Keep an eye on the frittata while baking; it’s ready when it’s puffed and the center is just set, avoiding overcooking.
Tips & Tricks
How to Perfect Texture and Flavor
To get the best texture and flavor in your frittata, focus on your eggs. Use fresh eggs for rich taste. Whisk the eggs and milk well, ensuring a smooth blend. Add garlic powder and oregano for a taste boost. Don’t skip seasoning with salt and pepper; it makes a big difference.
Best Practices for Cooking Evenly
Cook your veggies first. This step helps them soften and release their flavors. Sauté them in olive oil for a few minutes before adding the egg mixture. Pour the eggs evenly over the veggies. This ensures they cook together. Start on the stovetop to set the edges, then finish in the oven.
Garnishing and Serving Suggestions
Presentation matters! Slice your frittata into wedges for easy serving. Garnish with fresh herbs like parsley or basil for color and flavor. Serving on a colorful platter catches the eye. You can also add a dollop of yogurt or a side salad for a fresh touch.

Variations
Protein Additions for a Hearty Meal
You can make your frittata more filling by adding protein. Cooked bacon or sausage adds great taste. For a healthier option, try diced turkey or chicken. You can even use plant-based options like tofu or tempeh. Just sauté the protein with the veggies before adding the eggs. This helps blend the flavors.
Seasonal Vegetable Options
Using seasonal veggies keeps your frittata fresh and tasty. In spring, try asparagus and peas. In summer, add fresh corn or tomatoes. Fall brings great choices like squash or mushrooms. In winter, root veggies like carrots or sweet potatoes work well. Be creative and mix different colors for a beautiful dish.
Flavor Boosts with Herbs and Spices
Herbs and spices can change the whole taste of your frittata. Fresh herbs like basil or parsley brighten the dish. Try adding a pinch of red pepper flakes for heat or smoked paprika for depth. If you love unique flavors, consider using curry powder or cumin. These spices can give your frittata a fun twist.
Storage Info
How to Store Leftover Veggie Frittata
To store leftover veggie frittata, first let it cool completely. Once cooled, cut the frittata into individual slices. Place slices in an airtight container. Keep it in the fridge for up to 3 days. This makes it easy to grab a slice for breakfast or lunch.
Reheating Tips for Best Results
When you’re ready to enjoy your frittata again, you can reheat it quickly. Use the microwave for a fast option. Heat on medium power for about 1-2 minutes. If you prefer the oven, preheat it to 350°F (175°C). Place slices on a baking sheet and heat for about 10-15 minutes. This helps the frittata stay fluffy and warm.
Freezing Frittata for Future Meals
If you want to save frittata for later, freezing is a great option. Wrap each slice tightly in plastic wrap. Then, place the wrapped slices in a freezer-safe bag. This keeps them fresh for up to 2 months. When you’re ready to eat, thaw in the fridge overnight. Reheat as mentioned above. Enjoy a tasty meal anytime!
FAQs
Can I make this veggie frittata ahead of time?
Yes, you can make this veggie frittata ahead of time. It stores well in the fridge for up to three days. Just let it cool completely after baking. Then, cover it tightly with plastic wrap or foil. When you are ready to eat, you can warm it in the oven or microwave. This makes it great for meal prep or busy mornings.
What are some gluten-free options for this recipe?
This veggie frittata is naturally gluten-free. The main ingredients, like eggs and veggies, do not contain gluten. If you want extra flavor, you can add gluten-free spices like smoked paprika or cumin. Always check your cheese to ensure it is gluten-free if you choose to add it.
How can I adjust the recipe for a larger crowd?
To serve more people, simply double the recipe. Use a larger skillet or bake it in a casserole dish. You may need to increase the baking time slightly. Just check for doneness by inserting a knife in the center. If it comes out clean, it’s ready! You can also add more veggies or cheese to make it heartier.
A veggie frittata is a simple, tasty dish full of healthy ingredients. We’ve covered the must-have ingredients, cooking steps, and tips for perfecting your frittata. You can easily swap ingredients to fit your needs and preferences. Don’t forget to try different flavors and seasonal veggies! Store leftovers properly, and you’ll enjoy this meal later, too. With these tips, you can make frittata fun and easy every time. Get creative in the kitchen and enjoy your cooking journey!

Quick and Easy Veggie Frittata
Ingredients
6 large eggs
1/2 cup milk (dairy or non-dairy)
1 cup spinach, chopped
1/2 cup bell peppers, diced (any color)
1/2 cup zucchini, diced
1/4 cup red onion, finely chopped
1/2 cup cherry tomatoes, halved
1 teaspoon garlic powder
1 teaspoon dried oregano
Salt and pepper to taste
1/4 cup feta cheese, crumbled (optional)
2 tablespoons olive oil
Instructions
Preheat your oven to 375°F (190°C).
In a large mixing bowl, whisk together the eggs and milk until well combined. Season with garlic powder, oregano, salt, and pepper.
In an oven-safe skillet, heat olive oil over medium heat. Add the red onion and bell peppers, sautéing for about 3-4 minutes until they start to soften.
Add the zucchini and spinach to the skillet, cooking for an additional 2-3 minutes until the spinach wilts.
Pour the egg mixture evenly over the vegetables in the skillet, making sure it’s distributed well.
Add the halved cherry tomatoes on top and sprinkle with feta cheese if using.
Cook on the stovetop for 2-3 minutes without stirring, letting the edges begin to set.
Transfer the skillet to the preheated oven and bake for 15-20 minutes or until the frittata is puffed and the center is set.
Once done, remove from the oven and let it cool slightly before cutting into wedges.
Prep Time: 10 minutes | Total Time: 30 minutes | Servings: 4
– Presentation Tips: Serve the frittata warm, garnished with fresh herbs like parsley or basil. Slice into wedges and serve on a colorful platter for an appealing table display.
Quick and Easy Veggie Frittata
Ingredients
- 6 large eggs
- 0.5 cup milk (dairy or non-dairy)
- 1 cup spinach, chopped
- 0.5 cup bell peppers, diced
- 0.5 cup zucchini, diced
- 0.25 cup red onion, finely chopped
- 0.5 cup cherry tomatoes, halved
- 1 teaspoon garlic powder
- 1 teaspoon dried oregano
- 1 to taste salt
- 1 to taste pepper
- 0.25 cup feta cheese, crumbled (optional)
- 2 tablespoons olive oil
Instructions
- Preheat your oven to 375°F (190°C).
- In a large mixing bowl, whisk together the eggs and milk until well combined. Season with garlic powder, oregano, salt, and pepper.
- In an oven-safe skillet, heat olive oil over medium heat. Add the red onion and bell peppers, sautéing for about 3-4 minutes until they start to soften.
- Add the zucchini and spinach to the skillet, cooking for an additional 2-3 minutes until the spinach wilts.
- Pour the egg mixture evenly over the vegetables in the skillet, making sure it's distributed well.
- Add the halved cherry tomatoes on top and sprinkle with feta cheese if using.
- Cook on the stovetop for 2-3 minutes without stirring, letting the edges begin to set.
- Transfer the skillet to the preheated oven and bake for 15-20 minutes or until the frittata is puffed and the center is set.
- Once done, remove from the oven and let it cool slightly before cutting into wedges.
![To make Easy Vegetable Pad Thai, you need just a few key items. Here’s what you’ll need: - 8 oz rice noodles - 2 tablespoons vegetable oil - 1 red bell pepper, julienned - 1 green bell pepper, julienned - 1 carrot, shredded - 3 green onions, chopped (whites and greens separated) - 2 cloves garlic, minced - 1 cup bean sprouts - 2 large eggs (optional for non-vegetarians) - 3 tablespoons soy sauce - 1 tablespoon tamarind paste - 1 tablespoon brown sugar - 1 tablespoon lime juice - Salt and pepper to taste - Crushed peanuts and lime wedges for garnish These ingredients create a bright and fresh flavor. Each one adds its own twist to the dish. You can easily change this recipe to fit your taste. Here are some optional ingredients you might like: - Tofu or tempeh for protein - Broccoli or snap peas for more veggies - Chili flakes for heat - Cilantro for extra flavor - Sesame oil for a nutty taste These additions help you make the dish your own. Feel free to mix and match based on what you have at home. For this recipe, you want to use the right rice noodles. Here are the best types to choose from: - Flat rice noodles: These are the most common for Pad Thai. They soak up flavors well. - Thin rice vermicelli: Great for a lighter dish, but cook them less time. - Thick rice noodles: Chewy and satisfying, but they may need longer cooking. I recommend going for flat rice noodles. They give you that authentic flavor and texture you crave. For the full recipe, check out the details above. To start, cook the rice noodles. Follow the package instructions closely. Usually, this means boiling them in water for about 5 to 7 minutes. You want them soft but not mushy. Once they are ready, drain them in a colander. Rinse with cold water to stop the cooking. Set the noodles aside. Next, let's prepare the vegetables. Take your red and green bell peppers and slice them into thin strips, called julienne. Shred the carrot finely using a grater or a sharp knife. For the green onions, chop them into small pieces but keep the white and green parts separate. Mince the garlic into tiny bits. Once you finish, everything will be ready to cook. Now, it's time to bring everything together. In a large wok or skillet, heat the vegetable oil over medium-high heat. Add the minced garlic first and stir for about 30 seconds. It should smell great! Then, toss in the julienned peppers and shredded carrot. Stir-fry these for about 3 to 4 minutes. They should soften but still have a little crunch. If you want eggs, push the veggies to one side of the pan. Crack the eggs in the empty space and scramble them. Mix the cooked eggs with the veggies. Add the drained rice noodles to the wok. Next, add the chopped green onion whites, bean sprouts, soy sauce, tamarind paste, brown sugar, and lime juice. Toss everything together until well mixed and heated through. Taste and add salt and pepper as needed. Your Easy Vegetable Pad Thai is ready! Serve it hot, garnished with crushed peanuts and lime wedges. For the full recipe, check out the details above. Enjoy! To get great flavor in your Easy Vegetable Pad Thai, focus on the sauce. Use fresh ingredients like lime juice and tamarind paste. They add a nice tang. Make sure to taste as you mix. Adjust the soy sauce and sugar to your liking. If you want more heat, add some chili flakes. This will make your dish pop! Cooking your veggies just right is key. Start with high heat in your wok or skillet. This helps keep them crisp. Cut your vegetables into thin strips for even cooking. Stir-fry them quickly. This usually takes just a few minutes. Add bean sprouts last, as they need only a brief cook. This way, they stay crunchy. For the best experience, serve your Pad Thai hot. Top it with crushed peanuts; they add a nice crunch. A squeeze of lime juice brightens the flavors too. You can also add fresh herbs like cilantro for a fresh touch. Serve it with lime wedges on the side for extra zing. For a fun twist, pair it with spring rolls or a light salad. To see the full details, check the Full Recipe. {{image_2}} You can easily make this dish gluten-free. Use rice noodles, which are naturally gluten-free. Instead of soy sauce, try tamari. Tamari tastes similar but has no gluten. Always check labels to be sure. Tofu is a great option for plant-based protein. It adds texture and absorbs flavors well. Use firm tofu for the best results. Cut it into cubes and sauté until golden. If you eat eggs, they work too. Just scramble them before mixing with the veggies. Both choices are tasty and filling. Want more heat? Add red pepper flakes or chili paste. Start with a small amount; you can always add more. If you like it mild, skip the spicy ingredients. The beauty of this dish is you can customize it to your taste. Enjoy experimenting with flavors! To keep your leftover Pad Thai fresh, place it in an airtight container. Make sure to cool it down first. Store it in the fridge. It should last for about three days. Reheat your Pad Thai in a pan for the best texture. Add a splash of water or soy sauce. This helps make it moist again. Heat it on low, stirring gently. You can also use the microwave. Just cover it to keep moisture in. If you want to save Pad Thai for later, freezing is a good option. Cool it completely before packing it. Use freezer-safe containers or bags. It can last up to three months in the freezer. When ready to eat, thaw it in the fridge overnight before reheating. For best results, eat it within a month. For the full recipe, check out the Easy Vegetable Pad Thai. To make the sauce, mix soy sauce, tamarind paste, brown sugar, and lime juice. This blend gives the dish a sweet and tangy flavor. You want to balance these ingredients to your taste. I suggest starting with the amounts listed in the Full Recipe. Adjust to make it perfect for you! Absolutely! You can swap in any veggies you like. Broccoli, snap peas, and zucchini work great. Use what you have on hand. Just remember to cut them into small pieces for even cooking. The goal is to keep a nice crunch while adding color to your dish! If you can't find tamarind paste, you can use lime juice or a mix of vinegar and sugar. This will mimic the tangy flavor of tamarind. Another option is to use a store-bought pad Thai sauce that contains tamarind. Experiment to find what you enjoy best! To make this dish shine, you need fresh and colorful ingredients. Here’s what you’ll need: - 8 oz rice noodles - 2 tablespoons vegetable oil - 1 red bell pepper, julienned - 1 green bell pepper, julienned - 1 carrot, shredded - 3 green onions, chopped (whites and greens separated) - 2 cloves garlic, minced - 1 cup bean sprouts Feel free to tweak this recipe to fit your taste. Here are some extras: - 2 large eggs (optional for non-vegetarians) - Crushed peanuts for garnish - Lime wedges for garnish For the best texture, I suggest flat rice noodles. Look for the wide ones labeled as "Pad Thai noodles." They soak up flavors well and make the dish more satisfying. If you prefer thinner noodles, rice vermicelli works too. Just keep an eye on cooking time, as they cook faster. Check out the [Full Recipe] for detailed steps. You now have all you need for an Easy Vegetable Pad Thai. You learned about key ingredients, cooking steps, and how to customize your dish. Remember to use fresh veggies for great taste. Adjust flavors to fit your style, whether that’s adding spice or protein. Store any leftovers properly for a tasty meal later. Enjoy creating this dish and impressing yourself with your cooking skills. Now, grab your ingredients and get started on this delightful, vibrant meal!](https://dailydishlab.com/wp-content/uploads/2025/06/ea2fad35-4884-4485-94ec-1f29792ad057-768x768.webp)
![- 1 lb boneless, skinless chicken breasts - 3 tablespoons olive oil - 2 tablespoons fresh lemon juice - 2 tablespoons Greek yogurt - 3 cloves garlic, minced The main ingredients are key to great flavor. The chicken serves as the base. Use fresh, quality chicken for the best taste. Olive oil adds richness. Lemon juice gives a nice tang. Greek yogurt adds creaminess and helps tenderize the meat. Garlic brings a punch of flavor that everyone loves. - 1 teaspoon dried oregano - 1 teaspoon dried thyme - 1 teaspoon paprika - Salt and pepper to taste Herbs and spices elevate your dish. Oregano is a classic Greek herb. Thyme adds earthiness, while paprika gives a subtle warmth. Salt and pepper enhance all flavors. You can adjust these to fit your taste. Fresh herbs can also work well if you have them on hand. - Wooden or metal skewers - Fresh parsley, chopped (for garnish) - Lemon wedges (for serving) Skewers are a must for souvlaki. If you use wooden skewers, soak them in water first. This prevents burning on the grill. Fresh parsley adds color and freshness on top. Lemon wedges are perfect for squeezing over the chicken. They boost flavor and add brightness to each bite. For the complete recipe, check out the Full Recipe section. In a medium bowl, whisk together the marinade ingredients. Combine 3 tablespoons of olive oil, 2 tablespoons of fresh lemon juice, and 2 tablespoons of Greek yogurt. Next, add 3 minced cloves of garlic, 1 teaspoon of dried oregano, 1 teaspoon of dried thyme, and 1 teaspoon of paprika. Finish with salt and pepper to taste. This mix is key for flavor. Now, take your 1 pound of boneless, skinless chicken breasts. Cut them into 1-inch cubes. Coat the chicken cubes in the marinade. Make sure each piece is well covered. After that, cover the bowl and place it in the refrigerator. Let it marinate for at least 30 minutes or up to 2 hours. This step makes the chicken juicy and tasty. First, preheat your grill or grill pan over medium-high heat. Once hot, thread the marinated chicken onto skewers. If you use wooden skewers, make sure they soaked in water for 30 minutes first. Leave some space between each piece for even cooking. Grill the chicken skewers for about 10 to 12 minutes. Turn them occasionally. Check for doneness by ensuring the internal temperature reaches 165°F (75°C). Once cooked, remove the skewers from the grill. Let them rest for about 5 minutes. This resting time allows the juices to spread throughout the chicken. For a full recipe, refer back to the earlier section. Enjoy your Greek chicken souvlaki with a garnish of fresh parsley and lemon wedges on the side! To get the best flavor from your chicken souvlaki, timing matters. I recommend marinating the chicken for at least 30 minutes. If you have more time, marinate for up to 2 hours. This longer time lets the chicken absorb the marinade's flavors deeply. Remember, the lemon juice helps tenderize the meat, making it juicy and tasty. You can grill souvlaki for that smoky flavor. However, if you don’t have a grill, you can use an oven or stovetop. When grilling, keep the heat medium-high. This way, the chicken gets nice grill marks and cooks evenly. If cooking in the oven, set it to 400°F (200°C). Cook for about 15-20 minutes, flipping halfway. Always check that the chicken reaches an internal temperature of 165°F (75°C) to ensure it’s safe to eat. Juicy chicken is the goal, so don’t overcook it. Presentation makes your dish more appealing. Serve the chicken souvlaki on a large platter. Drizzle some olive oil over the top for shine. Add a bowl of tzatziki sauce for dipping. Pair it with fresh veggies like cucumber and tomato salad. This not only looks great but also adds color and freshness to your meal. For the final touch, garnish with chopped parsley and a few lemon wedges on the side. This makes your meal pop and invites everyone to dig in. For the full recipe, check out the [Full Recipe]. {{image_2}} You can switch up the chicken for lamb or beef. Both meats add great taste. Lamb gives a rich flavor, while beef adds a hearty bite. Use the same marinade for these meats. Just ensure they are cut into similar-sized pieces. This way, they cook evenly. Grill them until they reach the right temperature. For lamb, that’s about 145°F (63°C). For beef, aim for 160°F (71°C). If you want a meat-free meal, try using vegetables or tofu. Bell peppers, zucchini, and mushrooms work well on skewers. Tofu soaks up the marinade nicely. Cut your vegetables into chunks that match the size of meat pieces. Marinate them just like the chicken. Grill the skewers until the veggies are tender and slightly charred. This gives a nice smoky flavor. Don’t be afraid to play with the herbs and spices. If you like more heat, add crushed red pepper flakes. Fresh herbs like basil or mint can also brighten the dish. You can even try adding cumin for a warm, earthy taste. Each tweak can make your souvlaki unique. Just remember to keep the balance of flavors in check. Enjoy the process of experimenting! For the full recipe, check out the original version. To keep your chicken souvlaki fresh, let it cool down first. Place it in an airtight container. Store it in the fridge for up to three days. Make sure to consume it within this time for the best taste. If you have any sides, like tzatziki or salad, store them separately. This keeps flavors fresh and prevents sogginess. When reheating chicken souvlaki, the best method is using an oven or a grill. Preheat your oven to 350°F (175°C). Place the skewers on a baking sheet. Heat for about 10-15 minutes. This method helps keep the chicken juicy. For the grill, warm it up and grill for 5 minutes, turning often. Check that the internal temperature reaches 165°F (75°C) for safe eating. If you want to save chicken souvlaki for later, freezing is a great option. First, let it cool completely. Then, wrap each skewer in plastic wrap. Place them in a freezer-safe bag. Label the bag with the date. You can freeze it for up to three months. To defrost, place the bag in the fridge overnight. Reheat as mentioned above. Enjoy your delicious meal later! The best way to marinate chicken for souvlaki is to use a mix of flavors. A simple marinade includes olive oil, lemon juice, Greek yogurt, garlic, and herbs. I recommend marinating your chicken for at least 30 minutes. For the best flavor, let it sit for up to 2 hours. This longer time helps the flavors soak into the chicken. Be sure to refrigerate the chicken while it marinates. Yes, you can cook Greek chicken souvlaki in the oven. First, preheat your oven to 400°F (200°C). Thread the marinated chicken onto skewers. Place the skewers on a baking sheet lined with parchment paper. Cook for about 15-20 minutes, turning the skewers halfway through. This helps them cook evenly and get a nice color. Check that the chicken is fully cooked before serving. To know if the chicken is fully cooked, use a meat thermometer. The safe internal temperature for chicken is 165°F (75°C). Insert the thermometer into the thickest part of the chicken. If it reads 165°F or higher, your chicken is done. If not, cook it a bit longer and check again. Always ensure your chicken is safe to eat for the best experience. This article covers how to make Greek chicken souvlaki, from ingredients to storage tips. You learned about the main ingredients, marinade prep, cooking methods, and serving ideas. Remember, marinating is key for flavor. Do not shy away from using different proteins or veggies. These variations can lead to new, tasty dishes. Storing and reheating properly will keep your leftovers enjoyable. Now, you’re ready to impress at your next meal with this easy, delicious recipe. Enjoy your cooking adventure!](https://dailydishlab.com/wp-content/uploads/2025/07/2cbb5fd3-8ba9-46d6-bdce-6c8d1fc81688-768x768.webp)
![To make this dish, you need fresh seafood and pasta. Here are the main ingredients: - 8 oz (225g) linguine or spaghetti - 1 lb (450g) shrimp, peeled and deveined - 1 lb (450g) scallops, patted dry These ingredients give you the perfect base for a seafood pasta that tastes like a dream. Seasoning can make or break your dish. Here are the key seasonings and additions: - 3 tablespoons olive oil, divided - 3 cloves garlic, minced - 1 cup cherry tomatoes, halved - 1 teaspoon red pepper flakes (adjust to taste) - 1 lemon, zested and juiced - 1 cup fresh spinach, roughly chopped - Salt and pepper to taste - Fresh parsley, chopped, for garnish These flavors blend beautifully, making your pasta lively and bright. You can use different types of pasta for this dish. I recommend: - Linguine - Spaghetti Both options work well. They hold the sauce nicely and pair well with the seafood. For a twist, try fettuccine or penne. Each adds its own charm to the dish. For the complete recipe, check out the [Full Recipe]. Start by filling a large pot with water. Add a pinch of salt to the water. Bring the water to a rolling boil. Once boiling, add 8 ounces of linguine or spaghetti. Cook it according to the package instructions until it's al dente. Before you drain it, save 1 cup of the pasta water. Drain the pasta and set it aside, keeping it warm. Grab a large skillet and place it over medium heat. Pour in 2 tablespoons of olive oil. Wait until the oil shimmers, then add 1 pound of shrimp, peeled and deveined. Cook the shrimp for about 2-3 minutes on each side. They should turn pink and opaque. Once done, use a slotted spoon to transfer the shrimp to a plate and set them aside. In the same skillet, add 1 tablespoon of olive oil. Gently place 1 pound of dry scallops in a single layer. Avoid crowding the pan. Sear the scallops for about 2-3 minutes without moving them. This helps form a golden crust. Flip the scallops over and sear the other side for another 2 minutes. Once cooked, remove them from the skillet and set them aside with the shrimp. Now it’s time to make the sauce. In the leftover oil, add 3 cloves of minced garlic and 1 teaspoon of red pepper flakes. Sauté for about 30 seconds until you smell the garlic. Be careful not to burn it! Then, add 1 cup of halved cherry tomatoes. Cook for 3-4 minutes until they soften and release their juices. Turn down the heat and stir in the juice and zest from 1 lemon. Add the cooked pasta directly to the skillet. Toss everything gently to combine. Use the reserved pasta water a little at a time. This creates a light, silky sauce. Toss in 1 cup of roughly chopped fresh spinach. Cook for 1 more minute until the spinach wilts. Carefully fold in the sautéed shrimp and scallops. Make sure they are evenly mixed throughout the pasta. Season with salt and pepper to taste. If you want more heat, add extra red pepper flakes. Now, plate the pasta in shallow bowls. Make sure each bowl has equal portions of seafood. Garnish with freshly chopped parsley for a colorful finish. Cooking shrimp and scallops just right is key. Shrimp cooks fast. It takes about 2-3 minutes per side. When they turn pink, they are done. Scallops need a little more time. Sear them for about 2-3 minutes on each side. They should have a nice golden crust. Keep an eye on them. Overcooked seafood can become tough. To boost the taste, try adding lemon zest and juice. This gives a fresh flavor. You can also toss in some fresh herbs like basil or dill. A pinch of red pepper flakes adds a nice kick. If you love cheese, sprinkle some grated Parmesan on top before serving. It melts beautifully over the warm pasta. Make your dish look as good as it tastes. Serve the pasta in shallow bowls. This allows the seafood to shine. Top with fresh parsley for a pop of color. You can also add a lemon wedge on the side for a bright touch. A drizzle of olive oil right before serving makes it look fancy. With these tips, your shrimp and scallop pasta will impress everyone at the table. For the full recipe, check above. {{image_4}} You can boost the nutrition of your shrimp and scallop pasta by adding vegetables. Fresh vegetables add color and flavor. Try these options: - Zucchini: Cut it into thin ribbons or small cubes. Sauté it for a few minutes until tender. - Bell Peppers: Slice them into strips and add them with the garlic for a sweet crunch. - Asparagus: Chop into pieces and add it in the last few minutes of cooking. - Broccoli: Steam it briefly before tossing it into the pasta for a healthy addition. Adding vegetables not only makes your meal more balanced, but it also adds great texture and flavor! While shrimp and scallops are delicious, you can mix up the proteins in this dish. Here are some tasty alternatives: - Chicken: Use bite-sized pieces of cooked chicken for a heartier meal. - Mussels: Add these tasty shellfish for a unique twist and a rich flavor. - Crab: Lump crab meat offers a sweet taste that pairs well with the pasta. Feel free to experiment with different proteins. Each option brings its own flavor and charm to the dish. Changing the sauce can completely alter the dish. Here are some sauce ideas to consider: - Creamy Alfredo: Replace the olive oil with heavy cream for a rich, creamy texture. - Pesto: Toss in fresh basil pesto before serving for a vibrant and herby flavor. - Tomato Sauce: Use a light marinara sauce for a classic Italian touch. Each sauce option adds a new layer of taste to your pasta. Explore these variations to find your favorite! For the complete recipe, check out the Full Recipe. To keep your shrimp and scallop pasta fresh, first let it cool. Place the pasta in an airtight container. Make sure to separate the seafood if possible. It helps keep everything fresh. Store it in the fridge for up to three days. This way, you can enjoy it later without losing flavor. When you are ready to eat, reheat the pasta gently. Use a skillet over low heat. Add a splash of water or olive oil to keep it moist. Stir frequently to heat evenly. This method helps keep the shrimp and scallops tender. Avoid using a microwave, as it can make them rubbery. You can freeze shrimp and scallop pasta if you want to save it longer. Use a freezer-safe container or bag. Make sure to remove as much air as possible. It will keep for up to two months. When you are ready to eat, thaw it in the fridge overnight. Reheat it slowly to keep the flavors and textures intact. For the full recipe, check the details above. I recommend using linguine or spaghetti for this dish. Both types hold the sauce well. Their long strands capture all the flavors from the shrimp and scallops. You want a pasta that balances with the seafood. Yes, frozen shrimp and scallops work great here. Just thaw them beforehand. This makes sure they cook evenly. The flavor stays fresh and delicious, even with frozen seafood. To make the dish less spicy, reduce or skip the red pepper flakes. You could also add a bit more lemon juice for a fresh taste. This will balance the flavor without adding heat. I suggest a light salad or garlic bread. A fresh green salad adds a nice crunch. Garlic bread complements the dish and soaks up the sauce well. Both options enhance your dining experience without overpowering it. You can find the full recipe for Seaside Delight Shrimp and Scallop Pasta in the earlier sections of this article. It provides all the details you need to create this tasty meal. In this blog post, we explored how to make delicious shrimp and scallop pasta. We reviewed main ingredients, seasonings, and pasta types. I shared step-by-step instructions, cooking times, and tips for flavor and presentation. We also discussed variations like adding vegetables and different sauces. Lastly, I provided storage methods and answered common FAQs. Cooking this dish can be easy and fun. You can impress your family and friends with your new skills. Enjoy creating and tasting your pasta dish!](https://dailydishlab.com/wp-content/uploads/2025/06/c6436c47-e976-4ac6-abd7-ac1aef5e871c-768x768.webp)