Vegan Peanut Butter Oat Bars Simple and Healthy Treat
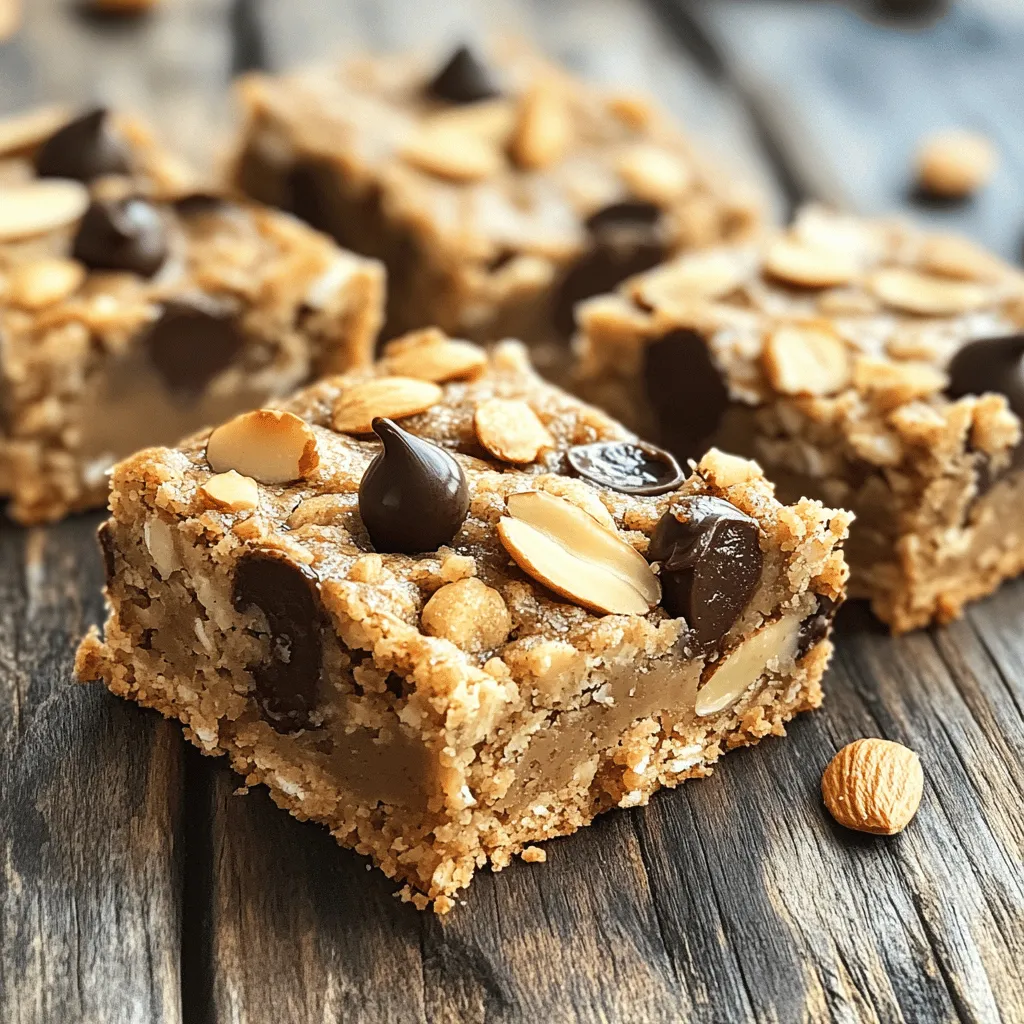
Craving a sweet treat that fits your vegan lifestyle? These Vegan Peanut Butter Oat Bars are it! Packed with wholesome ingredients like rolled oats, creamy peanut butter, and a hint of natural sweetness, they’re quick to make and perfect for on-the-go snacking. In this article, I’ll guide you through easy steps to whip up these delicious bars. Let’s get started on this simple and healthy treat!
Why I Love This Recipe
- Healthy Ingredients: This recipe is packed with wholesome ingredients like oats, peanut butter, and nuts, making it a nutritious snack option.
- Easy to Make:
- Customizable: You can easily modify this recipe by adding your favorite nuts or swapping in different plant-based milks.
- Delicious Flavor: The combination of peanut butter and chocolate is always a crowd-pleaser, satisfying your sweet tooth without the guilt.
Ingredients
Detailed List of Ingredients
To make Vegan Peanut Butter Oat Bars, you need the following ingredients:
- 1 ½ cups rolled oats
- 1 cup natural peanut butter
- 1/2 cup maple syrup
- 1/4 cup almond milk
- 1/2 cup chopped nuts
- 1/2 cup dairy-free chocolate chips
- 1 teaspoon vanilla extract
- A pinch of salt
These ingredients create a chewy and tasty treat. The oats give a great texture. The peanut butter adds a rich flavor. Maple syrup brings natural sweetness. Almond milk keeps it creamy. Chopped nuts add crunch, while chocolate chips give a sweet touch.
Optional Ingredients for Customization
You can change the recipe to suit your taste. Here are some optional ingredients:
- Different types of plant-based milk, like soy or oat milk
- Alternative sweeteners, such as agave or brown sugar
- Additional mix-ins, like dried fruits or seeds
Mixing in these options can make your bars unique. You can choose what you like best. Enjoy experimenting with flavors!

Step-by-Step Instructions
Preparation Steps
1. Preheat the oven and line the baking pan: Start by preheating your oven to 350°F (175°C). This step is key for even baking. Next, take an 8×8 inch baking pan and line it with parchment paper. This makes removal easy later on.
2. Mixing wet ingredients together: In a large mixing bowl, add 1 cup of natural peanut butter, 1/2 cup of maple syrup, 1/4 cup of almond milk, 1 teaspoon of vanilla extract, and a pinch of salt. Mix these together until they blend well. This creates a smooth base for your bars.
Combining the Ingredients
1. Adding oats and nuts: Now, add 1 ½ cups of rolled oats and 1/2 cup of chopped nuts to the wet mixture. Stir until the oats and nuts are fully coated. This helps the bars hold their shape and adds crunch.
2. Folding in chocolate chips: Gently fold in 1/2 cup of dairy-free chocolate chips. Make sure they are evenly distributed throughout the mixture. This will give your bars a sweet and rich flavor.
Baking Process
1. Pouring mixture into the pan: Pour the mixture into your prepared baking pan. Use a spatula to spread it out evenly. Press down firmly to create a solid layer. This helps the bars stay together when baked.
2. Baking time and indicators: Bake in the preheated oven for 20-25 minutes. Keep an eye on the edges; they should turn golden brown when done. Once baked, remove them from the oven and let them cool in the pan for about 10 minutes. After that, transfer to a wire rack to cool completely.
Pro Tips
- Storage Tip: Keep the bars in an airtight container at room temperature for up to one week, or refrigerate for longer freshness.
- Nut Substitution: Feel free to swap in your favorite nuts or seeds based on your preference or dietary needs.
- Chocolate Variations: Try adding different flavors of dairy-free chocolate chips for a unique twist, like mint or caramel.
- Texture Tip: For chewier bars, bake for a shorter time, and for crunchier bars, extend the baking time slightly.
Tips & Tricks
Achieving the Perfect Texture
To get the best texture for your vegan peanut butter oat bars, start with the right batter consistency. Mix the wet ingredients until they are smooth. If the peanut butter is too thick, it can make the batter dry. If needed, add a bit more almond milk for moisture.
Next, when you pour the mixture into the baking pan, press it down firmly. This helps create an even layer. Use a spatula or your hands to press it down. A well-pressed mixture will hold together better after baking.
Serving Suggestions
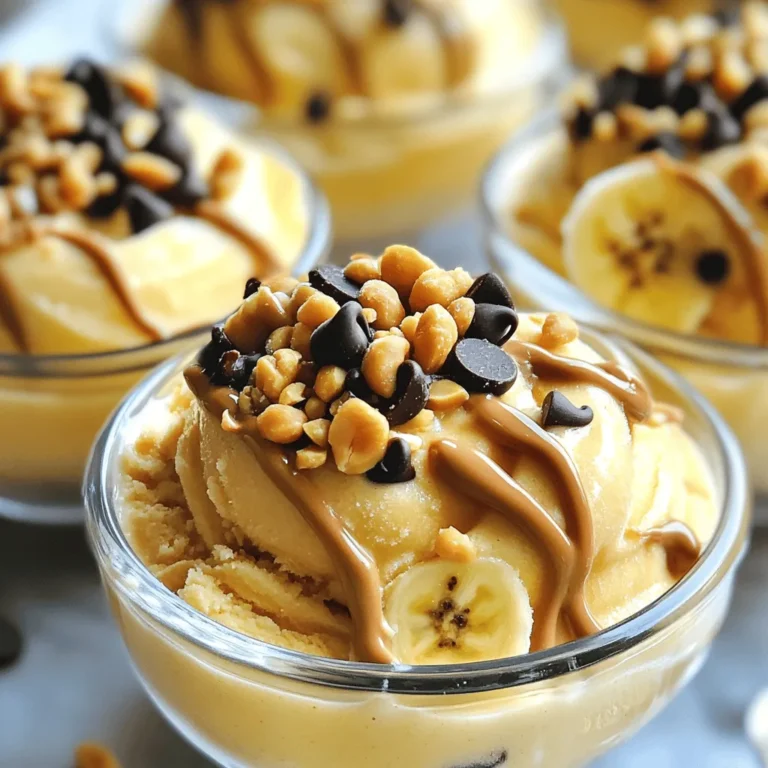
For serving, these bars are great on their own. You can add toppings for more flavor. Try drizzling some melted dairy-free chocolate on top. Chopped nuts or shredded coconut also make great additions.
Pair these bars with a glass of plant-based milk or a warm cup of tea. The creamy milk balances the rich peanut flavor. Tea adds a nice touch, especially in the afternoon.
Common Mistakes to Avoid
One mistake to avoid is not measuring your ingredients right. Use measuring cups for accuracy. Too much or too little of an ingredient can change the texture.
Another common error is overbaking the bars. Keep an eye on them while they bake. They should turn golden brown around the edges but stay soft in the center. If you bake them too long, they can become hard and dry.

Variations
Flavor Variations
You can change the taste of your vegan peanut butter oat bars easily. Try adding cocoa powder or melted chocolate for a rich, chocolatey treat. It gives the bars a nice depth of flavor. Spices like cinnamon or nutmeg can also make a difference. A teaspoon of cinnamon adds warmth and sweetness. Nutmeg gives a nice hint of spice, too. These small tweaks can make your bars exciting and new each time.
Ingredient Substitutions
If you want a nut-free option, sunflower seed butter works well. It has a similar texture to peanut butter. This swap makes the bars safe for those with nut allergies. For a gluten-free version, check that your oats are certified gluten-free. You can also use quinoa flakes as a great alternative. These options help everyone enjoy the bars without worry.
Dietary Adaptations
If you follow a keto or low-carb diet, you can adjust this recipe. Use unsweetened almond milk and reduce the maple syrup. You can substitute some oats with crushed nuts or seeds. This keeps the bars low in carbs but still tasty. For those with nut allergies, stick to sunflower seed butter. You can replace the chocolate chips with carob chips for a nut-free treat. These changes help you keep enjoying your favorite snacks while meeting your dietary needs.
Storage Info
Best Practices for Storing
To keep your vegan peanut butter oat bars fresh, store them in an airtight container. This helps maintain their moisture and flavor. You can use glass or plastic containers with a tight seal. If you want to keep them in the fridge, that works too. Just make sure they are covered well. The fridge is a good spot if you live in a warm area.
For longer storage, you can freeze the bars. Wrap each one in plastic wrap or foil. Then, place them in a freezer-safe bag. This way, they stay fresh for up to three months.
Shelf Life
At room temperature, the bars last about a week. If you store them in the fridge, they can last up to two weeks. Check for signs of spoilage. If the bars smell off or have a weird texture, it’s best to toss them. Always trust your senses when it comes to food safety.
These storage tips will help you enjoy your vegan peanut butter oat bars longer.
In this post, we covered how to make delicious energy bars. You learned about essential ingredients, optional add-ins, and easy steps to prepare them. We shared tips for perfect texture, serving ideas, and common mistakes to avoid. We also explored flavor variations and dietary options to suit your needs. Finally, we discussed storage tips and answers to your common questions.
These energy bars are easy and fun to make. You can customize them any way you like!

Vegan Peanut Butter Oat Bars
Ingredients
1 ½ cups rolled oats
1 cup natural peanut butter (smooth or chunky)
1/2 cup maple syrup
1/4 cup almond milk (or any plant-based milk)
1/2 cup chopped nuts (e.g., almonds or walnuts)
1/2 cup dairy-free chocolate chips
1 teaspoon vanilla extract
A pinch of salt
Instructions
Preheat your oven to 350°F (175°C) and line an 8×8 inch baking pan with parchment paper.
In a large mixing bowl, combine the peanut butter, maple syrup, almond milk, vanilla extract, and salt. Stir until well blended.
Add the rolled oats and chopped nuts to the mixture. Stir until the oats and nuts are fully coated.
Gently fold in the dairy-free chocolate chips, ensuring an even distribution.
Pour the mixture into the prepared baking pan, spreading it evenly with a spatula. Press down firmly to create an even layer.
Bake in the preheated oven for 20-25 minutes, or until the edges start to turn golden brown.
Remove from the oven and let the bars cool in the pan for about 10 minutes before transferring them to a wire rack to cool completely.
Once fully cooled, cut into squares or bars and store in an airtight container.
Prep Time: 10 minutes | Total Time: 35 minutes | Servings: 12 bars
Vegan Peanut Butter Oat Bars
Ingredients
- 1.5 cups rolled oats
- 1 cup natural peanut butter (smooth or chunky)
- 0.5 cup maple syrup
- 0.25 cup almond milk (or any plant-based milk)
- 0.5 cup chopped nuts (e.g., almonds or walnuts)
- 0.5 cup dairy-free chocolate chips
- 1 teaspoon vanilla extract
- a pinch salt
Instructions
- Preheat your oven to 350°F (175°C) and line an 8x8 inch baking pan with parchment paper.
- In a large mixing bowl, combine the peanut butter, maple syrup, almond milk, vanilla extract, and salt. Stir until well blended.
- Add the rolled oats and chopped nuts to the mixture. Stir until the oats and nuts are fully coated.
- Gently fold in the dairy-free chocolate chips, ensuring an even distribution.
- Pour the mixture into the prepared baking pan, spreading it evenly with a spatula. Press down firmly to create an even layer.
- Bake in the preheated oven for 20-25 minutes, or until the edges start to turn golden brown.
- Remove from the oven and let the bars cool in the pan for about 10 minutes before transferring them to a wire rack to cool completely.
- Once fully cooled, cut into squares or bars and store in an airtight container.

![- 1 cup all-purpose flour (heat-treated) - 1/4 cup granulated sugar - 1/4 cup brown sugar, packed - 1/2 cup unsalted butter, melted - 1/4 teaspoon salt - 1 teaspoon vanilla extract - 1/2 cup rainbow sprinkles - 1/2 cup mini chocolate chips (optional) - 1 cup vanilla frosting Heat-treating flour is key for safety. Raw flour can have germs. To heat-treat, spread the flour on a baking sheet. Bake it at 350°F (175°C) for five minutes. This step kills any harmful bacteria, making it safe to eat without baking. If you want a gluten-free option, you can use a gluten-free flour blend. Look for one that is designed for baking. This makes it easy for everyone to enjoy these tasty bars. Feel free to mix it up with different sprinkles. You can use chocolate sprinkles, or even themed sprinkles for events. For frosting, try chocolate or cream cheese frosting instead. Each will give a new twist to the bars. You can always experiment to find your favorite combination! 1. Mixing the dry ingredients Start with a large mixing bowl. Add 1 cup of heat-treated flour, 1/4 cup of granulated sugar, 1/4 cup of brown sugar, and 1/4 teaspoon of salt. Use a whisk to blend them well. This mix forms the base of your bars. 2. Combining wet ingredients Next, pour in 1/2 cup of melted unsalted butter and 1 teaspoon of vanilla extract. Stir until everything combines into a dough. This part brings the sweetness and rich flavor to the bars. 1. Pressing mixture into the pan Line an 8x8-inch square baking pan with parchment paper. Leave some paper hanging over the edges. This makes it easy to lift the bars later. Press the dough evenly into the pan. Use a spatula to smooth the top. 2. Spreading the frosting evenly Grab 1 cup of vanilla frosting. Spread it over the pressed mixture. Use your spatula to create a nice, even layer. For fun, sprinkle some extra rainbow sprinkles on top for color and crunch. 1. Refrigeration time and tips for proper setting Place the pan in the fridge for at least 30 minutes. This helps the bars firm up. If you want them extra solid, leave them in longer. Once set, lift the bars out using the parchment paper. Cut into squares and enjoy! For the complete recipe, check out the Full Recipe section. - Overmixing the batter: Mixing too much can make your bars dense. Just mix until combined. - Skipping refrigeration: If you don’t chill the bars, they will stay too soft. Chill for at least 30 minutes. - Reducing sugar for less sweetness: You can cut down the granulated sugar. This will make the bars less sweet without losing flavor. - Adding flavor extracts: Try different extracts like almond or coconut. Just a little can change the taste. - Best mixing bowls and tools: Use a large mixing bowl for easy stirring. A sturdy spatula helps combine the batter well. - Recommended baking pan types: A metal or glass 8x8-inch pan works best. Line it with parchment paper for easy removal. For the full recipe, check out the No-Bake Funfetti Cake Batter Bars. {{image_2}} You can change the flavor of your No-Bake Funfetti Cake Batter Bars easily. Try making chocolate cake batter bars by swapping in chocolate cake mix for the flour. Just mix it in as you would the flour. This gives a rich, chocolatey taste that many love. Another fun twist is using peanut butter. Replace the butter with creamy peanut butter. This adds a nutty flavor that pairs well with sprinkles. You can also mix in mini chocolate chips for extra indulgence. Make your bars pop with seasonal decorations. Use holiday-themed sprinkles for Christmas, Halloween, or birthdays. You can find sprinkles shaped like stars, hearts, or seasonal colors. This makes the bars festive and fun for any occasion. You can also change the color of your sprinkles based on the season. For spring, use pastel colors. For summer, bright colors shine. This small touch makes your bars look special and inviting. Want a vegan version? It’s easy! For dairy-free substitutions, use coconut oil in place of butter. It gives a nice flavor and texture. You can also use plant-based milk for the frosting. For frosting, try a vegan buttercream made with powdered sugar and plant-based butter. This way, you keep the creamy texture without using dairy. These options make your delicious bars suitable for everyone! For the full recipe, check out the [Full Recipe]. To keep your No-Bake Funfetti Cake Batter Bars fresh, store them in the refrigerator. Place the bars in an airtight container. This helps keep them moist and tasty. You can also cover them tightly with plastic wrap. If you want to save them for later, you can freeze them. Cut the bars into squares first. Wrap each piece in plastic wrap and then put them in a freezer bag. They will stay fresh this way! When stored correctly, these bars can last about a week in the fridge. If you freeze them, expect them to stay fresh for up to three months. Always check for any signs of spoilage before eating them. Look for changes in color or smell. You don’t need to reheat these bars, as they are best served cold. If you want a warm treat, you can microwave them for a few seconds. Just be careful not to overheat. A few seconds is all you need to enjoy a soft, tasty treat! No, you should not use regular flour. Raw flour can contain harmful bacteria. Heat-treated flour kills these germs and makes the flour safe for no-bake recipes. You can easily heat-treat flour at home by baking it on a baking sheet. Spread it out and bake at 350°F for about five minutes. Let it cool before using. These bars stay fresh for about five days at room temperature. To keep them longer, store them in the fridge. You know they are spoiled if they smell bad or look dry. Check for any mold as well. If you see any signs of spoilage, toss them out. Yes, you can make these bars ahead of time. They are great for parties and special events. Just prepare them a day or two before. Store them in the fridge until you are ready to serve. To save time, you can also press the mixture into the pan and chill it. Frost just before serving for the best taste. You can easily swap ingredients if needed. If you lack rainbow sprinkles, use chocolate or other types. For the frosting, any flavor works well. Don’t have mini chocolate chips? You can skip them or use nuts instead. Just be creative and adjust the recipe to fit what you have at home. For the full recipe, check the original instructions. This blog post covered the key ingredients, steps, and tips for making delicious dessert bars. We discussed crucial details like heat-treating flour and gluten-free options. I shared variations and ideas for seasonal fun, plus how to store and reheat leftovers. In summary, these bars are easy to make and fun to customize. With simple ingredients and clear steps, you're ready to bake. Enjoy creating your own tasty treats!](https://dailydishlab.com/wp-content/uploads/2025/07/c4f5a401-6c49-4de0-bdd4-db0dcac5f5d0-768x768.webp)