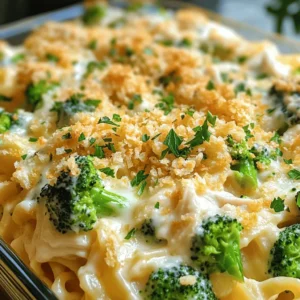
Chicken and Broccoli Alfredo Casserole Cozy Family Meal

Looking for a comforting family meal that’s easy to make? You’re going to love this Chicken and Broccoli Alfredo Casserole! It’s creamy, cheesy, and packed with flavors your whole family will enjoy. Follow our simple steps to create a dish that warms hearts and fills bellies. Whether you’re cooking for kids or guests, this recipe will have everyone asking for seconds! Let’s dive into what you’ll need to get started.
Why I Love This Recipe
- Comforting Dish: This Chicken and Broccoli Alfredo Casserole offers a warm and creamy texture that feels like a hug in a dish.
- Easy to Make: With simple ingredients and straightforward steps, this recipe is perfect for busy weeknights.
- Family Favorite: Kids and adults alike love this dish, making it a great choice for family dinners.
- Versatile Ingredients: You can easily customize this recipe by adding other vegetables or using different proteins.
Ingredients
Detailed Ingredient List
- Chicken: Use 2 cups of cooked chicken. You can shred or dice it. Leftover rotisserie chicken works great too.
- Broccoli: You need 3 cups of broccoli florets. Fresh or frozen is fine. If using fresh, steam it briefly to keep the bright color.
- Fettuccine Pasta: Grab 12 oz of fettuccine pasta. Cooking it until al dente gives the best texture.
- Alfredo Sauce: Use 2 cups of Alfredo sauce. You can buy it or make your own. Homemade adds a fresh taste.
- Cheese Types: You will need 1 cup of shredded mozzarella cheese and 1/2 cup of grated Parmesan cheese. These cheeses melt well and add flavor.
- Spices and Seasonings: Add 1 teaspoon each of garlic powder and onion powder. These spices enhance the taste. Don’t forget salt and pepper to your liking.
- Optional Garnishes: For a pop of color, use chopped parsley. It also adds a fresh flavor. You might like adding breadcrumbs for crunch on top.

Step-by-Step Instructions
Preparation Steps
- Preheat the Oven: Start by preheating your oven to 350°F (175°C). This sets the stage for our casserole to cook perfectly.
- Cook the Pasta: In a large pot, bring salted water to a boil. Add 12 ounces of fettuccine pasta. Cook it until it is al dente, following the package instructions. Once done, drain the pasta and set it aside.
- Prepare Broccoli: Take 3 cups of broccoli florets. If using fresh broccoli, steam the florets for 3-4 minutes until they are bright green and slightly tender. If you have frozen broccoli, just thaw it before adding.
- Mix Ingredients: In a big mixing bowl, combine the cooked fettuccine, 2 cups of shredded chicken, the prepared broccoli, and 2 cups of Alfredo sauce. Add 1 teaspoon of garlic powder, 1 teaspoon of onion powder, salt, and pepper to taste. Mix everything well until it’s all coated.
- Assemble Casserole: Grease a 9×13-inch casserole dish with 1 tablespoon of olive oil. Pour the pasta mixture into the dish. Spread it out evenly so every bite has the same goodness.
- Add Cheese Layer: Take 1 cup of shredded mozzarella cheese and 1/2 cup of grated Parmesan cheese. Sprinkle them evenly on top of the casserole for a cheesy finish.
- Breadcrumb Topping: In a small bowl, mix 1/2 cup of breadcrumbs with a little olive oil until coated. Sprinkle this mixture over the cheese layer to add a nice crunch.
- Bake the Casserole: Cover the casserole with aluminum foil. Bake it in the preheated oven for 25 minutes. After that, remove the foil and bake for another 10-15 minutes. This step helps get the top golden and bubbly.
- Garnish and Serve: Once baked, take it out of the oven and let it cool for a few minutes. Before serving, garnish with chopped parsley for a fresh touch.
Pro Tips
- Use Rotisserie Chicken: For a quick and easy option, use store-bought rotisserie chicken. It saves time and adds great flavor!
- Customize the Veggies: Feel free to add other vegetables such as bell peppers or spinach to boost nutrition and flavor.
- Make it Ahead: Prepare the casserole a day in advance and refrigerate it. Just bake it fresh when ready to serve!
- Adjust the Creaminess: If you prefer a creamier dish, add a splash of milk or cream to the Alfredo sauce before mixing it in.
Tips & Tricks
Cooking Tips for Perfection
Ensuring Even Cooking
To make sure everything cooks evenly, cut the chicken and broccoli into similar sizes. This helps them cook at the same rate. When you mix the ingredients, stir them well. This spreads the heat and flavors throughout the dish.
Perfect Pasta Texture
Cook the fettuccine until it is al dente, which means it should be firm but not hard. This texture helps the pasta hold its shape when baking. Remember to drain it well to avoid excess water in the casserole.
Seasoning Recommendations
Season the chicken and broccoli with salt and pepper before mixing them in. You can also add a pinch of red pepper flakes for a bit of heat. Taste the Alfredo sauce before adding it. If it needs more flavor, add a little garlic powder or onion powder.
Presentation Tips
Garnishing Ideas
For a beautiful touch, sprinkle fresh parsley on top before serving. You can also add a few extra cheese shreds for a nice look. If you want more color, try adding some sliced cherry tomatoes on top.
Serving Suggestions
Serve the casserole hot straight from the oven. Pair it with a simple green salad or garlic bread to make a complete meal. You can also offer extra Alfredo sauce on the side for those who want more creaminess.

Variations
Ingredient Swaps
Alternate Vegetables
You can change the broccoli for other veggies. Try using spinach, peas, or bell peppers. Each veggie adds a new flavor. Mix and match for fun! You can also add mushrooms for an earthy taste. Just remember to adjust the cooking time for any fresh veggies to keep them tender.
Different Protein Options
While chicken is great, you can swap it for turkey or shrimp. For a vegetarian option, use chickpeas or lentils. Each protein brings its own twist. If you want a smoky flavor, try adding some cooked bacon or sausage. This keeps the meal exciting and personal.
Sauce Considerations
Homemade vs. Store-Bought Alfredo
You can use store-bought Alfredo for speed. It saves time and tastes good. But if you want to impress, make your own! A fresh sauce tastes richer and creamier. Use butter, cream, and Parmesan for a classic blend. You can add garlic for more flavor, too.
Dairy-Free or Vegan Options
Want a dairy-free twist? Use coconut milk or almond milk for the sauce. Nutritional yeast adds a cheesy flavor without the dairy. You can also make a cashew cream for a rich base. These options keep the dish creamy and delicious while meeting dietary needs.
Storage Info
Storing Leftovers
Refrigeration Guidelines
You can store leftovers in the fridge. Place the casserole in an airtight container. It will keep fresh for up to three days. Make sure to cool it down before sealing. This way, you avoid extra moisture inside the container.
Freezing Instructions
You can also freeze the casserole for longer storage. Use a freezer-safe dish to avoid freezer burn. Wrap the dish tightly with plastic wrap and foil. The casserole can last up to three months in the freezer. When ready to eat, thaw it in the fridge overnight before reheating.
Reheating Tips
Best Methods for Reheating Casserole
The best way to reheat your casserole is in the oven. Preheat the oven to 350°F (175°C). Cover the dish with foil to prevent it from drying out. Bake for about 20 minutes or until warmed through. You can also use the microwave for quick reheating. Just heat in short bursts, stirring in between to ensure even heating.
FAQs
Can I use frozen chicken?
Yes, you can use frozen chicken. Just make sure to thaw it first. Cook the chicken until it reaches 165°F to ensure it’s safe to eat. You can then shred or dice it for the casserole.
How long does the casserole last in the fridge?
The casserole lasts about three to four days in the fridge. Store it in an airtight container. Make sure it cools down before you put it in the fridge.
Can I prepare the casserole ahead of time?
Yes, you can prepare the casserole ahead of time. Just assemble it and cover it tightly. Keep it in the fridge for up to a day before baking. This makes meal prep easier for busy days.
What should I serve with Chicken and Broccoli Alfredo Casserole?
You can serve a simple green salad or garlic bread with the casserole. These sides add freshness and balance to the meal. You can also consider a light soup as a starter. For those who enjoy a burst of flavor, a tangy vinaigrette goes well with the creamy casserole.
This blog post covered how to make a Chicken and Broccoli Alfredo Casserole. We went through the essential ingredients, step-by-step instructions, and helpful tips for perfection. You can add your own twist with ingredient swaps or sauces. Proper storage and reheating methods help keep leftovers fresh. Enjoy your cooking! This dish is great for family meals or gatherings. I hope you feel excited to try your hand at this easy yet tasty recipe.
Chicken and Broccoli Alfredo Alfredo Casserole
Ingredients
2 cups cooked chicken, shredded or diced
3 cups broccoli florets (fresh or frozen)
12 oz fettuccine pasta
2 cups Alfredo sauce (store-bought or homemade)
1 cup shredded mozzarella cheese
1/2 cup grated Parmesan cheese
1 teaspoon garlic powder
1 teaspoon onion powder
Salt and pepper to taste
1 tablespoon olive oil
1/2 cup breadcrumbs (for topping)
Parsley, chopped (for garnish)
Instructions
Preheat the Oven: Preheat your oven to 350°F (175°C).
Cook the Pasta: In a large pot of salted boiling water, cook the fettuccine according to package instructions until al dente. Drain and set aside.
Prepare Broccoli: If using fresh broccoli, steam the florets for about 3-4 minutes until bright green and slightly tender. If using frozen, simply thaw them and set aside.
Mix Ingredients: In a large mixing bowl, combine the cooked pasta, shredded chicken, steamed broccoli, Alfredo sauce, garlic powder, onion powder, salt, and pepper. Mix until well incorporated.
Assemble Casserole: Grease a 9×13-inch casserole dish with olive oil. Pour the pasta mixture into the dish, spreading it evenly.
Cheese Layer: Sprinkle the shredded mozzarella and grated Parmesan cheese evenly over the top of the casserole.
Breadcrumb Topping: In a small bowl, combine breadcrumbs with a drizzle of olive oil; mix until coated. Sprinkle the breadcrumb mixture evenly over the cheese layer for added crunch.
Bake: Cover the casserole with aluminum foil and bake in the preheated oven for 25 minutes. Then, remove the foil and bake for an additional 10-15 minutes or until the top is golden and bubbly.
Garnish and Serve: Remove from the oven and let it cool for a few minutes. Garnish with chopped parsley before serving.
Prep Time: 15 minutes | Total Time: 50 minutes | Servings: 6
Chicken and Broccoli Alfredo Casserole
Ingredients
- 2 cups cooked chicken, shredded or diced
- 3 cups broccoli florets (fresh or frozen)
- 12 oz fettuccine pasta
- 2 cups Alfredo sauce (store-bought or homemade)
- 1 cup shredded mozzarella cheese
- 0.5 cup grated Parmesan cheese
- 1 teaspoon garlic powder
- 1 teaspoon onion powder
- to taste Salt and pepper
- 1 tablespoon olive oil
- 0.5 cup breadcrumbs (for topping)
- as needed Parsley, chopped (for garnish)
Instructions
- Preheat your oven to 350°F (175°C).
- In a large pot of salted boiling water, cook the fettuccine according to package instructions until al dente. Drain and set aside.
- If using fresh broccoli, steam the florets for about 3-4 minutes until bright green and slightly tender. If using frozen, simply thaw them and set aside.
- In a large mixing bowl, combine the cooked pasta, shredded chicken, steamed broccoli, Alfredo sauce, garlic powder, onion powder, salt, and pepper. Mix until well incorporated.
- Grease a 9x13-inch casserole dish with olive oil. Pour the pasta mixture into the dish, spreading it evenly.
- Sprinkle the shredded mozzarella and grated Parmesan cheese evenly over the top of the casserole.
- In a small bowl, combine breadcrumbs with a drizzle of olive oil; mix until coated. Sprinkle the breadcrumb mixture evenly over the cheese layer for added crunch.
- Cover the casserole with aluminum foil and bake in the preheated oven for 25 minutes. Then, remove the foil and bake for an additional 10-15 minutes or until the top is golden and bubbly.
- Remove from the oven and let it cool for a few minutes. Garnish with chopped parsley before serving.
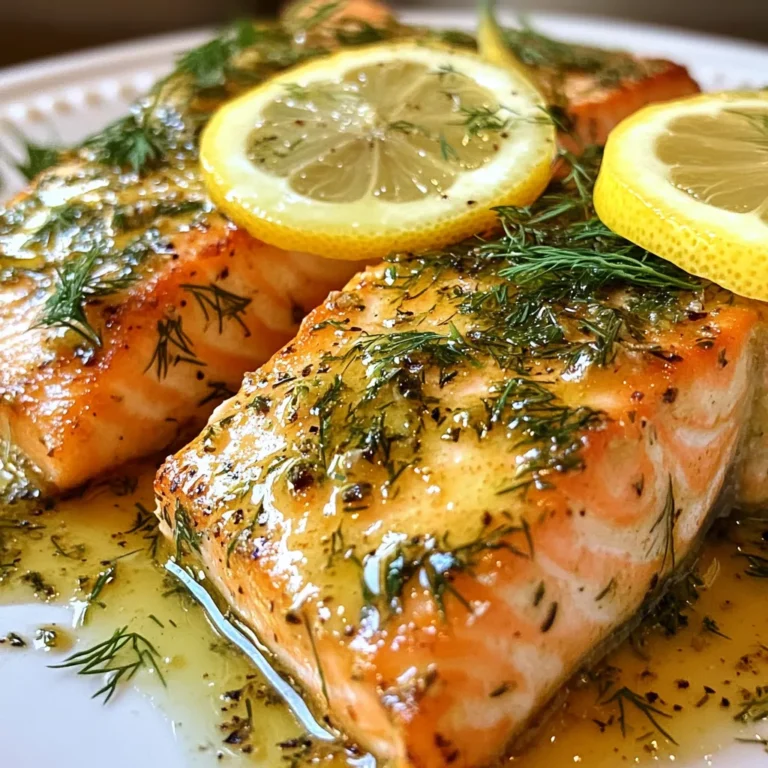
![Let’s dive into the simple ingredients that make this dish shine. Each element plays a role in creating a tasty and healthy meal. Here’s what you need: - 4 cod fillets (about 6 oz each) - 2 tablespoons olive oil - 2 lemons (one for zest and juice, one for slices) - 3 cloves garlic, minced - 1 teaspoon dried oregano - 1 teaspoon dried thyme - 1 teaspoon paprika - Salt and pepper to taste - Fresh parsley, chopped (for garnish) Cod fillets are the star here. They have a mild taste that works well with the bright lemon and herbs. Olive oil adds richness and helps the fish stay moist. Garlic brings a punch of flavor, and the herbs add freshness. Using fresh lemons is key. You’ll use one for zest and juice, which brightens up the dish. The other lemon gets sliced and placed on top of the cod for extra flavor and a nice look. Dried oregano and thyme give depth to the dish. Paprika adds a hint of warmth. Finally, a sprinkle of salt and pepper rounds it all out. These ingredients come together to create a dish that is both light and satisfying. If you want to see how these ingredients blend, check out the Full Recipe for step-by-step instructions. 1. Preheat the oven: Start by setting your oven to 400°F (200°C). This ensures even cooking for our cod. 2. Prepare the marinade: In a small bowl, mix 2 tablespoons of olive oil, 3 minced garlic cloves, the zest of one lemon, and the juice from that same lemon. Add 1 teaspoon each of dried oregano, thyme, and paprika. Finally, season with salt and pepper to taste. Stir it well. 3. Coat the cod fillets: Place your 4 cod fillets in a baking dish. Pour the lemon herb marinade over each fillet. Make sure they are all well coated in that tasty mix. 1. Arrange lemon slices: Take the other lemon and slice it. Place the lemon slices on top of each cod fillet. This adds a fresh, zesty kick while baking. 2. Baking time and temperatures: Slide the baking dish into your preheated oven. Bake for 15-20 minutes. The cod is ready when it turns opaque and flakes easily with a fork. 1. Rest and garnish before serving: Once the cod is done, take it out and let it rest for a couple of minutes. This helps the juices settle. Before serving, sprinkle freshly chopped parsley on top. It adds color and a fresh taste. Feel free to check the [Full Recipe] for more details! Choosing the best cod is key to a tasty dish. Look for cod fillets that are firm and moist. They should have a clean, ocean-like smell. Freshness matters. If you can, buy wild-caught cod for the best flavor. Fresh herbs and citrus add bright notes. Use fresh parsley, thyme, and oregano when possible. They bring out the lemon's zest. Always choose lemons that feel heavy for their size. Juicy lemons will boost your dish. To ensure moist fillets, don’t overcook the cod. Bake just until it is opaque and flakes easily. Set a timer for 15 minutes, then check. If it needs more time, add a few minutes. Adjusting seasoning levels is easy. Taste the marinade before adding it to the cod. If it feels bland, add a pinch more salt or pepper. You can always adjust to match your palate. Pair this dish with sides that complement its light flavors. Roasted vegetables work nicely. Try asparagus or green beans for a fresh touch. A light sauce can elevate the meal. Consider a yogurt dill sauce for creaminess. It adds a nice contrast to the cod. For a bit of crunch, add a side salad. For the full recipe, see the details above. {{image_2}} You can try other white fish instead of cod. Fish like tilapia or haddock work well. They will soak up the lemon and herb flavors nicely. If you want a richer taste, you can substitute cod with salmon. Salmon has more fat, so it stays moist when cooked. The lemon still brightens the dish, making it fresh and tasty. Adding spices can take your baked lemon herb cod to the next level. You might want to try adding cumin or dill to the mix. These spices pair well with lemon, enhancing the dish's flavor. If you love heat, consider making a spicy version. Add chili flakes or fresh jalapeños to the marinade. This twist creates a fun kick that many will enjoy. While baking is easy, you can also grill or pan-sear your cod. Grilling adds a smoky flavor that many people love. Just be sure to keep an eye on it so it doesn't dry out. Air-frying is another great option. It cooks the fish quickly and gives it a nice crust. Each method offers a unique taste and texture, so feel free to experiment. To store leftover cod, let it cool first. Place the cod in an airtight container. Cover it tightly to keep it fresh. You can store it in the fridge for up to three days. Make sure to check for any off smells or changes in texture before eating. If you want to keep cod longer, freezing is a great option. Wrap the cod tightly in plastic wrap or foil. You can also use a freezer-safe bag. This helps prevent freezer burn. Cod can last up to three months in the freezer. When you are ready to use it, remember to thaw it slowly. Place it in the fridge overnight for the best results. To reheat your baked cod, use the oven or a skillet. If you use the oven, preheat it to 350°F (175°C). Place the cod on a baking sheet for about 10 minutes. This keeps it moist and tasty. If you choose a skillet, heat it over medium heat. Add a splash of olive oil and gently warm the cod for about 5 minutes. Avoid high heat to keep the texture nice. Enjoy your flavorful meal again! What can I substitute for cod in this recipe? You can use halibut, haddock, or tilapia as substitutes for cod. Each fish has a mild flavor and similar texture. This ensures your dish remains light and flaky. How do I know when cod is fully cooked? Cod is fully cooked when it turns opaque and flakes easily with a fork. This usually takes 15 to 20 minutes at 400°F. A food thermometer can help; the internal temperature should reach 145°F. Can I prepare the marinade in advance? Yes, you can prepare the marinade a day ahead. Store it in the fridge until you are ready to use it. This allows the flavors to blend nicely. Caloric values per serving Each serving of Baked Lemon Herb Cod contains about 250 calories. This is a healthy option for a balanced meal. Key vitamins and minerals in the dish This dish is rich in protein, vitamin C, and omega-3 fatty acids. Cod provides important nutrients for heart health and overall well-being. Making it gluten-free This recipe is naturally gluten-free. Use gluten-free seasoning blends if you want to add extra flavors without worry. Adjusting for low-sodium diets For a low-sodium version, skip the added salt. Use fresh herbs and lemon juice for flavor without extra salt. This keeps your meal healthy and tasty. This article covered how to make delicious baked cod. You learned about the right ingredients, like fresh cod and herbs. I shared step-by-step instructions for preparing, baking, and serving. We also explored tips for ingredient selection and cooking methods. Remember, cooking should be fun and simple. Experiment with flavors and cooking styles. Whether you stick to cod or try other fish, enjoy the process. Keep these tips in mind for tasty meals every time. Happy cooking!](https://dailydishlab.com/wp-content/uploads/2025/07/2716cd61-27b0-42e4-83ae-f5907d1cee06-768x768.webp)

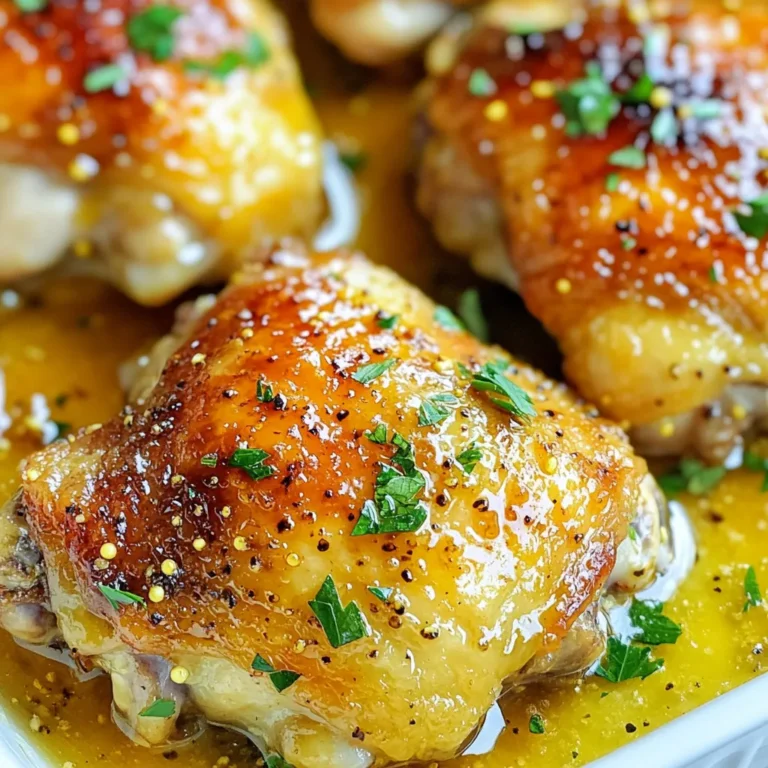
![- 2 boneless, skinless chicken breasts - 1 tablespoon olive oil - Salt and pepper to taste - 1 teaspoon garlic powder - 1 cup cherry tomatoes, halved - 1 cup fresh mozzarella balls, halved - 1 teaspoon balsamic glaze - 1/4 cup fresh basil leaves, chopped For the Caprese Chicken Skillet, I focus on fresh and simple flavors. The chicken breasts are the star. I use boneless and skinless for quick cooking. Season them well with salt, pepper, and garlic powder. This simple mix adds great taste. Next, I use cherry tomatoes. Their sweetness pairs so well with the chicken. Halving them helps them cook faster and release juice. Fresh mozzarella balls are a must. When they melt, they create a creamy layer over the chicken. Finally, I finish with balsamic glaze and fresh basil. These add a burst of flavor and freshness. - Additional herbs (e.g., oregano or thyme) - Vegetables (e.g., bell peppers or onions) You can customize this dish with extra herbs. Oregano or thyme can add a nice touch. If you want more veggies, bell peppers or onions work great. They add color and more flavor. - Large skillet - Meat thermometer - Cutting board and knife To make this dish, I recommend a large skillet. It gives enough space for everything to cook evenly. A meat thermometer helps ensure the chicken is cooked through. A cutting board and knife are essential for chopping tomatoes and basil. For the full recipe and more details, check out the [Full Recipe]. First, I season the chicken breasts. I sprinkle salt, pepper, and garlic powder on both sides. This simple step adds great flavor to the chicken. Next, I heat olive oil in a large skillet over medium heat. When the oil is hot, I add the seasoned chicken breasts. I sear them for about 6-7 minutes on each side. The goal is to get them golden brown and fully cooked. I check the internal temperature; it should reach 165°F (75°C). Once cooked, I remove the chicken and set it aside. In the same skillet, I add the halved cherry tomatoes. I sauté them for about 3-4 minutes. This softens the tomatoes and helps them release their juices. The aroma fills the kitchen, making my mouth water! Now it's time to put it all together. I lower the heat and return the chicken to the skillet. I top each chicken breast with the halved mozzarella balls. Then, I cover the skillet for about 2-3 minutes. This allows the cheese to melt perfectly over the chicken. Finally, I drizzle balsamic glaze over the chicken and tomatoes. I sprinkle fresh basil on top for a burst of flavor. The dish is now ready to serve! I plate it right from the skillet for a rustic look. The melted mozzarella stretches as I cut into the chicken. It looks and tastes amazing! You can find the full recipe for Caprese Chicken Skillet to follow along easily! To get the best chicken texture, use a meat thermometer. Cook the chicken until it hits 165°F (75°C). This ensures it's juicy and safe to eat. If you want to avoid overcooked chicken, don’t rush the cooking. Sear chicken for about 6-7 minutes on each side. If the chicken looks golden brown, it’s likely ready. Using fresh herbs makes a big difference. Fresh basil adds a bright taste. Dried herbs can work, but they lack that punch. For the balsamic glaze, choose a high-quality brand. A good glaze is thick and sweet. It adds a rich flavor that ties all the ingredients together. Serve the dish straight from the skillet for a cozy feel. It looks great and keeps the food warm. For extra visual appeal, sprinkle more fresh basil on top. You can also drizzle more balsamic glaze around the plate. This adds color and makes your meal look gourmet. Check out the Full Recipe for more details. {{image_2}} You can swap chicken for turkey or shrimp in this dish. Turkey works well as a leaner option. It absorbs the flavors nicely and cooks fast. Shrimp adds a fun twist. They cook quickly too. Just sauté them in olive oil until they turn pink. Both options bring a new taste to the skillet. If you prefer a meatless meal, make a Caprese Skillet without meat. Instead of chicken, use hearty vegetables. Zucchini, eggplant, or bell peppers can work great. Sauté them until tender. You still get that fresh taste with tomatoes and mozzarella. This option is just as colorful and delicious. Adding Italian seasoning or chili flakes can boost the flavor. Italian seasoning brings herbs like oregano and basil together. Just a teaspoon adds depth to the dish. If you like heat, sprinkle chili flakes on top. This extra kick makes every bite exciting. You can mix and match these ideas to suit your taste. For the full recipe, check out the detailed instructions. To store leftovers, let the Caprese Chicken cool first. Place it in an airtight container. You can keep it in the fridge for up to three days. When you're ready to eat, just take it out and reheat. If you want to freeze the dish, cut it into smaller pieces. Use a freezer-safe container or bag. Make sure to remove as much air as possible. You can freeze it for up to three months. When you want to eat it, let it thaw overnight in the fridge. To reheat, use a skillet over medium heat. Add a splash of water to prevent dryness. Cover it with a lid to keep the moisture in. You can also use the microwave, but it may not keep the cheese as nice. Heat in short bursts until hot. Enjoy your meal just like the first time! You can prep this meal in advance. Start by cooking the chicken and tomatoes. Cool them down and store in an airtight container. Keep in the fridge for up to three days. When you are ready to eat, just reheat in a skillet. Add fresh mozzarella and basil last to keep them fresh. Yes, you can switch up the cheese! Try using goat cheese for a tangy flavor. Feta also works well if you like a crumbly texture. For a creamy taste, you can use ricotta. Each cheese adds a unique twist to your dish. This dish is delicious on its own, but you can add sides. Serve with a simple green salad for freshness. Garlic bread pairs nicely if you want something hearty. You could also try it with roasted vegetables for extra flavor. Access the full recipe for Caprese Chicken Skillet! In this post, I covered how to make a delicious Caprese Chicken Skillet. We explored essential ingredients like chicken, tomatoes, and mozzarella, along with optional add-ons and cooking tips. I shared steps for cooking the chicken and veggies to perfection and suggested storage tips. Remember, you can swap meats or make it vegetarian for variety. This dish is not just tasty but easy to prepare and customize. Now, gather your ingredients, try the recipe, and enjoy every bite!](https://dailydishlab.com/wp-content/uploads/2025/06/81b82b43-9289-48a9-b4c0-455fdfb47d4f-768x768.webp)