Caprese Stuffed Avocados Healthy and Flavorful Delight
![- 2 ripe avocados - 1 cup cherry tomatoes, halved - 1 cup fresh mozzarella balls, drained - 1/4 cup fresh basil leaves, chopped - 2 tablespoons balsamic glaze - 1 tablespoon extra virgin olive oil - Salt and pepper to taste Choosing ripe avocados To pick ripe avocados, look for ones that yield slightly to gentle pressure. They should feel soft but not mushy. Dark green or almost black skin often indicates ripeness. Selecting high-quality mozzarella When picking mozzarella, choose fresh balls packed in water for best taste. They should be creamy and slightly springy to the touch. Avoid dry or crumbly options. Best tomatoes for freshness Select plump cherry tomatoes that shine and feel firm. They should have a sweet smell. Avoid any with wrinkles or blemishes for the freshest results. You need a few tools for this recipe: - A sharp knife - A cutting board - A mixing bowl - A spoon - A serving plate When cutting avocados, safety is key. Always cut away from your body. Make sure you hold the avocado steady. Use a sharp knife to slice easily through the skin. First, cut each avocado in half and remove the pit. If you want more space for stuffing, scoop out a little flesh. Be careful not to break the skin. Next, take your mixing bowl. Combine the halved cherry tomatoes, mozzarella balls, and chopped basil. Now, drizzle the balsamic glaze and olive oil over the mix. Add salt and pepper to taste. Toss everything gently until coated. Then, spoon the mixture into each avocado half. Fill them generously; it makes a nice presentation. For a finishing touch, drizzle a little extra balsamic glaze on top. This adds a nice shine and flavor. To serve, place your stuffed avocados on a colorful plate. This makes the dish pop! For added flair, garnish with extra basil leaves. A sprinkle of cracked black pepper also enhances the look and taste. Enjoy this healthy and flavorful delight! For the full recipe, check out the details above. When making Caprese stuffed avocados, avoid these common mistakes: - Over-mashing the avocado: You want the avocado to be creamy but still chunky. If you mash it too much, the texture will not hold up. - Using unripe ingredients: Always choose ripe avocados and fresh tomatoes. Unripe avocados can ruin the dish. To make your Caprese stuffed avocados even better, try these tips: - Additional spices and herbs: Add a pinch of garlic powder or crushed red pepper for a kick. Fresh oregano can also complement the flavors well. - Variations with cheese types: Instead of mozzarella, try feta or goat cheese for a different flavor profile. Each cheese brings its own texture and taste. Pair your Caprese stuffed avocados with these ideas: - Best pairings as side dishes: Serve with a light salad or crusty bread. These will balance the richness of the avocado. - Ideal occasions for serving: This dish works great for summer picnics, brunches, or casual dinners. The bright colors and fresh flavors make it a showstopper. Remember, you can find the full recipe for Caprese stuffed avocados [here]. {{image_2}} You can change up the cheese or protein in your Caprese stuffed avocados. For cheese, try feta or goat cheese. Both add a nice twist to the dish. If you want extra protein, consider adding grilled chicken or chickpeas. These swaps keep the meal tasty and fun. If you run out of balsamic glaze, you can use a mix of vinegar and honey. This gives you a sweet and tangy flavor. You can also try lemon juice for a fresher taste. These alternatives work well and keep your dish exciting. Making this dish gluten-free is easy. All the ingredients are naturally gluten-free. Just make sure any add-ins you choose are also gluten-free. If you want a vegan version, swap mozzarella for a vegan cheese. You can also use tofu for extra protein. To lower calories, skip the cheese or use less. You can also reduce oil and glaze. This keeps the taste without too many calories. Enjoy your healthy meal without losing flavor. To give your Caprese stuffed avocados an Italian flair, add sun-dried tomatoes or prosciutto. These ingredients bring rich flavors that fit perfectly with the original recipe. For a Mediterranean twist, add olives or artichokes. These ingredients make your dish even more vibrant. You can also use herbs like oregano or thyme for added depth. Each variation keeps your meal fresh and packed with flavor. For the full recipe, check out Caprese Stuffed Avocados. To store leftover stuffed avocados, place them in an airtight container. This keeps them fresh longer. It's best to eat them within a day. If you have extra filling, store it in a small bowl. Cover it tightly with plastic wrap. This keeps the mixture fresh for a few days. For the best taste, eat the filling within three days. Can you freeze stuffed avocados? I recommend not freezing them. The texture of the avocado changes when frozen. However, you can freeze the filling. To do this, place it in a freezer-safe bag. Squeeze out the air before sealing. It can last up to three months in the freezer. When you're ready to eat, thaw it in the fridge overnight. How long can leftovers last? Stuffed avocados are best enjoyed fresh. If stored properly, they last about a day. The filling can last longer, about three days in the fridge. Look for signs of spoilage. If you see mold or an off smell, discard it. Fresh ingredients like tomatoes can spoil quickly, so check them often. To find the best avocados, look for a few signs. First, gently squeeze the avocado in your palm. It should feel slightly soft but not mushy. Next, check the skin color. A dark green or black skin often means it's ripe. Finally, look at the stem. If it comes off easily and reveals green underneath, the avocado is ready. Yes, you can prepare some parts in advance. Chop the tomatoes and basil and mix them with mozzarella. Store this mix in the fridge. Cut the avocados just before serving. This keeps them fresh and tasty. You can also make the balsamic glaze in advance and store it in a jar. To stop avocados from turning brown, use lemon or lime juice. Brush the juice on the cut sides. If your avocado is already brown, you can scoop out the brown part. The green flesh underneath is still good to eat. Store any leftovers in an airtight container to slow down oxidation. This blog post covered a delicious stuffed avocado recipe, highlighting key ingredients, tips for freshness, and easy steps. I shared tricks to enhance flavor, avoid common mistakes, and offered variations for everyone. Remember, using ripe ingredients makes a big difference. You can also adjust the recipe to fit your diet or taste. Enjoy experimenting with this fresh and healthy dish in your kitchen! Embrace the joy of cooking while making something tasty and fun. Happy cooking!](https://dailydishlab.com/wp-content/uploads/2025/06/7cc9200a-b80e-4e13-a62f-626088c82c0b.webp)
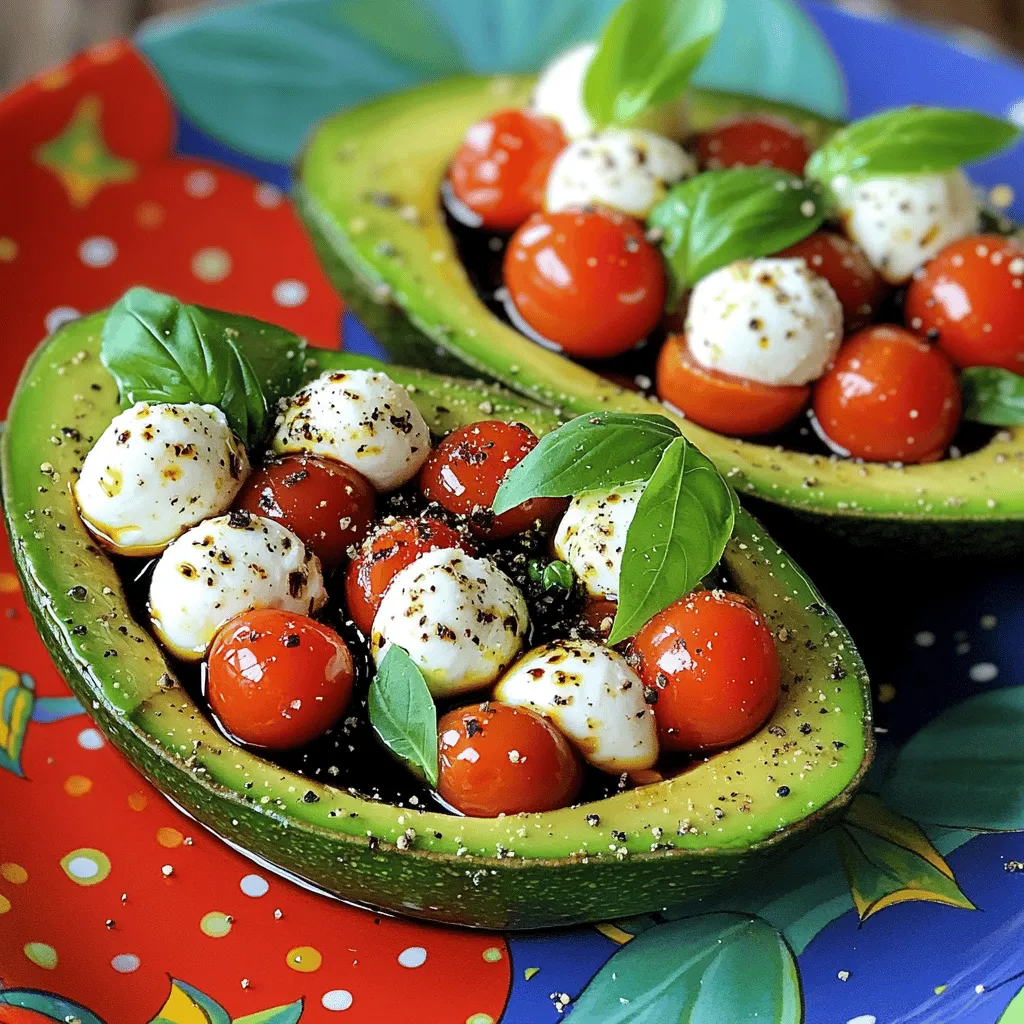
Looking for a healthy and tasty snack? Caprese Stuffed Avocados offer the perfect blend of flavors and nutrients. With creamy avocado, juicy tomatoes, and fresh mozzarella, this dish is both simple and satisfying. Plus, it’s easy to make! In this article, I’ll show you how to whip up this delightful recipe, share tips for perfect ingredients, and explore fun variations. Get ready to impress your taste buds!
Why I Love This Recipe
- Fresh and Flavorful: The combination of ripe avocados, juicy tomatoes, and creamy mozzarella makes for a delightful explosion of flavors in every bite.
- Quick and Easy: This recipe comes together in just 10 minutes, making it perfect for a last-minute appetizer or a healthy snack.
- Healthy and Nutritious: Packed with healthy fats from avocados and protein from mozzarella, this dish is both satisfying and good for you.
- Visually Stunning: The vibrant colors of the ingredients create a beautiful presentation that is sure to impress your guests.
Ingredients
List of Ingredients
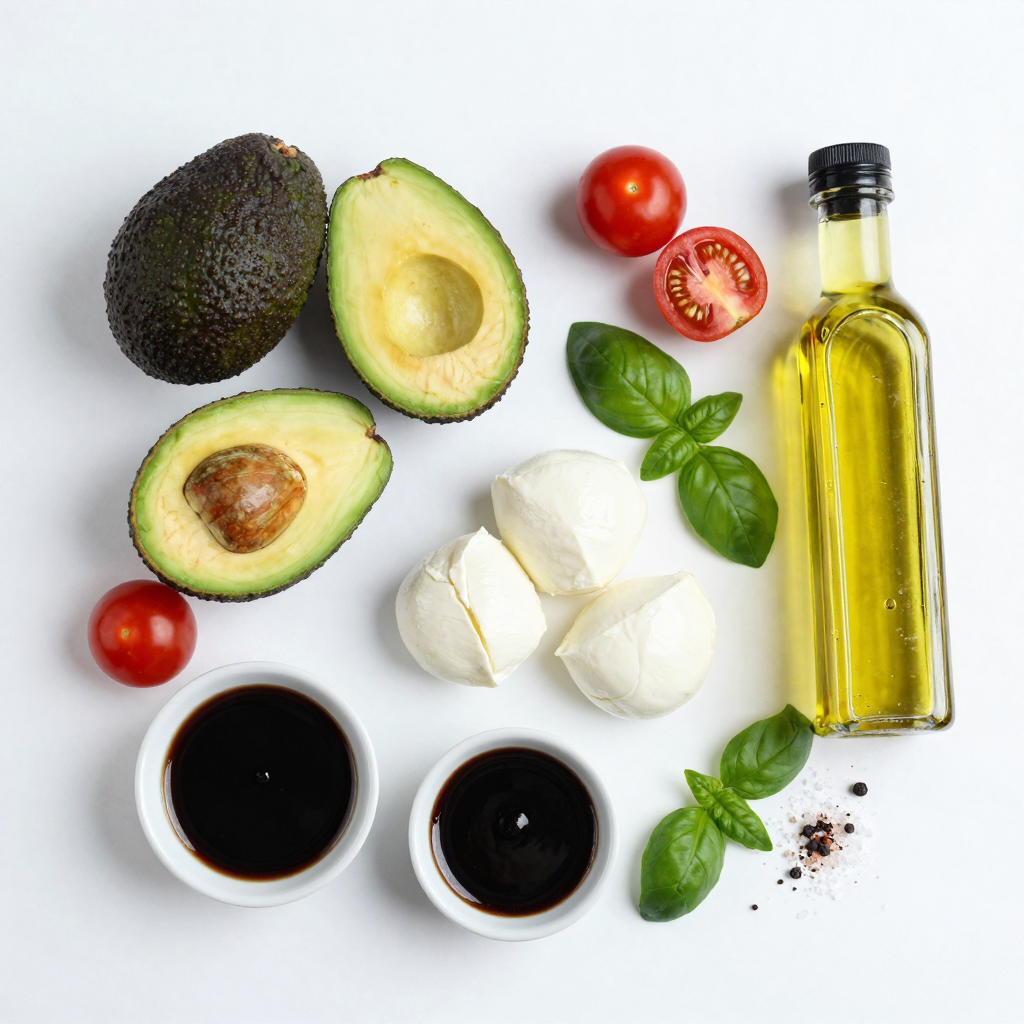
- 2 ripe avocados
- 1 cup cherry tomatoes, halved
- 1 cup fresh mozzarella balls, drained
- 1/4 cup fresh basil leaves, chopped
- 2 tablespoons balsamic glaze
- 1 tablespoon extra virgin olive oil
- Salt and pepper to taste
Tips for Selecting Fresh Ingredients
Choosing ripe avocados
To pick ripe avocados, look for ones that yield slightly to gentle pressure. They should feel soft but not mushy. Dark green or almost black skin often indicates ripeness.
Selecting high-quality mozzarella
When picking mozzarella, choose fresh balls packed in water for best taste. They should be creamy and slightly springy to the touch. Avoid dry or crumbly options.
Best tomatoes for freshness
Select plump cherry tomatoes that shine and feel firm. They should have a sweet smell. Avoid any with wrinkles or blemishes for the freshest results.
Step-by-Step Instructions
Preparation Overview
You need a few tools for this recipe:
- A sharp knife
- A cutting board
- A mixing bowl
- A spoon
- A serving plate
When cutting avocados, safety is key. Always cut away from your body. Make sure you hold the avocado steady. Use a sharp knife to slice easily through the skin.
Detailed Recipe Steps
First, cut each avocado in half and remove the pit. If you want more space for stuffing, scoop out a little flesh. Be careful not to break the skin. Next, take your mixing bowl. Combine the halved cherry tomatoes, mozzarella balls, and chopped basil.
Now, drizzle the balsamic glaze and olive oil over the mix. Add salt and pepper to taste. Toss everything gently until coated. Then, spoon the mixture into each avocado half. Fill them generously; it makes a nice presentation.
For a finishing touch, drizzle a little extra balsamic glaze on top. This adds a nice shine and flavor.
Presentation Recommendations
To serve, place your stuffed avocados on a colorful plate. This makes the dish pop! For added flair, garnish with extra basil leaves. A sprinkle of cracked black pepper also enhances the look and taste.
Enjoy this healthy and flavorful delight!
Pro Tips
- Choose Ripe Avocados: Make sure your avocados are ripe but not overripe for the best texture and flavor.
- Fresh Ingredients Matter: Use fresh mozzarella and high-quality basil for enhanced taste and aroma in your dish.
- Perfect Balsamic Glaze: If you want a thicker consistency, reduce balsamic vinegar in a saucepan until it thickens, then drizzle over the filling.
- Serving Presentation: For a stunning presentation, serve on a colorful plate and sprinkle with extra basil and cracked pepper.
Tips & Tricks
Common Mistakes to Avoid
When making Caprese stuffed avocados, avoid these common mistakes:
- Over-mashing the avocado: You want the avocado to be creamy but still chunky. If you mash it too much, the texture will not hold up.
- Using unripe ingredients: Always choose ripe avocados and fresh tomatoes. Unripe avocados can ruin the dish.
Enhancing Flavor and Texture
To make your Caprese stuffed avocados even better, try these tips:
- Additional spices and herbs: Add a pinch of garlic powder or crushed red pepper for a kick. Fresh oregano can also complement the flavors well.
- Variations with cheese types: Instead of mozzarella, try feta or goat cheese for a different flavor profile. Each cheese brings its own texture and taste.
Serving Suggestions
Pair your Caprese stuffed avocados with these ideas:
- Best pairings as side dishes: Serve with a light salad or crusty bread. These will balance the richness of the avocado.
- Ideal occasions for serving: This dish works great for summer picnics, brunches, or casual dinners. The bright colors and fresh flavors make it a showstopper.
Variations
Ingredient Swaps
You can change up the cheese or protein in your Caprese stuffed avocados. For cheese, try feta or goat cheese. Both add a nice twist to the dish. If you want extra protein, consider adding grilled chicken or chickpeas. These swaps keep the meal tasty and fun.
If you run out of balsamic glaze, you can use a mix of vinegar and honey. This gives you a sweet and tangy flavor. You can also try lemon juice for a fresher taste. These alternatives work well and keep your dish exciting.
Dietary Adjustments
Making this dish gluten-free is easy. All the ingredients are naturally gluten-free. Just make sure any add-ins you choose are also gluten-free. If you want a vegan version, swap mozzarella for a vegan cheese. You can also use tofu for extra protein.
To lower calories, skip the cheese or use less. You can also reduce oil and glaze. This keeps the taste without too many calories. Enjoy your healthy meal without losing flavor.
Regional Twists
To give your Caprese stuffed avocados an Italian flair, add sun-dried tomatoes or prosciutto. These ingredients bring rich flavors that fit perfectly with the original recipe.
For a Mediterranean twist, add olives or artichokes. These ingredients make your dish even more vibrant. You can also use herbs like oregano or thyme for added depth. Each variation keeps your meal fresh and packed with flavor.
Storage Info
Best Practices for Storage
To store leftover stuffed avocados, place them in an airtight container. This keeps them fresh longer. It’s best to eat them within a day. If you have extra filling, store it in a small bowl. Cover it tightly with plastic wrap. This keeps the mixture fresh for a few days. For the best taste, eat the filling within three days.
Freezing Options
Can you freeze stuffed avocados? I recommend not freezing them. The texture of the avocado changes when frozen. However, you can freeze the filling. To do this, place it in a freezer-safe bag. Squeeze out the air before sealing. It can last up to three months in the freezer. When you’re ready to eat, thaw it in the fridge overnight.
Shelf Life
How long can leftovers last? Stuffed avocados are best enjoyed fresh. If stored properly, they last about a day. The filling can last longer, about three days in the fridge. Look for signs of spoilage. If you see mold or an off smell, discard it. Fresh ingredients like tomatoes can spoil quickly, so check them often.
FAQs
How do you choose ripe avocados for this recipe?
To find the best avocados, look for a few signs. First, gently squeeze the avocado in your palm. It should feel slightly soft but not mushy. Next, check the skin color. A dark green or black skin often means it’s ripe. Finally, look at the stem. If it comes off easily and reveals green underneath, the avocado is ready.
Can I make this recipe ahead of time?
Yes, you can prepare some parts in advance. Chop the tomatoes and basil and mix them with mozzarella. Store this mix in the fridge. Cut the avocados just before serving. This keeps them fresh and tasty. You can also make the balsamic glaze in advance and store it in a jar.
What to do if my avocados turn brown?
To stop avocados from turning brown, use lemon or lime juice. Brush the juice on the cut sides. If your avocado is already brown, you can scoop out the brown part. The green flesh underneath is still good to eat. Store any leftovers in an airtight container to slow down oxidation.
This blog post covered a delicious stuffed avocado recipe, highlighting key ingredients, tips for freshness, and easy steps. I shared tricks to enhance flavor, avoid common mistakes, and offered variations for everyone. Remember, using ripe ingredients makes a big difference. You can also adjust the recipe to fit your diet or taste. Enjoy experimenting with this fresh and healthy dish in your kitchen! Embrace the joy of cooking while making something tasty and fun. Happy cooking!
![- 2 ripe avocados - 1 cup cherry tomatoes, halved - 1 cup fresh mozzarella balls, drained - 1/4 cup fresh basil leaves, chopped - 2 tablespoons balsamic glaze - 1 tablespoon extra virgin olive oil - Salt and pepper to taste Choosing ripe avocados To pick ripe avocados, look for ones that yield slightly to gentle pressure. They should feel soft but not mushy. Dark green or almost black skin often indicates ripeness. Selecting high-quality mozzarella When picking mozzarella, choose fresh balls packed in water for best taste. They should be creamy and slightly springy to the touch. Avoid dry or crumbly options. Best tomatoes for freshness Select plump cherry tomatoes that shine and feel firm. They should have a sweet smell. Avoid any with wrinkles or blemishes for the freshest results. You need a few tools for this recipe: - A sharp knife - A cutting board - A mixing bowl - A spoon - A serving plate When cutting avocados, safety is key. Always cut away from your body. Make sure you hold the avocado steady. Use a sharp knife to slice easily through the skin. First, cut each avocado in half and remove the pit. If you want more space for stuffing, scoop out a little flesh. Be careful not to break the skin. Next, take your mixing bowl. Combine the halved cherry tomatoes, mozzarella balls, and chopped basil. Now, drizzle the balsamic glaze and olive oil over the mix. Add salt and pepper to taste. Toss everything gently until coated. Then, spoon the mixture into each avocado half. Fill them generously; it makes a nice presentation. For a finishing touch, drizzle a little extra balsamic glaze on top. This adds a nice shine and flavor. To serve, place your stuffed avocados on a colorful plate. This makes the dish pop! For added flair, garnish with extra basil leaves. A sprinkle of cracked black pepper also enhances the look and taste. Enjoy this healthy and flavorful delight! For the full recipe, check out the details above. When making Caprese stuffed avocados, avoid these common mistakes: - Over-mashing the avocado: You want the avocado to be creamy but still chunky. If you mash it too much, the texture will not hold up. - Using unripe ingredients: Always choose ripe avocados and fresh tomatoes. Unripe avocados can ruin the dish. To make your Caprese stuffed avocados even better, try these tips: - Additional spices and herbs: Add a pinch of garlic powder or crushed red pepper for a kick. Fresh oregano can also complement the flavors well. - Variations with cheese types: Instead of mozzarella, try feta or goat cheese for a different flavor profile. Each cheese brings its own texture and taste. Pair your Caprese stuffed avocados with these ideas: - Best pairings as side dishes: Serve with a light salad or crusty bread. These will balance the richness of the avocado. - Ideal occasions for serving: This dish works great for summer picnics, brunches, or casual dinners. The bright colors and fresh flavors make it a showstopper. Remember, you can find the full recipe for Caprese stuffed avocados [here]. {{image_2}} You can change up the cheese or protein in your Caprese stuffed avocados. For cheese, try feta or goat cheese. Both add a nice twist to the dish. If you want extra protein, consider adding grilled chicken or chickpeas. These swaps keep the meal tasty and fun. If you run out of balsamic glaze, you can use a mix of vinegar and honey. This gives you a sweet and tangy flavor. You can also try lemon juice for a fresher taste. These alternatives work well and keep your dish exciting. Making this dish gluten-free is easy. All the ingredients are naturally gluten-free. Just make sure any add-ins you choose are also gluten-free. If you want a vegan version, swap mozzarella for a vegan cheese. You can also use tofu for extra protein. To lower calories, skip the cheese or use less. You can also reduce oil and glaze. This keeps the taste without too many calories. Enjoy your healthy meal without losing flavor. To give your Caprese stuffed avocados an Italian flair, add sun-dried tomatoes or prosciutto. These ingredients bring rich flavors that fit perfectly with the original recipe. For a Mediterranean twist, add olives or artichokes. These ingredients make your dish even more vibrant. You can also use herbs like oregano or thyme for added depth. Each variation keeps your meal fresh and packed with flavor. For the full recipe, check out Caprese Stuffed Avocados. To store leftover stuffed avocados, place them in an airtight container. This keeps them fresh longer. It's best to eat them within a day. If you have extra filling, store it in a small bowl. Cover it tightly with plastic wrap. This keeps the mixture fresh for a few days. For the best taste, eat the filling within three days. Can you freeze stuffed avocados? I recommend not freezing them. The texture of the avocado changes when frozen. However, you can freeze the filling. To do this, place it in a freezer-safe bag. Squeeze out the air before sealing. It can last up to three months in the freezer. When you're ready to eat, thaw it in the fridge overnight. How long can leftovers last? Stuffed avocados are best enjoyed fresh. If stored properly, they last about a day. The filling can last longer, about three days in the fridge. Look for signs of spoilage. If you see mold or an off smell, discard it. Fresh ingredients like tomatoes can spoil quickly, so check them often. To find the best avocados, look for a few signs. First, gently squeeze the avocado in your palm. It should feel slightly soft but not mushy. Next, check the skin color. A dark green or black skin often means it's ripe. Finally, look at the stem. If it comes off easily and reveals green underneath, the avocado is ready. Yes, you can prepare some parts in advance. Chop the tomatoes and basil and mix them with mozzarella. Store this mix in the fridge. Cut the avocados just before serving. This keeps them fresh and tasty. You can also make the balsamic glaze in advance and store it in a jar. To stop avocados from turning brown, use lemon or lime juice. Brush the juice on the cut sides. If your avocado is already brown, you can scoop out the brown part. The green flesh underneath is still good to eat. Store any leftovers in an airtight container to slow down oxidation. This blog post covered a delicious stuffed avocado recipe, highlighting key ingredients, tips for freshness, and easy steps. I shared tricks to enhance flavor, avoid common mistakes, and offered variations for everyone. Remember, using ripe ingredients makes a big difference. You can also adjust the recipe to fit your diet or taste. Enjoy experimenting with this fresh and healthy dish in your kitchen! Embrace the joy of cooking while making something tasty and fun. Happy cooking!](https://dailydishlab.com/wp-content/uploads/2025/06/7cc9200a-b80e-4e13-a62f-626088c82c0b-300x300.webp)
Caprese Stuffed Avocados
Ingredients
2 ripe avocados
1 cup cherry tomatoes, halved
1 cup fresh mozzarella balls, drained
1/4 cup fresh basil leaves, chopped
2 tablespoons balsamic glaze
1 tablespoon extra virgin olive oil
Salt and pepper to taste
Instructions
Carefully cut each avocado in half and remove the pit.
Using a spoon, gently scoop out a small portion of the flesh to create a little more space for the filling, but be careful not to break the skin.
In a mixing bowl, combine the halved cherry tomatoes, mozzarella balls, and chopped basil.
Drizzle the balsamic glaze and olive oil over the mixture, then season with salt and pepper to taste. Gently toss until everything is evenly coated.
Spoon the tomato and mozzarella mixture into each avocado half, filling them generously.
Drizzle a little extra balsamic glaze on top for a beautiful finish.
Serve immediately for the best flavor and texture.
Prep Time, Total Time, Servings: 10 min | 10 min | 2 servings
– Presentation Tips: Place the stuffed avocados on a colorful serving plate. Garnish with extra basil leaves and some cracked black pepper for additional visual appeal.
Caprese Stuffed Avocados
Ingredients
- 2 whole ripe avocados
- 1 cup cherry tomatoes, halved
- 1 cup fresh mozzarella balls, drained
- 0.25 cup fresh basil leaves, chopped
- 2 tablespoons balsamic glaze
- 1 tablespoon extra virgin olive oil
- to taste salt and pepper
Instructions
- Carefully cut each avocado in half and remove the pit.
- Using a spoon, gently scoop out a small portion of the flesh to create a little more space for the filling, but be careful not to break the skin.
- In a mixing bowl, combine the halved cherry tomatoes, mozzarella balls, and chopped basil.
- Drizzle the balsamic glaze and olive oil over the mixture, then season with salt and pepper to taste. Gently toss until everything is evenly coated.
- Spoon the tomato and mozzarella mixture into each avocado half, filling them generously.
- Drizzle a little extra balsamic glaze on top for a beautiful finish.
- Serve immediately for the best flavor and texture.
- Presentation Tips: Place the stuffed avocados on a colorful serving plate. Garnish with extra basil leaves and some cracked black pepper for additional visual appeal.
. To make your Crispy Parmesan Cauliflower Bites truly amazing, use Panko breadcrumbs. They add a great crunch that regular breadcrumbs can't match. When you coat the florets, spray them lightly with olive oil. This helps them get golden and crispy. For a tasty twist, pair the bites with marinara sauce or garlic aioli for dipping. Both options bring out the flavors of the cauliflower. Before serving, sprinkle fresh parsley on top. It adds a pop of color and freshness. Be careful not to overcrowd the baking sheet. If the florets are too close, they will steam instead of crisp. Also, make sure each floret has an even coating of the breadcrumb mix. This ensures every bite is crispy and delicious. {{image_2}} You can easily change the heat of your cauliflower bites. Just add more cayenne or sprinkle in some red pepper flakes. If you love herbs, try Italian seasoning for a fresh twist. These simple changes can make your bites even more exciting. Want a different cheese flavor? Switch it up! Use cheddar for a sharp taste or mozzarella for a milder touch. You can also adjust the cheese amount to fit your taste. More cheese gives a richer flavor, while less keeps it light. If you need a gluten-free version, it's easy! Just swap all-purpose flour with gluten-free flour. You can also use gluten-free breadcrumbs for the coating. This way, everyone can enjoy these tasty bites without worry. Remember to check the Full Recipe for detailed steps and measurements! You should let your cauliflower bites cool completely before storing them. Once cool, place them in an airtight container. This keeps them fresh and tasty. I often use a glass container with a tight lid. It works well to prevent moisture from getting in. For the best texture, reheat your cauliflower bites in the oven. Set your oven to 350°F and bake for 10-15 minutes. This helps regain their crispiness. If you are short on time, you can use the microwave. Just know that they may lose some crunch this way. You can freeze raw coated florets before baking. This makes meal prep super easy. Just coat the florets as usual and place them on a baking sheet. Freeze them for about an hour, then transfer them to a freezer-safe bag. When you are ready to bake, you can bake them directly from frozen. Just add a few more minutes to the baking time. This method makes it simple to enjoy these crispy bites anytime. For the full recipe, check back to the beginning. Crispy Parmesan Cauliflower Bites usually last 3-5 days in the refrigerator. To keep them fresh, store them in an airtight container. This helps maintain their taste and texture. If you notice any signs of spoilage, it’s best to toss them out. Yes, you can prep and coat them ahead of time. Just coat the florets and keep them in the fridge. Bake them just before serving for the best results. This keeps them crispy and hot, perfect for sharing with friends or family. These bites pair well with many dipping sauces. You can try ranch, marinara, or mustard. Each dip adds its own flavor, making your snack even more tasty. Feel free to get creative with sauces you enjoy! For the full recipe, check out the complete details above. Making Crispy Parmesan Cauliflower Bites is simple and fun. We covered key ingredients, from fresh cauliflower to tasty seasonings. I shared step-by-step instructions and tips for achieving that perfect crunch. You can customize these bites to fit your taste or dietary needs. Don’t forget to store them well for later. With a bit of practice, you’ll impress friends and family with this healthy snack. Enjoy the making and sharing of these bites!](https://dailydishlab.com/wp-content/uploads/2025/07/cd5319ec-8bde-454d-b3ba-e0a3ba5bfe99-768x768.webp)
![- 1 cup roasted red peppers (jarred or homemade) - 1 cup cooked chickpeas (canned or boiled) - 2 tablespoons tahini - 2 tablespoons lemon juice - 1 garlic clove, minced - 1 teaspoon ground cumin - Salt and pepper to taste - 4 large whole wheat tortillas - 1 cup fresh spinach leaves - ½ cup feta cheese, crumbled - ¼ cup fresh basil leaves I love these ingredients because they come together to create rich flavors. The roasted red peppers bring a sweet, smoky taste. Chickpeas add creaminess and protein. Tahini and lemon juice add a nice tang. For added taste, use garlic and cumin. They make the hummus more exciting. Don't forget salt and pepper! They help balance the flavors. When you wrap the hummus in tortillas, you can add fresh spinach for crunch. Feta cheese gives a salty kick, while basil adds freshness. These optional ingredients make the pinwheels even better. With these ingredients, you can make Roasted Red Pepper Hummus Pinwheels that impress. Follow the [Full Recipe] for steps to bring these wraps to life! To make the roasted red pepper hummus, you will blend key ingredients together. Combine 1 cup of roasted red peppers, 1 cup of cooked chickpeas, 2 tablespoons of tahini, 2 tablespoons of lemon juice, 1 minced garlic clove, and 1 teaspoon of ground cumin in a blender. Blend until the mix is smooth. Add salt and pepper to taste. This hummus is creamy and full of flavor. Now, let's assemble the pinwheels. Take a large whole wheat tortilla and lay it flat on a clean surface. Spread about ¼ cup of the hummus evenly over the tortilla. Leave some space at the edges. On top of the hummus, add ¼ cup of fresh spinach leaves. If you like, sprinkle on 2 tablespoons of crumbled feta cheese and a few fresh basil leaves. Now, carefully roll the tortilla from one edge to the other. Make sure to roll it tightly to keep the filling secure. Once you have rolled all the tortillas, it’s time to cut them into pinwheels. Use a sharp knife to slice each roll into 1-inch thick pieces. Arrange the pinwheels on a serving platter. For a nice touch, drizzle a bit of olive oil on top and sprinkle some fresh herbs. This adds color and extra flavor. You can find the full recipe [here](#). To get the best hummus, focus on the texture. If it feels too thick, add olive oil or water. Blend until it’s smooth and creamy. You want it to spread easily on your tortillas. A good texture makes your pinwheels taste even better. Rolling is key to great pinwheels. Start at one edge and roll tightly. This keeps the filling secure and prevents spills. If your pinwheels are too loose, they may fall apart. A firm roll helps keep everything together for a perfect bite. Make your pinwheels look fancy! Use toothpicks to hold them in place. This makes it easy for guests to grab one. You can also add fresh herbs on top for color. A small bowl of extra hummus on the side adds a nice touch. For the full recipe, check out the details above. {{image_2}} You can easily change the taste of your pinwheels. Try adding roasted garlic for a rich, deep flavor. Sun-dried tomatoes bring a sweet and tangy twist. Both additions make your hummus pop with new taste. Experimenting with these ingredients can surprise your guests with delightful flavors. If you want a different base, swap chickpeas for black beans. This change gives you a new taste and texture. You can also use gluten-free tortillas if needed. This way, everyone can enjoy your pinwheels, regardless of their diet. You can still keep the recipe fun and tasty. Using seasonal vegetables or herbs can refresh your pinwheels. In spring, add fresh asparagus or peas for a crisp bite. In summer, use vibrant tomatoes or cucumbers to brighten the dish. Autumn herbs like sage or thyme can add warmth. Winter greens like kale can add depth. These changes keep your pinwheels exciting all year long. For the full recipe, check out [Full Recipe]. You should keep leftover pinwheels in an airtight container. This helps maintain their freshness. Store them in the refrigerator for up to 2 days. After that, they may lose flavor and texture. If you want to save pinwheels for later, freeze them rolled but uncut. This method preserves their taste. When you're ready to eat, thaw them in the fridge overnight. This way, they stay delicious and ready for serving. To enjoy your pinwheels, serve them chilled. If you prefer them at room temperature, let them sit for about 15 minutes before serving. This little wait brings out the flavors. For the full recipe, check the earlier sections. You can make these pinwheels vegan by using plant-based feta or simply omitting the cheese. This keeps the wraps tasty without using any animal products. The hummus itself is already vegan, so you can enjoy this dish guilt-free. Yes, you can prepare these pinwheels ahead of time. Just assemble them and refrigerate for up to 2 days. This makes them perfect for parties or quick snacks. When you're ready to serve, just slice them and enjoy! These pinwheels pair well with a light salad, fresh veggies, or extra hummus for dipping. You can also add some crunchy pita chips for a fun texture mix. This way, you’ll have a lovely spread ready for any occasion. These Roasted Red Pepper Hummus Pinwheels are simple and fun to make. You blend roasted peppers with chickpeas, tahini, and lemon juice to create your hummus. Then, you spread it on tortillas, add fresh greens and cheese, and roll them up. You can store any leftovers in the fridge, or even freeze them for later. Mix things up with different ingredients or flavors. Enjoy these tasty pinwheels as a snack or a meal. Happy cooking!](https://dailydishlab.com/wp-content/uploads/2025/07/cc610438-684d-4891-90d6-a163b369b276-768x768.webp)
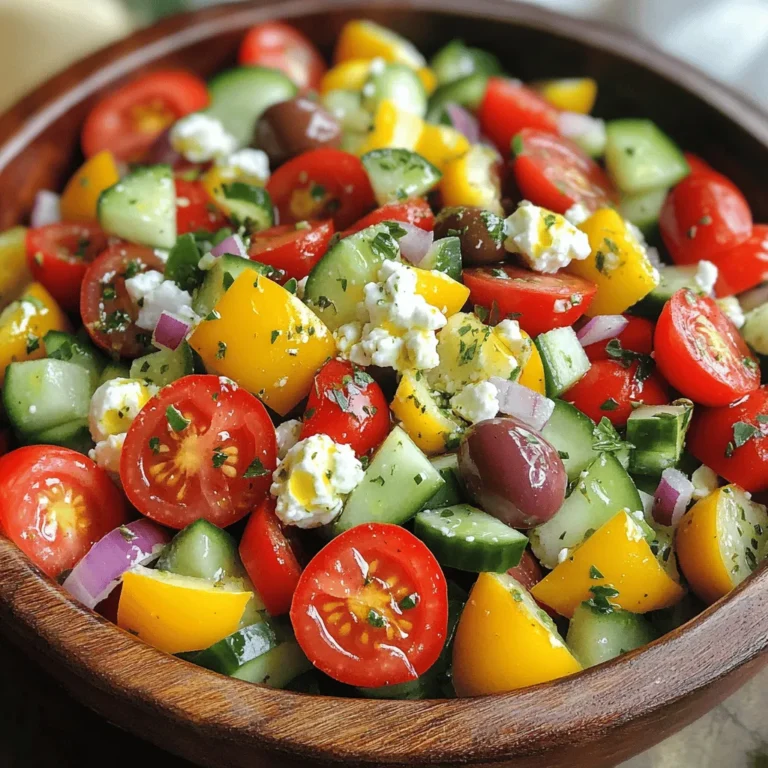
![To create a vibrant Cucumber Dill Greek Salad, you need fresh ingredients. Each element adds flavor and texture. Here’s what you will need: - Cucumber: 2 large, diced - Cherry tomatoes: 1 cup, halved - Red onion: 1 small, thinly sliced - Bell pepper: 1 (any color), diced - Kalamata olives: 1 cup, pitted and halved - Feta cheese: 1 cup, crumbled - Fresh dill: 1 tablespoon, chopped (or 1 teaspoon dried) - Olive oil: 3 tablespoons, extra-virgin - Lemon juice: 2 tablespoons - Salt and pepper: to taste These ingredients come together to form a refreshing and simple dish. The combination of cool cucumbers and tangy feta creates a delightful contrast. Adding olives brings a briny kick, while fresh dill adds a nice herbal note. Each bite is crisp, flavorful, and satisfying. Using high-quality ingredients is key. Choose firm cucumbers and ripe tomatoes. Fresh herbs make a big difference, too. For the best taste, use extra-virgin olive oil and fresh lemon juice. If you want to explore the full process, check out the Full Recipe for step-by-step guidance. Enjoy making this delicious salad! Start by peeling the cucumbers. You can skip this if you prefer the skin. Next, dice the cucumbers into small, bite-sized pieces. Then, take your cherry tomatoes and cut them in half. For the red onion, slice it thinly. Finally, dice the bell pepper into small pieces. Each vegetable adds color and crunch to our salad. In a large serving bowl, mix the diced cucumbers, halved cherry tomatoes, sliced red onion, and diced bell pepper. These fresh veggies create a nice base. Now, gently fold in the Kalamata olives and crumbled feta cheese. Be careful not to break the feta. This adds a creamy texture to the salad. In a small bowl, whisk together the extra-virgin olive oil and fresh lemon juice. This will be our dressing. Then, add the chopped dill, salt, and pepper. Whisk again until it is well mixed. The dressing brings all the flavors together. Drizzle the dressing over the salad. Use a large spoon to gently toss everything together. Make sure all ingredients are well coated. This step is key for a tasty salad. Taste the salad and adjust the seasoning. You can add more salt, pepper, or lemon juice if needed. For the best flavor, let the salad sit for about 10-15 minutes before serving. This allows the flavors to meld and enhances the taste. For the full recipe, check out the link. Fresh vegetables are key to a great salad. They add crunch and flavor. For the best taste, pick firm cucumbers, ripe tomatoes, and crisp bell peppers. Look for bright colors and smooth skins. This ensures they are fresh and packed with nutrients. Kalamata olives are a must for this dish. They bring a rich, briny taste. Seek out authentic Kalamata olives, as they offer the best flavor. Check for olives that are dark purple or black, with a smooth texture. Avoid any that look shriveled or dry. For presentation, serve this salad in a large bowl. Arrange the veggies in layers for a colorful look. You can also use small mason jars for individual servings. This fun style makes it easy to grab and enjoy. Pair this salad with grilled chicken or fish for a complete meal. You can also serve it with pita bread for a light lunch. It goes well with tzatziki sauce, which adds a nice creaminess. Marinating the salad adds depth. Let it sit for about 10-15 minutes before serving. This helps the flavors blend. If you have time, prepare it early in the day. It will taste even better after a few hours in the fridge. Serve this salad chilled for the most refreshing experience. It’s perfect for hot days or summer gatherings. Enjoy it as a side dish or a light main course. For more flavor, try adding a splash of red wine vinegar or a pinch of garlic. For the full recipe, check out the Cucumber Dill Greek Salad. {{image_2}} You can switch up the cheese in this salad. If you want a twist, try goat cheese or ricotta. Both add a creamy texture and taste. For dressings, consider balsamic vinegar or yogurt-based dressings. Each option brings its own flair to the salad. This salad shines with fresh, seasonal veggies. In summer, add ripe avocado or sweet corn. In fall, try diced apples or roasted nuts for crunch. Change the herbs too; basil or mint can give a new flavor. Adjust the dressing with spices fitting the season for a unique touch. Get creative by adding elements from other cuisines. Try diced jalapeños for a spicy kick or sprinkle with sesame seeds for an Asian vibe. You can also mix in chopped cilantro or lime juice for a Mexican twist. Explore fusion recipes, like adding quinoa for a heartier meal. To keep your Cucumber Dill Greek Salad fresh, refrigerate any leftovers right away. Use an airtight container to store the salad. This keeps flavors intact and prevents wilting. Make sure to seal the container tightly. You can enjoy the salad for about 3 to 4 days in the fridge. Check for signs of spoilage before eating. Look for wilting or a sour smell. If the salad looks off, it's best to toss it. Leftover salad can be used in many ways. Try mixing it with cooked pasta for a quick dish. You can add it to a wrap for a tasty lunch. Chopped salad makes a great topping for grilled chicken or fish. Get creative and enjoy your leftovers! For the full recipe, check the [Full Recipe]. Yes, you can make this salad ahead of time. To prepare in advance, chop the vegetables and store them separately. Keep the dressing in a jar. Just before serving, mix everything together. This keeps the veggies crisp and fresh. The salad stays good for about three days in the fridge. Use an airtight container to store it. If you notice any signs of spoilage, like a strange smell or mushy veggies, throw it away. This salad can be made vegan. Just skip the feta cheese or use a plant-based cheese. You can also replace the honey in the dressing with agave syrup for sweetness. This way, everyone can enjoy it. This salad goes well with grilled chicken or fish. You can also serve it with pita bread and hummus. For a full meal, pair it with rice or quinoa dishes. To boost the dressing's flavor, add more lemon juice or dill. You can also mix in a pinch of garlic powder or a splash of red wine vinegar. Taste as you go to find your perfect balance. For the complete recipe, check out the Full Recipe. This blog post covered everything you need for a perfect Cucumber Dill Greek Salad. You learned about key ingredients, step-by-step preparation, and expert tips for the best taste. Remember to choose fresh produce and experiment with variations to suit your taste. This salad is easy to make and can be tweaked for any season or diet. Enjoy this tasty dish at your next meal or gathering, and feel free to get creative with leftovers. A fresh salad can brighten any plate!](https://dailydishlab.com/wp-content/uploads/2025/07/5e5811ac-3a9b-4435-8173-96f3851851ae-768x768.webp)