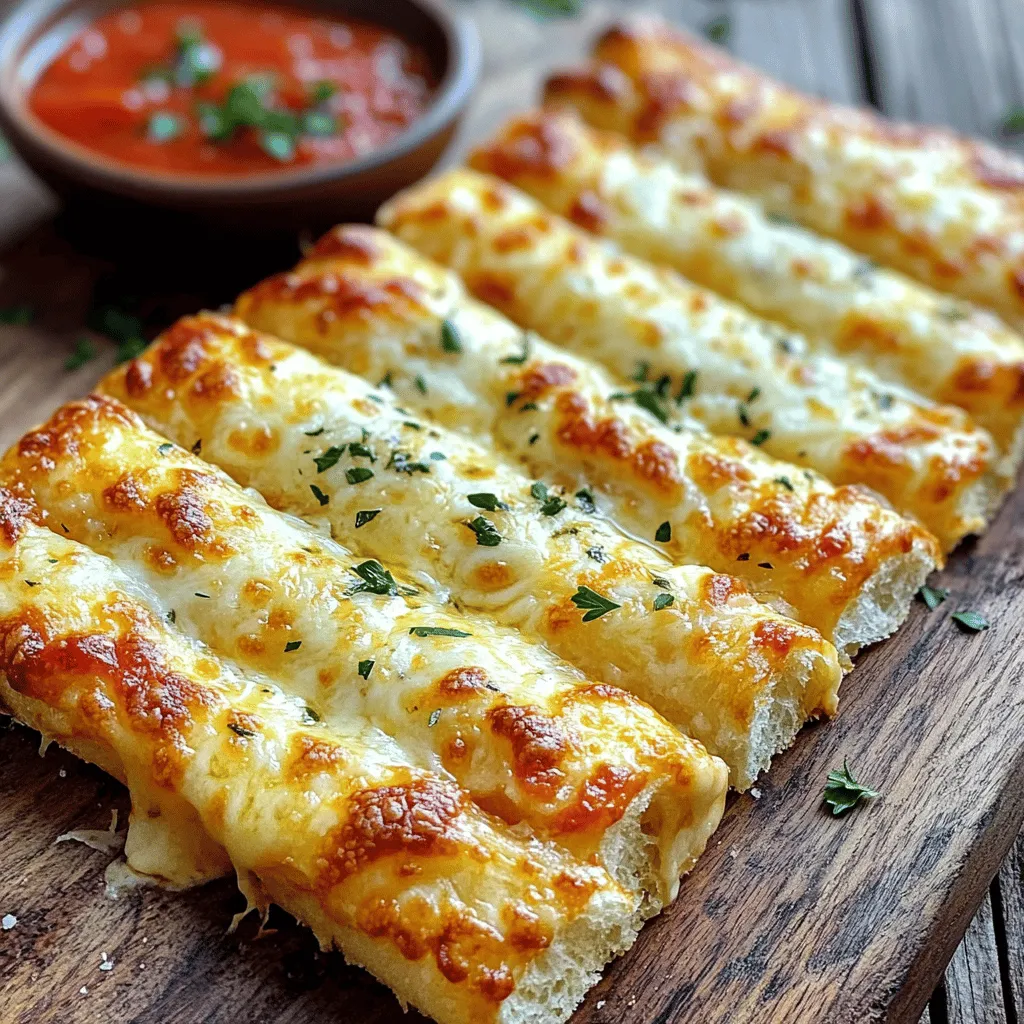
Cheesy Garlic Breadsticks Easy and Delicious Recipe

Get ready to indulge in the warm, gooey goodness of cheesy garlic breadsticks! In this easy recipe, I’ll guide you through every step to create these tasty treats that are perfect for any meal or snack. With simple ingredients and quick prep, you’ll impress your friends and family. Let’s dive into the cheesy, garlicky goodness and make a batch today!
Why I Love This Recipe
- Delicious Flavor Combination: The blend of garlic, butter, and cheeses creates a mouthwatering taste that is irresistible.
- Easy to Make: This recipe uses simple ingredients and straightforward steps, making it perfect for both novice and experienced bakers.
- Perfect for Sharing: These breadsticks are great for gatherings, parties, or family dinners, allowing everyone to enjoy a warm, cheesy treat.
- Versatile Serving Options: They can be served alongside marinara sauce, soups, or salads, making them a versatile addition to any meal.
Ingredients
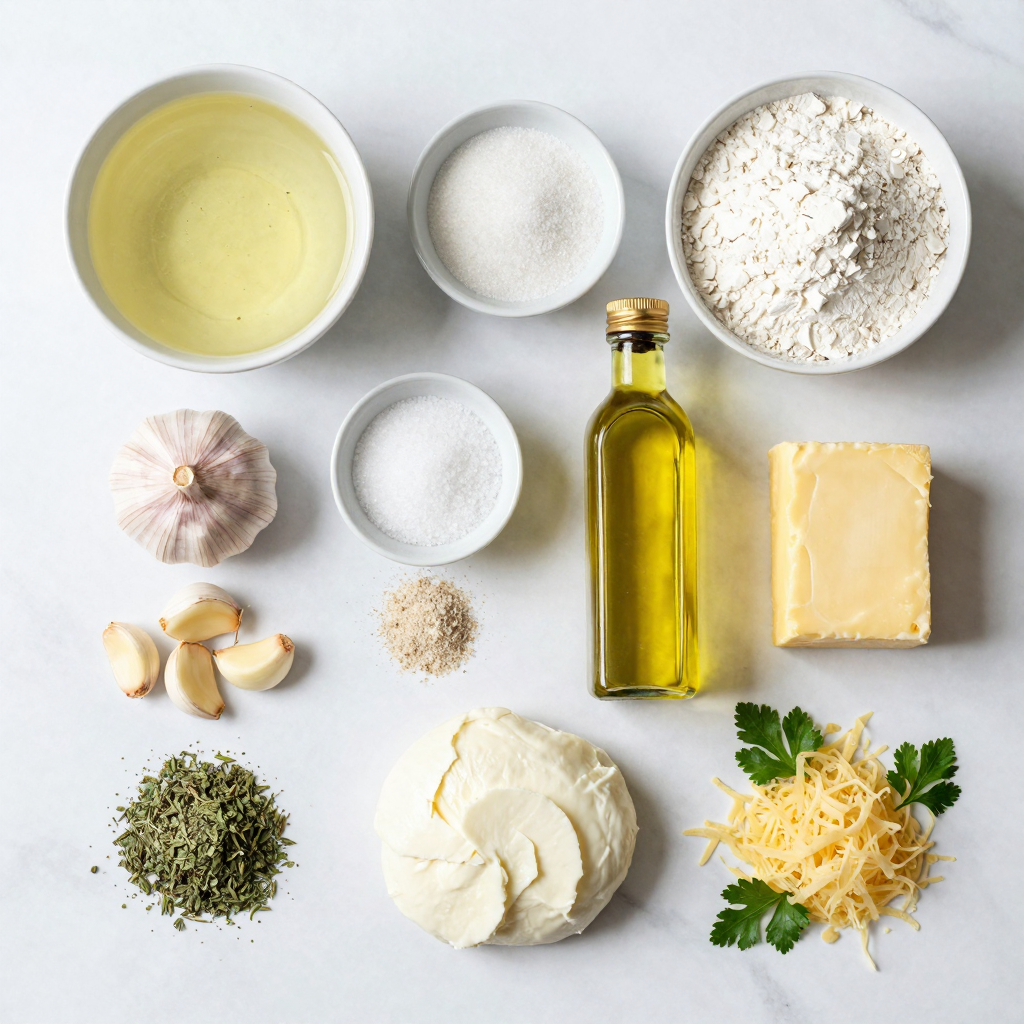
List of Ingredients for Cheesy Garlic Breadsticks
To make Cheesy Garlic Breadsticks, you need the following ingredients:
- 1 cup warm water (110°F to 115°F)
- 2 ¼ teaspoons (1 packet) active dry yeast
- 1 tablespoon sugar
- 2 ½ cups all-purpose flour
- 1 teaspoon salt
- 2 tablespoons olive oil
- 4 tablespoons unsalted butter, melted
- 3 cloves garlic, minced
- 1 teaspoon dried oregano
- 1 teaspoon garlic powder
- 1 ½ cups shredded mozzarella cheese
- ¼ cup grated Parmesan cheese
- Fresh parsley, chopped (for garnish)
Measurement Conversions (cups to grams, etc.)
Understanding how to convert measurements helps in baking. Here are some simple conversions:
- 1 cup of water = 240 grams
- 1 tablespoon of sugar = 12.5 grams
- 1 cup of all-purpose flour = 120 grams
- 1 teaspoon of salt = 5.7 grams
- 1 cup of shredded mozzarella = 113 grams
- 1 cup of grated Parmesan = 100 grams
These conversions make it easier to scale your recipes.
Substitutions for Common Ingredients
You may not have all the ingredients. Here are some easy swaps:
- Active dry yeast: Use instant yeast in the same amount.
- All-purpose flour: Substitute with whole wheat flour or gluten-free flour.
- Olive oil: Use melted coconut oil or any neutral oil.
- Unsalted butter: Use margarine or vegan butter for a dairy-free option.
- Mozzarella cheese: Try cheddar or provolone for a different flavor.
- Garlic: Use garlic powder in place of fresh garlic if needed.
These substitutions ensure you can still make delicious Cheesy Garlic Breadsticks even with limited ingredients.
Step-by-Step Instructions
Preparation of the Dough
To start, combine 1 cup of warm water, 2 ¼ teaspoons of active dry yeast, and 1 tablespoon of sugar in a small bowl. Wait for 5 to 10 minutes until it foams. This shows the yeast is alive. In a larger bowl, mix 2 ½ cups of all-purpose flour and 1 teaspoon of salt. Make a well in the center and pour in the yeast mixture and 2 tablespoons of olive oil. Stir everything together until it forms a dough.
Rising the Dough: Tips for Perfect Texture
Knead the dough on a floured surface for 5 to 7 minutes. It should feel smooth and elastic. Place the dough in a greased bowl, cover it with a cloth, and let it rise in a warm area for about 1 hour. You want it to double in size. For the best rise, keep it away from drafts and cover it well.
Baking Instructions for Crispy Breadsticks
Once the dough has risen, punch it down to release air. Roll it out into a rectangle about ½ inch thick. Place this on a baking sheet lined with parchment paper. Mix 4 tablespoons of melted butter, 3 cloves of minced garlic, 1 teaspoon of dried oregano, and 1 teaspoon of garlic powder in a bowl. Brush this mixture over the dough. Then, sprinkle 1 ½ cups of shredded mozzarella and ¼ cup of grated Parmesan cheese evenly on top. Use a pizza cutter to slice the dough into sticks, but don’t cut all the way through.
Preheat your oven to 425°F (220°C) and bake for 12 to 15 minutes until golden brown. The cheese should be bubbly. Once baked, sprinkle fresh parsley on top and let it cool for a minute before serving. Enjoy your cheesy garlic breadsticks!
Pro Tips
- Yeast Activation: Ensure your water temperature is just right; too hot can kill the yeast, and too cold won’t activate it. Aim for 110°F to 115°F for optimal frothiness.
- Dough Rising: For a faster rise, place the dough in a warm, draft-free area. An oven preheated to the lowest setting and then turned off works great!
- Cheese Choices: Feel free to mix and match cheeses! Cheddar, provolone, or a sprinkle of feta can add unique flavors to your breadsticks.
- Serving Suggestion: Serve your breadsticks warm alongside marinara sauce or a homemade herb dip for an extra flavor boost.
Tips & Tricks
How to Achieve the Perfect Cheese Pull
To get that perfect cheese pull, use high-quality mozzarella. Shredded cheese melts best when it’s fresh. Make sure to sprinkle the cheese evenly on the dough. This helps it melt nicely. When you pull apart the breadsticks, the cheese should stretch beautifully. Also, bake them until they are golden brown. This gives you a crispy outside and gooey inside.
Common Mistakes to Avoid
One common mistake is not letting the dough rise enough. The dough needs time to grow. If you rush this step, your breadsticks may turn out dense. Another mistake is using too much flour when rolling out the dough. This can make your breadsticks dry. Use just enough flour to keep the dough from sticking. Lastly, don’t skip the garlic butter mix. It adds a ton of flavor.
Best Practices for Flavor Enhancement
For extra flavor, try adding fresh herbs like basil or thyme. These can give your breadsticks a fresh taste. You can also play with spices like crushed red pepper for a kick. If you want a cheesy boost, mix in some grated Parmesan with the mozzarella. This gives a rich flavor and a nice texture. Lastly, serve your breadsticks with marinara sauce for dipping. This adds even more taste and makes them fun to eat.
Variations
Different Cheese Options for Cheesy Garlic Breadsticks
You can mix different cheeses to create a unique flavor. Besides mozzarella, try provolone for a sharp touch. Cheddar adds a rich creaminess. For a bold taste, incorporate gouda or fontina. These cheeses melt well and enhance the breadsticks’ texture. Mixing cheeses allows you to adjust flavors based on your mood or pantry.
Seasoning Variations (e.g., herbs, spices)
Don’t limit yourself to the basic seasonings. You can add red pepper flakes for heat. A sprinkle of Italian seasoning brings out great flavors. Try fresh basil or thyme for an earthy kick. For a twist, use smoked paprika or even taco seasoning. Each option can change your breadsticks from simple to gourmet.
Gluten-Free Options
If you need a gluten-free choice, use a gluten-free flour blend. Many blends work well for this recipe. Just ensure you follow the package instructions for the best results. You can also add a bit of xanthan gum for better texture. This way, everyone can enjoy cheesy garlic breadsticks.
Storage Info
How to Store Leftover Breadsticks
To keep your leftover breadsticks fresh, first let them cool down. Wrap each stick in plastic wrap or aluminum foil. You can also put them in an airtight container. Store them at room temperature for up to two days. For longer storage, place them in the fridge. They will last for about a week in the fridge.
Reheating Instructions for Best Results
When you want to enjoy your leftover breadsticks, reheating is simple. Preheat your oven to 350°F (175°C). Unwrap the breadsticks and place them on a baking sheet. Heat them for about 5-7 minutes. This method keeps breadsticks crispy. You can also use a microwave. However, this may make them a bit soft. Heat them for 15-20 seconds, checking often.
Freezing Techniques and Thawing Tips
If you want to store breadsticks for later, freezing is great. Wrap each breadstick tightly in plastic wrap. Then, place them in a freezer bag or airtight container. They can stay in the freezer for about three months. When you are ready to eat them, take them out and thaw overnight in the fridge. For quick thawing, leave them at room temperature for 1-2 hours. Reheat as mentioned above for the best taste. Enjoy your cheesy garlic breadsticks anytime!
FAQs
How long do Cheesy Garlic Breadsticks last?
Cheesy garlic breadsticks stay fresh for about 2 to 3 days. Keep them in an airtight container at room temperature. If stored properly, you can also freeze them. They last up to a month in the freezer. Just let them cool completely before wrapping them up. To enjoy later, thaw them overnight in the fridge.
Can I make the dough in advance?
Yes, you can make the dough ahead of time. After you knead the dough, let it rise for about an hour. Then, punch it down and wrap it tightly in plastic wrap. Place it in the fridge for up to 24 hours. When you’re ready, take it out and let it come to room temperature before rolling it out.
What can I serve with Cheesy Garlic Breadsticks?
Cheesy garlic breadsticks pair well with many dishes. Here are some tasty options:
- Marinara sauce for dipping
- A fresh garden salad
- Spaghetti or pasta dishes
- Soup, like tomato or minestrone
- Grilled vegetables for a healthy side
These options make your meal more colorful and fun. Enjoy your cheesy garlic breadsticks with any of these delicious sides!
This blog post covered how to make tasty cheesy garlic breadsticks. We shared a clear list of ingredients and helpful measurements. I provided step-by-step instructions for making, rising, and baking the dough. You also learned tips for perfect cheese pulls and common mistakes to avoid.
Try out the variations for fun flavors! Store extras well and reheat them perfectly. Remember, cheesy garlic breadsticks are great for sharing or enjoying alone. Now, you’re ready to make delicious treats that everyone will love. Get cooking!
Cheesy Garlic Breadsticks
Ingredients
1 cup warm water (110°F to 115°F)
2 ¼ teaspoons (1 packet) active dry yeast
1 tablespoon sugar
2 ½ cups all-purpose flour
1 teaspoon salt
2 tablespoons olive oil
4 tablespoons unsalted butter, melted
3 cloves garlic, minced
1 teaspoon dried oregano
1 teaspoon garlic powder
1 ½ cups shredded mozzarella cheese
¼ cup grated Parmesan cheese
Fresh parsley, chopped (for garnish)
Instructions
In a small bowl, combine the warm water, yeast, and sugar. Let it sit for about 5-10 minutes until frothy.
In a large mixing bowl, combine the flour and salt. Make a well in the center and add the yeast mixture and olive oil. Stir until combined.
Knead the dough on a floured surface for about 5-7 minutes until smooth and elastic.
Place the dough in a greased bowl, cover with a cloth, and let it rise in a warm area for about 1 hour, or until doubled in size.
Preheat your oven to 425°F (220°C). Line a baking sheet with parchment paper.
Once the dough has risen, punch it down and roll it out to a rectangle (about ½ inch thick). Transfer it to the prepared baking sheet.
In a small bowl, mix together melted butter, minced garlic, oregano, and garlic powder. Brush this mixture generously over the dough.
Evenly sprinkle the shredded mozzarella and grated Parmesan cheese over the top.
Using a pizza cutter, gently slice the dough into sticks without cutting all the way through.
Bake in the preheated oven for 12-15 minutes or until golden brown and the cheese is bubbly.
Remove from the oven and sprinkle with fresh parsley. Allow to cool for a minute before serving.
Prep Time: 15 minutes | Total Time: 1 hour 30 minutes | Servings: 12 sticks
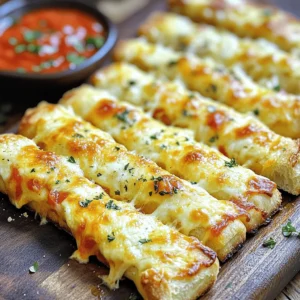
– Presentation Tips: Serve warm on a wooden board with a side of marinara sauce for dipping, garnished with a sprinkle of extra parsley.
Cheesy Garlic Breadsticks
Ingredients
- 1 cup warm water (110°F to 115°F)
- 2.25 teaspoons active dry yeast
- 1 tablespoon sugar
- 2.5 cups all-purpose flour
- 1 teaspoon salt
- 2 tablespoons olive oil
- 4 tablespoons unsalted butter, melted
- 3 cloves garlic, minced
- 1 teaspoon dried oregano
- 1 teaspoon garlic powder
- 1.5 cups shredded mozzarella cheese
- 0.25 cup grated Parmesan cheese
- to taste Fresh parsley, chopped (for garnish)
Instructions
- In a small bowl, combine the warm water, yeast, and sugar. Let it sit for about 5-10 minutes until frothy.
- In a large mixing bowl, combine the flour and salt. Make a well in the center and add the yeast mixture and olive oil. Stir until combined.
- Knead the dough on a floured surface for about 5-7 minutes until smooth and elastic.
- Place the dough in a greased bowl, cover with a cloth, and let it rise in a warm area for about 1 hour, or until doubled in size.
- Preheat your oven to 425°F (220°C). Line a baking sheet with parchment paper.
- Once the dough has risen, punch it down and roll it out to a rectangle (about ½ inch thick). Transfer it to the prepared baking sheet.
- In a small bowl, mix together melted butter, minced garlic, oregano, and garlic powder. Brush this mixture generously over the dough.
- Evenly sprinkle the shredded mozzarella and grated Parmesan cheese over the top.
- Using a pizza cutter, gently slice the dough into sticks without cutting all the way through.
- Bake in the preheated oven for 12-15 minutes or until golden brown and the cheese is bubbly.
- Remove from the oven and sprinkle with fresh parsley. Allow to cool for a minute before serving.