Cinnamon Sugar Pumpkin Donut Holes Irresistible Treat
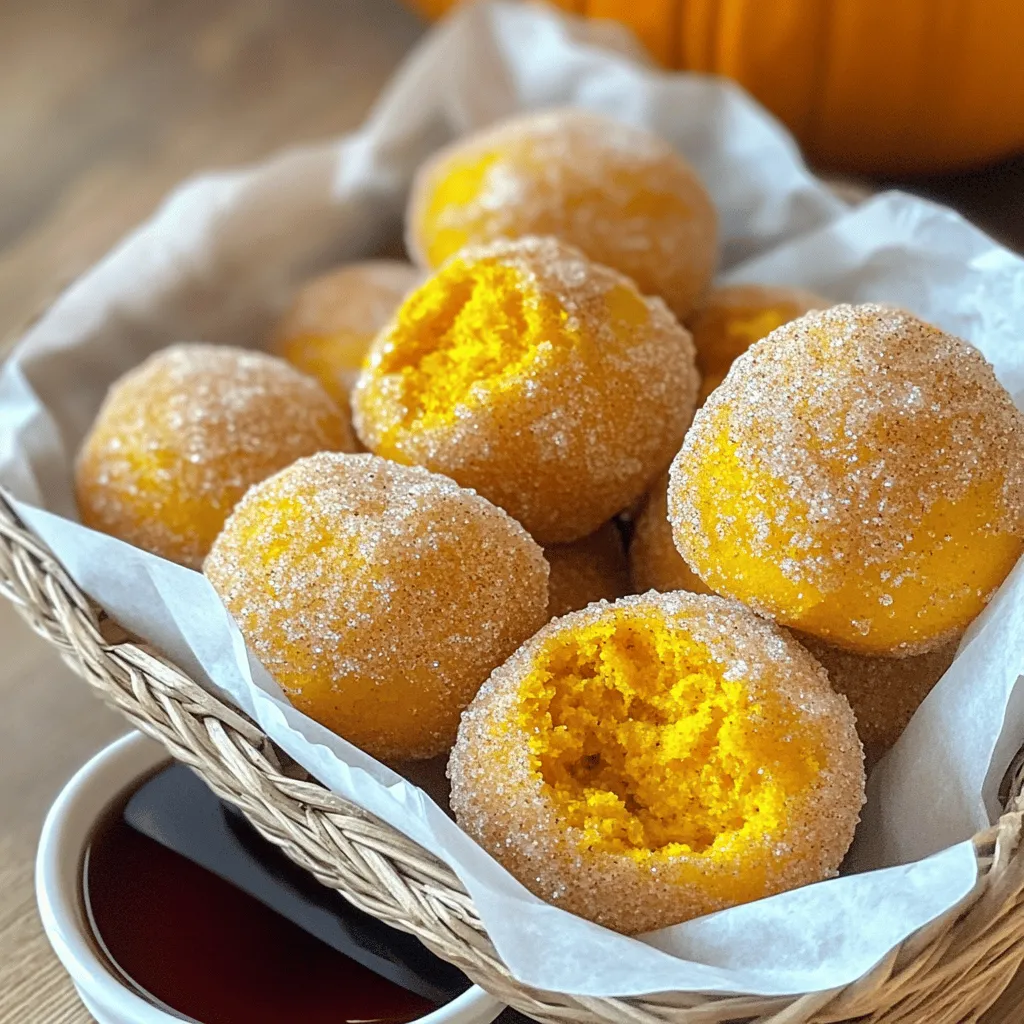
Get ready to treat yourself! My Cinnamon Sugar Pumpkin Donut Holes are a must-try this fall. They offer a warm, sweet, and spiced flavor that will make your taste buds dance. With simple ingredients and easy steps, you’ll have a batch ready in no time. Whether for a cozy breakfast or a snack, these donut holes are simply irresistible. Let’s dive into the recipe and make some magic happen!
Why I Love This Recipe
- Delicious Flavor Combination: The warm spices of cinnamon and nutmeg perfectly complement the sweetness of pumpkin, creating a delightful autumn treat.
- Easy to Make: This recipe is simple and quick, allowing you to whip up a batch of these donut holes in just about 30 minutes.
- Perfect for Sharing: With 24 donut holes, this recipe is great for gatherings, making it easy to share with family and friends.
- Customizable Coating: You can easily adjust the cinnamon sugar coating or even add a glaze for a different flavor experience.
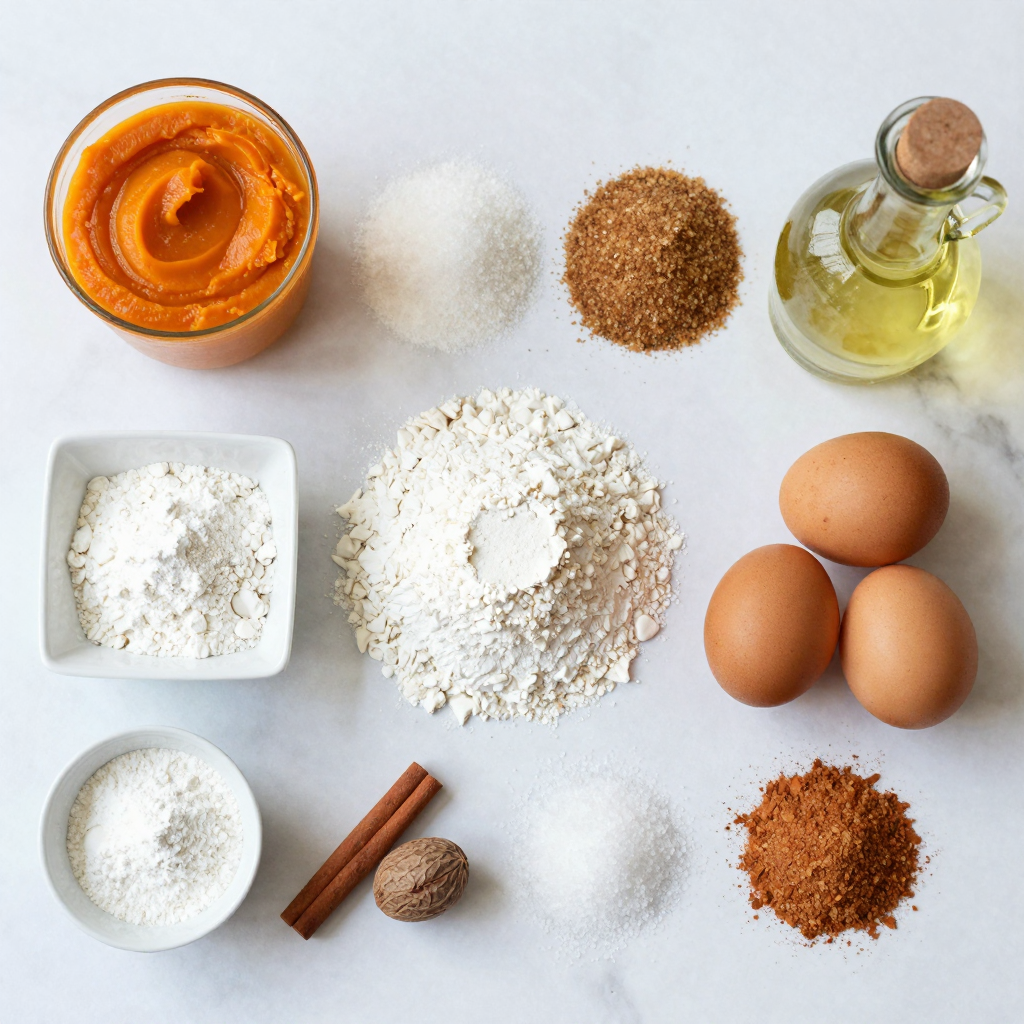
Ingredients
Essential Ingredients
To make cinnamon sugar pumpkin donut holes, you need a few key items. Here is what you will need:
- 1 cup canned pumpkin puree
- 1/2 cup granulated sugar
- 1/4 cup brown sugar
- 1/4 cup vegetable oil
- 2 large eggs
- 2 cups all-purpose flour
- 2 teaspoons baking powder
- 1 teaspoon baking soda
- 1 teaspoon cinnamon
- 1/2 teaspoon nutmeg
- 1/4 teaspoon salt
- 1/2 cup granulated sugar (for coating)
- 2 teaspoons ground cinnamon (for coating)
These ingredients create a moist, flavorful batter that bakes into soft donut holes.
Optional Ingredients
You can add a few optional ingredients to enhance the flavor. Consider these:
- Vanilla extract for extra sweetness
- Chopped nuts for crunch
- Mini chocolate chips for a sweet twist
These ingredients can elevate your donut holes, making them even more delightful.
Substitutions for Dietary Needs
If you have dietary restrictions, you can still enjoy these treats. Here are some easy swaps:
- Use gluten-free flour instead of all-purpose flour.
- Swap vegetable oil with melted coconut oil for a different flavor.
- Replace eggs with flaxseed meal or applesauce for a vegan option.
These substitutions keep the essence of the dish while catering to your needs.
Step-by-Step Instructions
Preparation of the Batter
To start, preheat your oven to 350°F (175°C). Grease your mini muffin pan or donut hole pan. In a large bowl, grab 1 cup of canned pumpkin puree, 1/2 cup of granulated sugar, 1/4 cup of brown sugar, 1/4 cup of vegetable oil, and 2 large eggs. Whisk these together until smooth. This mix gives the donut holes their moistness and flavor.
In another bowl, mix 2 cups of all-purpose flour, 2 teaspoons of baking powder, 1 teaspoon of baking soda, 1 teaspoon of cinnamon, 1/2 teaspoon of nutmeg, and 1/4 teaspoon of salt. Gradually add this dry mix to your wet mix. Stir just until combined. Be careful not to overmix, as this keeps them light and fluffy.
Baking the Donut Holes
Use a small cookie scoop or tablespoon to fill each cavity of your greased pan about 2/3 full with batter. This helps them rise perfectly. Bake them in the preheated oven for 12-15 minutes. To check if they’re done, insert a toothpick into the center. If it comes out clean, they are ready. Let the donut holes cool in the pan for 5 minutes before removing them.
Coating in Cinnamon Sugar
While the donut holes bake, prepare the cinnamon sugar coating. In a small bowl, mix 1/2 cup of granulated sugar with 2 teaspoons of ground cinnamon. Once you take the donut holes out of the oven, roll them in the cinnamon sugar while they’re warm. This coating sticks better when they are still hot. After coating, place them on a cooling rack to cool completely.Enjoy your warm, sweet creations!
Pro Tips
- Use Fresh Spices: For the best flavor, use freshly ground cinnamon and nutmeg instead of pre-ground spices. This enhances the aromatic profile of your donut holes.
- Don’t Overmix: When combining wet and dry ingredients, mix until just combined to ensure your donut holes remain light and fluffy.
- Cool Before Coating: Allow the donut holes to cool slightly before rolling them in cinnamon sugar. This helps the coating stick better and prevents it from melting away.
- Experiment with Dipping Sauces: Try serving your donut holes with different dipping sauces such as caramel, chocolate, or cream cheese frosting for added flavor variety.
Tips & Tricks
How to Ensure Fluffy Donut Holes
To make fluffy donut holes, start with fresh baking powder. Old baking powder can ruin the rise. Mix your wet and dry ingredients gently. Overmixing can lead to dense treats. Also, remember to measure your flour correctly. Use a spoon to fill your measuring cup, then level it off. This method helps you avoid extra flour.
Common Baking Mistakes to Avoid
One big mistake is not preheating your oven. An oven that is not hot enough can make your donut holes dense. Avoid opening the oven door too often while baking. This can cause a drop in temperature. Lastly, ensure your baking pan is well-greased. Sticking can ruin your perfect donut holes.
Best Practices for Measuring Ingredients
Always use dry measuring cups for flour and sugar. For liquids, use clear liquid measuring cups. When measuring brown sugar, pack it down firmly. This gives you the right amount. For spices, using a scale can improve accuracy. This way, you get the right flavor every time.
Variations
Adding Chocolate Chips or Nuts
You can easily boost your donut holes with chocolate chips or nuts. Add 1/2 cup of chocolate chips to the batter for a sweet twist. If you prefer nuts, try chopped pecans or walnuts for a nice crunch. Just fold them into the batter gently. This step adds flavor and texture. You can mix and match these options for fun results.
Different Flavor Coat Options
While cinnamon sugar is classic, you can try other coatings. For a twist, roll the donut holes in powdered sugar. You can also mix in cocoa powder for a chocolatey touch. Another option is to use maple sugar for a unique taste. Get creative and find a flavor that you love. Each coating brings its own charm to the donut holes.
Gluten-Free Version of the Recipe
To make this recipe gluten-free, swap out all-purpose flour with a gluten-free blend. Many blends work well and keep the donuts soft. Ensure the blend contains xanthan gum for the right texture. You might need to adjust baking time slightly. Check for doneness using a toothpick. This way, you can enjoy these delicious treats without gluten.
Storage Info
Best Ways to Store Leftover Donut Holes
To keep your donut holes fresh, store them in an airtight container. I recommend placing a paper towel at the bottom. This helps absorb any moisture. Keep the container at room temperature for up to three days. If you have more than that, consider freezing them for later.
How to Freeze for Later Use
Freezing is easy and keeps your donut holes tasty. First, let them cool completely. Then, arrange them in a single layer on a baking sheet. Freeze them for about an hour until firm. Once they are firm, place them in a freezer-safe bag. Be sure to squeeze out as much air as possible. You can freeze them for up to three months.
Reheating Recommendations
When you’re ready to enjoy your donut holes, reheating them is simple. Preheat your oven to 350°F (175°C). Place the donut holes on a baking sheet. Warm them for about 5-7 minutes. This will make them soft and bring back that fresh-baked taste. You can also microwave them for about 10-15 seconds. Just be careful not to overheat them! Enjoy your cinnamon sugar pumpkin donut holes just like they were fresh from the oven!
FAQs
Can I use fresh pumpkin instead of canned?
Yes, you can use fresh pumpkin. First, cook the pumpkin until soft. Then, mash it into a smooth puree. Be sure to drain any excess water. This gives your donut holes a fresh flavor. However, canned pumpkin is easier and quicker.
How long do these donut holes stay fresh?
These donut holes stay fresh for about three days at room temperature. Keep them in an airtight container. If you want them to last longer, store them in the fridge. They can stay good for up to a week when chilled.
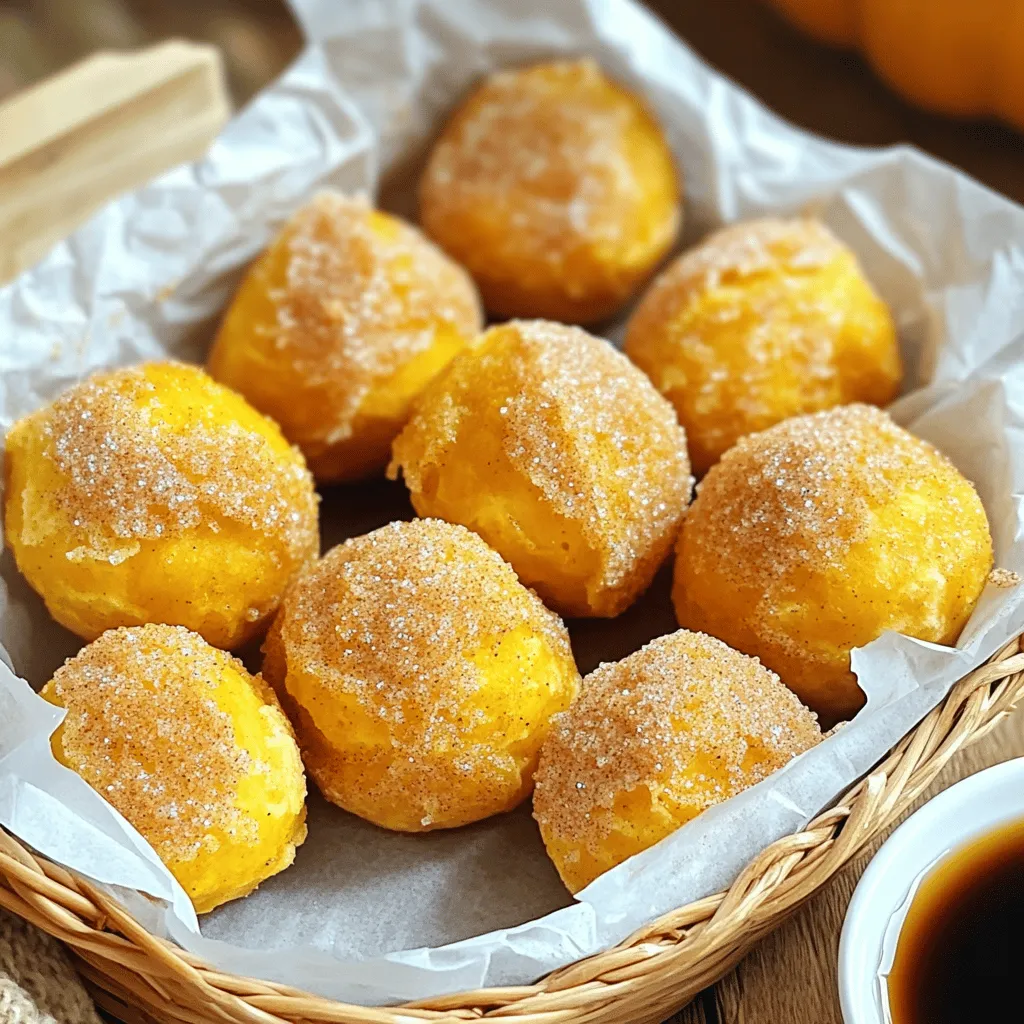
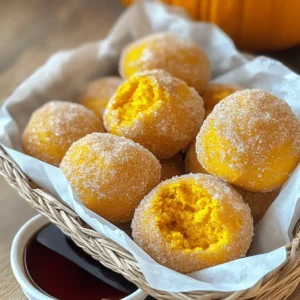
What’s the best way to serve cinnamon sugar pumpkin donut holes?
Serve them warm for the best taste. You can arrange them in a pretty basket lined with parchment paper. For extra fun, add a small bowl of maple syrup for dipping. You can also dust them with more cinnamon sugar before serving. Enjoy the sweet, warm flavors!
You now know how to make delicious cinnamon sugar pumpkin donut holes. We explored the key ingredients, detailed step-by-step instructions, and tips for perfect results. Remember, you can customize your donut holes with different flavors or toppings to suit your taste. Store them properly to keep them fresh, and don’t hesitate to try new variations. Enjoy your baking journey, and share these tasty treats with friends and family for joy and smiles. Happy baking!
Cinnamon Sugar Pumpkin Donut Holes
Ingredients
1 cup canned pumpkin puree
1/2 cup granulated sugar
1/4 cup brown sugar
1/4 cup vegetable oil
2 large eggs
2 cups all-purpose flour
2 teaspoons baking powder
1 teaspoon baking soda
1 teaspoon cinnamon
1/2 teaspoon nutmeg
1/4 teaspoon salt
1/2 cup granulated sugar (for coating)
2 teaspoons ground cinnamon (for coating)
Instructions
Preheat your oven to 350°F (175°C) and grease a mini muffin pan or donut hole baking pan.
In a large mixing bowl, whisk together the pumpkin puree, granulated sugar, brown sugar, vegetable oil, and eggs until smooth.
In another bowl, combine the flour, baking powder, baking soda, cinnamon, nutmeg, and salt. Gradually add the dry ingredients to the wet ingredients, stirring until just combined. Be careful not to overmix.
Using a small cookie scoop or tablespoon, fill each cavity of the greased muffin or donut hole pan about 2/3 full with the batter.
Bake in the preheated oven for 12-15 minutes, or until a toothpick inserted into the center comes out clean.
While the donut holes are baking, prepare the cinnamon sugar coating. In a small bowl, mix together the granulated sugar and ground cinnamon.
Once the donut holes are baked, remove them from the oven and let them cool in the pan for about 5 minutes. Then, carefully remove them from the pan and roll them in the cinnamon sugar coating while they’re still warm.
Place the coated donut holes on a cooling rack to cool completely.
Prep Time: 15 minutes | Total Time: 30 minutes | Servings: 24 donut holes
– Presentation Tips: Arrange the donut holes in a seasonal basket lined with parchment paper. Dust with extra cinnamon sugar for an appealing finish and serve with a side of maple syrup for dipping. Enjoy!
Cinnamon Sugar Pumpkin Donut Holes
Ingredients
- 1 cup canned pumpkin puree
- 1 2 granulated sugar
- 1 4 brown sugar
- 1 4 vegetable oil
- 2 large eggs
- 2 cups all-purpose flour
- 2 teaspoons baking powder
- 1 teaspoon baking soda
- 1 teaspoon cinnamon
- 1 2 nutmeg
- 1 4 salt
- 1 2 granulated sugar (for coating)
- 2 teaspoons ground cinnamon (for coating)
Instructions
- Preheat your oven to 350°F (175°C) and grease a mini muffin pan or donut hole baking pan.
- In a large mixing bowl, whisk together the pumpkin puree, granulated sugar, brown sugar, vegetable oil, and eggs until smooth.
- In another bowl, combine the flour, baking powder, baking soda, cinnamon, nutmeg, and salt. Gradually add the dry ingredients to the wet ingredients, stirring until just combined. Be careful not to overmix.
- Using a small cookie scoop or tablespoon, fill each cavity of the greased muffin or donut hole pan about 2/3 full with the batter.
- Bake in the preheated oven for 12-15 minutes, or until a toothpick inserted into the center comes out clean.
- While the donut holes are baking, prepare the cinnamon sugar coating. In a small bowl, mix together the granulated sugar and ground cinnamon.
- Once the donut holes are baked, remove them from the oven and let them cool in the pan for about 5 minutes. Then, carefully remove them from the pan and roll them in the cinnamon sugar coating while they're still warm.
- Place the coated donut holes on a cooling rack to cool completely.
![To make these brownies, you need specific ingredients. Here’s what you’ll gather: - 1 cup unsalted butter (2 sticks) - 2 cups granulated sugar - 4 large eggs - 1 teaspoon vanilla extract - 1 cup all-purpose flour - 1 cup unsweetened cocoa powder - 1/2 teaspoon salt - 1 cup chopped pecans - 1 cup caramel sauce (store-bought or homemade) - 1/2 cup chocolate chips (semi-sweet or dark) - 1/4 teaspoon sea salt (for topping) Each ingredient plays a key role in creating the rich, fudgy texture and flavor you will love. While the essential ingredients are perfect, you can add more for extra flavor. Consider these options: - A dash of espresso powder can deepen the chocolate taste. - A splash of bourbon or rum brings warmth and complexity. - Use dark chocolate chips for a richer finish. - Add sea salt flakes on top for a contrast in taste. These optional ingredients can take your brownies to the next level. To make the process smooth, you'll need some tools. Here’s what I recommend: - A medium saucepan for melting butter. - A mixing bowl for combining wet ingredients. - A separate bowl for dry ingredients. - A whisk for mixing eggs and vanilla. - A spatula to fold in the nuts and chips. - A 9x13 inch baking pan lined with parchment paper. These tools help you create the perfect caramel pecan turtle brownies. For the full recipe, you can check the complete steps and tips. Enjoy your baking! To create your brownie batter, start with the basics. First, preheat your oven to 350°F (175°C). Next, grease a 9x13 inch baking pan and line the bottom with parchment paper. This step helps with easy removal later. In a medium saucepan, melt 1 cup of unsalted butter over low heat. Once it melts, add 2 cups of granulated sugar and stir until mixed well. Remove the saucepan from heat and let it cool for a few minutes. This cooling step is important to avoid cooking the eggs. Now, whisk in 4 large eggs, one at a time. Add 1 teaspoon of vanilla extract and mix until smooth. In another bowl, sift together 1 cup of all-purpose flour, 1 cup of unsweetened cocoa powder, and 1/2 teaspoon of salt. Gradually add the dry mix to the wet mix. Stir gently until just combined. Overmixing can lead to tough brownies. Fold in 1 cup of chopped pecans and 1/2 cup of chocolate chips, saving a few pecans for the topping. Now it’s time to layer your brownies. Pour half of the brownie batter into the prepared pan and spread it evenly. Drizzle half of the caramel sauce over this layer. Then spoon the rest of the batter on top and spread it gently. Drizzle the remaining caramel sauce over this layer. Sprinkle the reserved pecans on top and add a pinch of sea salt to enhance the flavor. Bake in your preheated oven for 30 to 35 minutes. To check for doneness, insert a toothpick in the center. It should come out with a few moist crumbs, not wet batter. After baking, remove the pan from the oven. Let the brownies cool in the pan for at least 30 minutes. Use the parchment paper to lift them out. Slice them into squares for serving. For a special touch, serve the brownies warm. Drizzle with extra caramel sauce and sprinkle with sea salt. This adds a lovely finishing touch that enhances the flavor. Enjoy your delicious creation! For the complete recipe, check out the [Full Recipe]. One big mistake is overmixing the batter. When you mix too much, it makes brownies tough. Mix until just combined for a softer bite. Another common error is not measuring ingredients well. Use dry measuring cups for flour and cocoa powder. Level the tops with a knife for accuracy. For that perfect chewy texture, use melted butter. This gives your brownies a rich flavor. Don't forget to let the batter rest for a few minutes before baking. It helps the ingredients meld together. Also, bake just until a toothpick shows a few moist crumbs. Too long makes them dry. Serve brownies warm to enjoy their gooey center. Drizzle extra caramel sauce on top for added sweetness. A sprinkle of sea salt can enhance the flavors. Pair with a scoop of vanilla ice cream for a delightful treat. Enjoy your Caramel Pecan Turtle Brownies with friends and family for a memorable dessert. Check out the Full Recipe for more tips! {{image_2}} If you want to change the taste, try other nuts. Almonds, walnuts, or hazelnuts can work well. Each nut gives a unique flavor. Almonds add a sweet crunch. Walnuts bring a rich, earthy taste. Hazelnuts give a hint of chocolate flavor. Just chop them as you would with pecans and mix them in. You can even toast the nuts lightly for extra flavor! Making your own caramel sauce is easy and fun. You need just sugar, butter, and cream. Start by melting sugar in a pan. Watch it closely so it doesn’t burn. Once it melts and turns golden, add butter and let it melt. Then, pour in heavy cream slowly and stir. Let it cool before using it in your brownies. This sauce adds a fresh taste that store-bought cannot match. Want to make these brownies gluten-free? Use gluten-free all-purpose flour instead of regular flour. Check that your caramel sauce is also gluten-free. Many brands are safe, but always read the label. This way, you can enjoy rich, gooey brownies without worry. The taste remains just as delightful, and your friends will never know the difference! Don't forget to check out the Full Recipe for all the details on making these sweet treats! To keep your caramel pecan turtle brownies fresh, store them in an airtight container. Place parchment paper between layers to avoid sticking. They can last up to a week at room temperature. For longer storage, put them in the fridge. This helps maintain their chewy texture and flavor. Freezing brownies is a great way to save some for later. First, allow them to cool completely. Then, cut them into squares. Wrap each piece tightly in plastic wrap. Put them in a freezer-safe bag or container. They can stay frozen for up to three months. When you’re ready to enjoy, just thaw them in the fridge overnight. To enjoy your brownies warm, reheat them in the microwave. Use a low power setting to avoid drying them out. Heat for about 10-15 seconds. You can also warm them in the oven. Set the oven to 350°F (175°C) and place the brownies in for about 5-10 minutes. This brings back that fresh-baked taste. For extra delight, drizzle some caramel sauce on top before serving. Turtle brownies get their name from the classic turtle candy. This candy has caramel, pecans, and chocolate. In our brownies, I mix these same flavors. The caramel adds sweetness, the pecans give a nice crunch, and the chocolate ties it all together. When you bite into these brownies, you taste the rich chocolate and gooey caramel. It's like a treat you can hold in your hand! Yes, you can. If you want to skip the eggs, you can use a few substitutes. Applesauce is a great choice. Use 1/4 cup of unsweetened applesauce for each egg. You can also use a flaxseed meal. Mix one tablespoon of flaxseed meal with three tablespoons of water. Let it sit for a few minutes until it gets thick. Both options work well and keep the brownies moist. These brownies stay fresh for about four to five days when stored properly. Keep them in an airtight container at room temperature. If you want them to last longer, you can freeze them. Just wrap them well in plastic wrap and place them in a freezer bag. They can last up to three months in the freezer. When you're ready to enjoy, just thaw them at room temperature or warm them in the microwave for a few seconds. Remember, for the full recipe, check our earlier section! In this post, we explored how to make delicious caramel pecan turtle brownies. We discussed essential and optional ingredients, the tools you need, and easy step-by-step instructions. I also shared useful tips to avoid common mistakes and achieve the perfect texture. Plus, we looked at variations, storage info, and common questions. Enjoying these brownies can be a fun baking adventure. I hope you try these tips and enjoy every bite!](https://dailydishlab.com/wp-content/uploads/2025/07/cd6252c4-9eb9-4ecc-b5d9-7ffc816e6e24-768x768.webp)