Greek Yogurt Banana Bread Tasty and Moist Recipe

Are you ready to take your banana bread game to the next level? My Greek Yogurt Banana Bread recipe is not only tasty, but it’s also incredibly moist, thanks to the magic of Greek yogurt. With just a few simple ingredients and easy steps, you’ll have a delicious loaf that everyone will love. Let’s dive into this simple and rewarding baking adventure!
Why I Love This Recipe
- Moist and Flavorful: This banana bread stays wonderfully moist thanks to the ripe bananas and Greek yogurt, resulting in a delightful texture with every bite.
- Healthier Alternative: Using Greek yogurt instead of oil or butter reduces the fat content while adding protein, making this a healthier treat you can enjoy guilt-free.
- Easy to Make: This recipe is straightforward and requires minimal ingredients, making it perfect for bakers of all skill levels.
- Customizable: Feel free to add your favorite nuts or spices to personalize this banana bread according to your taste preferences.
Ingredients
List of Ingredients
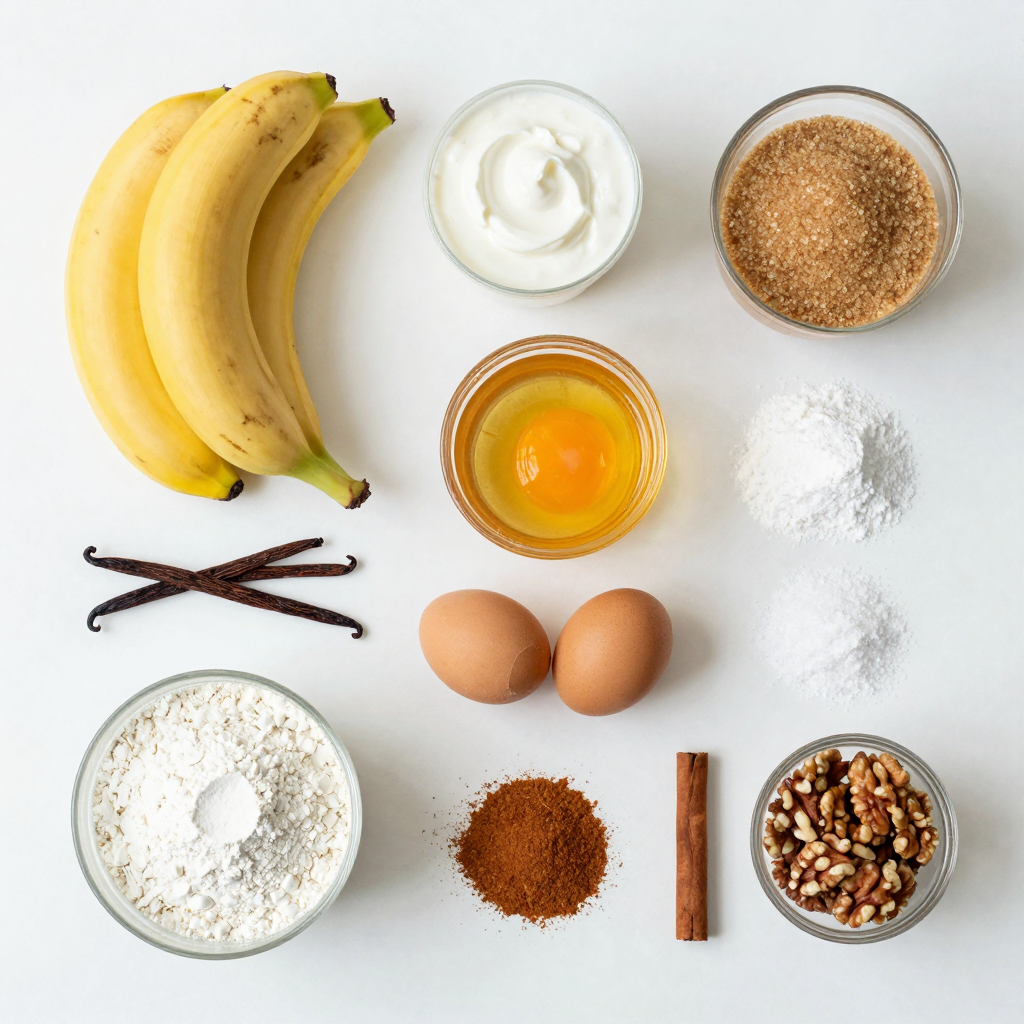
- 3 ripe bananas, mashed
- 1 cup Greek yogurt (plain, unsweetened)
- 1/2 cup brown sugar
- 1/4 cup honey
- 2 large eggs
- 1 teaspoon vanilla extract
- 1 teaspoon baking powder
- 1 teaspoon baking soda
- 1/2 teaspoon salt
- 1 1/2 cups all-purpose flour
- 1/2 teaspoon cinnamon (optional)
- 1/2 cup chopped walnuts or pecans (optional)
To make Greek yogurt banana bread, you need simple, fresh ingredients. Ripe bananas are key. They add natural sweetness and moisture. Use plain Greek yogurt for creaminess and tang. Brown sugar and honey enhance flavor and keep the bread moist.
The eggs bind everything together. Vanilla extract gives a warm, inviting aroma. Baking powder and baking soda help the bread rise. A pinch of salt balances the sweetness.
You can add cinnamon for warmth or nuts for crunch if you like. Both add texture and flavor. These ingredients blend to create a loaf that is soft, moist, and delicious.
Equipment Needed
- 9×5 inch loaf pan
- Mixing bowls
- Whisk and spatula
Gathering the right tools makes cooking easier. A 9×5 inch loaf pan shapes the bread perfectly. Mixing bowls help combine ingredients without mess. A whisk mixes wet ingredients well. A spatula helps scrape the bowl clean.
With these tools, you can smoothly create your Greek yogurt banana bread.
Step-by-Step Instructions
Prepping the Ingredients
- Preheat the oven to 350°F (175°C).
- Grease or line the loaf pan with parchment paper.
Start by getting your oven nice and hot. This helps the bread rise well. Greasing the pan keeps the bread from sticking. Parchment paper makes it easy to lift out the bread later.
Mixing the Batter
- Combine wet ingredients in a large bowl.
- Whisk together dry ingredients in a separate bowl.
In a big bowl, mix your ripe bananas, Greek yogurt, brown sugar, honey, eggs, and vanilla extract. Make sure everything blends well. In another bowl, whisk the flour, baking powder, baking soda, salt, and cinnamon if you want. This step keeps your bread light and fluffy.
Baking the Bread
- Fold dry ingredients into the wet mixture.
- Pour batter into the pan and smooth the top.
- Bake for 50-60 minutes and check with a toothpick.
Now, gently add the dry mix to the wet mix. Stir until combined but don’t overdo it; some lumps are okay. Pour your batter into the loaf pan and smooth the top with a spatula. Bake for 50 to 60 minutes. To check if it’s done, insert a toothpick into the center. If it comes out clean, your bread is ready!
Pro Tips
- Use Ripe Bananas: The riper the bananas, the sweeter and more flavorful your banana bread will be. Look for bananas with lots of brown spots or even completely brown skin.
- Don’t Overmix: When combining the wet and dry ingredients, mix just until combined. Overmixing can lead to a dense and tough bread.
- Experiment with Add-ins: Feel free to customize your banana bread by adding chocolate chips, dried fruits, or different nuts for a unique twist.
- Storage Tips: Store your banana bread in an airtight container at room temperature for up to 3 days, or refrigerate for up to a week. It also freezes well for up to 3 months.
Tips & Tricks
Achieving the Perfect Texture
Ripe bananas are key to great banana bread. They should be soft and spotty. This ripeness adds natural sweetness and moisture. If your bananas are not ripe, the bread may turn out dry. Avoiding overmixing is also important. Mix just until the flour disappears. A few lumps are fine. Overmixing can make the bread tough.
Enhancing Flavor
You can add more flavor with spices. Nutmeg is a great choice. It pairs well with banana. Try using flavored Greek yogurt, too. You can find options like vanilla or honey. These flavors will bring out the best in your banana bread.
Serving Suggestions
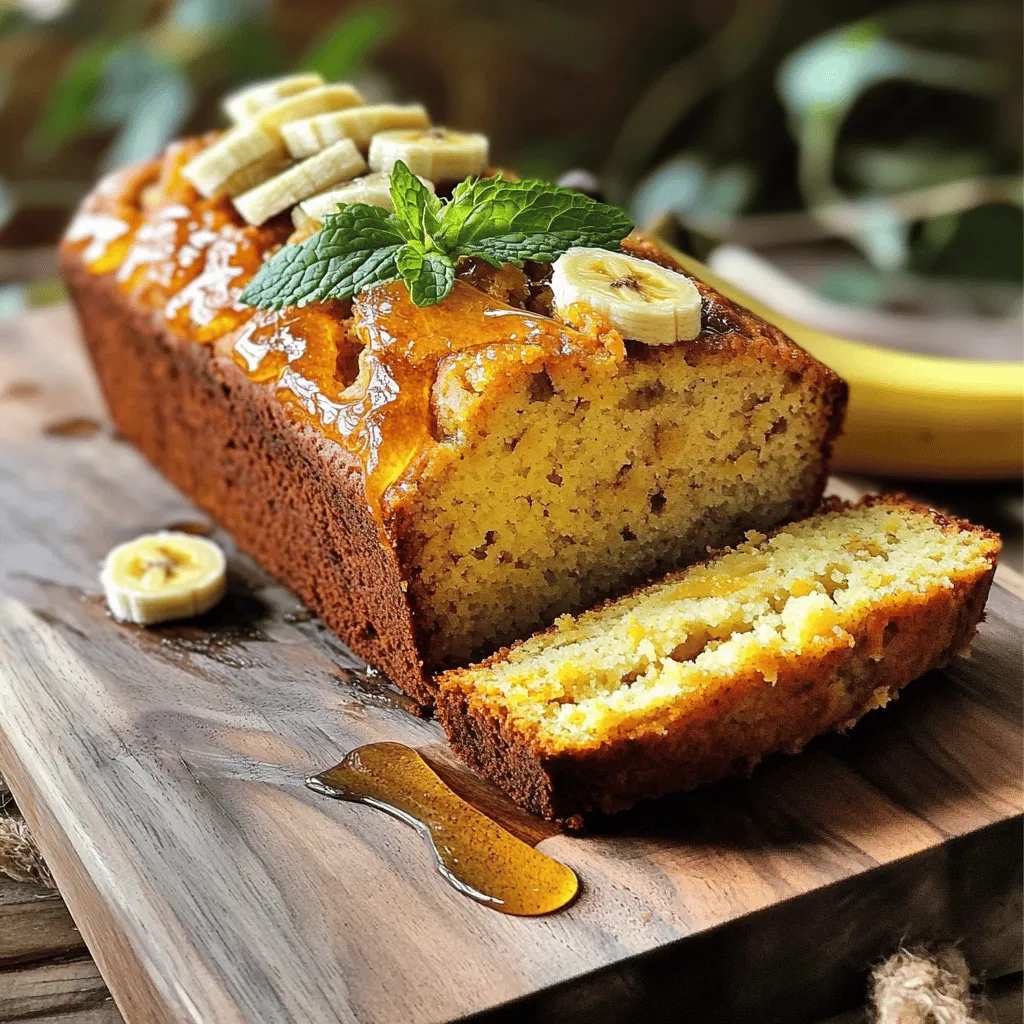
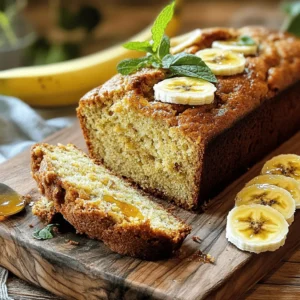
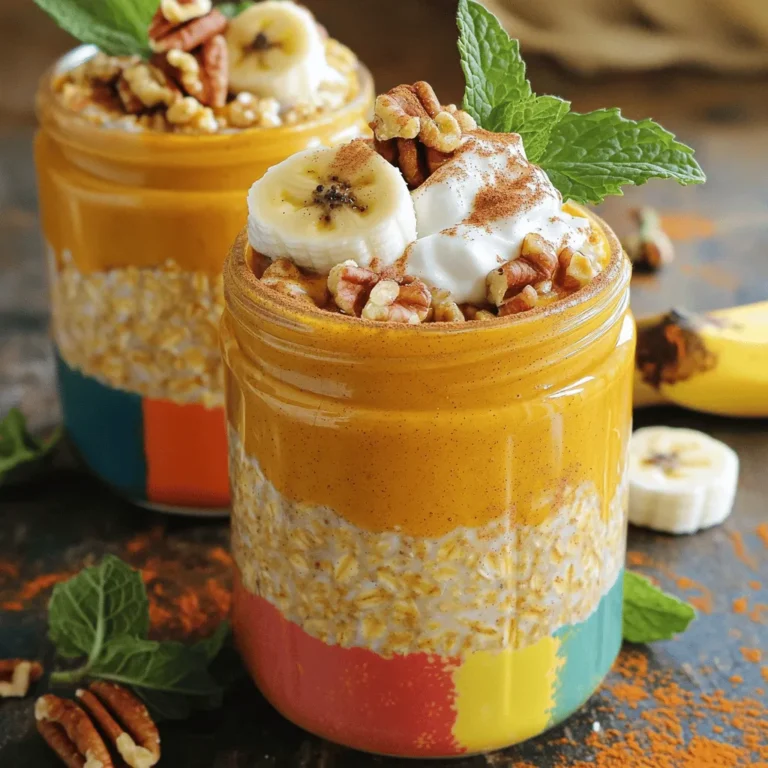
Presentation matters! Slice your banana bread and place it on a wooden board. Drizzle honey over the slices for a sweet touch. Garnish with banana slices and a sprig of mint. Serve with spreads like peanut butter or cream cheese. This adds extra flavor and a fun twist.
Variations
Ingredient Substitutions
If you run out of Greek yogurt, you can use sour cream or regular yogurt. Both will keep your bread moist and tasty. For those avoiding gluten, try using almond flour or a gluten-free blend. These swaps maintain the bread’s great texture and flavor.
Flavor Infusions
To make your banana bread extra special, add chocolate chips. They melt into the batter and create a rich flavor. You can also mix in dried fruits like raisins or cranberries. These fruits add sweetness and a fun texture.
Dietary Adaptations
Want a vegan version? Use flax eggs and almond milk instead of regular eggs and yogurt. This keeps the bread moist while making it plant-based. If you are watching your sugar intake, consider using sweeteners like stevia or monk fruit. This way, you can enjoy a delicious banana bread without the extra sugar.
Storage Info
Storing Leftovers
To keep your Greek yogurt banana bread moist, store it properly. Wrap it tightly in plastic wrap. You can also use an airtight container. Both methods will help keep the bread fresh. Avoid leaving it out in the open air. This can dry it out quickly.
Freezing Tips
Freezing banana bread is a great way to save it. First, slice the bread into pieces. Wrap each slice in plastic wrap. Then, place the slices in a freezer bag. This helps keep them fresh for longer. When you want to eat a slice, take it out and let it thaw. You can leave it at room temperature or use a microwave for a quick warm-up.
Shelf Life
In the fridge, your Greek yogurt banana bread lasts about one week. If you freeze it, it can last up to three months. Always check for any signs of spoilage before eating. Proper storage will keep it tasty and safe for you to enjoy!
FAQs
What can I substitute for Greek yogurt in banana bread?
If you don’t have Greek yogurt, try these options:
- Sour cream: It adds a similar tangy flavor.
- Regular yogurt: This works well but may make the bread less thick.
- Silken tofu: Blend it smooth for a dairy-free option.
- Applesauce: This adds moisture and sweetness. Use the same amount as yogurt.
Using these substitutes can change the flavor and texture slightly. Don’t worry, though; your banana bread will still taste great!
How do I know when my banana bread is done baking?
You can check your banana bread with a toothpick or cake tester. Insert it into the center of the loaf. If it comes out clean, your bread is done! If it has wet batter on it, bake for a few more minutes. This simple test helps you avoid underbaking.
Can I make banana bread without eggs?
Yes, you can make banana bread without eggs! Here are some egg substitutes:
- Flaxseed meal: Mix 1 tablespoon of flaxseed with 2.5 tablespoons of water. Let it sit for 5 minutes.
- Chia seeds: Use the same method as flaxseed.
- Unsweetened applesauce: Use 1/4 cup for each egg.
- Mashed banana: A fun choice! Use 1/4 cup per egg.
These swaps help you create a tasty vegan banana bread. Enjoy experimenting!
This banana bread recipe is simple and fun. You learned about the key ingredients, equipment, and steps. I shared tips to enhance flavor and texture. You can try various substitutions for different diets. Storing and freezing tips help keep leftovers fresh.
Now, you can enjoy delicious banana bread any time! Remember, baking is all about experimenting, so have fun with it.
Greek Yogurt Banana Bread
Ingredients
3 ripe bananas, mashed
1 cup Greek yogurt (plain, unsweetened)
1/2 cup brown sugar
1/4 cup honey
2 large eggs
1 teaspoon vanilla extract
1 teaspoon baking powder
1 teaspoon baking soda
1/2 teaspoon salt
1 1/2 cups all-purpose flour
1/2 teaspoon cinnamon (optional)
1/2 cup chopped walnuts or pecans (optional)
Instructions
Preheat your oven to 350°F (175°C) and grease a 9×5 inch loaf pan or line it with parchment paper.
In a large mixing bowl, combine the mashed bananas, Greek yogurt, brown sugar, honey, eggs, and vanilla extract. Mix until well combined and smooth.
In a separate bowl, whisk together the flour, baking powder, baking soda, salt, and cinnamon (if using).
Gradually add the dry ingredients to the wet mixture, stirring gently until just combined. Be careful not to overmix; a few lumps are okay.
If using, fold in the chopped walnuts or pecans for added texture.
Pour the batter into the prepared loaf pan, smoothing the top with a spatula.
Bake in the preheated oven for 50-60 minutes, or until a toothpick inserted into the center comes out clean.
Once done, remove the bread from the oven, and let it cool in the pan for 10 minutes before transferring it to a wire rack to cool completely.
Prep Time: 15 min | Total Time: 1 hr 15 min | Servings: 8 slices
– Presentation Tips: Slice the banana bread and serve on a wooden cutting board. For an elegant touch, drizzle a little honey over the slices, and garnish with banana slices and a sprig of mint.
Greek Yogurt Banana Bread
Ingredients
- 3 whole ripe bananas, mashed
- 1 cup Greek yogurt (plain, unsweetened)
- 0.5 cup brown sugar
- 0.25 cup honey
- 2 large eggs
- 1 teaspoon vanilla extract
- 1 teaspoon baking powder
- 1 teaspoon baking soda
- 0.5 teaspoon salt
- 1.5 cups all-purpose flour
- 0.5 teaspoon cinnamon (optional)
- 0.5 cup chopped walnuts or pecans (optional)
Instructions
- Preheat your oven to 350°F (175°C) and grease a 9x5 inch loaf pan or line it with parchment paper.
- In a large mixing bowl, combine the mashed bananas, Greek yogurt, brown sugar, honey, eggs, and vanilla extract. Mix until well combined and smooth.
- In a separate bowl, whisk together the flour, baking powder, baking soda, salt, and cinnamon (if using).
- Gradually add the dry ingredients to the wet mixture, stirring gently until just combined. Be careful not to overmix; a few lumps are okay.
- If using, fold in the chopped walnuts or pecans for added texture.
- Pour the batter into the prepared loaf pan, smoothing the top with a spatula.
- Bake in the preheated oven for 50-60 minutes, or until a toothpick inserted into the center comes out clean.
- Once done, remove the bread from the oven, and let it cool in the pan for 10 minutes before transferring it to a wire rack to cool completely.

![To make Peach Cream Cheese Danish, you need these key items: - 1 package (8 oz) cream cheese, softened - 1/4 cup granulated sugar - 1 teaspoon vanilla extract - 1 package (1 lb) refrigerated crescent roll dough - 2 ripe peaches, sliced thin - 1 tablespoon lemon juice - 1 teaspoon ground cinnamon - 1 egg, beaten (for egg wash) - Powdered sugar for drizzling These ingredients create a creamy filling and a flaky crust. The peaches add a sweet touch. You can add a few extra ingredients for more taste: - 1 tablespoon honey for sweetness - 1/2 teaspoon almond extract for a nutty note - Chopped nuts for crunch These extras can take your danish to the next level. Try them out for a twist! Gather these tools for easy cooking: - Mixing bowls - Whisk or electric mixer - Baking sheet - Parchment paper - Knife and cutting board Having the right tools makes the process smooth. You will feel like a pro in no time! For the complete recipe, check out the Full Recipe link. To start, gather your cream cheese, sugar, and vanilla extract. Beat the softened cream cheese in a bowl. Add the granulated sugar and vanilla extract next. Mix until you have a smooth and creamy filling. This step is simple but key. You want a rich flavor that pairs well with the peaches. Set this bowl aside as you move on. Now, let’s work with the crescent roll dough. Open the package and unroll it on a floured surface. Pinch the seams to form a rectangle. This helps keep the dough intact. Cut the dough into squares about 4 inches by 4 inches. Make a small indentation in the center of each square. This is where your filling will go. Next, take your sliced peaches. Toss them with lemon juice and ground cinnamon. This mix adds a bright taste. Place a tablespoon of the cream cheese filling in the center of each dough square. Top it with a few peach slices. You can fold the corners over the filling to create a pocket. This keeps the delicious filling inside. Before baking, brush the tops with a beaten egg. This gives the danishes a lovely golden color. Preheat your oven to 375°F (190°C). Line a baking sheet with parchment paper to prevent sticking. Bake the danishes for 15-18 minutes. Look for a golden brown color and puffed dough. Let them cool for a few minutes. Drizzle with powdered sugar for that sweet touch. Enjoy your Peach Cream Cheese Danish as a delightful treat! For the complete recipe, check the [Full Recipe]. To make your Peach Cream Cheese Danish shine, use ripe peaches. They add sweetness and flavor. You can also sprinkle a bit of extra sugar on the peaches before baking. It helps them caramelize and enhances their taste. For a rich creaminess, ensure your cream cheese is at room temperature. This makes it easy to blend with sugar and vanilla. Don’t rush this step. A smooth filling gives the best texture. If your danishes don't puff up, check your oven temperature. An oven that is too cool can lead to flat pastries. Also, ensure you seal the edges well. If they open during baking, the filling will spill out. If the dough is too sticky, add a bit of flour when rolling it out. This will help prevent sticking and make it easier to shape. These danishes are perfect warm. You can serve them with a scoop of vanilla ice cream or a dollop of whipped cream. For a fun twist, try pairing them with a cup of coffee or tea. They also make a great breakfast treat or a delightful dessert. You can find the full recipe to perfect your own Peach Cream Cheese Danish. Enjoy! {{image_2}} You can change up the fruit in your Danish. Try using apples, berries, or pears. Each fruit gives a new taste. Apples add crunch, while berries bring a sweet-tart flavor. For pears, use ripe ones for the best texture. You can mix fruits too! Combine peaches with blueberries for a fun twist. This way, you can create your favorite flavor each time. If you need gluten-free options, look for gluten-free crescent roll dough. Many brands have tasty choices that work well. For a vegan version, swap cream cheese for plant-based cream cheese. Use a vegan egg wash or skip it for a golden look. You can also replace sugar with maple syrup or agave for sweetening. These changes let everyone enjoy the Danish! Want to make your Danish even better? Add spices like nutmeg or ginger for warmth. You can mix in a splash of almond extract for a nutty taste. Try adding a dollop of jam on top of the cream cheese too. You can experiment with different flavors! The possibilities are endless, and you can find your perfect combo. Check the Full Recipe to see how to make your new favorite treat! To keep your Peach Cream Cheese Danish fresh, place it in an airtight container. This will help preserve its flavor and texture. You can store it in the fridge for up to three days. Just make sure it is completely cool before sealing it. If you prefer to keep it longer, freezing is a great option. When you want to enjoy your leftover Danish, reheating is simple. Preheat your oven to 350°F (175°C). Place the Danish on a baking sheet for about 10-15 minutes. This will warm it up nicely and keep the pastry crisp. You can also use a microwave if you're in a hurry, but the oven gives better results. If you want to freeze the Danish, wrap each piece tightly in plastic wrap. Then, place them in a freezer-safe bag. They can last up to three months in the freezer. When you're ready to eat, just thaw them in the fridge overnight. Reheat in the oven for the best taste. For the full recipe, check the earlier sections. Yes, you can use canned peaches. They save time and are easy to find. Just make sure to drain them well. Canned peaches can be softer than fresh ones. This may change the texture slightly. If you want a firmer bite, fresh peaches are best. You will know the danishes are done when they turn golden brown. The dough should be puffy and cooked through. You can also check the bottom. It should feel firm and have a slight crunch. If they look undercooked, give them a few more minutes. Yes, you can prepare the dough ahead of time. Just keep it covered in the fridge. Make sure to use it within a day or two. If you want to freeze it, roll it out and wrap it tightly. When ready, thaw it in the fridge overnight before using. For the complete recipe, check out the Full Recipe link. Enjoy your baking! You now know how to make a delicious Peach Cream Cheese Danish. We covered key ingredients, step-by-step instructions, and handy tips. You can adjust flavors and even swap out fruits. Remember, storing leftovers properly keeps them fresh. Don't shy away from experimenting with options like vegan swaps. Making this treat is fun and easy! Enjoy baking and sharing your tasty danish creations!](https://dailydishlab.com/wp-content/uploads/2025/07/e83a1769-6d69-4dce-85bf-b37ffbe7d076-768x768.webp)