Peanut Butter Chocolate Chip Energy Balls Quick Treat

Craving a quick and tasty energy boost? Look no further! Peanut Butter Chocolate Chip Energy Balls are easy to make and perfect for any snack time. With just a few simple ingredients, you can whip up these mighty treats that are not only delicious but also packed with nutrients. In this guide, I’ll walk you through creating these bite-sized wonders. Let’s dive into the sweet world of energy balls!
Why I Love This Recipe
- Quick and Easy: This recipe takes just 10 minutes of prep time, making it a perfect snack for busy days.
- Healthy Ingredients: Packed with rolled oats, chia seeds, and natural nut butter, these energy balls are a nutritious choice.
- Customizable: You can easily swap out ingredients, like using almond butter or adding dried fruits, to suit your taste.
- Deliciously Satisfying: The combination of peanut butter and chocolate chips creates a treat that satisfies cravings without guilt.
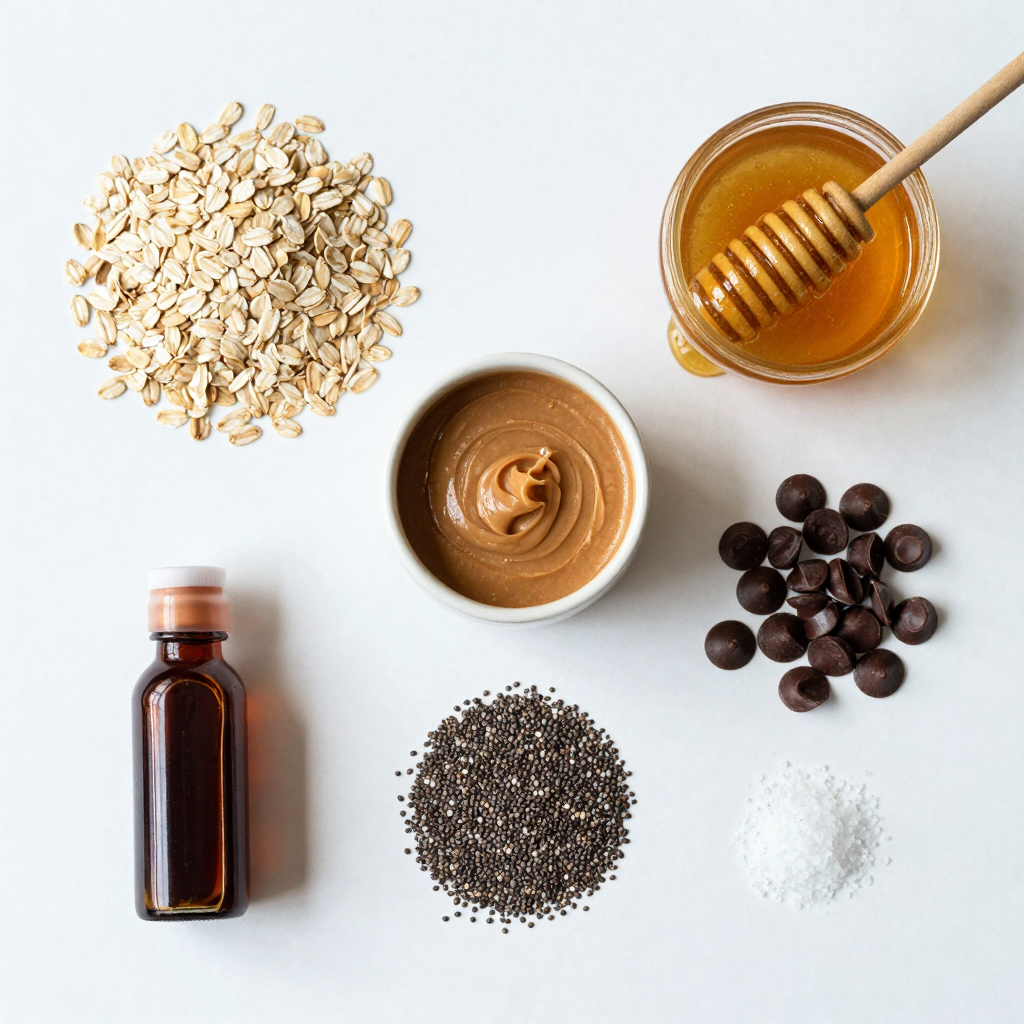
Ingredients
Main Ingredients for Peanut Butter Chocolate Chip Energy Balls
- 1 cup rolled oats
- 1/2 cup natural peanut butter (or almond butter)
- 1/3 cup honey or maple syrup
- 1/2 cup mini chocolate chips
To make Peanut Butter Chocolate Chip Energy Balls, you’ll need a few key ingredients. First, rolled oats form the base. They give texture and help bind the balls. Next, you’ll use natural peanut butter, which adds creaminess and flavor. Honey or maple syrup serves as the sweetener, making the balls sticky. Finally, mini chocolate chips bring a delightful burst of chocolate in every bite.
Optional Add-Ins
- 1/4 cup chia seeds
- A pinch of sea salt
- Additional flavorings (cinnamon, nutmeg)
For added nutrition, consider chia seeds. They boost fiber and omega-3s. A pinch of sea salt enhances flavor, balancing sweetness. You can also add spices like cinnamon or nutmeg for warmth. These optional add-ins let you customize the flavor and texture. If you want to try different tastes, these options are fun to explore.You’ll see how easy it is to whip up these energizing snacks!
Step-by-Step Instructions
Preparation Steps
- In a large bowl, combine the rolled oats, peanut butter, honey, chia seeds, and vanilla extract.
- Mix well with a spatula or your hands until everything is fully integrated. The mixture should feel sticky but easy to handle.
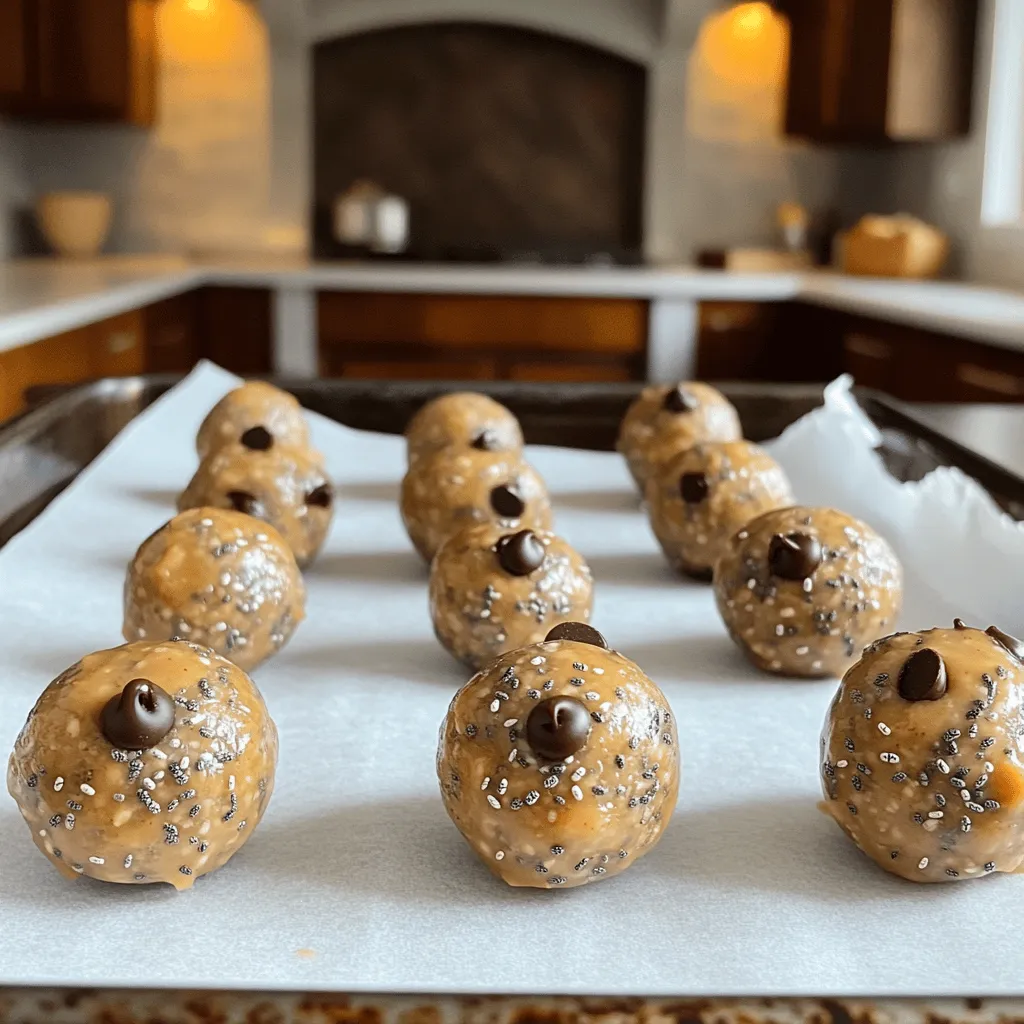
Forming the Energy Balls
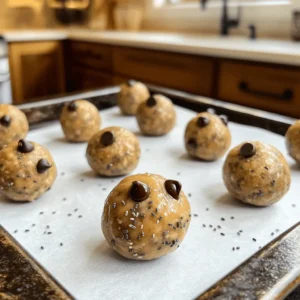
- Use your hands to roll the mixture into small balls, each about 1 inch wide.
- Place each ball on a baking sheet lined with parchment paper.
Chilling and Serving
- Refrigerate the energy balls for 30 minutes. This helps them firm up nicely.
- Enjoy them as a quick snack or a boost before workouts. Store leftovers in an airtight container in the fridge for up to one week.
Pro Tips
- Use Creamy Nut Butter: Opt for creamy peanut butter or almond butter to ensure the mixture binds well and rolls easily into balls.
- Chill for Firmness: Refrigerating the energy balls for about 30 minutes helps them firm up, making them easier to handle and eat.
- Customize Sweetness: Adjust the amount of honey or maple syrup based on your sweetness preference, or try adding a dash of cinnamon for extra flavor.
- Mix-In Variations: Feel free to add other mix-ins like dried fruits, nuts, or seeds to customize your energy balls to your taste.
Tips & Tricks
Making the Perfect Energy Balls
To avoid sticking, wet your hands slightly. This helps the mixture roll smoothly. It keeps your hands clean too! Make sure to mix the chocolate chips well. You want each bite to have a bit of chocolate. An even spread makes every energy ball tasty.
Customization Ideas
You can swap out peanut butter for any nut butter you like. Almond or cashew butter works great too! For an extra crunch, add seeds like pumpkin or sunflower. Dried fruits, like raisins or cranberries, also add sweetness. Get creative and make these energy balls your own!
Variations
Flavor Variations
You can change the taste of your Peanut Butter Chocolate Chip Energy Balls easily. One way is to add cocoa powder. This gives your balls a rich chocolate flavor. Just mix in two tablespoons of cocoa powder with the other ingredients. This simple switch makes them even more delightful.
You can also enhance the flavor with spices. Adding a teaspoon of cinnamon gives warmth and depth. Vanilla extract adds a sweet note. Both spices boost the taste and make the energy balls unique.
Health-Based Variations
If you’re watching sugar intake, try low-sugar options. You can use stevia or erythritol instead of honey or maple syrup. These sweeteners keep the taste without the extra sugar. Just use the same amount as honey in the recipe.
For gluten-free energy balls, use certified gluten-free oats. Many oats could contain gluten if processed in the same area as gluten products. Check the label to be safe. This way, everyone can enjoy these tasty treats.
Explore these variations to suit your taste or health goals.
Storage Info
Best Storage Practices
To keep your Peanut Butter Chocolate Chip Energy Balls fresh, use airtight containers. This method prevents air from spoiling them. Store them in the fridge for up to one week. The cool temperature helps maintain their flavor and texture.
Freezing Energy Balls
If you want to store them longer, freezing is your best bet. To freeze, place the energy balls in a single layer on a baking sheet. After they freeze for a couple of hours, transfer them to a freezer-safe bag. This way, they won’t stick together.
When you’re ready to enjoy one, simply take it out and let it thaw at room temperature. For the best texture, avoid microwaving. Let them sit for about 15 minutes before eating. Enjoy the perfect bite!
FAQs
Common Questions
How long do Peanut Butter Chocolate Chip Energy Balls last?
These energy balls last about one week in the fridge. Store them in an airtight container to keep them fresh.
Can I make these energy balls vegan?
Yes, you can make them vegan. Use maple syrup instead of honey and pick a vegan nut butter.
What can I substitute for honey or maple syrup?
You can use agave syrup or brown rice syrup as a sweet substitute.
Cooking FAQ
Can I bake these energy balls instead?
Baking is not needed for these energy balls. They are meant to be raw and no-bake.
What to do if the mixture is too dry or too wet?
If the mixture is too dry, add a little more peanut butter. If too wet, mix in more oats.
Nutritional Questions
How many calories are in Peanut Butter Chocolate Chip Energy Balls?
Each energy ball has about 100 calories. This can vary based on your exact ingredients.
Are these energy balls suitable for kids?
Yes, these energy balls are a great snack for kids. They are healthy and fun to eat.
You can easily make tasty Peanut Butter Chocolate Chip Energy Balls at home. We covered the main ingredients, preparation steps, and fun variations. Don’t forget to customize them to your taste!
These energy balls are great for snacks or quick meals. Proper storage keeps them fresh for days. Try different flavors and add-ins to find your favorite. Enjoy your energy balls!
Peanut Butter Chocolate Chip Energy Balls
Ingredients
1 cup rolled oats
1/2 cup natural peanut butter (or almond butter)
1/3 cup honey or maple syrup
1/2 cup mini chocolate chips
1/4 cup chia seeds
1/2 teaspoon vanilla extract
A pinch of sea salt
Instructions
In a large mixing bowl, combine the rolled oats, peanut butter, honey (or maple syrup), chia seeds, and vanilla extract.
Mix well using a spatula or your hands until all the ingredients are fully integrated. The mixture should be sticky but manageable.
Stir in the mini chocolate chips, ensuring they are evenly distributed throughout the mixture.
Use your hands to roll the mixture into small balls, about 1 inch in diameter. Place each ball onto a parchment-lined baking sheet.
Once all the mixture has been rolled into balls, refrigerate them for about 30 minutes to firm up.
After chilling, your energy balls are ready to eat! Store any leftovers in an airtight container in the fridge for up to one week.
– Prep Time: 10 minutes | Total Time: 40 minutes | Servings: About 12-15 balls
Peanut Butter Chocolate Chip Energy Balls
Ingredients
- 1 cup rolled oats
- 1/2 cup natural peanut butter (or almond butter)
- 1/3 cup honey or maple syrup
- 1/2 cup mini chocolate chips
- 1/4 cup chia seeds
- 1/2 teaspoon vanilla extract
- a pinch sea salt
Instructions
- In a large mixing bowl, combine the rolled oats, peanut butter, honey (or maple syrup), chia seeds, and vanilla extract.
- Mix well using a spatula or your hands until all the ingredients are fully integrated. The mixture should be sticky but manageable.
- Stir in the mini chocolate chips, ensuring they are evenly distributed throughout the mixture.
- Use your hands to roll the mixture into small balls, about 1 inch in diameter. Place each ball onto a parchment-lined baking sheet.
- Once all the mixture has been rolled into balls, refrigerate them for about 30 minutes to firm up.
- After chilling, your energy balls are ready to eat!

![- 1 cup coconut milk - 1/2 cup chia seeds - 1 ripe mango, diced - 2 tablespoons maple syrup or honey (adjust to taste) - 1 teaspoon vanilla extract - Pinch of salt - Toasted coconut flakes for garnish (optional) - Fresh mint leaves for garnish (optional) Coconut milk offers healthy fats that boost energy. It also helps with digestion. Chia seeds are full of fiber, which aids in digestion and keeps you full longer. Mango is rich in vitamins A and C, which support your immune system and skin. Maple syrup or honey adds natural sweetness and contains antioxidants. Vanilla extract gives flavor and may help reduce stress. Salt enhances taste and can help balance fluids in your body. Toasted coconut flakes add crunch and fiber, while mint adds freshness and aids digestion. If you don't have coconut milk, use almond or oat milk for a different taste. For chia seeds, you can use ground flaxseeds, but the texture will change. Any ripe fruit can replace mango, like bananas or berries, for varied flavors. Maple syrup can be swapped with agave syrup or stevia for a lower-calorie option. If you want a sugar-free choice, skip the sweetener and let the fruit shine. You can use vanilla bean paste instead of extract for a richer flavor. This recipe for Mango Coconut Chia Pudding is simple and packed with flavor. To make Mango Coconut Chia Pudding, start with the coconut milk. In a mixing bowl, combine: - 1 cup coconut milk - 2 tablespoons maple syrup or honey - 1 teaspoon vanilla extract - A pinch of salt Whisk these ingredients until they blend well. Next, add the chia seeds. Gradually whisk in: - 1/2 cup chia seeds This step is key. Make sure the seeds spread evenly in the liquid. Cover the bowl, or move the mix to a container with a lid. Place it in the fridge for at least 4 hours. For best results, leave it overnight. This waiting time lets the chia seeds absorb the coconut milk. After chilling, check the pudding. Stir it well to break up clumps. Now it’s ready for serving! To get the right texture, use fresh chia seeds. Old seeds may not thicken well. If your pudding is too thick, add a bit more coconut milk. For a creamier texture, use full-fat coconut milk. Remember to stir well after chilling. This helps avoid clumps and ensures smoothness. For a beautiful presentation, layer the pudding in clear glasses. Start with a layer of chia pudding, then add: - Diced mango Repeat the layers until the glass is full. Finish with a sprinkle of toasted coconut flakes and fresh mint leaves. This adds color and flavor. Serve it cold for a refreshing treat. For the full recipe, check below! You can make this pudding your own. Here are my favorite tips: - Add spices: A sprinkle of cinnamon or nutmeg can bring warmth. - Mix fruits: Try adding berries or pineapple for a tropical twist. - Change sweeteners: Use agave nectar or stevia instead of maple syrup. - Include nuts: Chopped almonds or walnuts add crunch and nutrition. Watch out for these common errors to get the best pudding: - Not whisking well: Make sure to mix the chia seeds fully into the liquid. - Skipping the chill time: Let the pudding sit for at least four hours. - Using too much liquid: Stick to the recipe for the right balance. - Not stirring before serving: A quick stir helps mix any settled chia seeds. You can boost both flavor and texture with some easy tricks: - Layer with fruit: Diced mango between layers adds freshness and color. - Garnish well: Use toasted coconut and mint leaves for a beautiful finish. - Serve chilled: This pudding tastes best when cold and creamy. - Experiment with toppings: Yogurt, granola, or seeds can add fun textures. For the full recipe, check out the detailed instructions above! {{image_2}} You can change the mango in this pudding for other fruits. Pineapple, kiwi, or passion fruit work great. Each fruit adds its own flavor and texture. You might want to mix in diced fruit before chilling the pudding. This way, each spoonful has a burst of tropical taste. You can also top the pudding with extra fruit for a colorful look. Coconut milk is a star in this recipe. If you want to try something different, use almond or oat milk. Both options are dairy-free and still creamy. Just keep in mind that each milk will change the flavor a bit. If you want a thicker base, add more chia seeds. This will help you achieve that creamy texture you love. Maple syrup or honey gives sweetness to the pudding. If you want a sugar-free option, try stevia or agave syrup. Both are great for adding sweetness without calories. You can also use ripe bananas for natural sweetness. Just mash them well and mix them into the base. This adds a new flavor while keeping the pudding healthy. For the full recipe, you can check the earlier section. Enjoy these fun variations! To keep your mango coconut chia pudding fresh, store it in airtight containers. This helps prevent any unwanted odors or flavors from seeping in. Make sure to place the pudding in the fridge right after it cools. You can also layer it in small jars for easy serving later. Mango coconut chia pudding lasts about 5 days in the fridge. If you want to keep it longer, you can freeze it. Pour the pudding into ice cube trays for easy portions. Just remember to thaw it in the fridge before serving. Do not refreeze after thawing. If your pudding thickens too much in the fridge, simply add a splash of coconut milk. Stir well to achieve your desired consistency. You can also mix in fresh mango pieces for a flavor boost. Enjoy it cold or let it sit at room temperature for a few minutes before digging in. Chia pudding is a simple dish made from chia seeds and liquid. When you mix chia seeds with coconut milk, they absorb the liquid. This makes a thick, creamy texture. To make it, whisk coconut milk, maple syrup, vanilla, and salt. Then, stir in chia seeds. Cover and chill for at least four hours. This lets the seeds swell and form a pudding. Yes, you can use different types of milk. Almond, soy, or oat milk work well. Each type adds its own flavor. Coconut milk gives a rich, tropical taste. Try what you like best to find your favorite! Mango coconut chia pudding lasts about four to five days in the fridge. Store it in an airtight container to keep it fresh. If you notice any changes in smell or texture, it is best to throw it away. Yes, chia pudding is very healthy. Chia seeds are high in fiber and protein. They also contain omega-3 fatty acids. Coconut milk provides good fats and vitamins. This dish is great for breakfast or a snack. To make chia pudding without sugar, skip the sweeteners. Use ripe mango for natural sweetness. You can also add spices like cinnamon or nutmeg for flavor. This makes the pudding tasty without added sugar. Here’s how to make it: - 1 cup coconut milk - 1/2 cup chia seeds - 1 ripe mango, diced - 2 tablespoons maple syrup or honey (adjust to taste) - 1 teaspoon vanilla extract - Pinch of salt - Toasted coconut flakes for garnish (optional) - Fresh mint leaves for garnish (optional) Follow the [Full Recipe] for step-by-step details on how to prepare this delicious treat! Mango coconut chia pudding is simple and fun to make. We explored key ingredients, their health perks, and ways to swap them out. I provided clear steps to prepare the dish and serve it just right. We looked at tips to enhance flavors and avoid common mistakes. You can try tropical fruit variations and find dairy-free options too. Proper storage ensures your pudding stays fresh and tasty. With these insights, you can create a delicious treat that fits your tastes and lifestyle. Enjoy your chia pudding adventure!](https://dailydishlab.com/wp-content/uploads/2025/07/e4ad1822-a4f3-41e3-be5e-fabc0a8bd60a-768x768.webp)