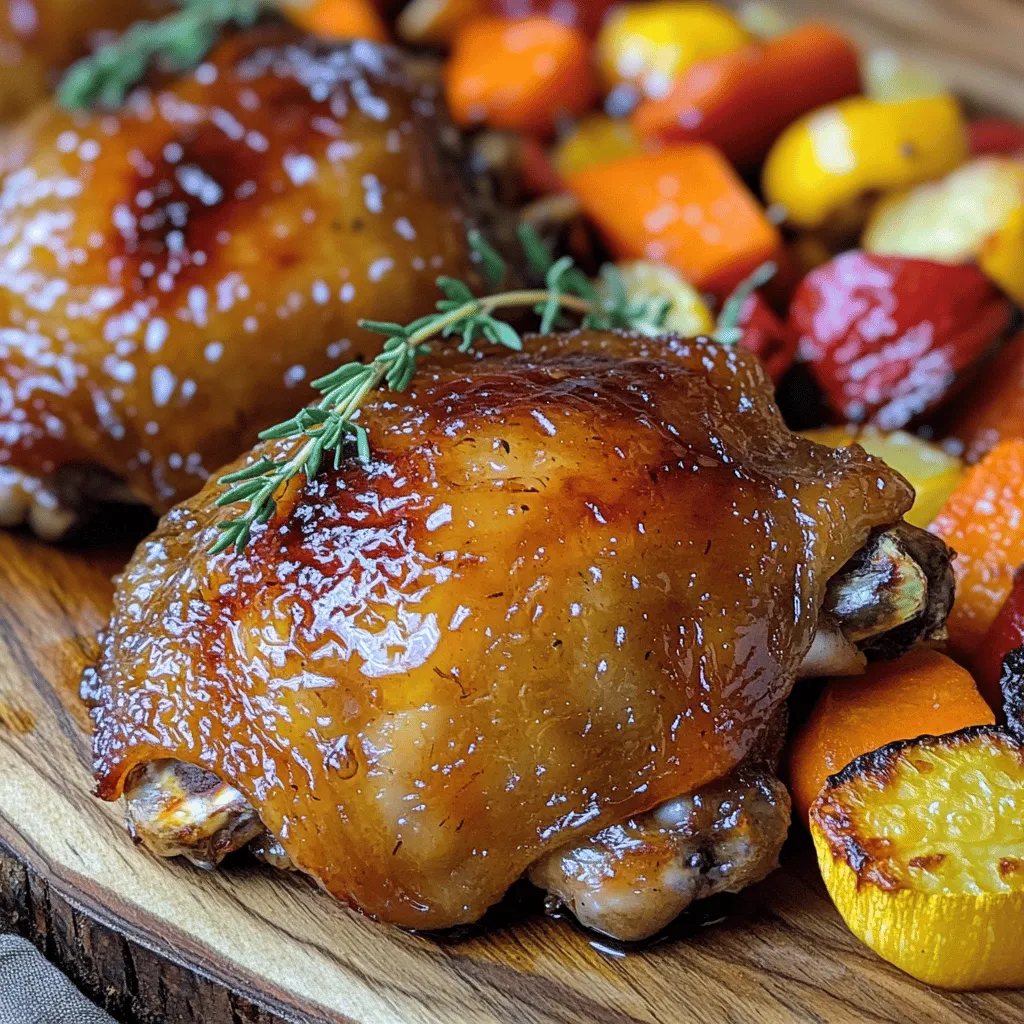
Maple Glazed Chicken Thighs Bold and Flavorful Recipe

Are you ready to elevate your dinner game? This Maple Glazed Chicken Thighs recipe is bold and bursting with flavor. With just a few simple ingredients, you’ll create a dish that dazzles. Say goodbye to boring meals! I’ll guide you through each step, from marinating to baking, ensuring you achieve crispy skin and juicy meat. Let’s dive into this sweet and savory delight that’s sure to impress!
Why I Love This Recipe
- Simple Preparation: This recipe requires minimal effort, making it perfect for a weeknight dinner or a special occasion.
- Deliciously Sweet and Savory: The maple syrup combined with Dijon mustard and garlic creates a perfect balance of flavors.
- Juicy and Tender Chicken: Bone-in, skin-on chicken thighs retain moisture and flavor, resulting in a succulent dish.
- Versatile Pairing Options: This dish goes well with a variety of sides, from roasted vegetables to a fresh salad.
Ingredients
Main Ingredients
- 4 bone-in chicken thighs, skin-on
- 1/2 cup pure maple syrup
- 2 tablespoons Dijon mustard
- 2 cloves garlic, minced
Additional Seasonings
- 1 tablespoon soy sauce (low sodium)
- 1 teaspoon fresh thyme leaves (or 1/2 tsp dried thyme)
- Salt and freshly ground black pepper, to taste
Cooking Essentials
- 1 tablespoon olive oil
- 1 tablespoon apple cider vinegar
When I make maple glazed chicken thighs, I always choose bone-in, skin-on pieces. The skin adds crispiness and flavor. The maple syrup brings a sweet touch, while the Dijon mustard gives a nice tang. Garlic adds depth and warmth.
For seasonings, I use low-sodium soy sauce. It helps balance the sweet flavors without being too salty. Fresh thyme leaves add a lovely herbal note, but dried thyme works too if that’s what you have. I always season with salt and fresh pepper for a little extra kick.
In terms of cooking essentials, I use olive oil to sear the chicken. It helps create that golden, crispy skin. The apple cider vinegar adds brightness to the glaze, making every bite pop.
This combination of ingredients creates a deliciously balanced dish.

Step-by-Step Instructions
Marinating the Chicken
To start, whisk together the marinade ingredients. In a medium bowl, combine:
- 1/2 cup pure maple syrup
- 2 tablespoons Dijon mustard
- 2 cloves garlic, minced
- 1 tablespoon soy sauce
- 1 teaspoon fresh thyme leaves
- Salt and freshly ground black pepper, to taste
- 1 tablespoon apple cider vinegar
Make sure everything mixes well. Now, coat the chicken thighs thoroughly in the marinade. Place them in the bowl, turning to cover all sides. Cover and refrigerate for at least 1 hour or overnight for more flavor.
Cooking Preparation
When you’re ready to cook, preheat your oven to 400°F (200°C). While that heats up, grab a large oven-safe skillet. Add 1 tablespoon of olive oil and heat it over medium-high heat. Once the oil is hot, add the marinated chicken thighs, skin-side down. Sear them for about 5-7 minutes until the skin turns golden brown and crispy.
Baking Process
After searing, carefully flip the chicken thighs over. Pour any remaining marinade from the bowl over the chicken in the skillet. Now, transfer the skillet to the preheated oven. Bake for 25-30 minutes. Check the internal temperature; it should reach 165°F (74°C). This ensures your chicken is cooked through and safe to eat.
Pro Tips
- Marinate Longer for Flavor: Allow the chicken to marinate overnight for maximum flavor infusion and tenderness.
- Check for Crispiness: Ensure the skin is crispy by not overcrowding the skillet when searing the chicken thighs.
- Use a Meat Thermometer: To ensure the chicken is perfectly cooked, use a meat thermometer to check that the internal temperature reaches 165°F (74°C).
- Rest Before Serving: Let the chicken rest for at least 5 minutes after cooking to allow the juices to redistribute for a juicier bite.
Tips & Tricks
Expert Cooking Tips
- How to ensure crispy skin on chicken: Start by patting the chicken thighs dry. This removes excess moisture. Next, sear the chicken in a hot skillet with olive oil. Cook skin-side down for about 5 to 7 minutes. This helps create that desired crispy skin.
- Ideal marination times for best flavor: For great flavor, marinate the chicken for at least 1 hour. If you can, let it sit overnight. The longer it marinates, the more the flavors soak in.
Serving Suggestions
- Pairing with side dishes like roasted vegetables: Maple glazed chicken pairs well with roasted veggies. Try carrots, Brussels sprouts, or green beans. They add color and nutrients to your meal.
- Garnishing ideas for presentation: For a lovely touch, garnish with fresh thyme sprigs. You can also sprinkle some chopped parsley on top. This adds a nice pop of color.
Troubleshooting
- Common issues and how to fix them: If your chicken is undercooked, use a meat thermometer. The chicken should reach 165°F (74°C) for safety. If it’s not cooked, return it to the oven until done. If the glaze is too thin, let it simmer on the stove to thicken before serving.
Variations
Alternative Ingredients
You can switch chicken thighs for chicken breasts if you prefer. Breasts are leaner but still tasty. If you want a different sweet flavor, use honey instead of maple syrup. Honey adds a floral note and works well in the glaze.
Flavor Enhancements
To spice things up, add chili flakes to the marinade. This gives a nice kick to the dish. You can also try using fresh herbs like rosemary instead of thyme. Rosemary adds a woodsy and aromatic flavor that pairs beautifully with chicken.
Cooking Methods
Grilling maple glazed chicken gives it a smoky flavor. If you want a crispy outside, grilling is a great choice. Baking is easier and keeps the chicken tender. You can also use a slow cooker. This method makes the chicken very juicy and allows the flavors to mix well.
Storage Info
Refrigeration
To store leftover chicken, place it in an airtight container. This keeps the chicken fresh. After cooking, let it cool before sealing. Store it in the fridge for up to 3 days. This keeps the flavor intact and safe to eat.
Freezing Tips
You can freeze cooked chicken thighs for later use. Wrap each piece tightly in plastic wrap. Then, place them in a freezer bag. This prevents freezer burn. Use within 3 months for the best taste. To thaw, move the chicken to the fridge overnight. For quick reheating, use the microwave or oven until heated through.
Meal Prep Ideas
Leftover chicken is great for meal prep. Dice it up for salads or sandwiches. It adds protein and flavor. For a meal prep version, marinate extra chicken at the start. Cook a larger batch and divide into portions. This makes lunch or dinner easy all week. For added variety, switch up dressings or toppings.
FAQs
How do I know when chicken thighs are fully cooked?
The best way to check if chicken thighs are done is by using a meat thermometer. The internal temperature should reach 165°F (74°C). This ensures the chicken is safe to eat. Remember, the juices should run clear, not pink.
Can I make maple glazed chicken thighs in advance?
Yes, you can prepare these chicken thighs ahead of time. Marinate the chicken and store it in the fridge for up to 24 hours. This allows the flavors to soak in. When ready to cook, follow the recipe steps. For reheating, use the oven to keep the skin crispy.
What should I serve with maple glazed chicken thighs?
You can pair these chicken thighs with many sides. Try roasted vegetables for a warm dish. A fresh green salad adds a nice crunch. Mashed potatoes or rice can soak up the sweet glaze.
Are there any dietary concerns with this recipe?
This recipe can be made gluten-free by using gluten-free soy sauce. If you want a lower-sugar option, try reducing the maple syrup amount. You can also mix in some apple juice for sweetness without too much sugar.
Can I use a different sweetener instead of maple syrup?
Yes, you can use honey or agave syrup as substitutes. These will change the flavor slightly but still taste great. Honey gives a richer flavor, while agave is milder. Adjust the amount based on your taste preference.
This post covered how to make delicious maple glazed chicken thighs. We discussed the main ingredients, marinating, and cooking methods. I shared tips for achieving the perfect chicken skin and pairing the dish with sides. You can also experiment with variations and learn storage tips for leftovers.
Cooking should be fun and tasty. With these methods and ideas, you’ll impress everyone at the table. Enjoy your cooking journey!

Maple Glazed Chicken Thighs
Ingredients
4 bone-in chicken thighs, skin-on
1/2 cup pure maple syrup
2 tablespoons Dijon mustard
2 cloves garlic, minced
1 tablespoon soy sauce (low sodium)
1 teaspoon fresh thyme leaves (or 1/2 tsp dried thyme)
Salt and freshly ground black pepper, to taste
1 tablespoon olive oil
1 tablespoon apple cider vinegar
Instructions
Marinate the Chicken: In a medium bowl, whisk together the maple syrup, Dijon mustard, minced garlic, soy sauce, thyme leaves, apple cider vinegar, salt, and pepper. Add the chicken thighs to the bowl, making sure they are well-coated in the marinade. Cover and refrigerate for at least 1 hour, or overnight for more flavor.
Preheat the Oven: When ready to cook, preheat your oven to 400°F (200°C).
Sear the Chicken: In a large oven-safe skillet, heat the olive oil over medium-high heat. Once hot, add the marinated chicken thighs skin-side down. Sear for about 5-7 minutes or until the skin is golden brown and crispy.
Add the Glaze: Carefully flip the chicken thighs over. Pour any remaining marinade from the bowl over the chicken in the skillet.
Bake: Transfer the skillet to the preheated oven and bake for 25-30 minutes, or until the chicken is cooked through (internal temperature should reach 165°F/74°C) and the glaze has thickened.
Rest the Chicken: Once cooked, remove the skillet from the oven and let the chicken rest for about 5 minutes. This allows the juices to redistribute.
Serve: Serve the chicken on a platter, drizzling extra glaze from the skillet over the top.
Prep Time: 10 minutes | Total Time: 1 hour (including marinating) | Servings: 4
– Presentation Tips: Garnish with fresh thyme sprigs and serve alongside roasted vegetables or a simple green salad for a complete meal.
Maple Glazed Chicken Thighs
Ingredients
- 4 pieces bone-in chicken thighs, skin-on
- 0.5 cup pure maple syrup
- 2 tablespoons Dijon mustard
- 2 cloves garlic, minced
- 1 tablespoon soy sauce (low sodium)
- 1 teaspoon fresh thyme leaves (or 1/2 tsp dried thyme)
- to taste Salt and freshly ground black pepper
- 1 tablespoon olive oil
- 1 tablespoon apple cider vinegar
Instructions
- In a medium bowl, whisk together the maple syrup, Dijon mustard, minced garlic, soy sauce, thyme leaves, apple cider vinegar, salt, and pepper. Add the chicken thighs to the bowl, making sure they are well-coated in the marinade. Cover and refrigerate for at least 1 hour, or overnight for more flavor.
- When ready to cook, preheat your oven to 400°F (200°C).
- In a large oven-safe skillet, heat the olive oil over medium-high heat. Once hot, add the marinated chicken thighs skin-side down. Sear for about 5-7 minutes or until the skin is golden brown and crispy.
- Carefully flip the chicken thighs over. Pour any remaining marinade from the bowl over the chicken in the skillet.
- Transfer the skillet to the preheated oven and bake for 25-30 minutes, or until the chicken is cooked through (internal temperature should reach 165°F/74°C) and the glaze has thickened.
- Once cooked, remove the skillet from the oven and let the chicken rest for about 5 minutes. This allows the juices to redistribute.
- Serve the chicken on a platter, drizzling extra glaze from the skillet over the top.
![- 1 pound rainbow carrots, peeled and cut into even-sized pieces - 3 tablespoons olive oil - 3 cloves garlic, minced - 1 teaspoon fresh rosemary, chopped - 1 teaspoon fresh thyme, chopped - 1 teaspoon fresh parsley, chopped - 1 tablespoon honey or maple syrup - Zest of 1 lemon - Salt and pepper to taste This dish shines with the bright colors of rainbow carrots. Using fresh herbs adds a wonderful touch. The garlic gives it a robust flavor, while honey or maple syrup adds sweetness. Don't forget the lemon zest; it gives a great citrus kick! Each ingredient plays a role in making this dish special. You can find the full recipe for Garlic Herb Roasted Rainbow Carrots to create this vibrant side dish. - Preheat the oven to 425°F (220°C). - Prepare the baking sheet with parchment paper. First, I love to start by preheating the oven. This step ensures that the carrots roast evenly. Parchment paper helps the carrots not stick to the baking sheet. It also makes cleanup easier. - Combine olive oil, garlic, herbs, honey, lemon zest, salt, and pepper in a bowl. - Toss rainbow carrots in the herb mixture until coated. Next, I mix my ingredients. In a bowl, I combine olive oil, minced garlic, fresh herbs, honey, lemon zest, salt, and pepper. The mix adds great flavor to the carrots. After mixing, I add the rainbow carrots to the bowl. I toss them until they're evenly coated. Each carrot gets a nice layer of the herb mix. - Arrange carrots on the baking sheet in a single layer. - Roasting time and temperature: 20-25 minutes at 425°F (220°C). Now, I arrange the carrots on the baking sheet. I place them in a single layer for even roasting. I roast them for 20 to 25 minutes at 425°F (220°C). Halfway through, I turn the carrots to help them caramelize. They will be tender and slightly sweet when done. This simple dish is a true delight! If you want the full recipe, check it out here. To ensure even roasting, cut your rainbow carrots into similar sizes. This way, they cook at the same rate. Spread them out on the baking sheet, leaving space between each piece. This helps warm air circulate, making them cook nicely. Turn the carrots halfway through roasting. This step adds flavor and helps them caramelize. When you flip them, use a spatula to avoid breaking them. You want each piece to stay whole for a great look. Want a tangy kick? Add balsamic vinegar or a touch of mustard to your mix. This gives depth and a nice contrast to the sweetness of the carrots. You can also try different herbs like dill or oregano for a fun twist. The key is to explore flavors you enjoy. Serving your roasted carrots on a nice platter makes a big difference. Arrange them in a circle or a line for an eye-catching display. Drizzle any glaze left on the baking sheet over the top for extra shine. To make your dish pop, garnish with fresh herbs. A sprinkle of parsley or thyme adds color and freshness. You can even add a squeeze of lemon for brightness. This simple touch makes your dish look gourmet. Check out the [Full Recipe] for more details on making these tasty carrots! {{image_2}} You can switch up the recipe using other root veggies. Try adding parsnips or beets for a colorful twist. These vegetables offer unique tastes and textures. You can also use baby carrots. They make for a cute presentation and cook quickly. Want to change the flavor? Add spices like cumin or paprika. These spices give the dish warmth and depth. You can also add citrus. A bit of orange zest brings a bright touch to the carrots. This zest pairs well with the garlic and herbs. If you want a vegan dish, simply skip the honey and use maple syrup. This keeps the sweetness while keeping it plant-based. For gluten-free diets, this recipe is already safe. Just ensure all your ingredients are gluten-free. Enjoy the dish without worry! For the full details on making Garlic Herb Roasted Rainbow Carrots, check the [Full Recipe]. To keep your garlic herb roasted rainbow carrots fresh, store them in the fridge. Place the cooled carrots in an airtight container. This keeps out moisture and air, which can spoil them. Use them within three to five days for the best taste. If you have leftovers, you can freeze them, but note that the texture may change. To freeze, spread the cooled carrots on a baking sheet. Freeze them for about an hour, then transfer them to a freezer bag. This method prevents them from sticking together. When it’s time to enjoy your carrots again, reheating is key. The best way is to use the oven. Preheat it to 350°F (175°C). Spread the carrots on a baking sheet in a single layer. Heat them for about 10 to 15 minutes, or until warm. This method keeps them crisp. Avoid microwaving them if you can. Microwaving can make the carrots soggy and lose their nice texture. If you must use a microwave, place a damp paper towel over the carrots to help retain moisture without making them mushy. Can I use regular carrots instead of rainbow carrots? Yes, you can use regular carrots. However, rainbow carrots add color and fun to your dish. Their taste is sweeter and richer. You can mix and match if you like. Regular carrots work well in this recipe. How can I make the recipe ahead of time? You can prep the carrots and the herb mix a day early. Just cut the carrots and mix them with the herbs. Store them in the fridge. When you're ready to cook, just roast them as directed in the full recipe. What should I do if my carrots aren’t tender after roasting? If your carrots aren't tender, they may need more time. Check them at 5-minute intervals. Add some water to the baking sheet if they look dry. This steam can help soften them. How do I know when the carrots are done? The carrots are done when they are tender and slightly caramelized. You can test them with a fork. They should be easy to pierce. Look for a golden-brown color on the edges for that perfect finish. Are roasted carrots healthy? Yes, roasted carrots are healthy. They are low in calories and high in fiber. This makes them great for digestion. They also contain vitamins like A and C, which help your immune system. What nutritional benefits do rainbow carrots provide? Rainbow carrots have many health benefits. They provide antioxidants that fight free radicals. The different colors show various nutrients. For example, orange carrots are high in beta-carotene, while purple carrots contain anthocyanins. These nutrients help keep you healthy and strong. This blog post covered a simple and tasty roasted rainbow carrots recipe. You learned about key ingredients like olive oil, fresh herbs, and flavor enhancers. I shared step-by-step instructions to achieve perfect roasting. You also got tips for storage and reheating, along with fun variations. The beauty of this dish lies in its versatility and vibrant colors. Enjoy making it your own, and bring joy to your meals with these delicious carrots. Eating well can also be fun and easy!](https://dailydishlab.com/wp-content/uploads/2025/06/d72d9d4c-d28b-4e8c-993a-1734cc17a3d6-768x768.webp)