
Irresistible Air Fryer Coconut Crusted Cod Recipe

Are you ready to enjoy a delightful and crispy dish? This Irresistible Air Fryer Coconut Crusted Cod recipe combines sweet coconut and flaky fish into a treat you’ll crave. Whether you’re a busy parent, a health-conscious food lover, or new to air frying, this easy recipe delivers incredible flavor with just a few simple steps. Let’s dive into the world of coconut crusted cod and elevate your next meal!
Why I Love This Recipe
- Delicious Flavor: The combination of coconut and lime zest creates a tropical flavor that’s irresistible.
- Healthy Cooking: Using an air fryer significantly reduces the amount of oil needed, making this dish a healthier option.
- Quick Preparation: This recipe is simple and can be prepared in just 30 minutes, perfect for busy weeknights.
- Versatile Serving Options: Serve it with sides like mango salsa or a fresh salad for a complete meal.
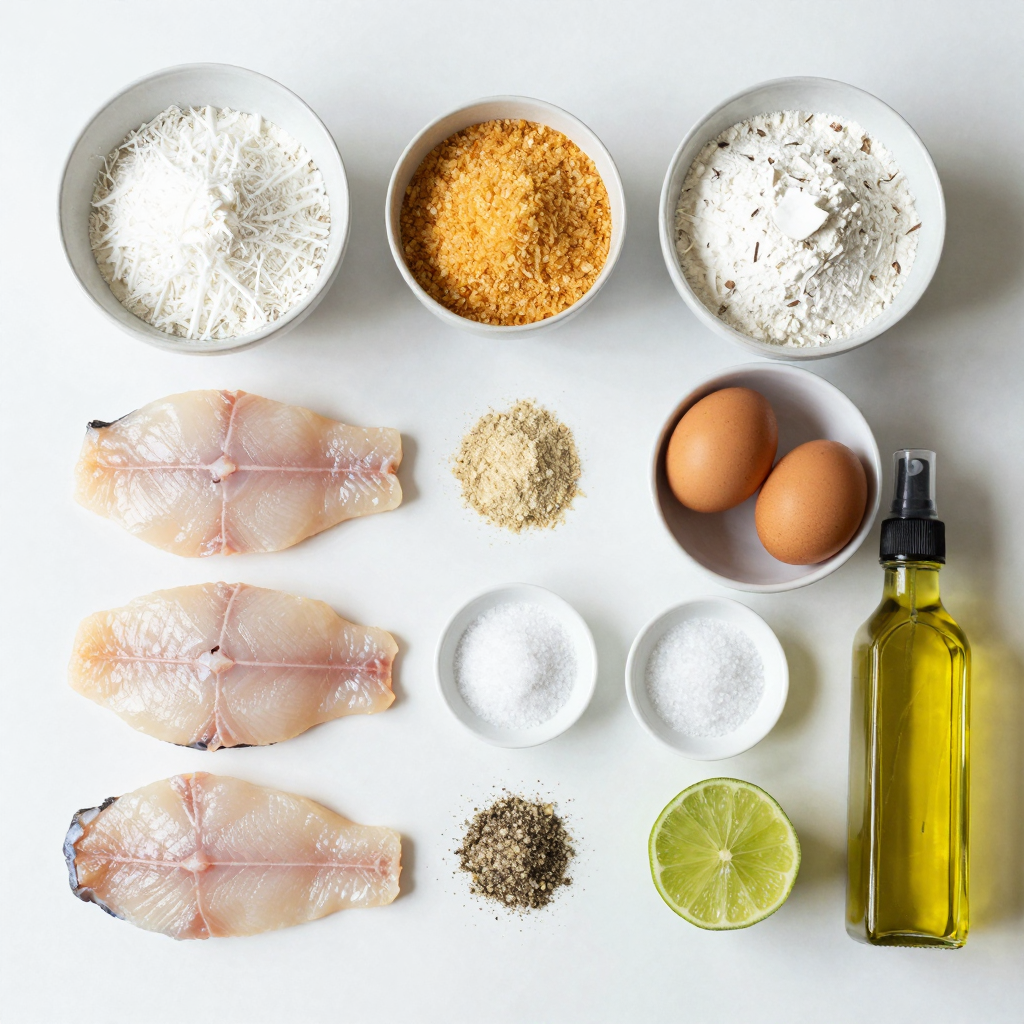
Ingredients
List of Required Ingredients
- 4 cod fillets (about 6 oz each)
- 1 cup unsweetened shredded coconut
- 1/2 cup panko breadcrumbs
- 1/4 cup all-purpose flour
- 2 large eggs, beaten
- 1 teaspoon garlic powder
- 1 teaspoon onion powder
- 1/2 teaspoon salt
- 1/4 teaspoon black pepper
- Zest of 1 lime
- Olive oil spray
Optional Seasonings and Add-ins
You can add flavor to the dish with some optional seasonings. Try adding:
- 1/2 teaspoon paprika for a smoky taste.
- 1/2 teaspoon cayenne pepper for heat.
- Fresh herbs like cilantro or parsley for freshness.
These add-ins can enhance the taste and bring a new twist to the cod.
Nutritional Information per Serving
Each serving of this coconut crusted cod contains:
- Calories: Approximately 350
- Protein: 25g
- Carbohydrates: 30g
- Fat: 15g
- Fiber: 3g
This dish is a great balance of protein and carbs. It provides a tasty meal that won’t break your diet. Enjoy it guilt-free!
Step-by-Step Instructions
Preparing the Coating
To create the tasty coating, grab a shallow dish. Mix 1 cup of unsweetened shredded coconut, 1/2 cup of panko breadcrumbs, 1 teaspoon of garlic powder, 1 teaspoon of onion powder, 1/2 teaspoon of salt, 1/4 teaspoon of black pepper, and the zest of 1 lime. Stir this mix well. The coconut gives a nice crunch, while the panko adds lightness. Set this aside for now.
Dredging and Coating the Cod
Next, take another shallow dish and add 1/4 cup of all-purpose flour. Coat each cod fillet lightly in the flour. Make sure to shake off any extra flour. This step helps the egg stick better. Then, dip the floured fillets into 2 beaten eggs. Make sure they are covered in egg. This will help the coconut mixture stick to the fish.
Now, take the egg-coated cod and transfer it to the coconut-panko mix. Press down firmly on the fillets. This ensures the coating sticks well. Make sure every inch of the fish is covered in this tasty crust.
Cooking in the Air Fryer
Before you cook, preheat your air fryer to 375°F (190°C) for about 5 minutes. While it heats up, lightly spray the air fryer basket with olive oil spray. Place the crusted cod fillets in the basket in a single layer. Leave some space between them for even cooking. Spray the tops of the fillets lightly with olive oil as well.
Cook the cod for about 10 to 12 minutes. Halfway through, flip the fillets so they cook evenly. You’ll know they are done when the crust is golden brown and the fish flakes easily with a fork. Once cooked, remove the cod and let it rest for a minute before serving. Enjoy this crispy delight!
Pro Tips
- Use Fresh Cod: Fresh cod fillets will yield the best flavor and texture. Look for bright, moist fillets with a mild aroma.
- Adjust Cooking Time: Cooking times may vary based on the thickness of the fillets. Use a fork to check if the fish flakes easily to ensure it’s cooked through.
- Experiment with Seasonings: Feel free to add additional spices or herbs to the coconut-panko mixture, such as paprika or cayenne, for an extra kick.
- Serve Immediately: For the best texture, serve the coconut-crusted cod right after cooking while the crust is still crispy.
Tips & Tricks
Achieving the Perfect Crispy Texture
To get that crispy texture, follow these steps:
- Use Fresh Ingredients: Fresh cod fillets yield the best results.
- Dry the Fish: Pat the cod fillets dry with paper towels. This helps the coating stick.
- Even Coating: Ensure even coverage of the coconut and panko mix. Press down firmly for a good grip.
- Spray Oil: Lightly spray the tops of the fillets with olive oil. This promotes browning and crispiness.
Common Mistakes to Avoid
Here are some common pitfalls to watch for:
- Skipping the Flour: Always coat the cod in flour first. This helps the egg and coating stick better.
- Overcrowding the Basket: Cook in batches if needed. This allows hot air to circulate and cooks the fish evenly.
- Not Preheating the Air Fryer: Preheating is key. It ensures the cod cooks quickly and crisps up nicely.
Alternative Cooking Methods (Oven, Pan-fry)
If you don’t have an air fryer, you can still make this dish:
- Oven Method: Preheat your oven to 400°F (200°C). Place the crusted cod on a baking sheet lined with parchment paper. Bake for 15-20 minutes, flipping halfway through.
- Pan-fry Method: Heat some oil in a pan over medium heat. Fry the cod for about 4-5 minutes on each side until golden brown. This method adds a lovely flavor but may use more oil.
These tips and tricks will ensure that your coconut-crusted cod is a hit every time you make it!

Variations
Ingredient Substitutions (Gluten-free options)
You can make this recipe gluten-free. Simply swap the all-purpose flour and panko breadcrumbs with gluten-free options. Use gluten-free flour for dredging. For the coating, look for gluten-free panko or crushed gluten-free crackers. This way, you can still enjoy that crunchy texture without gluten.
Flavor Variations (Adding spices or herbs)
You can spice things up easily! Try adding smoked paprika or cayenne pepper for heat. If you love fresh herbs, mix chopped cilantro or parsley into the coating. You can also add lemon zest instead of lime for a different citrus twist. Experiment with flavors to find what you like best!
Sides to Serve with Coconut Crusted Cod
Pair your coconut crusted cod with fun sides. A tropical mango salsa adds sweetness and color. You can also serve it with a fresh salad, like a citrus or avocado salad. Rice or quinoa makes a great base too. These sides enhance the meal and balance the flavors perfectly.
Storage Info
Storing Leftovers
After cooking, let the cod cool down. Place any leftovers in an airtight container. Keep it in the fridge. Cod stays fresh for about 2-3 days. Make sure to store the cod without the sauce. This keeps the crust crispy.
Reheating Instructions
To reheat, use the air fryer for best results. Preheat it to 350°F (175°C). Place the cod in the basket and heat for about 5-7 minutes. This keeps the crust crunchy. You can also use an oven. Set it to 350°F (175°C) and heat for 10-12 minutes.
Freezing Guidelines
You can freeze the uncooked, coated cod. Place the coated fillets in a single layer on a baking sheet. Freeze until solid, then transfer to a freezer bag. This method saves space. The frozen cod lasts for about 2 months. When ready, cook from frozen. Just add a few extra minutes to the cooking time.
FAQs
How do I keep the coating from falling off?
To keep the coating on your cod, follow these steps:
- Make sure to coat the fish in flour first. This helps the egg stick better.
- Press the coconut-panko mix firmly onto the cod. This helps it stick well.
- Don’t rush the cooking. Let it cook until golden brown to seal in the crust.
If you follow these tips, your cod will have a nice, crunchy coating.
Can I use other types of fish for this recipe?
Yes, you can use other fish! Some great options are:
- Tilapia
- Halibut
- Catfish
- Salmon
Each fish has its own flavor and texture. Adjust the cooking time as needed. Thicker fish may need more time.
Is coconut crusted cod healthy?
Coconut crusted cod can be a healthy choice. Here are some reasons why:
- Cod is low in calories and high in protein.
- The unsweetened coconut adds fiber and healthy fats.
- Using an air fryer cuts down on oil, making it lighter.
Pair it with fresh veggies or a salad for a balanced meal. Enjoy your healthy, tasty dish!
In this blog post, we covered making coconut-crusted cod from start to finish. We discussed ingredients, cooking steps, and tips for the best results. Remember to choose the right fish and seasonings to fit your taste.
Crispy cod can be easy and fun to make. Try different seasonings and sides to keep it fresh. With these cooking methods and storage tips, you can enjoy this dish anytime. Dive into the world of coconut-crusted cod and impress your taste buds!
Air Fryer Coconut Crusted Cod
Ingredients
4 cod fillets (about 6 oz each)
1 cup unsweetened shredded coconut
1/2 cup panko breadcrumbs
1/4 cup all-purpose flour
2 large eggs, beaten
1 teaspoon garlic powder
1 teaspoon onion powder
1/2 teaspoon salt
1/4 teaspoon black pepper
Zest of 1 lime
Olive oil spray
Instructions
Prepare the Coating: In a shallow dish, mix the shredded coconut, panko breadcrumbs, garlic powder, onion powder, salt, pepper, and lime zest. Set aside.
Dredge the Cod: In a separate dish, place the all-purpose flour. Coat each cod fillet lightly in flour, shaking off any excess.
Egg Wash: Next, dip the floured cod fillets into the beaten eggs, ensuring they are fully coated.
Crust the Fillets: Transfer the egg-coated fillets into the coconut-panko mixture. Press down firmly to ensure the coating adheres to the fish.
Preheat the Air Fryer: Preheat your air fryer to 375°F (190°C) for about 5 minutes.
Air Fry the Cod: Lightly spray the air fryer basket with olive oil spray. Place the crusted cod fillets in the basket in a single layer. Spray the tops of the fillets lightly with olive oil.
Cooking Time: Cook the cod for about 10-12 minutes, flipping halfway through, until the crust is golden brown, and the fish flakes easily with a fork.
Serve: Remove the cod from the air fryer, and let it rest for a minute before serving.
Prep Time: 15 minutes | Total Time: 30 minutes | Servings: 4
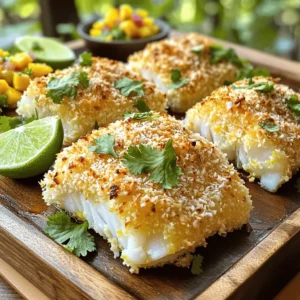
– Presentation Tips: Serve the coconut-crusted cod on a wooden platter with lime wedges and a sprinkle of fresh cilantro for a tropical touch. Pair with a side of mango salsa for added color and flavor!
Air Fryer Coconut Crusted Cod
Ingredients
- 4 fillets cod fillets (about 6 oz each)
- 1 cup unsweetened shredded coconut
- 1/2 cup panko breadcrumbs
- 1/4 cup all-purpose flour
- 2 large eggs, beaten
- 1 teaspoon garlic powder
- 1 teaspoon onion powder
- 1/2 teaspoon salt
- 1/4 teaspoon black pepper
- 1 zest lime
- as needed spray olive oil spray
Instructions
- In a shallow dish, mix the shredded coconut, panko breadcrumbs, garlic powder, onion powder, salt, pepper, and lime zest. Set aside.
- In a separate dish, place the all-purpose flour. Coat each cod fillet lightly in flour, shaking off any excess.
- Next, dip the floured cod fillets into the beaten eggs, ensuring they are fully coated.
- Transfer the egg-coated fillets into the coconut-panko mixture. Press down firmly to ensure the coating adheres to the fish.
- Preheat your air fryer to 375°F (190°C) for about 5 minutes.
- Lightly spray the air fryer basket with olive oil spray. Place the crusted cod fillets in the basket in a single layer. Spray the tops of the fillets lightly with olive oil.
- Cook the cod for about 10-12 minutes, flipping halfway through, until the crust is golden brown, and the fish flakes easily with a fork.
- Remove the cod from the air fryer, and let it rest for a minute before serving.
- Serve the coconut-crusted cod on a wooden platter with lime wedges and a sprinkle of fresh cilantro for a tropical touch. Pair with a side of mango salsa for added color and flavor!


![To make Bang Bang Salmon, you need a few simple ingredients. Each one adds its own special touch to the dish. Here’s what you will need: - 4 salmon fillets (approximately 6 ounces each) - 1/2 cup mayonnaise - 2 tablespoons sweet chili sauce - 1 teaspoon Sriracha sauce (adjust based on your spice tolerance) - 1 tablespoon freshly squeezed lime juice - 1 teaspoon garlic powder - 1 teaspoon ground ginger - Salt and freshly ground black pepper, to taste - 2 tablespoons sesame oil (for cooking) - 3 green onions, finely chopped (for garnish) - Toasted sesame seeds (for garnish) These ingredients create a perfect balance of flavors. The salmon shines with its rich taste, while the sauce brings sweetness and a hint of spice. If you want to try a twist, you can adjust the Sriracha sauce to suit your heat preference. The fresh lime juice adds a nice zing, making the dish bright and refreshing. For the best results, use fresh salmon fillets. They cook up juicy and flaky. Don’t forget the green onions and sesame seeds for garnish. They add color and texture to your finished dish. If you want to explore more, check out the Full Recipe for step-by-step guidance. To start, grab a medium mixing bowl. Combine the following ingredients: - 1/2 cup mayonnaise - 2 tablespoons sweet chili sauce - 1 teaspoon Sriracha sauce - 1 tablespoon lime juice - 1 teaspoon garlic powder - 1 teaspoon ground ginger Whisk these together until smooth. This sauce brings a sweet and spicy kick to the salmon. Set it aside so the flavors can mingle. Next, take your salmon fillets. Pat them dry with paper towels. This step helps the skin crisp up nicely. Season both sides with salt and pepper. Now, heat 2 tablespoons of sesame oil in a large, non-stick skillet over medium-high heat. Wait until the oil shimmers. Carefully place the salmon fillets skin-side down in the hot skillet. Cook for 4-5 minutes without moving them. This creates a golden crust. Then, flip each fillet gently using a spatula. Cook for another 3-4 minutes. The salmon should be opaque and easily flake with a fork when done. Once the salmon is cooked perfectly, remove it from the skillet. Place the fillets on a serving platter. Drizzle the prepared Bang Bang sauce over the top of each fillet. For a pop of color and texture, sprinkle the dish with finely chopped green onions and toasted sesame seeds. For an extra touch, arrange lime wedges on the side. This adds a zesty burst of flavor. You can find the Full Recipe for detailed steps and tips. Enjoy your delicious Bang Bang Salmon! When selecting salmon, freshness is key. Look for bright, firm fillets. The color should be vibrant, ranging from deep pink to orange. Avoid any fillets that look dull or have brown spots. Wild-caught salmon often has more flavor than farmed salmon. If you can, ask your fishmonger about the source. Sustainable options are always a great choice. Cooking salmon requires attention. For a 6-ounce fillet, cook for about 4-5 minutes on the skin side. Flip the fillet and cook for an additional 3-4 minutes. Keep an eye on the fish; it’s done when it flakes easily with a fork. If the salmon is thicker, adjust your cooking time. Use a meat thermometer for accuracy; the internal temperature should reach 145°F. For a beautiful presentation, serve your Bang Bang Salmon on a large platter. Drizzle extra Bang Bang sauce around the edges. Garnish with chopped green onions and toasted sesame seeds for crunch. Lime wedges add a zesty kick. Pair it with rice or a fresh salad to complete the meal. This dish is perfect for dinner parties or a weeknight treat. For the complete recipe, check the [Full Recipe]. {{image_4}} You can switch up the sauce to keep things fun. Try using yogurt instead of mayonnaise for a lighter taste. You can also mix in some honey mustard for a sweet kick. If you prefer something spicy, add more Sriracha or even chipotle sauce. Each sauce brings a new flavor twist to your Bang Bang Salmon. Pair your salmon with colorful veggies. Steamed broccoli or sautéed spinach work great. You can also roast bell peppers and zucchini for a tasty side. If you want a fun twist, serve it over a bed of rice or quinoa. These sides will make your meal more filling and nutritious. Baking is an easy way to cook Bang Bang Salmon. Preheat your oven to 400°F (200°C). Place the seasoned salmon on a baking sheet and drizzle with sesame oil. Bake for 12-15 minutes or until cooked through. Grilling is another option. Heat your grill and cook the salmon fillets for about 4-5 minutes per side. Both methods keep the salmon juicy and flavorful. For the complete instructions, check out the Full Recipe. To keep leftover Bang Bang salmon fresh, store it in the fridge. First, let the salmon cool down to room temperature. Then, place it in an airtight container. Make sure to cover it well to keep out air. Leftover salmon stays good for up to three days in the fridge. When you are ready to enjoy your leftover salmon, reheat it gently. I recommend using the oven for the best results. Preheat your oven to 350°F (175°C). Place the salmon on a baking sheet, and cover it with foil. Heat for about 10-15 minutes or until warm. You can also use a microwave, but it may dry out the fish. If using a microwave, heat in 30-second intervals to avoid overcooking. For storing your Bang Bang salmon, choose high-quality glass or BPA-free plastic containers. Glass containers work well because they don't hold odors and are easy to clean. Make sure the container has a tight seal to keep the salmon fresh. If you plan to freeze the salmon, use freezer-safe bags. Remove as much air as possible before sealing to prevent freezer burn. Bang Bang Salmon has a rich and creamy flavor. The sauce is sweet with a hint of heat. The balance of sweet chili and Sriracha gives it a unique kick. The salmon itself is tender and flaky, soaking up the sauce well. When you take a bite, you’ll enjoy layers of flavor that excite your taste buds. It’s a dish that combines savory, spicy, and slightly tangy notes, making it a delight for many. Yes, you can easily make Bang Bang Salmon gluten-free. First, check the labels on your sweet chili sauce and Sriracha. Many brands use gluten-free ingredients. If you find a gluten-free option, you'll be good to go! Also, ensure your mayonnaise is gluten-free. Making these swaps lets you enjoy this tasty dish without worry. You can tell when salmon is cooked by checking its color. It should turn from bright pink to a pale, opaque color. Use a fork to test it; if it flakes easily, it’s done. The internal temperature should reach 145°F for safety. Cooking times can vary based on the thickness of the fillet, so keep an eye on it. Following these tips will help you achieve perfectly cooked salmon every time. You learned how to make Bang Bang Salmon from start to finish. We covered the ingredients, cooking steps, and helpful tips along the way. With this quick guide, you can impress anyone with your cooking. Feel free to explore variations to tailor the dish to your taste. Remember to store leftovers properly to enjoy them later. This simple yet flavorful recipe can be a favorite at your table. Enjoy cooking and happy eating!](https://dailydishlab.com/wp-content/uploads/2025/06/cb4eba24-a376-4c4d-af92-86d27a762fa6-768x768.webp)

![- 1 pound Italian sausage (spicy or sweet) - 9 oz cheese tortellini (fresh or frozen) - 1 medium onion, finely chopped - 3 cloves garlic, minced (about 1 tablespoon) - 3 medium carrots, diced into small pieces - 2 celery stalks, diced - 6 cups chicken broth (low-sodium for a healthier option) - 1 can (14 oz) diced tomatoes, undrained - 2 cups fresh spinach, roughly chopped - 1 teaspoon Italian seasoning (or to taste) - Salt and pepper to taste - 2 tablespoons olive oil I love using Italian sausage in this soup. You can choose spicy for a bold taste or sweet for a milder flavor. The cheese tortellini adds a nice touch. I prefer fresh tortellini, but frozen works well too. The veggies bring color and taste to the soup. I use onion, garlic, carrots, and celery. These give a lovely base. I always add diced tomatoes and chicken broth. They create a rich, tasty broth. Spinach adds a fresh finish and a pop of green. - Fresh basil leaves - Grated Parmesan cheese Garnishes make this soup special. Fresh basil leaves add a fresh burst of flavor. Grated Parmesan cheese gives a salty finish. You can sprinkle them on top before serving. - Different types of sausage - Additional vegetables (e.g., bell peppers, zucchini) - Seasoning alternatives You can change this soup to fit your taste. Try different sausages for a new twist. Adding bell peppers or zucchini boosts the veggie count. For seasoning, feel free to mix it up. A dash of red pepper flakes can add heat. For the complete instructions, check out the Full Recipe. First, we need to prep our veggies. Start by chopping: - 1 medium onion - 3 medium carrots - 2 celery stalks - 3 cloves garlic Chop the onion and carrots into small pieces. Dice the celery into small bits. For the garlic, mince it finely. Set these aside. Next, let’s prepare the sausage. Remove the casing from 1 pound of Italian sausage. Crumble the sausage into small pieces. This will help it cook evenly. Now, let’s cook! In a large pot, heat 2 tablespoons of olive oil over medium heat. Add the chopped onion, diced carrots, and celery. Sauté these for about 5 minutes. You want them soft, and the onion should look clear. After that, add the minced garlic. Cook for about 1 minute. Keep stirring until the garlic smells great. Next, add the crumbled sausage to the pot. Brown the sausage for 7-8 minutes. Stir it often, so it cooks evenly and gets nice color. Once the sausage is browned, it’s time to add the broth. Pour in 6 cups of chicken broth and 1 can of diced tomatoes (don’t drain them). Add 1 teaspoon of Italian seasoning. Mix everything well and bring it to a boil. When it boils, lower the heat to medium-low. Carefully add 9 ounces of cheese tortellini to the pot. Let it simmer for 5-7 minutes until the tortellini is al dente. Next, gently stir in 2 cups of chopped fresh spinach. Cook until the spinach wilts, which takes about 2 minutes. Taste the soup and season with salt and pepper as you like. Serve this warm in bowls. You can add fresh basil leaves and sprinkle some grated Parmesan cheese on top for extra flavor. For the full recipe, check out the details above! To avoid overcooking the tortellini, add it to the pot only when the soup reaches a boil. This helps keep the pasta firm. Cook the tortellini for about 5 to 7 minutes, just until it's tender but still has a bit of bite. Stir it gently to avoid sticking. To ensure the flavors meld together, let the soup simmer for a few minutes after adding the tortellini. This allows the spices and ingredients to blend nicely. Taste the soup before serving. Adjust salt and pepper to make the flavors pop. Pair your soup with warm, crusty bread for a hearty meal. A simple side salad adds freshness to the table. If you serve a larger group, consider making a double batch. Soup is easy to share, and it tastes even better the next day. For a lighter option, use low-sodium broth. This helps control the salt without losing flavor. Swap out regular sausage for lean sausage or turkey sausage. This small change cuts down on fat while keeping the dish satisfying. {{image_4}} For a spicy kick, you can try spicy sausage tortellini soup. Use spicy Italian sausage instead of sweet. This adds a nice warmth to the dish. You can also add red pepper flakes for more heat. Adjust the amount to your taste. If you want a lighter option, consider a vegetarian tortellini soup. Replace the sausage with mushrooms or lentils for protein. You can use vegetable broth instead of chicken broth. This keeps the soup flavorful and satisfying. Incorporating seasonal vegetables can enhance the soup's taste. In spring, add fresh peas or asparagus. In summer, try zucchini or bell peppers. Fall brings great choices like diced butternut squash or sweet potatoes. In winter, root vegetables add heartiness. For different occasions, you can adjust the soup. For a cozy night, keep it simple. For a festive meal, add a splash of cream. This makes the soup rich and creamy for special gatherings. If you need gluten-free options, look for gluten-free tortellini. Many brands offer great choices. You can also use rice or quinoa instead of tortellini. This keeps the meal filling while meeting dietary needs. For vegan substitutes, swap the sausage for plant-based alternatives. Use vegetable broth and skip the cheese. Adding beans or lentils can boost protein. You still get a hearty soup without animal products. For the full recipe and more cooking tips, check the [Full Recipe]. To store your Sausage Tortellini Soup, first let it cool down. - Place the soup in an airtight container. - Store it in the refrigerator if you plan to eat it soon. The soup stays fresh for about 3 to 4 days in the fridge. If you want to save it for later, freezing is a great option. - Pour the cooled soup into freezer-safe bags or containers. - Make sure to leave some space for expansion. Frozen soup can last for up to 3 months. Reheating the soup properly keeps its flavor intact. - The best ways to reheat are on the stove or in the microwave. - If using the stove, heat it in a pot over medium heat. Stir it often to ensure even heating. - If using a microwave, heat it in short bursts. - Stir in between to avoid hot spots. For storage containers, use glass or BPA-free plastic. These types resist stains and are safe for reheating. The soup lasts about 3 to 4 days in the fridge. To maximize freshness, store it properly. - Keep the soup sealed tightly to prevent air exposure. - This helps avoid spoilage and keeps flavors strong. If you notice any off smell or change in color, it's best to discard it. By following these tips, you can enjoy your Sausage Tortellini Soup even days later. You can swap tortellini for different types of pasta, like penne or shell pasta. Rice is another option. Both will work well in this soup. Just adjust cooking times based on what you choose. Yes, you can make this soup ahead of time. Cook it fully, then cool it down. Store it in an airtight container. Place it in the fridge for up to three days. Reheat it on the stove or microwave when ready to eat. Sausage Tortellini Soup lasts about three to four days in the fridge. To keep it fresh, store it in an airtight container. Check for any signs of spoilage before you eat it. Yes, you can use frozen vegetables in this soup. They are quick and easy. Just add them at the same time as the tortellini. Frozen veggies cook fast, so keep an eye on them. This soup is freezer-friendly! Let it cool completely before freezing. Store it in a freezer-safe container. When ready to eat, thaw it in the fridge overnight. Reheat on the stove or microwave without losing flavor. Enjoy this tasty meal anytime! For the full recipe, check out the link! In this article, we explored how to make a hearty Sausage Tortellini Soup. We covered the key ingredients, including Italian sausage, fresh tortellini, and common vegetables. I shared tips on preparation, cooking, and serving. You also learned about variations for flavor, dietary needs, and storage. Remember, this soup is versatile and simple to make. You can customize it to fit your taste and dietary goals. Enjoy your cooking and the delightful taste of this comforting dish!](https://dailydishlab.com/wp-content/uploads/2025/06/6131aa1e-cc84-4164-90dd-a9e6e2f2c232-768x768.webp)