Miso Ginger Glazed Eggplant Flavorful Plant-Based Dish
Are you ready to elevate your meals with a tasty, plant-based dish? Miso Ginger Glazed Eggplant offers bold flavors that everyone will enjoy. This dish combines the rich umami of miso with the zing of fresh ginger. I’ll guide you through the easy steps, ingredient tips, and clever variations. You’ll impress your family and friends with this delicious, healthy recipe. Let’s dive into this culinary adventure together!
Why I Love This Recipe
- Flavorful Combination: The miso and ginger blend creates a rich, umami-packed glaze that elevates the eggplant’s natural sweetness.
- Health Benefits: Eggplant is low in calories and high in fiber, making this dish a nutritious choice for any meal.
- Easy Preparation: With just a few simple steps, you can have a delicious dish ready in under 40 minutes.
- Versatile Serving Options: This recipe works wonderfully as a side dish or as a main course served over rice.
Ingredients
Complete List of Ingredients
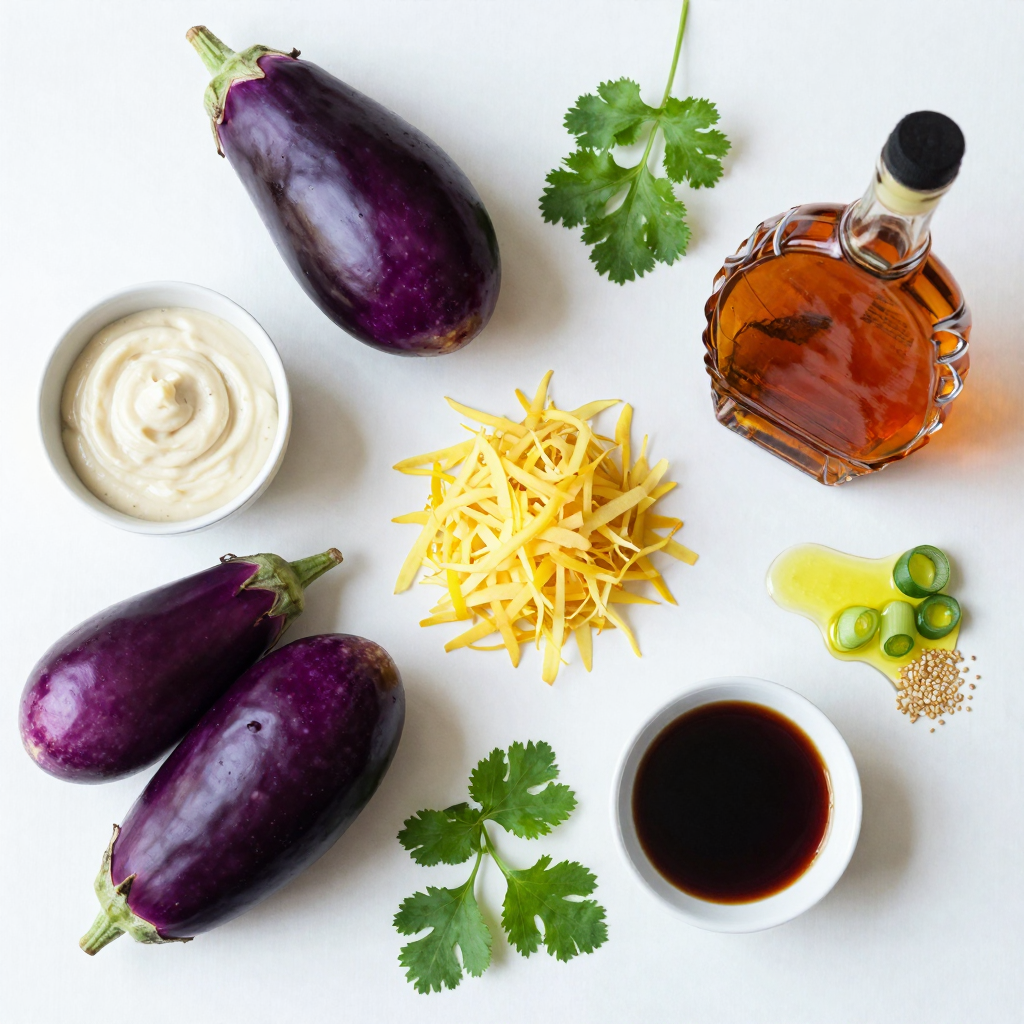
- 2 medium-sized eggplants, sliced into 1-inch thick rounds
- 3 tablespoons white miso paste
- 2 tablespoons fresh ginger, grated
- 1 tablespoon maple syrup
- 2 tablespoons soy sauce
- 1 tablespoon sesame oil
- 2 green onions, finely sliced
- 1 tablespoon sesame seeds (for garnish)
- Fresh cilantro leaves (for garnish)
Ingredient Notes and Substitutions
You can swap eggplant for zucchini or bell peppers if you prefer. White miso adds a sweet flavor. If you can’t find it, try yellow miso instead. Fresh ginger gives the dish a nice zing. You can use ground ginger if fresh is not available. Maple syrup gives sweetness, but honey works too. For a gluten-free option, use tamari instead of soy sauce.
Importance of Fresh Ingredients
Fresh ingredients make a big difference in flavor. Fresh eggplant should feel firm and plump. Look for bright, smooth skin with no blemishes. Fresh ginger should smell strong and spicy. This ensures your dish tastes its best. Using fresh herbs like cilantro adds brightness and color. Always try to use the freshest ingredients you can find. It elevates your meal from good to great!
Step-by-Step Instructions
Preparation of Eggplant
Start by washing the eggplants. Look for two medium-sized ones for this dish. Slice them into 1-inch thick rounds. This size helps them cook evenly. Place the slices on a clean kitchen towel. Let them sit for about 10 minutes. This step removes excess moisture. It also helps the eggplant soak up flavors better.
Making the Miso Glaze
In a mixing bowl, combine the white miso paste, grated ginger, maple syrup, soy sauce, and sesame oil. Whisk these ingredients together until smooth. This glaze gives the eggplant a rich, savory flavor. The ginger adds a nice kick, while the maple syrup balances the saltiness. Make sure everything is well mixed.
Baking the Eggplant to Perfection
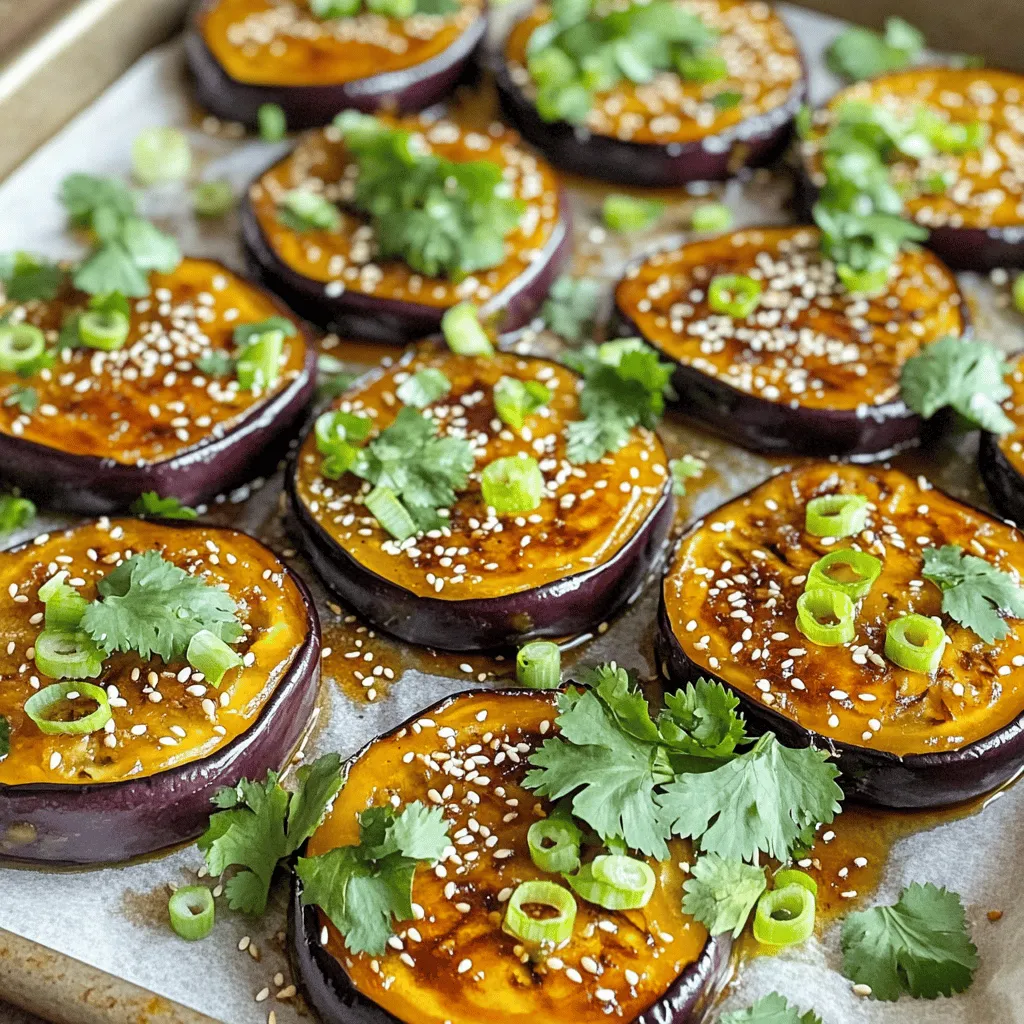
Preheat your oven to 400°F (200°C). Line a baking sheet with parchment paper. Lay the eggplant slices flat on the sheet. Brush both sides of each slice with the miso glaze. Make sure they are fully coated. Bake for 20-25 minutes. Flip them halfway through to ensure even cooking. The eggplant should become tender and slightly caramelized. Once done, drizzle any leftover glaze over the top. Finally, garnish with sliced green onions, sesame seeds, and cilantro leaves. Enjoy this flavorful dish warm!
Pro Tips
- Choose the Right Eggplant: Select firm, shiny eggplants with smooth skin for the best texture and flavor.
- Adjust the Sweetness: Feel free to modify the amount of maple syrup based on your preference for sweetness; honey can also be used as a substitute.
- Marinate for More Flavor: For a deeper flavor, marinate the eggplant slices in the miso glaze for 30 minutes before baking.
- Experiment with Toppings: Enhance the dish by adding toppings like crushed peanuts or chili flakes for an extra crunch and spice.
Tips & Tricks
How to Achieve the Best Flavor
For the best flavor, use fresh ginger. Grate it right before cooking. Fresh ginger has a strong, bright taste that makes the glaze pop. Remember to whisk the miso paste well. This ensures it mixes smoothly with ginger, maple syrup, soy sauce, and sesame oil. Brush the glaze on both sides of the eggplant. This helps the flavors soak into the eggplant.
Avoiding Common Mistakes
One common mistake is not slicing the eggplant evenly. Aim for 1-inch thick rounds. This helps the eggplant cook evenly. Another mistake is not flipping the eggplant halfway through baking. Flipping ensures both sides caramelize nicely. Also, be careful not to overbake. The eggplant should be tender, not mushy.
Tools Needed for Easy Preparation
You will need a few simple tools for this dish. A sharp knife is key for slicing the eggplant. A mixing bowl helps combine the glaze. A whisk makes mixing easy and smooth. Use a baking sheet lined with parchment paper to avoid sticking. Finally, a brush helps spread the glaze evenly on the eggplant. These tools will make your cooking process quick and enjoyable!

Variations
Adding Extra Vegetables
You can customize this dish by adding extra veggies. Try adding bell peppers, zucchini, or mushrooms. These vegetables add color and nutrition. Slice them into similar sizes as the eggplant. Toss them in the miso glaze too. This adds more flavor and makes the dish even more exciting.
Different Types of Miso
Miso comes in many types. Each type has a unique taste. White miso, used in this recipe, is mild and sweet. You can also use red miso for a stronger flavor. Mixing miso types can create a new taste. Experiment to find your favorite combination. Each type will change the dish slightly, so have fun with it!
Serving Suggestions Beyond Rice
While rice is a classic choice, you can serve this dish in different ways. Try it over quinoa or farro for a nutty flavor. You can also enjoy it in a salad with fresh greens. Another option is to serve it as a filling in wraps or tacos. These ideas keep your meals fresh and exciting!
Storage Info
How to Store Leftovers
To store leftover Miso Ginger Glazed Eggplant, let it cool first. Place it in an airtight container. Keep it in the fridge for up to three days. Make sure to separate the eggplant from any sauce. This helps it stay fresh longer.
Reheating Instructions
To reheat, you can use the oven or a microwave. If using the oven, preheat it to 350°F (175°C). Place the eggplant on a baking sheet and heat for about 10 minutes. If using a microwave, cover the dish with a lid. Heat in short bursts of 30 seconds. Check often to avoid overcooking.
Freezing Guidelines
You can freeze Miso Ginger Glazed Eggplant, but it may change texture. Let the eggplant cool completely. Wrap each piece in plastic wrap. Place them in a freezer bag and remove as much air as you can. It’s best to use them within three months. Thaw in the fridge overnight before reheating.
FAQs
Can I use other vegetables instead of eggplant?
Yes, you can. Try zucchini, bell peppers, or mushrooms. These veggies will soak up the miso glaze well. Each option brings a unique taste and texture. Just adjust your baking time based on thickness so they cook evenly.
What is the best way to serve Miso Ginger Glazed Eggplant?
Serve it warm, either as a side dish or main course. Place it over rice for a filling meal. You can also pair it with quinoa or noodles. Add a sprinkle of green onions and sesame seeds on top for flair. Fresh cilantro adds a nice touch too.
Is this dish suitable for meal prep?
Yes, it is perfect for meal prep! Cook a batch and store it in the fridge. It keeps well for up to five days. You can reheat it in the oven or microwave. This makes it easy to enjoy a healthy meal throughout the week.
This article covers everything you need for Miso Ginger Glazed Eggplant. We focused on ingredients, offering tips for fresh choices and substitutions. The step-by-step guide makes prep simple, from eggplant to perfect glaze. I shared ways to enhance flavor and avoid mistakes. You can try variations with other veggies or miso types and explore serving ideas.
In conclusion, this dish is tasty and easy to make. Use my tips for the best results. Enjoy creating a meal that impresses your taste buds!

Miso Ginger Glazed Eggplant
Ingredients
2 medium-sized eggplants, sliced into 1-inch thick rounds
3 tablespoons white miso paste
2 tablespoons fresh ginger, grated
1 tablespoon maple syrup
2 tablespoons soy sauce
1 tablespoon sesame oil
2 green onions, finely sliced
1 tablespoon sesame seeds (for garnish)
Fresh cilantro leaves (for garnish)
Instructions
Preheat the oven to 400°F (200°C).
In a mixing bowl, whisk together the white miso paste, grated ginger, maple syrup, soy sauce, and sesame oil until smooth.
Place the eggplant slices on a baking sheet lined with parchment paper. Brush both sides generously with the miso glaze mixture.
Bake in the preheated oven for 20-25 minutes, flipping halfway through, until the eggplants are tender and slightly caramelized.
Once baked, remove the eggplant from the oven and drizzle any remaining glaze over the top.
Garnish with sliced green onions, sesame seeds, and fresh cilantro leaves.
Serve warm as a side dish or over a bed of rice for a delightful main course.
Prep Time: 15 minutes | Total Time: 40 minutes | Servings: 4
Miso Ginger Glazed Eggplant
Ingredients
- 2 medium-sized eggplants, sliced into 1-inch thick rounds
- 3 tablespoons white miso paste
- 2 tablespoons fresh ginger, grated
- 1 tablespoon maple syrup
- 2 tablespoons soy sauce
- 1 tablespoon sesame oil
- 2 green onions finely sliced
- 1 tablespoon sesame seeds (for garnish)
- 1 bunch fresh cilantro leaves (for garnish)
Instructions
- Preheat the oven to 400°F (200°C).
- In a mixing bowl, whisk together the white miso paste, grated ginger, maple syrup, soy sauce, and sesame oil until smooth.
- Place the eggplant slices on a baking sheet lined with parchment paper. Brush both sides generously with the miso glaze mixture.
- Bake in the preheated oven for 20-25 minutes, flipping halfway through, until the eggplants are tender and slightly caramelized.
- Once baked, remove the eggplant from the oven and drizzle any remaining glaze over the top.
- Garnish with sliced green onions, sesame seeds, and fresh cilantro leaves.
- Serve warm as a side dish or over a bed of rice for a delightful main course.