
Spicy Cajun Shrimp Quesadillas Savory Weeknight Treat
Craving something bold and delicious for dinner? Look no further! These Spicy Cajun Shrimp Quesadillas are your perfect answer. Packed with vibrant shrimp, zesty Cajun seasoning, and gooey cheese, they deliver a punch of flavor. Plus, they come together in just a few easy steps! Let’s dive into the ingredients and get ready for a savory weeknight treat that will impress your taste buds and your family.
Why I Love This Recipe
- Bold Flavor Profile: The combination of Cajun seasoning and fresh vegetables creates a vibrant and spicy flavor that truly stands out.
- Quick to Prepare: This recipe can be ready in just 30 minutes, making it perfect for a weeknight dinner or a last-minute gathering.
- Customizable Ingredients: You can easily swap out the shrimp for chicken or veggies, and adjust the spice level to suit your taste.
- Perfect for Sharing: These quesadillas are great for parties or family meals, allowing everyone to enjoy delicious, cheesy bites.
Ingredients
Main Ingredients
- 1 lb shrimp, peeled and deveined
- 1 tablespoon Cajun seasoning
- 4 large flour tortillas
The key to this dish is fresh shrimp. I love using shrimp that is peeled and deveined. It makes cooking easier and faster. The Cajun seasoning adds a kick that makes each bite exciting. Flour tortillas are perfect for holding all the tasty filling.
Vegetables
- 1 small red bell pepper, diced
- 1 small green bell pepper, diced
- 1 small onion, diced
I often use both red and green bell peppers for color and taste. They add sweet crunch. Onions bring a nice flavor when sautéed. Together, these veggies make the filling fresh and vibrant.
Cheese and Serving Suggestions
- 1 cup shredded cheese (cheddar or Monterey Jack)
- 1/4 cup sour cream (for serving)
- Fresh cilantro, chopped (for garnish)
- Lime wedges (for serving)
Cheese is a must! I like using cheddar or Monterey Jack because they melt well. After cooking, I top the quesadillas with sour cream, cilantro, and fresh lime. These add brightness and balance to the spicy filling.

Step-by-Step Instructions
Marinating the Shrimp
To prepare the shrimp, start by placing them in a large bowl. Add one tablespoon of Cajun seasoning. Mix well to coat the shrimp evenly. Let the shrimp marinate for about 10 minutes. This short time allows the flavors to soak in without overpowering the shrimp.
Cooking the Vegetables
Next, heat one tablespoon of olive oil in a large skillet over medium heat. Add the diced onion and bell peppers to the pan. Sauté them for about 5 minutes. You want them to soften but not lose their crunch. Stir often to prevent sticking.
Assembling and Cooking Quesadillas
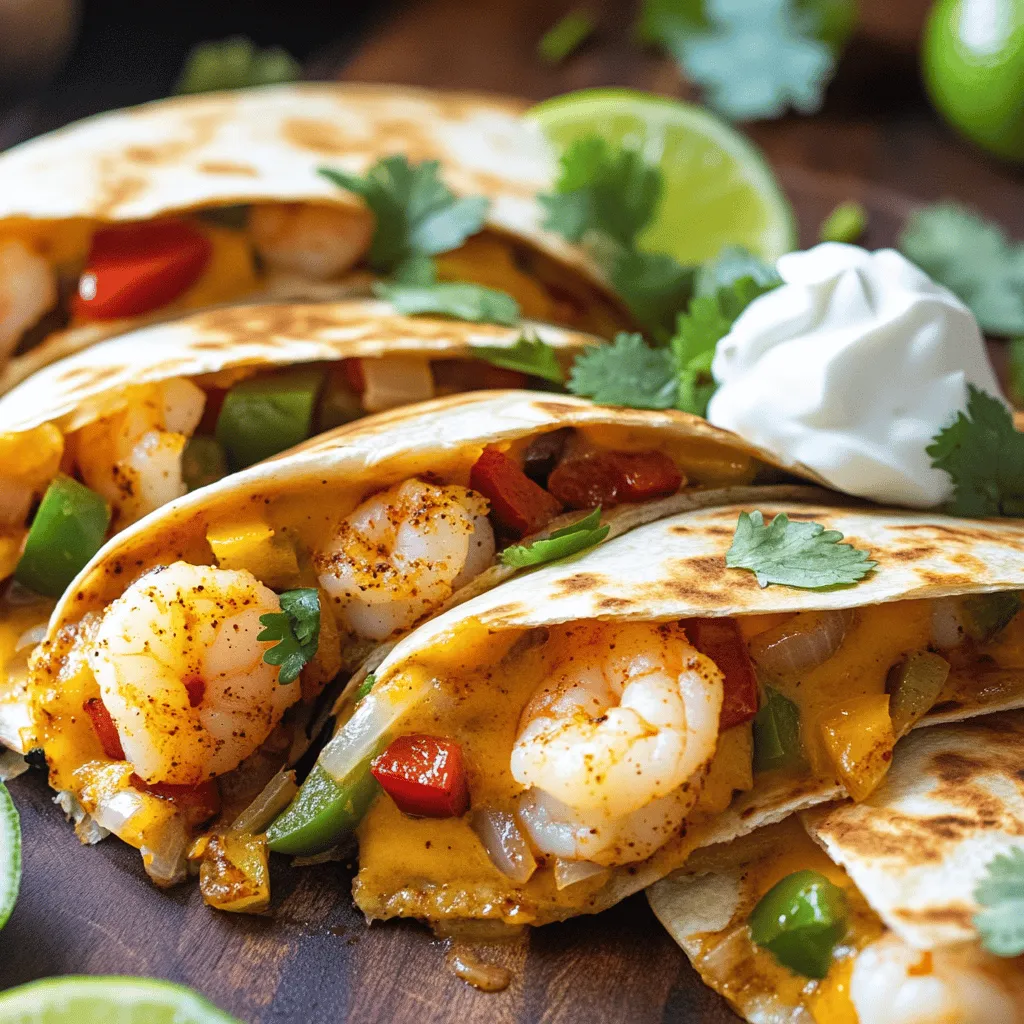
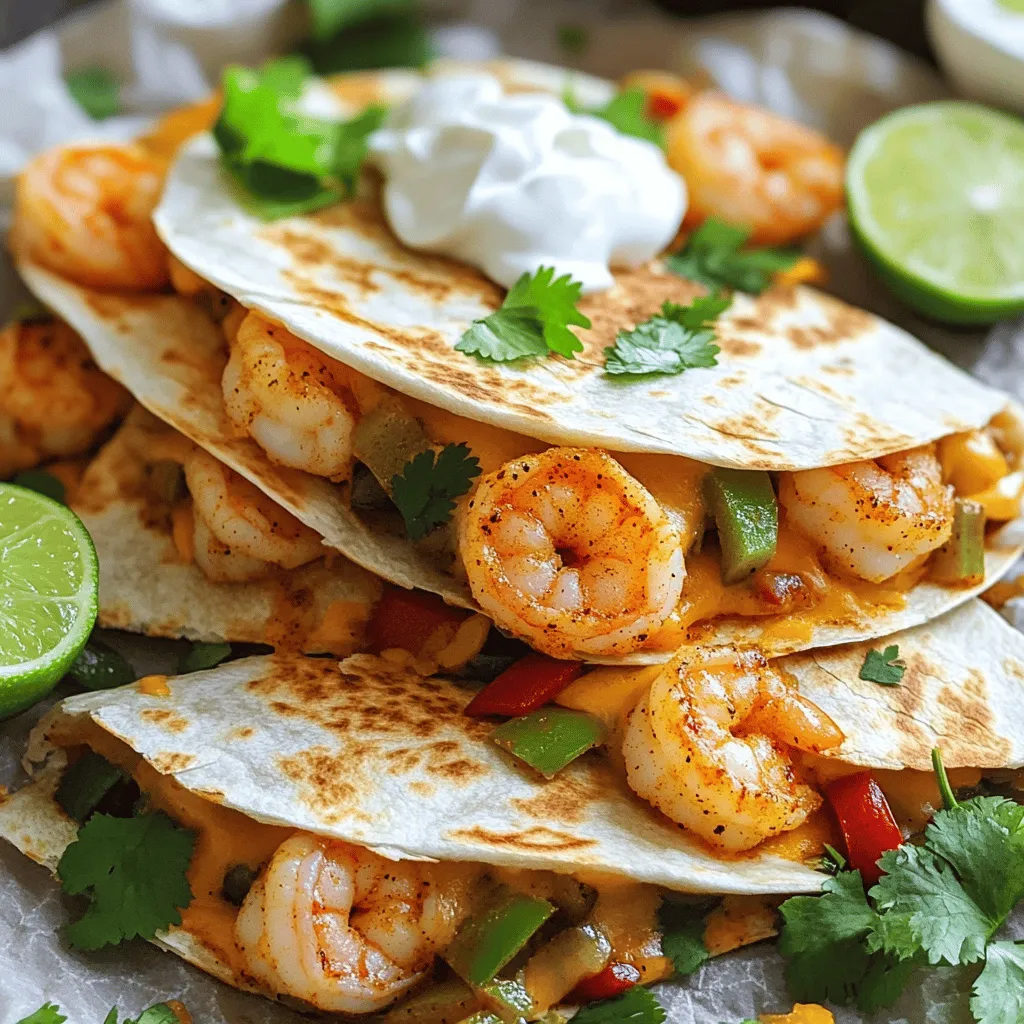
Now, it’s time to assemble your quesadillas. Wipe the skillet clean and lower the heat to medium-low. Place one large flour tortilla in the skillet. On one half, layer some of the shrimp mixture and a handful of shredded cheese. Fold the tortilla over the filling. Cook for about 3-4 minutes on each side. You want the tortilla to be golden brown and the cheese to melt. Repeat this process with the remaining tortillas and filling. Cut the quesadillas into wedges and serve warm with sour cream, fresh cilantro, and lime wedges.
Pro Tips
- Perfectly Cooked Shrimp: Avoid overcooking the shrimp by removing them from heat as soon as they turn pink and opaque.
- Cheese Choice: Opt for a blend of cheeses, such as cheddar and Monterey Jack, for a creamier texture and enhanced flavor.
- Spice it Up: Adjust the amount of Cajun seasoning based on your spice preference or mix in some additional herbs for complexity.
- Serving Suggestions: Add fresh avocado slices or a zesty salsa on the side for an extra layer of flavor and freshness.
Tips & Tricks
Achieving Perfect Quesadillas
To make great quesadillas, start with the right heat. The ideal cooking temperature is medium-low. This helps the cheese melt without burning the tortilla. If it’s too hot, the outside cooks fast while the inside stays cold. Avoid filling spillage by folding the tortilla carefully. Use just enough filling to close it, but not too much. This way, you keep all the flavors inside.
Customizing Flavor
You can adjust the spice levels to fit your taste. If you like it hotter, add more Cajun seasoning. If you prefer milder flavors, cut back on the spice. You can also try different seasonings. Add garlic powder for extra depth or smoked paprika for a rich taste. Experiment with what you enjoy most!
Serving Suggestions
Pair your quesadillas with sides for a complete meal. Fresh salsa or guacamole works well. You can also serve them with a simple salad. For presentation, cut the quesadillas into wedges and arrange them nicely on a plate. Add a dollop of sour cream in the center and sprinkle some cilantro on top. Lime wedges add a bright touch.
Variations
Protein Alternatives
You can switch shrimp for chicken. Use the same Cajun seasoning. Cook it until it’s done. Chicken needs a bit longer than shrimp.
Tofu is a great choice too. Press it to remove extra water. Cut it into cubes and season it just like shrimp. Sauté until crispy for a tasty vegetarian option.
Different Cheese Options
If you need a cheese substitute, try pepper jack. It adds a nice kick. You can even mix cheeses for more flavor. Combine sharp cheddar with creamy Monterey Jack. This mix gives your quesadillas a rich taste.
Gluten-Free Options
For a gluten-free version, use gluten-free tortillas. They are easy to find at most stores. Just make sure to check the labels for any hidden gluten.
You can also try other diet-friendly adaptations. Use lettuce wraps instead of tortillas. This keeps it fresh and light. Enjoy your Spicy Cajun Shrimp Quesadillas in a new way!
Storage Info
Storing Leftovers
Store leftover quesadillas in an airtight container. Place parchment paper between layers to keep them crisp. Refrigerate them within two hours of cooking. They can last up to three days in the fridge. For longer storage, freeze the quesadillas. Wrap each one in plastic wrap and then in foil. This will help keep them fresh. They can last up to three months in the freezer.
Reheating Best Practices
To reheat quesadillas, use a skillet over medium heat. This method keeps them crispy. Heat each side for about three minutes. You can also use an oven. Preheat it to 350°F (175°C) and bake for 10-15 minutes. If you want to use a microwave, add a damp paper towel on top. This will help prevent sogginess. However, the skillet or oven is best for keeping the crispiness.
Shelf Life
In the fridge, your quesadillas will last about three days. In the freezer, they can last up to three months. Be sure to label your containers. This way, you can track how long they have been stored. Always check for any signs of spoilage before eating. If the quesadillas look or smell off, it’s best to throw them away.
FAQs
Can I make quesadillas in advance?
Yes, you can make quesadillas in advance. Start by cooking the shrimp and veggies as usual. Let them cool. Then, layer the filling inside the tortillas and stack them carefully. Wrap them in plastic wrap or foil. Store them in the fridge for up to a day. You can also freeze them for longer storage. Just remember to separate layers with parchment paper to avoid sticking. When you’re ready to eat, cook from frozen or thaw in the fridge.
What can I serve with Spicy Cajun Shrimp Quesadillas?
You have many tasty options for sides. Here are some ideas:
- Mexican rice: The spices pair well with the quesadillas.
- Black beans: They add protein and fiber.
- Guacamole: Creamy and delicious with a kick.
- Corn salsa: Refreshing and brightens the dish.
- Mixed green salad: A light side to balance the flavors.
How do I know when the shrimp is cooked?
Look for a few signs to tell if the shrimp is done. Cooked shrimp turns pink and opaque. They should curl into a tight “C” shape. If they curl into an “O,” they may be overcooked. Another sign is firmness; they should feel springy when you press them. Cooking shrimp takes just a few minutes, so watch them closely!
In this blog post, I covered how to make spicy Cajun shrimp quesadillas. We explored key ingredients like shrimp, vegetables, and cheeses. I shared steps for marinating shrimp, cooking veggies, and assembling perfect quesadillas. Tips for customizing flavors and storage info help you enjoy leftovers.
Making quesadillas is fun and easy. With practice, you will create delicious meals. Enjoy your cooking journey and impress your friends and family!

Spicy Cajun Shrimp Quesadillas
Ingredients
1 lb shrimp, peeled and deveined
1 tablespoon Cajun seasoning
1 tablespoon olive oil
1 small red bell pepper, diced
1 small green bell pepper, diced
1 small onion, diced
1 cup shredded cheese (cheddar or Monterey Jack)
4 large flour tortillas
1/4 cup sour cream (for serving)
Fresh cilantro, chopped (for garnish)
Lime wedges (for serving)
Instructions
In a large bowl, combine the shrimp with Cajun seasoning, ensuring the shrimp are evenly coated. Let marinate for about 10 minutes.
Heat olive oil in a large skillet over medium heat. Add the diced onion and bell peppers, sautéing for about 5 minutes or until they soften.
Add the seasoned shrimp to the skillet and cook for another 4-5 minutes, or until the shrimp are pink and cooked through. Remove from heat and set aside.
Wipe the skillet clean and lower the heat to medium-low. Place one flour tortilla in the skillet.
On one half of the tortilla, layer some of the shrimp mixture followed by shredded cheese. Fold the tortilla in half over the filling.
Cook for about 3-4 minutes on each side, or until the tortilla is golden brown and the cheese melts. Repeat with the remaining tortillas and filling.
Cut the quesadillas into wedges and serve warm with sour cream, fresh cilantro, and lime wedges on the side.
Prep Time: 15 mins | Total Time: 30 mins | Servings: 4
Spicy Cajun Shrimp Quesadillas
Ingredients
- 1 lb shrimp, peeled and deveined
- 1 tablespoon Cajun seasoning
- 1 tablespoon olive oil
- 1 small red bell pepper, diced
- 1 small green bell pepper, diced
- 1 small onion, diced
- 1 cup shredded cheese (cheddar or Monterey Jack)
- 4 large flour tortillas
- 1 4 cup sour cream (for serving)
- 1 bunch fresh cilantro, chopped (for garnish)
- 1 lime wedges (for serving)
Instructions
- In a large bowl, combine the shrimp with Cajun seasoning, ensuring the shrimp are evenly coated. Let marinate for about 10 minutes.
- Heat olive oil in a large skillet over medium heat. Add the diced onion and bell peppers, sautéing for about 5 minutes or until they soften.
- Add the seasoned shrimp to the skillet and cook for another 4-5 minutes, or until the shrimp are pink and cooked through. Remove from heat and set aside.
- Wipe the skillet clean and lower the heat to medium-low. Place one flour tortilla in the skillet.
- On one half of the tortilla, layer some of the shrimp mixture followed by shredded cheese. Fold the tortilla in half over the filling.
- Cook for about 3-4 minutes on each side, or until the tortilla is golden brown and the cheese melts. Repeat with the remaining tortillas and filling.
- Cut the quesadillas into wedges and serve warm with sour cream, fresh cilantro, and lime wedges on the side.
![- 1 can (15 oz) chickpeas, drained and rinsed - 1/4 cup fresh parsley, chopped - 1/4 cup fresh cilantro, chopped - 1/2 small onion, roughly chopped - 2 cloves garlic, minced - 1 tsp ground cumin - 1 tsp ground coriander - 1/2 tsp baking powder - 1/4 cup all-purpose flour (or chickpea flour for gluten-free) - Salt and pepper to taste - 3 tablespoons olive oil - Optional: tahini sauce for serving Gathering your ingredients is the first step to making easy baked falafel. Chickpeas are the base of this dish. They provide protein and fiber. Fresh parsley and cilantro add bright flavor. The onion and garlic bring warmth and depth. Ground cumin and coriander give that classic falafel taste. Baking powder helps the falafel puff up a bit. Flour binds everything together. You can use all-purpose flour or chickpea flour if you want a gluten-free option. Don't forget to season with salt and pepper. This is key to enhancing the flavors. Finally, olive oil gives that crispy texture when baking. If you like, serve your falafel with tahini sauce for a creamy dip. Follow this full recipe to make sure you get it just right. - Preheat your oven to 375°F (190°C). Line a baking sheet with parchment paper. - In a food processor, combine the chickpeas, parsley, cilantro, onion, and garlic. Pulse it a few times until mixed, but keep some texture. - Add the cumin, coriander, baking powder, flour, salt, and pepper to the food processor. Pulse until just mixed. Scrape the sides as needed. The mix should hold but feel slightly crumbly. - Shape the mixture into small balls, about the size of a golf ball. Place them on the baking sheet. Gently flatten them with your hand. - Drizzle the falafel with olive oil. This helps them crisp up while baking. - Bake for 25-30 minutes, flipping halfway through. They should turn golden brown and feel crispy. - Let them cool slightly before serving. Enjoy your crunchy and flavorful baked falafel! For the complete details, check the Full Recipe. To get the best texture for your falafel, avoid overprocessing the mixture. When you blend the chickpeas and herbs, pulse it gently. You want a coarse blend, not a smooth paste. This keeps it light and fluffy. Also, determine the perfect falafel size. Aim for small balls about the size of a golf ball. This size helps them cook evenly and stay crispy. When you shape them, ensure they are not too compact. They need some air to become crunchy. You can enhance the flavor by experimenting with spices. In addition to cumin and coriander, try adding smoked paprika or cayenne pepper. These spices can kick up the taste and make your falafel stand out. Incorporate additional herbs for more depth. Fresh dill or mint adds a nice twist. Just chop them fine and mix them in. This will brighten the flavor and make your dish even more delightful. For the full recipe, check out the complete guide to making crispy baked falafel. {{image_2}} You can easily adapt baked falafel to fit different diets. For a gluten-free option, swap out the all-purpose flour for chickpea flour. This change keeps the falafel tasty and safe for those with gluten sensitivities. Just use the same amount of chickpea flour as the recipe calls for. If you're looking for vegan variations, you're in luck! The base of this recipe is already vegan. Just ensure you serve it with plant-based sauces like tahini. You can also add extra veggies to your falafel mix for added nutrients. Want to give your falafel a kick? Try making spicy baked falafel. Add a chopped jalapeño or a pinch of cayenne pepper to the mix. This addition gives the falafel a nice heat that pairs well with cooling sauces. For a Mediterranean-style twist, consider adding sun-dried tomatoes to your falafel mixture. This will give your falafel a tangy flavor that is delightful. You can chop them up and mix them in with the other ingredients. These variations help you explore different tastes while keeping the recipe simple. Try them out and see which ones you like best! For the full recipe, refer to the earlier sections. To keep your baked falafel fresh, store them in the fridge. Place them in an airtight container. They last up to four days this way. Make sure they cool completely before sealing. This prevents moisture buildup. For longer storage, you can freeze them. Wrap each falafel in plastic wrap. Then, place them in a freezer bag. They can stay in the freezer for up to three months. When it’s time to enjoy your falafel again, you have two good options: the oven or the microwave. The oven keeps them crispy. Preheat the oven to 350°F (175°C). Place the falafel on a baking sheet and heat for about 10-15 minutes. For a quick meal, use the microwave. Just remember, this method can make them softer. To keep them crispy, try reheating in a skillet. This adds a nice crunch back to the outside. Enjoy your crunchy falafel again! For the full recipe, check out the [Full Recipe]. How to make falafel from scratch? To make falafel from scratch, you need key ingredients. Start with a can of chickpeas. Rinse and drain them well. Then, blend the chickpeas with herbs like parsley and cilantro. Add onion, garlic, and spices for flavor. Mix in some flour and baking powder to help the falafel hold together. Shape the mixture into balls or patties, and bake them until crispy. Can I bake falafel without oil? You can bake falafel without oil, but it may not be as crispy. Oil helps create that crunchy texture. If you want to skip oil, form the falafel and bake them as is. Keep an eye on them, as they may need a little longer to brown. What to serve with baked falafel? Baked falafel pairs well with many things. You can serve them in warm pita bread. Add fresh veggies like lettuce, tomatoes, and cucumber. Drizzle tahini sauce or yogurt on top for added flavor. You can also enjoy them on a salad or with a side of hummus. Why are my falafel falling apart? Falafel may fall apart for a few reasons. If the mixture is too wet, they won’t hold shape. Be sure to drain the chickpeas well. Using enough flour helps bind the mixture. Also, do not overprocess it in the food processor. Keep some texture for better structure. How do I know when falafel is done baking? You can tell if falafel is done by its color and texture. They should be golden brown and crispy on the outside. If they feel firm to the touch, they are likely done. Bake for 25-30 minutes, flipping halfway through for even cooking. You now have a clear guide to making delicious falafel. We covered ingredients, step-by-step instructions, and helpful tips. Whether you prefer gluten-free or spicy versions, there’s an option for you. Store your falafel safely and reheat it right to keep it crisp. Enjoy your homemade falafel as a tasty snack or meal. With these tips, you can make perfect falafel every time. Now, it's time to get cooking and share your creations!](https://dailydishlab.com/wp-content/uploads/2025/07/105e670d-6b88-46d5-acd9-26b7b59cff64-768x768.webp)