Sheet-Pan Garlic Butter Shrimp and Gnocchi Delight
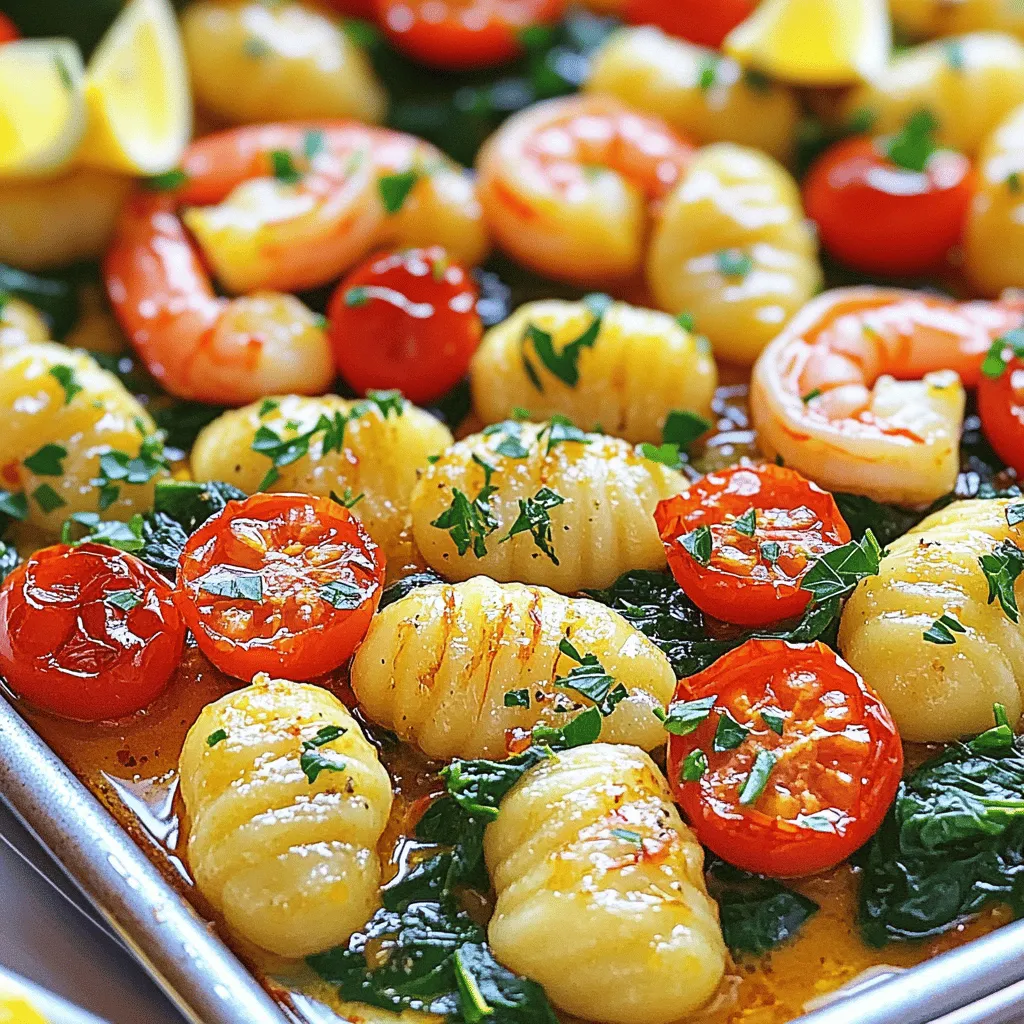
Are you craving a quick and tasty meal? Look no further than my Sheet-Pan Garlic Butter Shrimp and Gnocchi Delight! This dish combines shrimp and gnocchi in a rich garlic butter sauce, all made on one pan for easy cleanup. In this post, I’ll share the ingredients, step-by-step instructions, and handy tips to help you create this delightful dish. Let’s dive into a meal that’s both simple and delicious!
Why I Love This Recipe
- Quick and Easy: This recipe comes together in just 30 minutes, making it perfect for a weeknight dinner.
- Flavor-Packed: The combination of garlic butter, smoked paprika, and fresh ingredients creates an irresistible flavor.
- One-Pan Wonder: Everything is cooked on a single sheet pan, which means less cleanup and more time to enjoy your meal.
- Healthy Ingredients: With shrimp, spinach, and cherry tomatoes, this dish is not only delicious but also nutritious.
Ingredients
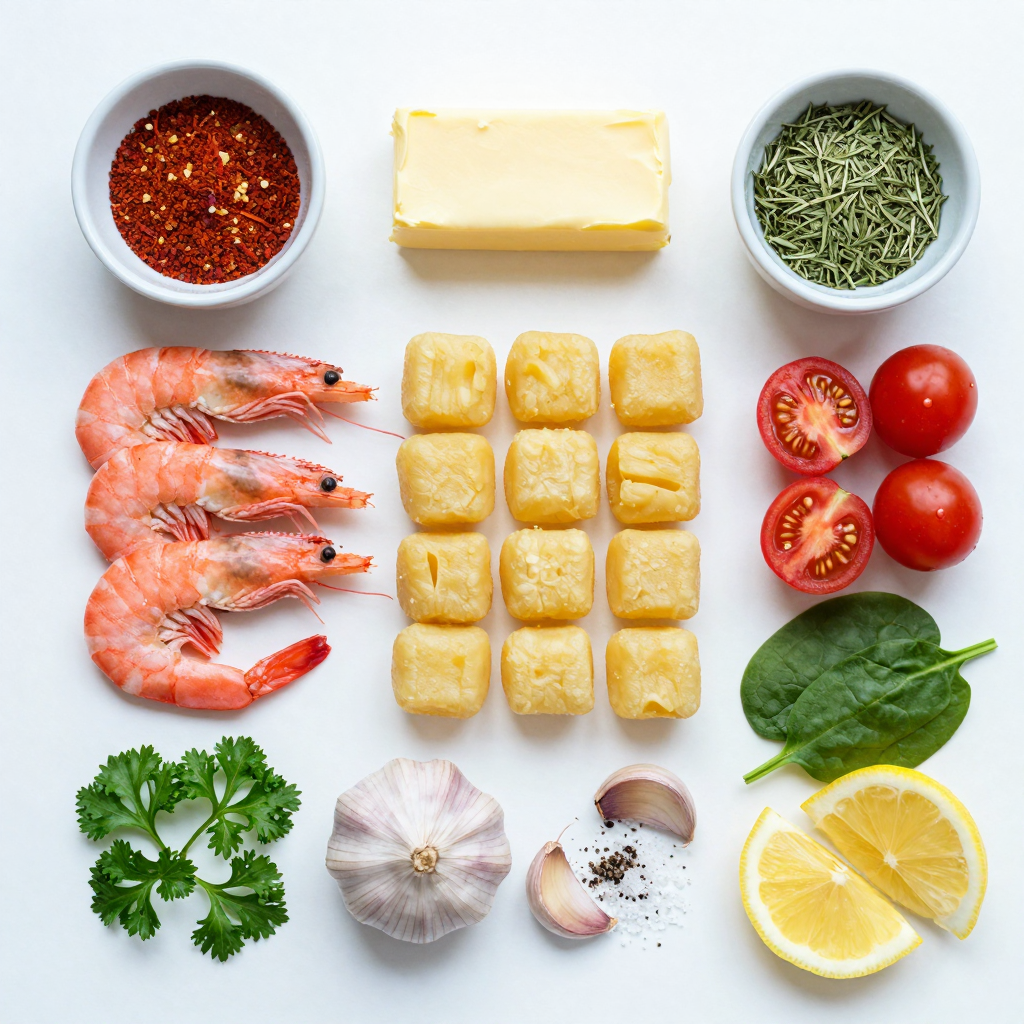
Complete ingredient list for Sheet-Pan Garlic Butter Shrimp and Gnocchi
To make this tasty dish, you will need:
- 1 pound shrimp, peeled and deveined
- 1 pound potato gnocchi
- 4 tablespoons unsalted butter
- 6 cloves garlic, minced
- 1 teaspoon smoked paprika
- 1 teaspoon dried oregano
- 1/2 teaspoon red pepper flakes (optional)
- 1 cup cherry tomatoes, halved
- 3 cups fresh spinach
- Salt and pepper to taste
- Fresh parsley, chopped for garnish
- Lemon wedges for serving
These ingredients work well together. The shrimp and gnocchi create a lovely base. The garlic butter adds rich flavor. Cherry tomatoes bring freshness, while spinach adds color and nutrients.
Optional ingredients and substitutions
You can change this recipe based on what you have. For instance:
- Use olive oil instead of butter for a lighter taste.
- Swap shrimp for chicken or tofu for a different protein.
- Try other veggies like bell peppers or zucchini.
These options let you customize your meal. You can make it your own while keeping it easy.
Fresh vs. frozen shrimp: What to use?
Fresh shrimp is often best for flavor and texture. However, frozen shrimp works well too. If using frozen shrimp, thaw them first. You can do this by placing them in cold water. This will help keep your shrimp juicy.
Both fresh and frozen shrimp will cook well in this dish. Choose what fits your schedule and budget. Enjoy the cooking process!
Step-by-Step Instructions
Prepping the oven and baking sheet
Start by preheating your oven to 425°F (220°C). This helps cook the shrimp and gnocchi evenly. Next, grab a large baking sheet and line it with parchment paper. This makes cleanup easy and prevents sticking.
Making the garlic butter mixture
In a large bowl, melt 4 tablespoons of unsalted butter. You can do this in the microwave or on the stovetop. Once melted, add 6 cloves of minced garlic, 1 teaspoon of smoked paprika, 1 teaspoon of dried oregano, and 1/2 teaspoon of red pepper flakes if you want a little heat. Mix in salt and pepper to taste. Stir until all the ingredients blend well, creating a rich garlic butter sauce.
Combining shrimp and gnocchi with seasonings
Now, add 1 pound of peeled and deveined shrimp and 1 pound of potato gnocchi to the bowl with the garlic butter. Toss everything together until the shrimp and gnocchi are fully coated. This step ensures that every bite is packed with flavor.
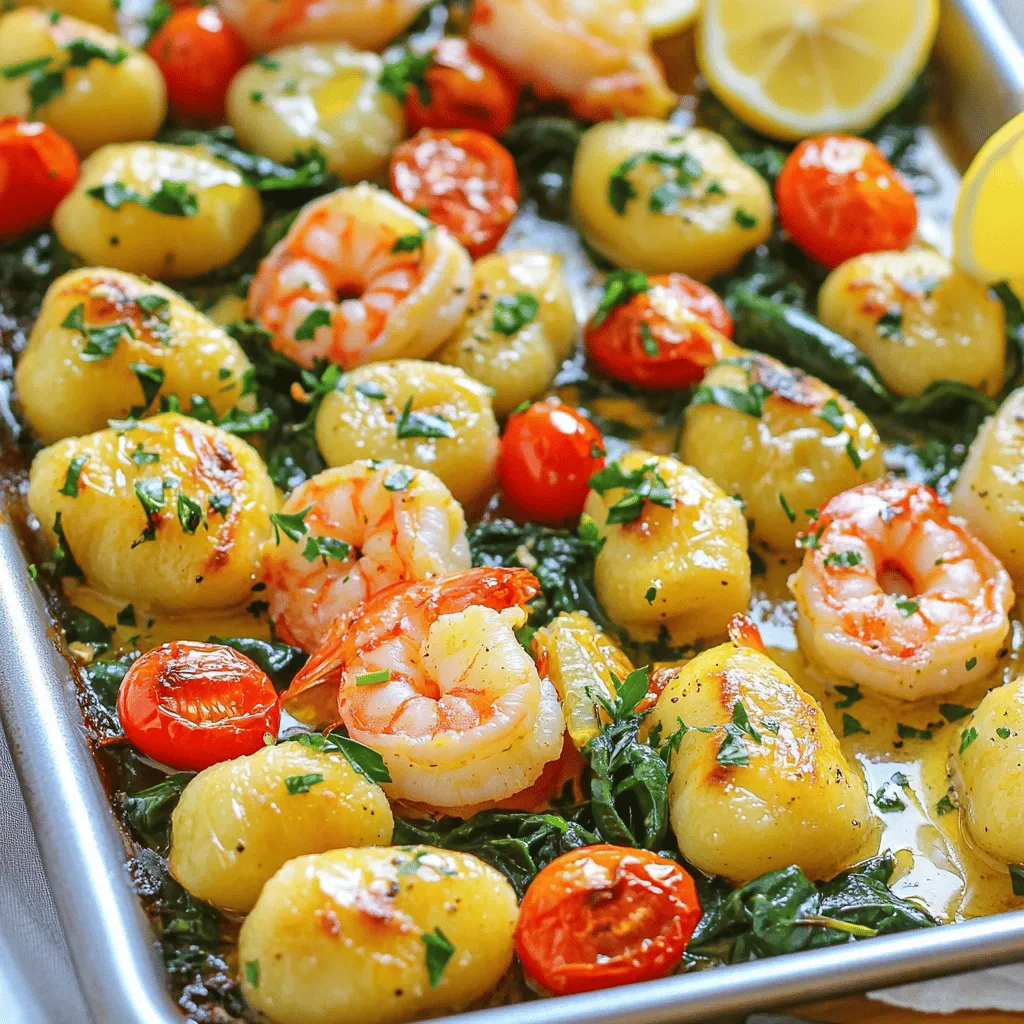
Baking tips for perfect texture
Spread the shrimp and gnocchi mixture evenly on the prepared baking sheet. Make sure not to overcrowd it; this will help everything bake properly. Scatter 1 cup of halved cherry tomatoes over the top and drizzle with a little olive oil if you like. Bake in the preheated oven for 15-20 minutes. The shrimp should turn pink and the gnocchi should be golden and slightly crispy. In the last 5 minutes, add 3 cups of fresh spinach to the sheet. Spread it over the top, and let it wilt in the oven. Once done, remove it and sprinkle with chopped parsley. Don’t forget to serve with lemon wedges for a fresh, zesty flavor!
Pro Tips
- Use Fresh Shrimp: For the best flavor and texture, opt for fresh shrimp instead of frozen. If using frozen, ensure they are fully thawed and patted dry before cooking.
- Customize Your Gnocchi: Feel free to use store-bought or homemade gnocchi. You can also try different types like sweet potato gnocchi for a unique twist.
- Don’t Overcook the Shrimp: Keep an eye on the shrimp while baking; they cook quickly. Remove them from the oven as soon as they turn pink to avoid a rubbery texture.
- Add More Veggies: Enhance the dish with additional vegetables like zucchini or bell peppers for added color and nutrition. Just chop them into similar sizes for even cooking.
Tips & Tricks
How to achieve perfectly tender shrimp
To get tender shrimp, start with fresh, high-quality shrimp. Peel and devein them before cooking. Cook them quickly on high heat. This keeps them juicy. If they overcook, they become rubbery. Bake them for 15-20 minutes at 425°F. Watch closely until they turn pink and opaque. This is the best sign they are ready.
Ensuring gnocchi is crispy on the outside
For crispy gnocchi, use a baking sheet lined with parchment paper. Toss the gnocchi with garlic butter to coat them well. Spread them out in a single layer on the sheet. This allows heat to circulate. Bake them alongside the shrimp. The hot oven will crisp them nicely in 15-20 minutes.
Flavor enhancement ideas (extra herbs, spices)
You can boost flavor by adding fresh herbs. Try basil or thyme for a new twist. A squeeze of lemon juice brightens the dish. You can also mix in some capers for a salty kick. If you love heat, add more red pepper flakes. For a smoky touch, try smoked paprika. Experimenting can lead to delightful surprises.
Variations
Vegetarian version using plant-based alternatives
You can easily make this dish vegetarian. Swap shrimp for firm tofu or tempeh. Both options soak up flavor well. Use the same garlic butter mix. Toss in your gnocchi and let it bake. Add veggies like bell peppers or zucchini for a colorful touch.
Seafood mix: Adding scallops or fish
Want a seafood mix? You can add scallops or fish. Scallops cook quickly, so add them at the same time as shrimp. For fish, choose firm types like salmon or cod. Cut them into bite-sized pieces. Mix them in the garlic butter blend, then bake as usual. You’ll get a rich and tasty dish.
Spicing it up with different sauce bases
Try different sauce bases for a twist. You can use pesto instead of garlic butter. Just toss your shrimp and gnocchi in the pesto before baking. For a creamy option, mix in Alfredo sauce. This will make your dish rich and savory. No matter the base, you can create your own unique flavor.
Storage Info
Best ways to store leftovers
To keep your Sheet-Pan Garlic Butter Shrimp and Gnocchi fresh, store leftovers in an airtight container. Make sure to cool the dish to room temperature first. This helps prevent moisture build-up. Place the container in the fridge. Your leftovers will last about 3 days. If you want to keep it longer, consider freezing.
Reheating tips for quality results
When it’s time to reheat, I recommend using the oven. Preheat it to 350°F (175°C). Place the dish in a baking pan and cover it with foil. This keeps the shrimp and gnocchi moist. Heat for about 15-20 minutes. You can also microwave small portions. Just cover them with a damp paper towel to keep them from drying out.
Freezing instructions and how to thaw
For freezing, pack the cooled dish in a freezer-safe container. Make sure it’s airtight to prevent freezer burn. Label it with the date. It can freeze well for up to 2 months. To thaw, move it to the fridge overnight. If you’re in a hurry, you can use the microwave on defrost. After thawing, reheat as mentioned above for the best taste.
FAQs
How long does it take to make Sheet-Pan Garlic Butter Shrimp and Gnocchi?
It takes about 30 minutes to make this dish. You will spend 10 minutes prepping. The cooking time is around 15 to 20 minutes. This quick recipe makes it easy to enjoy a tasty meal on busy nights.
Can I use store-bought garlic butter instead?
Yes, you can use store-bought garlic butter. It saves time and adds flavor. Just make sure it has good quality. This way, your meal stays simple and quick. If you like, you can add extra garlic for a stronger taste.
What can I serve with this dish?
You can serve this dish with a fresh salad or crusty bread. A light green salad pairs well with the rich flavors. Crusty bread is great for soaking up extra sauce. You might also enjoy a glass of white wine for a special touch.
In this post, we covered how to make Sheet-Pan Garlic Butter Shrimp and Gnocchi. You learned about the ingredient list and helpful tips for baking. I shared ways to vary the recipe and how to store leftovers. Remember to use fresh shrimp for the best taste. Experiment with toppings to find your favorite flavor. Cooking should be fun and tasty! Enjoy your meal and share it with friends or family.

Sheet-Pan Garlic Butter Shrimp and Gnocchi
Ingredients
1 pound shrimp, peeled and deveined
1 pound potato gnocchi
4 tablespoons unsalted butter
6 cloves garlic, minced
1 teaspoon smoked paprika
1 teaspoon dried oregano
1/2 teaspoon red pepper flakes (optional)
1 cup cherry tomatoes, halved
3 cups fresh spinach
Salt and pepper to taste
Fresh parsley, chopped for garnish
Lemon wedges for serving
Instructions
Preheat your oven to 425°F (220°C). Line a large baking sheet with parchment paper for easy cleanup.
In a large bowl, melt the butter in the microwave or on the stovetop. Stir in the minced garlic, smoked paprika, oregano, red pepper flakes, salt, and pepper to create a garlic butter mixture.
Add the shrimp and gnocchi to the bowl with the garlic butter and toss until they are well coated.
Spread the shrimp and gnocchi mixture evenly on the prepared baking sheet.
Scatter the halved cherry tomatoes over the top and drizzle with a little extra olive oil if desired.
Bake in the preheated oven for 15-20 minutes, or until the shrimp are pink and cooked through, and the gnocchi are golden and slightly crispy.
In the last 5 minutes of baking, add the fresh spinach to the baking sheet, spreading it over the shrimp and gnocchi, and return to the oven until wilted.
Remove from the oven and sprinkle with chopped parsley before serving.
Serve with lemon wedges on the side for a burst of fresh flavor.
Prep Time: 10 minutes | Total Time: 30 minutes | Servings: 4
Sheet-Pan Garlic Butter Shrimp and Gnocchi
Ingredients
- 1 pound shrimp, peeled and deveined
- 1 pound potato gnocchi
- 4 tablespoons unsalted butter
- 6 cloves garlic, minced
- 1 teaspoon smoked paprika
- 1 teaspoon dried oregano
- 0.5 teaspoon red pepper flakes (optional)
- 1 cup cherry tomatoes, halved
- 3 cups fresh spinach
- to taste Salt and pepper
- for garnish Fresh parsley, chopped
- for serving Lemon wedges
Instructions
- Preheat your oven to 425°F (220°C). Line a large baking sheet with parchment paper for easy cleanup.
- In a large bowl, melt the butter in the microwave or on the stovetop. Stir in the minced garlic, smoked paprika, oregano, red pepper flakes, salt, and pepper to create a garlic butter mixture.
- Add the shrimp and gnocchi to the bowl with the garlic butter and toss until they are well coated.
- Spread the shrimp and gnocchi mixture evenly on the prepared baking sheet.
- Scatter the halved cherry tomatoes over the top and drizzle with a little extra olive oil if desired.
- Bake in the preheated oven for 15-20 minutes, or until the shrimp are pink and cooked through, and the gnocchi are golden and slightly crispy.
- In the last 5 minutes of baking, add the fresh spinach to the baking sheet, spreading it over the shrimp and gnocchi, and return to the oven until wilted.
- Remove from the oven and sprinkle with chopped parsley before serving.
- Serve with lemon wedges on the side for a burst of fresh flavor.
![- 500g chicken breast, cubed - 1 large onion, finely chopped - 3 cloves garlic, minced - 1 inch ginger, grated - 2 tablespoons curry powder - 1 teaspoon turmeric powder - 1 teaspoon cumin powder - 400ml coconut milk - 1 tablespoon vegetable oil - Salt and pepper to taste To make my easy chicken curry, I focus on fresh and simple ingredients. Chicken breast is my main protein. The onions, garlic, and ginger create a rich base. The spices, like curry powder, turmeric, and cumin, bring warmth and depth. Coconut milk adds creaminess and a hint of sweetness, balancing the spices. - Fresh herbs like cilantro - Lime wedges for serving If you want to elevate your dish, add fresh herbs like cilantro. It gives a bright flavor and nice color. Lime wedges on the side add a zesty kick when served. They contrast well with the creamy curry. - Large skillet or pan - Measuring cups and spoons Having the right tools makes cooking easier. A large skillet or pan helps with even cooking. Use measuring cups and spoons for accuracy. Proper tools ensure your easy chicken curry turns out perfect every time. For the full recipe, check the section above. To start, I heat vegetable oil in a large skillet over medium heat. I add the finely chopped onion and sauté it for about five minutes. The onion should turn translucent. Next, I stir in the minced garlic and grated ginger. I cook this mixture for another one to two minutes until it smells great. Now comes the fun part: toasting the spices! I sprinkle curry powder, turmeric, and cumin into the pan. I stir well to coat the onions and toast the spices for about one minute. This step brings out their rich flavors. After preparing the base, I add the cubed chicken breast to the pan. I season it with salt and pepper for a balanced taste. It’s important to brown the chicken pieces thoroughly. I cook them for about five to seven minutes, ensuring they turn golden on all sides. Once the chicken is browned, I pour in the coconut milk. I bring the mixture to a gentle simmer and then reduce the heat to low. Covering the pan, I let it cook for 15 to 20 minutes. This allows the chicken to cook through and the sauce to thicken. Before serving, I taste the curry and adjust the seasoning if needed. A fresh garnish of chopped coriander adds a lovely touch. For the full recipe, check the details above. To make your chicken curry perfect, focus on the spice blend. Use fresh spices whenever you can. They add much more flavor than old ones. Toast the spices in the pan before adding other ingredients. This step releases their oils and boosts their taste. You can also adjust the spice levels to match your taste. If you prefer a milder curry, reduce the curry powder. For extra warmth, add a bit more cumin. Using fresh ingredients is key for a tasty curry. Fresh chicken, onions, garlic, and ginger make a big difference. Chop the onion finely to help it cook faster. Mince the garlic and grate the ginger for the best flavor. The coconut milk should be full-fat for a creamy texture. When you cook with quality items, your dish shines. Chicken curry pairs well with simple sides. Serve it over fluffy rice for a filling meal. You can also try naan or roti for a fun twist. These breads soak up the sauce nicely. Garnishing your dish can elevate its look. Sprinkle fresh coriander on top before serving. This adds color and a fresh taste. You might also squeeze some lime juice over the curry. The zest brightens the flavors and adds a nice touch. To manage your cooking time, prep before you cook. Chop all your ingredients first. This makes cooking smoother and faster. While the chicken simmers, clean up your workspace. This keeps your kitchen organized and less stressful. You can also start cooking rice or bread while the curry simmers. This multitasking saves time and lets you serve everything hot. For a quick meal, the full recipe of quick and creamy chicken curry takes just 35 minutes. With these tips, you’ll not only save time but also enjoy a delicious dinner! {{image_2}} You can easily make this chicken curry vegetarian or vegan. Simply replace the chicken with tofu or your favorite vegetables. Some great choices are bell peppers, carrots, and peas. For a delicious twist, use firm tofu. Cut it into cubes and sauté it until golden. This adds a nice texture. When using coconut milk, be sure to pick a full-fat version. It gives a rich flavor. If you want a lighter option, use light coconut milk but add a bit of vegetable broth for depth. You can also add extra spices to boost flavor. Try adding a dash of soy sauce for umami. You can create exciting versions of chicken curry by adding spices from different regions. For an Indian-inspired dish, add garam masala or fenugreek. These spices bring warmth and depth to the curry. If you prefer a Thai-style curry, add lemongrass and kaffir lime leaves. These ingredients bring a fresh and zesty flavor. Use fresh or dried lemongrass, and slice it finely. This will enhance the overall taste and give a unique twist. Adjusting the spice level is easy. To make the curry mild, use less curry powder and skip the hot peppers. For a medium heat, use a bit of chili powder or cayenne. If you like it hot, add fresh chili peppers, like jalapeños or serranos. You can also use hot sauce to kick it up a notch. Just start with a small amount and taste as you go. This way, you can control the heat to your liking. To keep your chicken curry fresh, first let it cool. Then, transfer the leftovers to airtight containers. This helps prevent moisture loss and keeps flavors intact. You can store it in the fridge for up to three days. For longer preservation, consider freezing. Divide the curry into portions, and freeze each in a separate container. It will last up to three months in the freezer. When you're ready to enjoy your chicken curry again, I recommend reheating it on the stove. This method warms the curry evenly. You can also use the microwave; just cover the bowl and heat it in short bursts. Stir in between to avoid hot spots. To maintain flavor and texture, add a splash of coconut milk or water if it seems thick. You can safely eat the leftovers within three days if stored in the fridge. If you freeze the curry, it should remain good for about three months. Always check for changes in smell or color. If you see any signs of spoilage, like a sour smell or odd texture, it’s best to toss it. To make easy chicken curry, follow these key steps: 1. Prepare your ingredients: Chop the onion, garlic, and ginger. 2. Heat oil: In a large pan, heat vegetable oil over medium heat. 3. Sauté onion: Add the chopped onion and cook until soft. 4. Add garlic and ginger: Stir in minced garlic and grated ginger for flavor. 5. Toast spices: Add curry powder, turmeric, and cumin. Stir to mix. 6. Cook chicken: Add cubed chicken, season, and brown on all sides. 7. Simmer with coconut milk: Pour in coconut milk, stir, and simmer until done. 8. Finish and serve: Taste, adjust seasoning, and garnish with coriander. These steps make it easy to create a rich and tasty chicken curry from scratch. Yes, you can use different meats. Here are some options: - Beef: Cut into small cubes, similar to chicken. - Lamb: Use tender pieces for a rich flavor. - Pork: Pork tenderloin works well in this curry. Each meat brings its unique taste. Adjust cooking times based on the meat you choose. The best side dishes for chicken curry include: - Cooked rice: Fluffy rice soaks up the sauce well. - Naan bread: Soft naan is perfect for dipping. - Raita: A yogurt sauce cools the spices. These sides complement the curry's rich flavors. Try mixing and matching to find your favorite! For the full recipe, check out the [Full Recipe]. In this article, we covered the key ingredients for chicken curry, including spices and optional items that boost flavor. You learned step-by-step instructions to cook, simmer, and serve your dish perfectly. We provided tips for enhancements, variations, and storage methods to keep your curry fresh. Cooking chicken curry is easy and fun. Experiment with flavors and share your creations. Enjoy your delicious meal!](https://dailydishlab.com/wp-content/uploads/2025/06/c5f0adf9-706c-4d08-bf07-c5d16fe1346d-768x768.webp)