Maple Glazed Pumpkin Scones Delightful Fall Treat
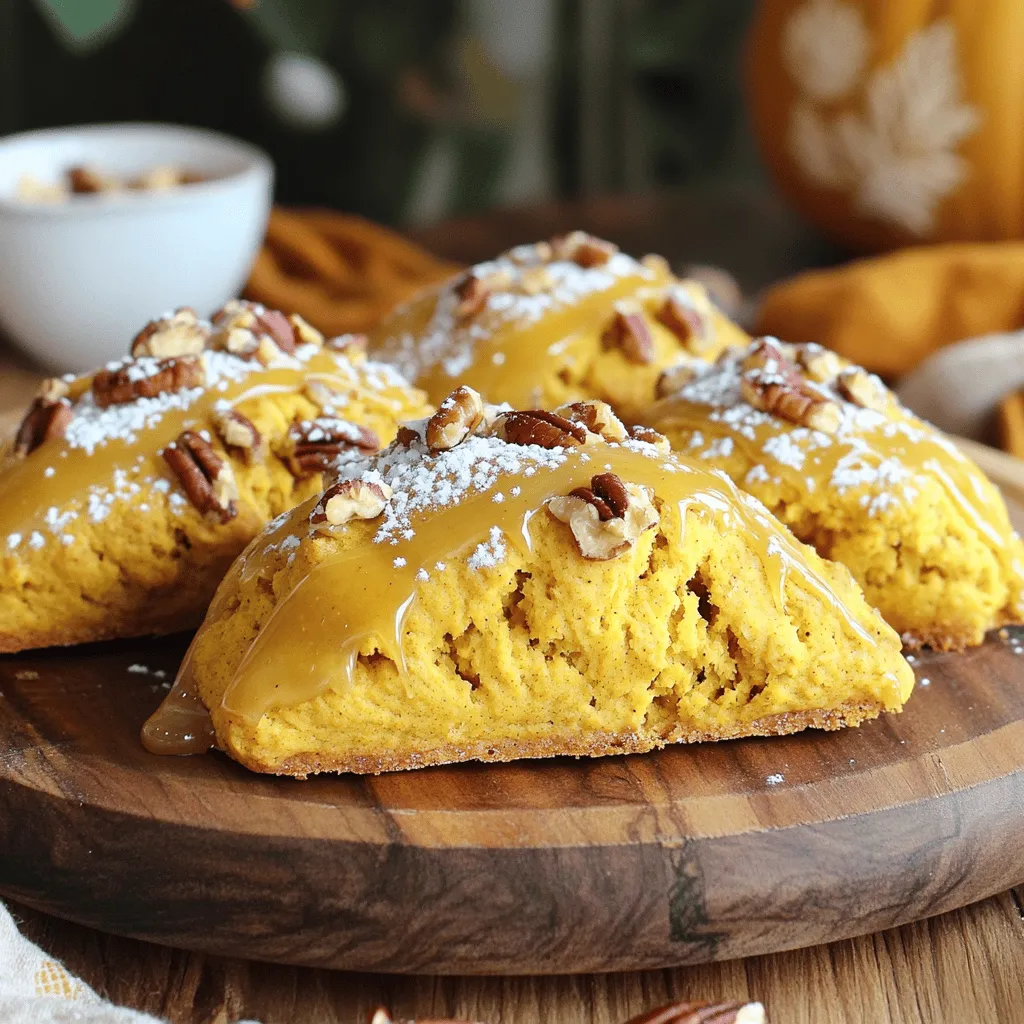
Fall is here, and that means it’s the perfect time for some cozy baking! If you love pumpkin, you’ll adore these Maple Glazed Pumpkin Scones. They’re packed with warm spices and drizzled with sweet maple glaze, making them a delightful treat for any autumn day. In this post, I’ll guide you through the simple steps to create these tasty scones that will impress your family and friends. Let’s get baking!
Why I Love This Recipe
- Perfect Fall Flavor: The combination of pumpkin and warm spices creates a cozy and inviting flavor that’s perfect for autumn.
- Easy to Make: This recipe is straightforward and doesn’t require any advanced baking skills, making it accessible for everyone.
- Decadent Maple Glaze: The maple glaze adds a sweet finishing touch that complements the scones beautifully.
- Versatile Treat: These scones are great for breakfast, brunch, or as a delightful snack with your afternoon tea or coffee.
Ingredients
Main Ingredients for Maple Glazed Pumpkin Scones
For these delightful scones, you need:
- 2 cups all-purpose flour
- 1/3 cup brown sugar, packed
- 1 tablespoon baking powder
- 1/2 teaspoon baking soda
- 1/2 teaspoon salt
- 1 tablespoon ground cinnamon
- 1/2 teaspoon ground nutmeg
- 1/4 cup cold unsalted butter, cubed
- 1 cup pumpkin puree
- 1/4 cup heavy cream
- 1 large egg
- 1 teaspoon vanilla extract
These ingredients combine to make a soft and moist scone. The flour and baking powder give the scone structure. Brown sugar adds sweetness and depth. Pumpkin puree brings moisture and a lovely fall flavor. Cinnamon and nutmeg add warmth and spice, making each bite cozy.
Ingredients for Maple Glaze
To make the sweet glaze, gather:
- 1/2 cup powdered sugar
- 2 tablespoons pure maple syrup
- 1–2 tablespoons milk (as needed for glaze consistency)
The glaze is simple yet delicious. Powdered sugar provides the base sweetness. Pure maple syrup adds a rich, natural flavor. Milk adjusts the thickness, allowing you to create the perfect drizzle over the warm scones.
This glaze makes the scones shine and adds that sweet finish everyone loves.

Step-by-Step Instructions
Preheat and Prepare
First, preheat your oven to 400°F (200°C). This gets the oven ready for baking. Next, line a baking sheet with parchment paper. This helps keep the scones from sticking.
Combine Dry Ingredients
In a large bowl, whisk together the following dry ingredients:
- 2 cups all-purpose flour
- 1/3 cup brown sugar, packed
- 1 tablespoon baking powder
- 1/2 teaspoon baking soda
- 1/2 teaspoon salt
- 1 tablespoon ground cinnamon
- 1/2 teaspoon ground nutmeg
Make sure everything mixes well. This step is key for a balanced flavor.
Incorporate Butter
Now, add 1/4 cup of cold, cubed unsalted butter into your flour mix. Use a pastry cutter or your fingers to work the butter into the flour. Keep mixing until it looks like coarse crumbs. This step gives the scones a nice texture.
Mix Wet Ingredients
In another bowl, combine these wet ingredients:
- 1 cup pumpkin puree
- 1/4 cup heavy cream
- 1 large egg
- 1 teaspoon vanilla extract
Mix until the mixture is smooth. This blend adds moisture and flavor.
Forming the Dough
Pour the wet mixture into the dry ingredients. Gently mix until everything just comes together. Be careful not to over-mix; the dough should feel slightly sticky.
Turn the dough out onto a floured surface. Pat it into a circle about 1-inch thick. Cut the dough into wedges or use a round cutter to shape the scones.
Baking Instructions
Place the scones on your prepared baking sheet. Make sure to space them apart. Bake for 15-18 minutes. Check if they are done by using a toothpick. If it comes out clean, they are ready! Enjoy the warm, fragrant aroma filling your kitchen as they bake.
Pro Tips
- Use Cold Ingredients: Ensure your butter and cream are cold before mixing. This helps create flaky scones by preventing the butter from melting too quickly.
- Don’t Overmix: Mix until just combined to keep the scones tender. Overmixing can lead to dense scones.
- Adjust Glaze Consistency: Start with less milk when making the glaze. You can always add more to achieve your desired drizzling consistency.
- Experiment with Spices: Feel free to adjust the spices according to your taste. Adding ginger or allspice can give your scones an extra flavor boost.
Tips & Tricks
Achieving the Perfect Texture
To make great scones, avoid over-mixing the dough. When you mix too much, the scones become tough. Mix just until you see no dry flour. The dough should feel slightly sticky.
For cutting and shaping, flour your surface well. Pat the dough into a circle about 1-inch thick. Use a sharp knife to cut wedges. You can also use a round cutter for pretty shapes. Remember, the sharper the tool, the cleaner the edge.
Flavor Enhancement
You can boost the flavor of your scones by adding spices or mix-ins. Try adding ginger or cloves for extra warmth. You can also add nuts like pecans or walnuts for texture. If you love chocolate, sprinkle in some chocolate chips for a sweet surprise.
Glazing Techniques
To get the perfect glaze, whisk the powdered sugar and maple syrup until smooth. Add milk a little at a time. You want a drizzling consistency. If your glaze is too thick, add more milk. If it’s too thin, add more powdered sugar. Drizzle the glaze over warm scones for the best flavor and look.

Variations
Nut and Chocolate Add-Ins
You can easily add nuts or chocolate to your scones. Chopped pecans or walnuts bring a nice crunch. They enhance the flavor too. If you prefer a sweet touch, add chocolate chips. I suggest using about 1/2 cup of either. Mix them into the dough just before you form it. This simple step gives your scones extra texture.
Alternative Flours
If you need a gluten-free option, you can swap out the all-purpose flour. Use a gluten-free blend that works for baking. You may need to add a bit more liquid for the dough. Start with an extra tablespoon of cream or milk. This keeps your scones moist and fluffy.
Seasonal Flavor Twists
To make your scones even more festive, think about adding seasonal flavors. Dried cranberries add a tart bite that pairs nicely with pumpkin. Use about 1/2 cup of cranberries for a fruity kick. Another option is to mix in some orange zest. This brightens the scone and adds a citrus twist. A teaspoon of zest will do the trick. These fun variations bring new life to your pumpkin scones.
Storage Info
Best Practices for Storing Scones
To keep scones fresh at room temperature, you need a good storage method. First, allow the scones to cool completely after baking. Then, place them in an airtight container. This helps maintain their softness. You can store them this way for up to three days. If you want to keep them longer, consider freezing.
Freezing Instructions
Freezing scones is an easy way to save them. You can freeze unbaked or baked scones. For unbaked scones, cut them into wedges and place them on a baking sheet. Freeze until solid, about an hour. Then transfer them to a freezer bag. For baked scones, cool them completely first. Wrap each scone in plastic wrap and place them in a freezer-safe bag. They will stay fresh for up to three months.
Reheating Tips
When you want to enjoy your scones again, reheating is key. For baked scones, preheat your oven to 350°F (175°C). Place the scones on a baking sheet and heat for about 10 minutes. This keeps them warm and soft. You can also use a microwave. Heat for about 15 to 20 seconds, but this may make them a bit chewy. Enjoy your scones warm!
FAQs
How do I know when my scones are done baking?
To check if your scones are done, look for a few signs. First, the tops should be golden brown. Second, use a toothpick; it should come out clean when inserted into the center. Finally, the scones should feel firm to the touch. If they look pale or feel soft, bake them a bit longer.
Can I use fresh pumpkin instead of canned puree?
Yes, you can use fresh pumpkin. Start by roasting a small pumpkin. Cut it in half and scoop out the seeds. Place the halves cut side down on a baking sheet. Roast at 400°F until soft, about 30 to 45 minutes. Let it cool, then scoop out the flesh and mash it. Strain any excess moisture to avoid watery scones.
What can I substitute for heavy cream?
If you need a substitute for heavy cream, there are a few options. You can use whole milk mixed with a bit of butter. Combine ¾ cup of milk with ¼ cup of melted butter. Another option is to use coconut cream for a dairy-free version. Both options can give good results in this recipe.
How long will the scones stay fresh?
Store your scones in an airtight container at room temperature. They will stay fresh for about 2 to 3 days. If you want them to last longer, consider freezing them. You can freeze baked scones for up to 2 months. Just wrap them well to prevent freezer burn.
In this article, we explored how to make maple glazed pumpkin scones step-by-step. We covered key ingredients like all-purpose flour, pumpkin puree, and spices. I shared tips on mixing and baking to achieve the perfect texture. You learned about variations, storage, and useful FAQs to troubleshoot.
Making these scones can be fun and rewarding. Enjoy trying different flavors and sharing with friends. Happy baking!

Maple Glazed Pumpkin Scones
Ingredients
2 cups all-purpose flour
1/3 cup brown sugar, packed
1 tablespoon baking powder
1/2 teaspoon baking soda
1/2 teaspoon salt
1 tablespoon ground cinnamon
1/2 teaspoon ground nutmeg
1/4 cup cold unsalted butter, cubed
1 cup pumpkin puree
1/4 cup heavy cream
1 large egg
1 teaspoon vanilla extract
1/2 cup powdered sugar (for glaze)
2 tablespoons pure maple syrup (for glaze)
1–2 tablespoons milk (as needed for glaze consistency)
Instructions
Preheat your oven to 400°F (200°C) and line a baking sheet with parchment paper.
In a large mixing bowl, whisk together the flour, brown sugar, baking powder, baking soda, salt, cinnamon, and nutmeg until well combined.
Add the cold, cubed butter into the flour mixture. Using a pastry cutter or your fingers, work the butter into the flour until it resembles coarse crumbs.
In a separate bowl, mix together the pumpkin puree, heavy cream, egg, and vanilla extract until smooth.
Pour the wet ingredients into the dry ingredients and gently mix until everything is just combined. Avoid over-mixing; the dough should be slightly sticky.
Turn the dough out onto a floured surface and pat it into a circle about 1-inch thick. Cut the dough into wedges or use a round biscuit cutter to create scones.
Place the scones on the prepared baking sheet, spacing them apart. Bake for 15-18 minutes, or until the tops are golden and a toothpick inserted comes out clean.
While the scones are baking, prepare the glaze by whisking together the powdered sugar, maple syrup, and just enough milk to reach a drizzling consistency.
Once the scones are done, allow them to cool for a few minutes before drizzling the maple glaze over the top.
Prep Time: 20 minutes | Total Time: 40 minutes | Servings: 8 scones
– Presentation Tips: Serve warm on a rustic wooden platter, drizzled with extra maple glaze and garnished with a dusting of powdered sugar. Add a sprinkle of chopped pecans for added texture and flavor!
Maple Glazed Pumpkin Scones
Ingredients
- 2 cups all-purpose flour
- 1/3 cup brown sugar, packed
- 1 tablespoon baking powder
- 1/2 teaspoon baking soda
- 1/2 teaspoon salt
- 1 tablespoon ground cinnamon
- 1/2 teaspoon ground nutmeg
- 1/4 cup cold unsalted butter, cubed
- 1 cup pumpkin puree
- 1/4 cup heavy cream
- 1 large egg
- 1 teaspoon vanilla extract
- 1/2 cup powdered sugar (for glaze)
- 2 tablespoons pure maple syrup (for glaze)
- 1–2 tablespoons milk (as needed for glaze consistency)
Instructions
- Preheat your oven to 400°F (200°C) and line a baking sheet with parchment paper.
- In a large mixing bowl, whisk together the flour, brown sugar, baking powder, baking soda, salt, cinnamon, and nutmeg until well combined.
- Add the cold, cubed butter into the flour mixture. Using a pastry cutter or your fingers, work the butter into the flour until it resembles coarse crumbs.
- In a separate bowl, mix together the pumpkin puree, heavy cream, egg, and vanilla extract until smooth.
- Pour the wet ingredients into the dry ingredients and gently mix until everything is just combined. Avoid over-mixing; the dough should be slightly sticky.
- Turn the dough out onto a floured surface and pat it into a circle about 1-inch thick. Cut the dough into wedges or use a round biscuit cutter to create scones.
- Place the scones on the prepared baking sheet, spacing them apart. Bake for 15-18 minutes, or until the tops are golden and a toothpick inserted comes out clean.
- While the scones are baking, prepare the glaze by whisking together the powdered sugar, maple syrup, and just enough milk to reach a drizzling consistency.
- Once the scones are done, allow them to cool for a few minutes before drizzling the maple glaze over the top.
![To make a delightful lemon zucchini sheet cake, gather these key ingredients: - 2 cups grated zucchini (about 2 medium zucchinis) - 1 cup granulated sugar - 1/2 cup vegetable oil - 1/2 cup unsweetened applesauce - 1/4 cup fresh lemon juice These ingredients work together to create a moist cake. The grated zucchini adds moisture and a subtle flavor. The sugar sweetens the cake, while the oil and applesauce keep it soft. Fresh lemon juice gives a bright and zesty taste. You can enhance your cake with a few optional ingredients: - Zest of 2 lemons - Whipped cream for serving - Fresh mint for garnish Adding lemon zest boosts the lemon flavor. Whipped cream makes a lovely topping, and fresh mint adds a pop of color and freshness. These options elevate your cake and make it even more enjoyable. If you want the full recipe, check out the complete details. First, preheat your oven to 350°F (175°C). This step helps the cake rise nicely. Next, grease and line a 9x13 inch sheet pan with parchment paper. This makes it easy to remove the cake later. In a large bowl, combine 1 cup of granulated sugar, 1/2 cup of vegetable oil, 1/2 cup of unsweetened applesauce, 3 large eggs, and 2 teaspoons of vanilla extract. Whisk these ingredients together until they blend well. This mix adds moisture and sweetness to your cake. Now, stir in 2 cups of grated zucchini, the zest of 2 lemons, and 1/4 cup of fresh lemon juice into your wet mix. The zucchini gives the cake a great texture. The lemon adds a lovely fresh flavor that brightens every bite. In another bowl, whisk together 2 cups of all-purpose flour, 1 teaspoon of baking powder, 1 teaspoon of baking soda, and 1/2 teaspoon of salt. This mix helps the cake rise and gives it structure. Gradually add the dry ingredients to the wet mixture. Stir gently until just combined. Be careful not to overmix; small lumps are okay. Overmixing can make the cake tough. Pour the batter into your prepared sheet pan. Use a spatula to smooth the top. Bake in your preheated oven for 25-30 minutes. To check if it's done, insert a toothpick into the center. If it comes out clean, your cake is ready! Let it cool in the pan for about 10 minutes before moving it to a wire rack to cool completely. You can find the full recipe [Full Recipe]. To make your Lemon Zucchini Sheet Cake moist, use both applesauce and oil. Applesauce adds moisture without extra fat. It gives a sweet taste and keeps the cake light. Oil helps keep the cake tender. Use half a cup of each. This mix makes your cake deliciously soft and moist. When you mix your batter, stop when it looks combined. Lumps are okay! Overmixing makes the cake tough. You want a light, airy texture. Just stir until no dry flour shows. Enjoy the small lumps; they will bake out and keep your cake fluffy. The baking time is key to a perfect cake. Use the toothpick test to check for doneness. Insert a toothpick into the center of the cake. If it comes out clean, your cake is ready. If it has wet batter on it, bake a few more minutes. Keep an eye on it so you don’t overbake. A perfectly baked cake is moist and soft. Try these tips for a delightful result! For the complete recipe, check the Full Recipe. {{image_2}} You can enhance your Lemon Zucchini Sheet Cake with fun add-ins. Consider adding nuts for crunch. Chopped walnuts or pecans work great. They add texture and a nutty flavor. If you love chocolate, mix in some chocolate chips. The sweet chocolate pairs well with the tangy lemon. You can also try adding dried fruits like raisins or cranberries. These will give your cake a chewy surprise. When it comes to frosting, you have choices. A lemon glaze is light and fresh. It adds a burst of flavor that complements the cake. To make it, mix powdered sugar with lemon juice until smooth. Drizzle it over the cooled cake for a sweet touch. On the other hand, cream cheese frosting gives a rich, creamy finish. It balances the tartness of the lemon. If you prefer a thicker layer, go for the cream cheese option. Both choices make your cake even more delightful. Want to make this cake gluten-free? It's easy! Substitute all-purpose flour with a gluten-free blend. Look for a mix that includes xanthan gum for better texture. Almond flour can also be a great option. Just note that it may change the taste slightly. You might need to adjust the baking time. Keep an eye on it while it bakes. With these swaps, everyone can enjoy this tasty cake! For the complete steps, check the Full Recipe. To keep your Lemon Zucchini Sheet Cake fresh, store it in the fridge. Place the cake in an airtight container. If you don't have one, wrap it tightly in plastic wrap. This helps prevent the cake from drying out. Remember to wait until it cools completely before storing it. Chilling the cake also helps it stay moist longer. To freeze your cake, first, let it cool down. Cut it into squares or leave it whole. Wrap each piece in plastic wrap, then in aluminum foil. This double wrap prevents freezer burn. Place the wrapped cake in a freezer-safe bag or container. When you're ready to enjoy it, take it out and let it thaw in the fridge overnight. This method keeps the cake soft and tasty. Your Lemon Zucchini Sheet Cake can last up to a week in the fridge. If stored correctly in the freezer, it can last for about three months. Always check for signs of spoilage, like off smells or mold. If it looks good and smells fine, it should be safe to eat! Yes, you can make this cake dairy-free! Here are some easy swaps: - Use almond milk or soy milk instead of any dairy milk. - Replace any butter with coconut oil or a dairy-free butter. - Ensure your applesauce is unsweetened and dairy-free. These swaps keep the cake moist and tasty. To check if your cake is done, look for these signs: - A toothpick inserted in the center comes out clean. - The edges of the cake pull away from the pan slightly. - The top feels firm and springs back when touched. These signs help ensure perfect baking every time. If you can't find zucchini, try these alternatives: - Grated carrots add sweetness and moisture. - Use finely shredded summer squash for a similar texture. - Apples can work well, adding a fruity flavor. These options can add fun twists to your cake! This blog post walks you through the steps to make a delicious Lemon Zucchini Sheet Cake. You learned about the must-have ingredients and some optional ones to add zest. I shared tips to keep your cake moist and avoid overmixing. You can even try variations, like adding nuts or going gluten-free. Baking should be fun and easy. Now, gather your ingredients and get started! Enjoy your baking adventure and make this cake shine!](https://dailydishlab.com/wp-content/uploads/2025/07/f8d12cbe-606d-4e9f-b3a7-8aa2f948db73-768x768.webp)