
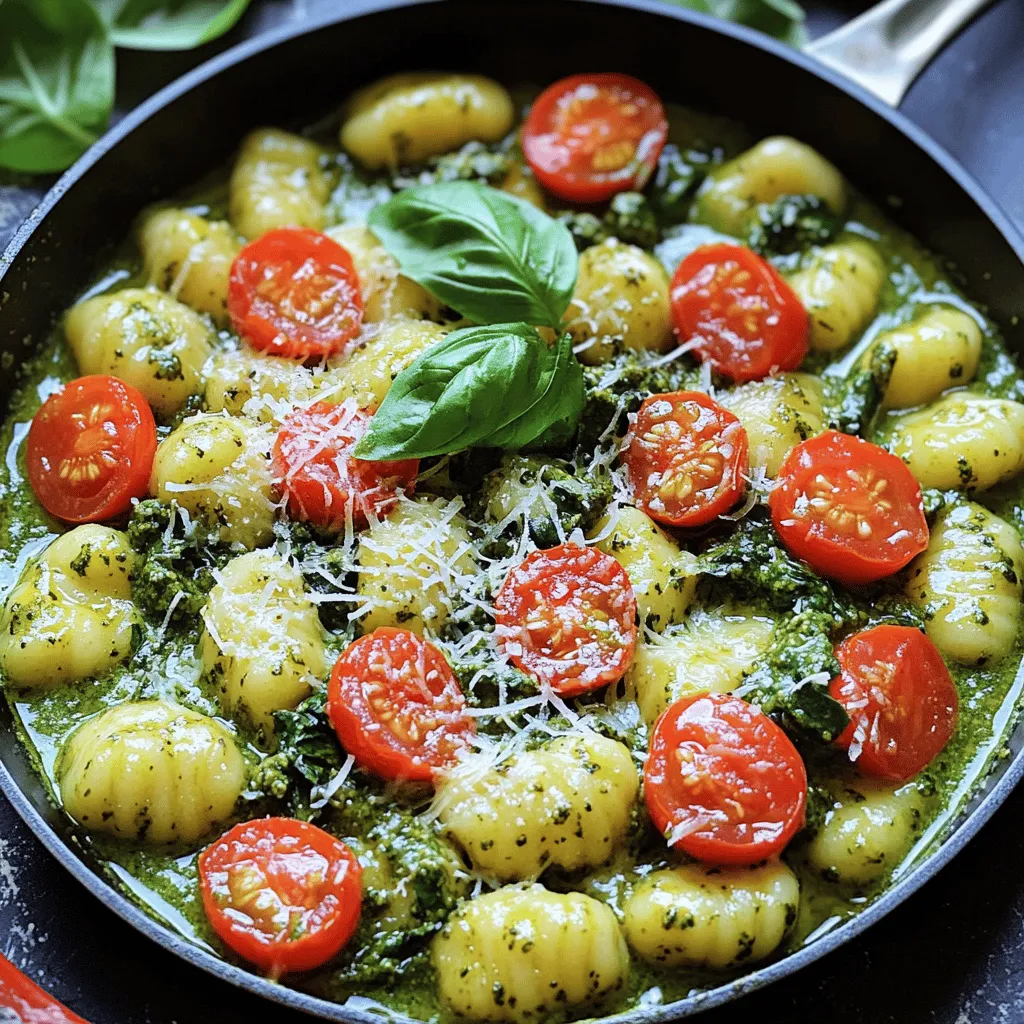
Creamy Pesto Gnocchi Skillet Flavorful Dinner Treat

Are you ready to impress dinner guests with a delicious dish? This Creamy Pesto Gnocchi Skillet is the key! With just a few simple ingredients, this one-pan meal bursts with flavor and comfort. I’ll guide you through each step, ensuring your gnocchi turns out perfectly. Let’s dive into this easy recipe and discover how to transform a busy weeknight into a delightful culinary experience!
Why I Love This Recipe
- Quick and Easy: This creamy pesto gnocchi skillet comes together in just 30 minutes, making it perfect for a busy weeknight dinner.
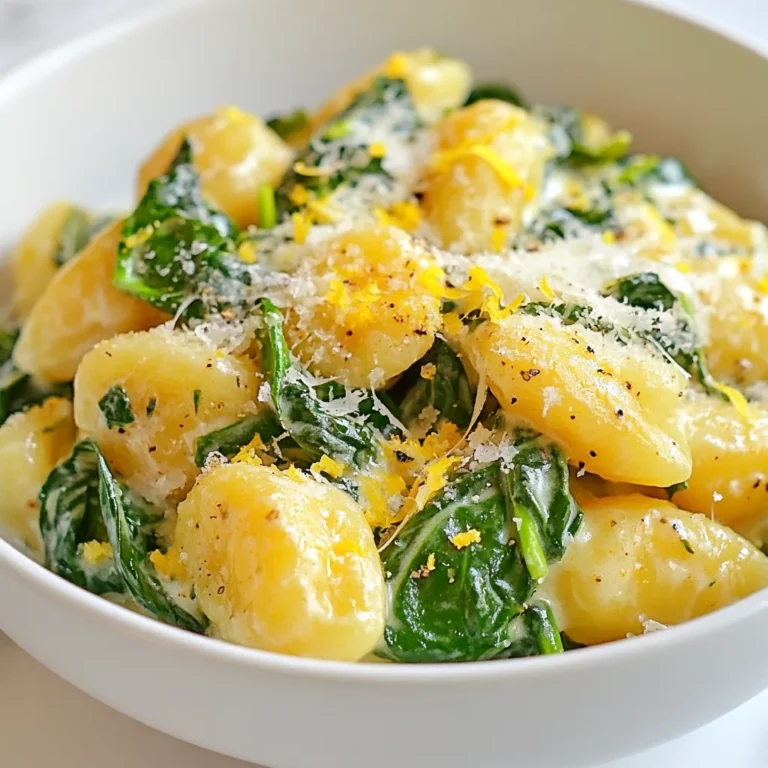
- Rich Flavors: The combination of fresh basil pesto, heavy cream, and Parmesan cheese creates a luxurious sauce that coats the gnocchi beautifully.
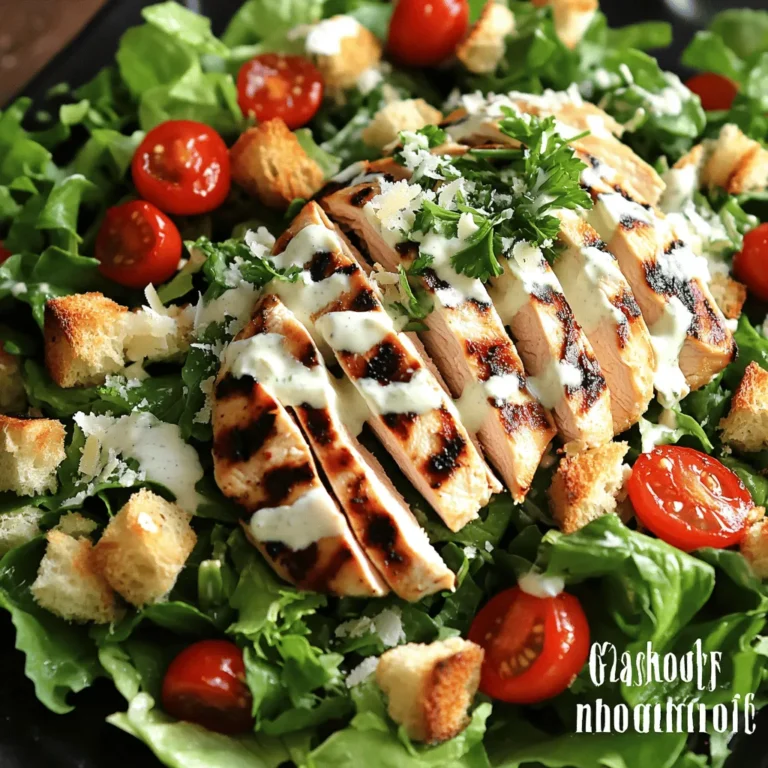
- Colorful Ingredients: With vibrant cherry tomatoes and fresh spinach, this dish is not only delicious but also visually appealing.
- Versatile and Customizable: You can easily add your favorite proteins or vegetables to make this dish your own!
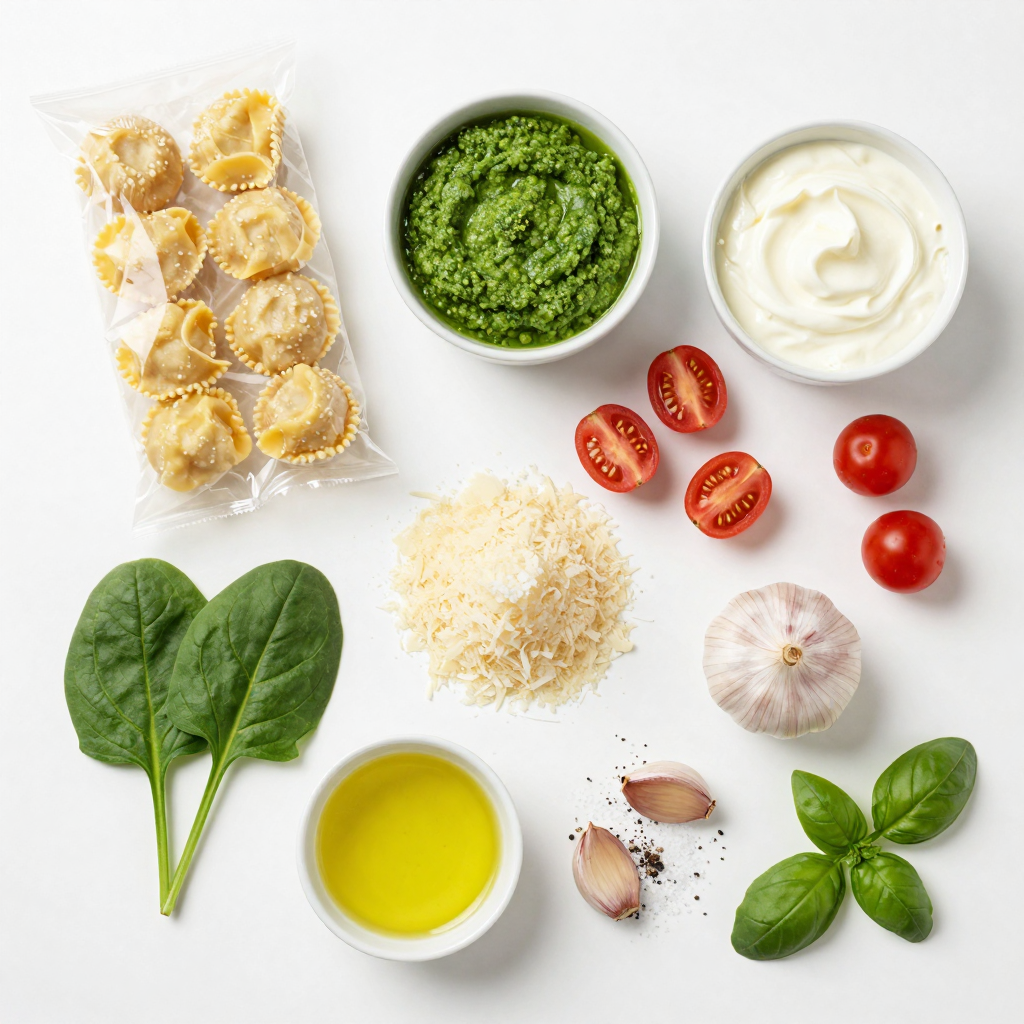
Ingredients
Main Ingredients
- 1 package (16 oz) gnocchi (fresh or frozen)
- 1 cup fresh basil pesto
- 1 cup heavy cream
The heart of this creamy pesto gnocchi skillet lies in its main ingredients. Gnocchi brings a soft, pillowy texture that pairs perfectly with the creamy sauce. You can choose fresh or frozen gnocchi based on what you have. Basil pesto adds a bright, herby flavor that shines through in every bite. Heavy cream gives the dish its luscious, rich texture that elevates the meal.
Additional Ingredients
- 1 cup cherry tomatoes, halved
- 1 cup spinach, fresh
- 1/2 cup grated Parmesan cheese
Cherry tomatoes add a burst of sweetness and color to your skillet. Their juicy nature balances the creaminess nicely. Fresh spinach brings a vibrant pop of green and nutrients. Grated Parmesan cheese melts into the dish, enhancing the flavor with a salty richness.
Pantry Staples
- 2 tablespoons olive oil
- 2 cloves garlic, minced
- Salt and pepper, to taste
You’ll need some pantry staples to complete this recipe. Olive oil adds a rich base for sautéing. Garlic gives off a strong, inviting aroma as it cooks. Season with salt and pepper to boost all the flavors. These simple ingredients make a big impact in your creamy pesto gnocchi skillet.
Step-by-Step Instructions
Preparing the Ingredients
- Cooking the gnocchi: Start by boiling water in a large pot. Add a pinch of salt. Once boiling, add the gnocchi. Cook until they float, which takes about 2-3 minutes. Drain and set aside. This step ensures the gnocchi is soft and ready to soak in the sauce.
- Sautéing the garlic: In a large skillet, heat two tablespoons of olive oil over medium heat. Add two minced garlic cloves. Sauté for about one minute. You want it fragrant, not browned. This adds a lovely flavor to the dish.
Building the Dish
- Cooking the cherry tomatoes: Next, add one cup of halved cherry tomatoes to the skillet. Cook for about 3-4 minutes. They should start to soften and release their juices. This makes the sauce bright and fresh.
- Adding spinach and cream: Once the tomatoes are soft, toss in one cup of fresh spinach. Sauté until it wilts, around 2-3 minutes. Then pour in one cup of heavy cream and bring it to a simmer. Stir continuously. This creates the creamy base for your gnocchi.
Combining and Serving
- Mixing in pesto and cheese: After the cream is simmering, stir in one cup of basil pesto. Mix until everything is well combined and heated through. Then add the cooked gnocchi. Toss gently to coat them in the creamy pesto sauce.
- Final seasoning and garnishing: Finally, mix in half a cup of grated Parmesan cheese. Season with salt and pepper to taste. Cook for another 1-2 minutes until everything is nice and hot. Garnish with fresh basil leaves before serving. Enjoy your delicious creamy pesto gnocchi skillet!
Pro Tips
- Use Fresh Ingredients: Opt for fresh basil pesto and ripe cherry tomatoes to enhance the flavor profile of your dish.
- Gnocchi Cooking Tip: Ensure you don’t overcook the gnocchi; they should float to the top of the boiling water, indicating they are done.
- Adjust Creaminess: For a lighter version, you can substitute half of the heavy cream with chicken or vegetable broth.
- Add Protein: For a heartier meal, consider adding grilled chicken or shrimp to the skillet along with the gnocchi.
Tips & Tricks
Cooking Tips
- How to perfectly cook gnocchi
To cook gnocchi just right, bring a pot of salted water to a boil. Add the gnocchi and wait until they float, which takes about 2-3 minutes. This means they are done! Drain them and set aside. Perfect gnocchi should be soft and slightly chewy.
- Sautéing garlic without burning
When sautéing garlic, use medium heat. Add minced garlic to the olive oil and stir often. It should cook for about one minute. If it turns brown, it may taste bitter. Keep an eye on it to get that sweet, fragrant flavor.
Flavor Enhancements
- Adding spices or herbs
You can boost flavor by adding a pinch of red pepper flakes for heat or a sprinkle of Italian seasoning. Fresh herbs, like thyme or oregano, can also add great taste. Feel free to experiment!
- Recommended serving suggestions
Serve your creamy pesto gnocchi with a simple green salad or some crusty bread. A glass of white wine pairs nicely too. Fresh basil leaves on top add a nice touch!
Common Mistakes to Avoid
- Overcooking vegetables
Don’t let your cherry tomatoes or spinach cook too long. You want them soft but still bright and fresh. Overcooked veggies lose their flavor and nutrients.
- Using the wrong type of cheese
Always choose fresh grated Parmesan cheese. Pre-grated cheese often has additives that affect taste and texture. Fresh cheese melts better and gives a richer flavor to your dish.
Variations
Ingredient Substitutions
You can swap out some ingredients for fun twists. Instead of spinach, try kale or arugula. These greens add a nice crunch and flavor. You can also use zucchini or bell peppers for more color. If you want a dairy-free meal, use coconut cream or cashew cream instead of heavy cream. This keeps it rich while being dairy-free.
Protein Add-Ins
Want to add protein? Chicken and shrimp work great. Cook them in the skillet before adding the other ingredients. For a vegetarian option, use chickpeas or lentils. They add protein and fiber, making your meal hearty and filling.
Sauce Alternatives
Homemade pesto tastes amazing in this dish. You can make it with fresh herbs, nuts, and olive oil. If you prefer a lighter sauce, try using yogurt instead of cream. It gives a nice tangy flavor while keeping the dish creamy.
Storage Info
Refrigeration Guidelines
After enjoying your creamy pesto gnocchi skillet, let it cool down. Store leftovers in an airtight container. This keeps the dish fresh and tasty. In the fridge, it lasts for about three days. If you notice any off smells or changes in texture, it’s best to toss it.
Freezing Instructions
You can freeze the gnocchi skillet for later meals. First, let it cool completely. Then, transfer it to a freezer-safe container. Make sure to leave some space for expansion. It will stay good for about two months. To reheat, let it thaw overnight in the fridge. Then, warm it up on the stove over low heat. Add a splash of cream to bring back the creaminess.
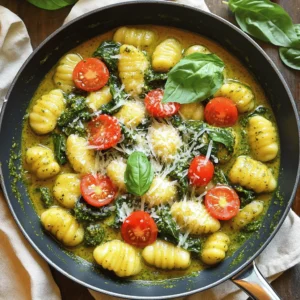
Serving Suggestions
Reheat your creamy pesto gnocchi skillet on the stove for the best results. You can add a bit of water or cream while warming. This keeps it moist and delicious. Serve it with a fresh salad or warm bread. Pairing with a light, crisp salad enhances the meal. A slice of garlic bread also makes a great companion.
FAQs
What is gnocchi?
Gnocchi is a type of pasta made from potatoes. It has a soft, chewy texture. You can find gnocchi fresh or frozen at the store. Each piece is small and round, making it fun to eat. Gnocchi pairs well with many sauces. In this recipe, it absorbs the rich creamy pesto sauce perfectly.
Can I make this dish vegan?
Yes, you can make this dish vegan! Use plant-based cream instead of heavy cream. There are great options like coconut cream or cashew cream. For cheese, try nutritional yeast for a cheesy flavor. Swap out the Parmesan with a vegan cheese brand. This keeps the dish creamy and delicious without dairy.
How can I make the dish spicier?
To add spice, try red pepper flakes. A pinch adds nice heat. You can also add sriracha or hot sauce for a kick. If you like jalapeños, chop them finely and mix them in. These options will bring a fun twist to the creamy pesto gnocchi.
This dish combines fresh gnocchi, creamy pesto, and colorful veggies for a tasty meal. You learned how to prepare the ingredients, build the dish, and avoid common mistakes. Remember to adjust flavors, use alternative ingredients, and practice good storage habits. Cooking can be fun and easy with the right tips. Try different variations to keep it exciting. You’ll impress your family and friends with this delightful meal. Enjoy your cooking journey!
Creamy Pesto Gnocchi Skillet
Ingredients
1 package (16 oz) gnocchi (fresh or frozen)
1 cup fresh basil pesto
1 cup heavy cream
1 cup cherry tomatoes, halved
1 cup spinach, fresh
1/2 cup grated Parmesan cheese
2 tablespoons olive oil
2 cloves garlic, minced
Salt and pepper, to taste
Fresh basil leaves, for garnish
Instructions
In a large skillet, heat olive oil over medium heat. Add the minced garlic and sauté for about 1 minute, until fragrant.
Cook the gnocchi according to package instructions until they float, then drain and set aside.
In the same skillet, add the halved cherry tomatoes and cook for 3-4 minutes until they start to soften.
Add the fresh spinach and sauté until wilted, about 2-3 minutes.
Pour in the heavy cream and bring to a simmer, stirring continuously.
Stir in the basil pesto, and mix until well combined and heated through.
Add the cooked gnocchi to the skillet and toss to coat in the creamy pesto sauce.
Mix in the grated Parmesan cheese, and season with salt and pepper to taste.
Cook for an additional 1-2 minutes until everything is heated through.
Serve hot, garnished with fresh basil leaves.
Prep Time: 10 min | Total Time: 30 min | Servings: 4
Creamy Pesto Gnocchi Skillet
Ingredients
- 16 oz gnocchi (fresh or frozen)
- 1 cup fresh basil pesto
- 1 cup heavy cream
- 1 cup cherry tomatoes, halved
- 1 cup fresh spinach
- 0.5 cup grated Parmesan cheese
- 2 tablespoons olive oil
- 2 cloves garlic, minced
- to taste salt and pepper
- for garnish fresh basil leaves
Instructions
- In a large skillet, heat olive oil over medium heat. Add the minced garlic and sauté for about 1 minute, until fragrant.
- Cook the gnocchi according to package instructions until they float, then drain and set aside.
- In the same skillet, add the halved cherry tomatoes and cook for 3-4 minutes until they start to soften.
- Add the fresh spinach and sauté until wilted, about 2-3 minutes.
- Pour in the heavy cream and bring to a simmer, stirring continuously.
- Stir in the basil pesto, and mix until well combined and heated through.
- Add the cooked gnocchi to the skillet and toss to coat in the creamy pesto sauce.
- Mix in the grated Parmesan cheese, and season with salt and pepper to taste.
- Cook for an additional 1-2 minutes until everything is heated through.
- Serve hot, garnished with fresh basil leaves.
![To make Easy Chicken and Dumplings, gather these key ingredients: - 1 lb (450g) boneless chicken thighs, diced - 4 cups chicken broth - 1 medium onion, chopped - 2 cloves garlic, minced - 2 cups carrots, sliced - 1 cup celery, chopped - 1 tsp dried thyme - 1 tsp dried rosemary - Salt and pepper to taste - 1 cup all-purpose flour - 2 tsp baking powder - 1/2 tsp salt - 1/2 cup milk - 2 tbsp butter, melted - Fresh parsley, chopped (for garnish) These ingredients combine to create a warm and filling dish. The chicken provides protein, while the veggies add flavor and color. The broth forms a rich base, and the dumplings offer a fluffy texture. You can add your own twist to this dish with these optional ingredients: - Frozen peas for extra sweetness - Corn for a pop of color - Different herbs like oregano or basil - A splash of cream for a richer broth Feel free to mix and match these to suit your taste. Personalizing your dish can make it even more special. To make this recipe, you will need: - A large pot for cooking - A cutting board and knife for chopping - A mixing bowl for the dough - A whisk for mixing dry ingredients - A spoon for dropping dumplings Using the right tools keeps your cooking smooth and easy. Having everything ready helps you enjoy the process more. For the full recipe, check out the detailed instructions that follow! Start by heating a bit of olive oil in a large pot over medium heat. Add 1 lb of diced boneless chicken thighs. Sauté the chicken until it turns golden brown, which takes about 5 to 7 minutes. Once done, remove the chicken and set it aside. In the same pot, toss in 1 medium chopped onion, 2 minced garlic cloves, 2 cups of sliced carrots, and 1 cup of chopped celery. Sauté these veggies for 5 to 6 minutes, until they soften. This step builds a great flavor base. In a mixing bowl, combine 1 cup of all-purpose flour, 2 teaspoons of baking powder, and 1/2 teaspoon of salt. Mix well. Create a well in the center of the dry mix. Pour in 1/2 cup of milk and 2 tablespoons of melted butter. Stir until the mixture just combines into a dough. Be careful not to overmix; it should remain a bit lumpy for fluffy dumplings. Return the cooked chicken to the pot with the sautéed veggies. Pour in 4 cups of chicken broth and add 1 teaspoon each of dried thyme and dried rosemary. Season with salt and pepper to your taste. Bring this mixture to a gentle simmer. Once simmering, drop spoonfuls of the dumpling dough into the pot. Cover the pot with a lid and let the dumplings cook for about 15 to 20 minutes. This steaming process makes them rise and become fluffy. After cooking, taste and adjust the seasoning if needed. Serve hot, garnished with fresh parsley for a touch of color. For the full recipe, check [Full Recipe]. To make fluffy dumplings, use the right ratio of flour and liquid. The dough should be soft, not too dry or runny. Mix gently; over-mixing leads to tough dumplings. Drop spoonfuls of the dough onto the simmering broth. Cover the pot and let them steam. This helps them rise and stay fluffy. One common mistake is cooking the dumplings uncovered. This can make them dense. Another mistake is using old baking powder. Always check the expiration date for the best rise. Be careful not to stir the dumplings while they cook. Agitation can break them apart and ruin their fluffy texture. To make your dish pop, add fresh herbs like parsley or thyme at the end. A squeeze of lemon juice brightens the flavors. For deeper flavor, sauté the vegetables longer until they caramelize. You can also add a splash of cream for a richer broth. These tips make your chicken and dumplings even more comforting. For the full recipe, check out the recipe section above. {{image_2}} You can make easy chicken and dumplings even creamier. To do this, add 1 cup of heavy cream or half-and-half to the chicken broth. This change gives the dish a rich texture. You can also use a can of cream of chicken soup. It adds creaminess and flavor with little effort. For a fun twist, try using different types of meat like turkey or even a mix of chicken and sausage. If you want a lighter meal, swap chicken thighs for chicken breasts. This reduces fat and calories. You can also use low-sodium chicken broth. For a gluten-free version, replace all-purpose flour with a gluten-free baking mix. Just be sure to check the mix for baking powder. Lastly, you can add more vegetables like peas or spinach for extra nutrients. You can boost the taste of your chicken and dumplings with spices. Add paprika for a smoky flavor or cayenne for some heat. Fresh herbs like parsley, dill, or chives can brighten the dish. You can mix in a squeeze of lemon juice for a fresh zing. Don’t forget to taste as you go! Adjust the seasoning to make it just right for you. These variations make it easy to customize this dish. You can check the Full Recipe for more ideas and tips! To keep your chicken and dumplings fresh, let them cool first. Use an airtight container for storage. This helps keep moisture in and prevents drying out. Store them in the fridge for up to three days. Label the container with the date to track how long it's been there. When ready to eat your leftovers, use a pot for reheating. Add a splash of broth or water to keep the dish moist. Heat on low to medium heat, stirring gently. This helps prevent the dumplings from breaking apart. You can also use the microwave, but stir halfway through for even heating. You can freeze chicken and dumplings for later. Place them in a freezer-safe container or bag. Remove as much air as possible to prevent freezer burn. They can last up to three months in the freezer. To reheat, thaw overnight in the fridge before warming on the stove. This keeps the texture nice and fluffy. For the full recipe, check the main article. I recommend using boneless chicken thighs for chicken and dumplings. They stay juicy and tender during cooking. Thighs also add rich flavor to the dish. If you prefer, you can use boneless chicken breasts. Just keep in mind that they can dry out more easily. Yes, you can use frozen vegetables! Frozen veggies are a great time-saver. They cook quickly and still add good taste. If using frozen carrots or peas, add them to the pot for the last few minutes of cooking. This way, they stay bright and flavorful. Dumplings need about 15 to 20 minutes to cook. Cover the pot with a lid during this time. This helps them steam and rise properly. You’ll know they are done when they puff up and feel firm to the touch. Enjoy the fluffy goodness! For the full recipe, check out the [Full Recipe]. You have all you need to create easy chicken and dumplings. The key ingredients set a strong base. You can customize flavors with optional ingredients and cool spices. Following the step-by-step process ensures a warm and comforting meal. Remember to learn from tips to avoid mistakes and make your dumplings fluffy. Store any leftovers properly and enjoy them later. This dish can change with simple variations, making it a staple in your kitchen. Now, get cooking and share this delightful meal with family.](https://dailydishlab.com/wp-content/uploads/2025/06/21507376-38c9-4f66-b35b-162bfb5424ce-768x768.webp)
![- 1 pound ziti pasta - 2 tablespoons olive oil - 1 onion, finely chopped - 3 cloves garlic, minced - 1 pound ground beef (or plant-based ground meat) - 1 jar (24 ounces) marinara sauce - 1 can (15 ounces) ricotta cheese - 1 egg - 2 cups shredded mozzarella cheese - 1 cup grated Parmesan cheese - 1 teaspoon Italian seasoning - Salt and pepper to taste - Fresh basil leaves for garnish (optional) For baked ziti, the ingredients are simple but full of flavor. First, you need ziti pasta as your base. I prefer the traditional ziti shape, but penne can work too. Olive oil adds richness and helps in cooking the onion and garlic. Next, the onion and garlic create a savory base for the meat sauce. You can choose ground beef for a classic taste, or use a plant-based option for a lighter meal. Marinara sauce brings the dish together, adding moisture and flavor. Ricotta cheese is a must. It adds creaminess. Mixing it with an egg binds everything together and gives a smooth texture. Mozzarella and Parmesan are essential for that cheesy top that makes baked ziti so appealing. Finally, season with Italian herbs, salt, and pepper. Fresh basil as a garnish adds a pop of color and flavor. If you want the full recipe, just check the section titled Full Recipe. 1. Preheat your oven to 375°F (190°C). This makes sure your dish cooks evenly. 2. Cook the ziti pasta according to package instructions until al dente. Drain the pasta and set it aside. Al dente means it should be firm but not hard. This helps keep the pasta from getting mushy later. 1. In a large skillet, heat the olive oil over medium heat. 2. Add the chopped onion and minced garlic. Sauté them until the onion turns translucent. This step builds flavor and aroma. 3. Next, add the ground beef to the skillet. Cook it until it is browned, breaking it apart with a spatula as it cooks. If there’s extra fat, drain it out. 4. Stir in the marinara sauce and Italian seasoning. Let the sauce simmer for about 5 minutes. This allows the flavors to mingle. Remove it from heat when done. 1. In a large mixing bowl, combine the cooked ziti with the meat sauce. Stir well to coat all the pasta with the sauce. 2. To assemble, spread half of the ziti mixture into a greased 9x13 inch baking dish. 3. Dollop half of the ricotta mixture over the pasta, spreading it gently. 4. Sprinkle half of the shredded mozzarella cheese on top. 5. Add the remaining ziti mixture on top, then dollop with the remaining ricotta. 6. Finally, sprinkle the rest of the mozzarella and Parmesan cheese over everything. 7. Cover the baking dish with aluminum foil and bake for 25 minutes. 8. Remove the foil and bake for an additional 15-20 minutes. Look for bubbly and golden brown cheese. 9. Let the baked ziti cool for about 10 minutes before serving. If you like, garnish with fresh basil leaves for a nice touch. For the full recipe, check out the detailed ingredient list above. Enjoy your delicious, comforting meal! How to avoid overcooked pasta To keep your pasta just right, cook the ziti for 2 minutes less than the package says. This way, the pasta stays firm after baking. Remember, it will cook more in the oven, so don't overdo it! Browning the cheese for extra flavor For a rich taste, broil the dish for the last few minutes. This gives the cheese a nice brown color and a crunchy bite. Just watch it closely so it doesn’t burn. Recommended herbs and spices Add freshness with basil or oregano. A pinch of red pepper flakes can give it a nice kick! Mix these in your meat sauce for a burst of flavor. Suggested cheese alternatives If you want to change things up, try goat cheese or feta instead of ricotta. They add a tangy twist. For mozzarella, fresh mozzarella balls can create a creamy texture and taste. Best sides to accompany baked ziti Serve your baked ziti with a simple green salad. A side of garlic bread goes great too! The crunch and flavors balance the creamy pasta. Pairing with wines and salads A light red wine, like Chianti, pairs well with baked ziti. If you prefer white, a crisp Pinot Grigio is also nice. For salads, a Caesar or caprese salad adds freshness to your meal. For the complete process, check the [Full Recipe]. {{image_2}} If you want a meatless option, try plant-based ground meat. This makes the dish lighter but still tasty. You can use lentils or mushrooms for a hearty feel. If you prefer, you can simply omit the meat. This gives you a delicious vegetarian baked ziti. You still get great flavor from the sauce and cheese. Cheese makes baked ziti special. Using fresh mozzarella gives a creamy and stretchy texture. Shredded mozzarella melts well, too. You can mix both types for extra flavor. Ricotta adds a nice creaminess. Try different ricotta brands or even mix in some herbs for added taste. You can make it your own with these cheese choices. Adding vegetables can boost flavor and nutrition. Spinach, zucchini, or bell peppers are great choices. Just chop them small so they blend well. Sauté them with the onion and garlic to enhance their taste. When adding veggies, balance is key. Use them with the right amount of sauce and cheese. This way, every bite stays flavorful. For more details, check the Full Recipe. To keep baked ziti fresh, cool it first. Then, place it in an airtight container. Glass or plastic containers work well for refrigeration. Make sure to seal the lid tightly to lock in moisture. When you reheat baked ziti, avoid the microwave if you can. Instead, use an oven set to 350°F (175°C). Cover it with foil to keep moisture in. Heat for about 20 minutes. If you want to freeze leftovers, let the ziti cool completely. Place it in freezer-safe containers, leaving space for expansion. Baked ziti lasts about 3 to 5 days in the fridge. If you freeze it, it can last up to 3 months. To ensure best flavor and texture, wrap it well before freezing. How long do I bake baked ziti? I bake baked ziti for about 40 to 45 minutes. First, cover it with foil and bake for 25 minutes. Then, remove the foil and bake for another 15 to 20 minutes. This method helps the cheese get nice and bubbly. Can I prepare baked ziti ahead of time? Yes, you can prepare baked ziti ahead of time. Assemble it the day before and keep it in the fridge. Just make sure to cover it well. Bake it the next day, adding a few extra minutes if it’s cold from the fridge. Gluten-free options for ziti To make a gluten-free baked ziti, use gluten-free ziti pasta. There are many brands available that taste great. Just check the package for cooking directions, as they may vary from regular pasta. Low-carb alternatives For a low-carb version, swap the ziti for spiralized zucchini or cauliflower rice. Both options are tasty and keep the dish light. Just be sure to adjust cooking times as needed. Can I replace ricotta cheese? Yes, you can replace ricotta cheese with cottage cheese or cream cheese. Both give a nice creamy texture. If you want to keep it dairy-free, use tofu blended with a little lemon juice. What to use instead of marinara sauce? If you don’t have marinara sauce, try using a homemade tomato sauce or even pesto. Both options add unique flavors to the dish. Just make sure to season them well for the best taste. [Full Recipe] Baked ziti is a classic dish that brings warmth and joy. It combines pasta, meat, and cheese into one tasty meal. Let me share how to make this comforting dish. - 1 pound ziti pasta - 2 tablespoons olive oil - 1 onion, finely chopped - 3 cloves garlic, minced - 1 pound ground beef (or plant-based ground meat) - 1 jar (24 ounces) marinara sauce - 1 can (15 ounces) ricotta cheese - 1 egg - 2 cups shredded mozzarella cheese - 1 cup grated Parmesan cheese - 1 teaspoon Italian seasoning - Salt and pepper to taste - Fresh basil leaves for garnish (optional) 1. Preheat your oven to 375°F (190°C). This ensures even cooking. 2. Cook the ziti pasta until it is al dente. Drain and set it aside. You want it firm so it holds up in the oven. 3. Heat olive oil in a large skillet over medium heat. Add the chopped onion and garlic. Cook until the onion is soft. 4. Add the ground beef to the skillet. Cook until it turns brown. Break it into small pieces as it cooks. Drain any extra fat if needed. 5. Stir in the marinara sauce and Italian seasoning. Let it simmer for about 5 minutes. This helps blend the flavors. 6. In a bowl, mix the ricotta cheese, egg, salt, and pepper. Stir until smooth. This will give creamy layers. 7. In another large bowl, combine the cooked ziti with the meat sauce. Mix well. Make sure every piece of pasta is coated. 8. Spread half of the ziti mixture into a greased baking dish. Add half of the ricotta mixture on top and sprinkle half of the mozzarella cheese. 9. Layer the rest of the ziti mixture on top. Add the remaining ricotta and sprinkle the rest of the mozzarella and Parmesan cheese. 10. Cover the dish with foil and bake for 25 minutes. This keeps it moist while cooking. 11. Remove the foil and bake for another 15-20 minutes. Look for bubbly and golden cheese on top. 12. Let it cool for about 10 minutes before serving. Garnish with fresh basil leaves if you like. With this recipe, you will create a dish that comforts and delights. Enjoy every cheesy bite! Baked ziti is a hearty dish made with simple ingredients. We covered the essential components, from pasta and sauce to cheese. I shared easy steps for cooking and assembling, plus tips for perfecting your meal. Remember, you can customize baked ziti with proteins and veggies to fit your taste. Don't forget about storage and reheating guidelines for leftovers. Enjoy this dish with friends and family, making each bite memorable!](https://dailydishlab.com/wp-content/uploads/2025/06/2fce1db0-3740-4cc6-8e4e-0aee4d2c952d-768x768.webp)
. 1. First, preheat your oven to 400°F (200°C). This helps the meatballs cook evenly. 2. Next, line a baking sheet with parchment paper. This makes for easy cleanup later. 3. In a large bowl, combine the ground turkey, breadcrumbs, grated Parmesan, minced garlic, grated ginger, egg, black pepper, and salt. Mix gently until everything is just combined. 4. Using your hands, form the mixture into meatballs. Aim for about 1 to 1.5 inches in diameter. Place them on the prepared baking sheet. 1. In a small bowl, whisk together the honey, soy sauce, and sesame oil. This will be your tasty honey garlic sauce. 2. Brush or drizzle half of the honey garlic sauce over the meatballs. Ensure each meatball gets a good coat. 1. Now, bake the meatballs in the oven for 15 minutes. This helps them cook through. 2. After 15 minutes, take the meatballs out. Drizzle the remaining honey garlic sauce over them. 3. Return the meatballs to the oven for another 10 minutes. They should be golden brown and fully cooked. 4. Once done, remove the meatballs from the oven. Let them rest for a few minutes. 5. Before serving, garnish with chopped cilantro and sprinkle sesame seeds on top for a nice touch. For the full experience of these flavors, check out the Full Recipe. Enjoy your cooking! Choosing the right ground turkey is key. Use lean ground turkey for juicy meatballs. Look for a blend that is 93% lean or higher. This gives a nice balance of flavor and moisture. Mixing techniques matter too. Use your hands, but don’t overmix. Overmixing can make the meatballs tough. Just mix until all the ingredients hold together. This keeps them light and tender. Ensure even cooking by placing meatballs apart on the baking sheet. This allows heat to flow around each one. You can also turn them halfway through baking for a nice brown color all over. Adjusting sweetness and saltiness can enhance your dish. If you like it sweeter, add more honey. For more salt, increase the soy sauce. Taste as you go to get it just right. Try alternative sauces for a twist. You can use teriyaki sauce for a richer taste. Or mix in some sriracha for a spicy kick. These changes can make the meatballs feel new and exciting. Using gluten-free substitutes is easy. Swap regular soy sauce with tamari. This keeps all the great flavor while making it gluten-free. Plus, you can use gluten-free breadcrumbs for the same tasty meatballs. For the full recipe, check the earlier section of this article. {{image_2}} You can easily swap turkey for other meats. Chicken and beef work well in this recipe. They both give great flavor. Just keep the cooking times in mind. If you want a vegetarian option, try plant-based meatballs. They are tasty and healthy. Use lentils or chickpeas as the base. You can also find many brands ready to cook. Experiment with herbs for different flavors. Add basil, parsley, or oregano to mix it up. Each herb brings a new taste to the dish. The air fryer is a quick way to cook these meatballs. Set it to 375°F (190°C). Cook for about 12 minutes, turning halfway. This gives them a nice crispy outside. You can also use a slow cooker. Place the meatballs in the cooker and pour the honey garlic sauce over them. Cook on low for 4 hours. The meatballs will be juicy and full of flavor. Grilling adds a smoky taste. Preheat your grill and cook for about 10 minutes. Turn them often to avoid burning. This method gives a nice char and enhances the flavor even more. For the full recipe, check out the complete guide above. Store your leftover honey garlic turkey meatballs in the fridge. Use an airtight container to keep them fresh. They can last for about 3 to 4 days in the refrigerator. When you want to eat them, simply reheat in the microwave or warm them on the stove. You can freeze these meatballs for later use. Let them cool completely after cooking. Place them in a single layer on a baking sheet. Freeze for about an hour until firm. Then, transfer the meatballs to a freezer-safe bag or container. Label the bag with the date. They should stay good for about 3 months. When you want to enjoy them, take out the meatballs and let them thaw in the fridge overnight. For reheating, you can bake them in the oven at 350°F (175°C) for about 15 minutes. This will help them stay juicy and flavorful. For more details and the full recipe, check out the entire guide! How do I know when turkey meatballs are cooked? Turkey meatballs are done when they reach an internal temperature of 165°F (74°C). Use a meat thermometer to check. The outside should also be golden brown for best taste. Can I make honey garlic turkey meatballs ahead of time? Yes, you can prepare the meatballs ahead of time. Shape them and store them in the fridge for up to 24 hours. This saves time on busy days. What can I serve with honey garlic turkey meatballs? These meatballs pair well with jasmine rice, steamed veggies, or a fresh salad. You can also serve them as appetizers with toothpicks. Is this recipe suitable for meal prep? Absolutely! The meatballs store well in airtight containers. They can last in the fridge for 3 to 4 days, making them perfect for meal prep. Can I substitute honey for another sweetener? Yes, you can use maple syrup or agave nectar. They will give a similar sweetness without the honey flavor. How can I make these meatballs spicier? Add red pepper flakes or sriracha to the meatball mix. You can also drizzle hot sauce over the meatballs before serving for an extra kick. In this post, I shared a simple recipe for honey garlic turkey meatballs. We covered the key ingredients, from ground turkey to delicious sauce options. You learned how to prepare, bake, and store your meatballs. With tips on perfecting texture and flavor, plus variations for all diets, you can make this dish your own. Enjoy making these meatballs and impress your family with your cooking skills!](https://dailydishlab.com/wp-content/uploads/2025/07/69b29533-6935-43ed-a652-e91bcda4bd1d-768x768.webp)