Slow Cooker Chipotle Chicken Burrito Bowls Recipe
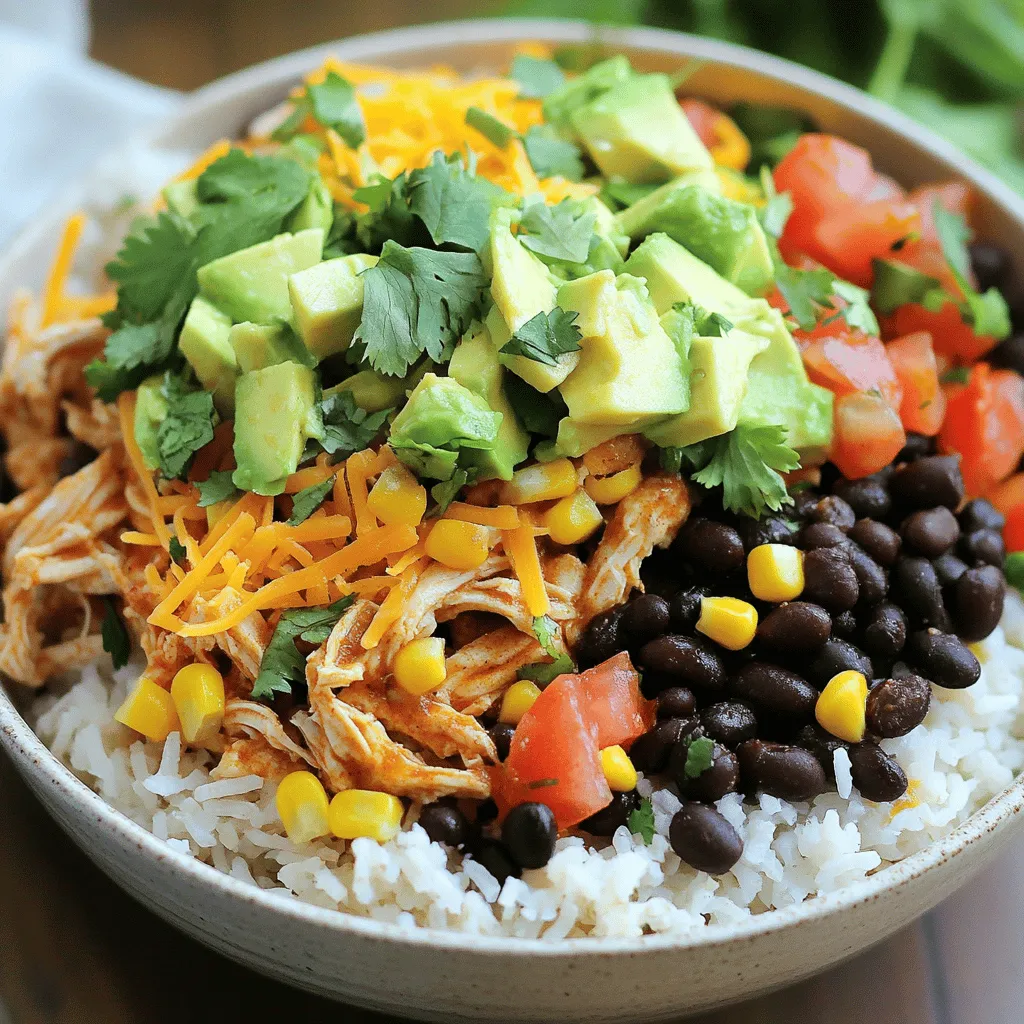
If you crave a hearty, flavorful meal that’s easy to make, you need this Slow Cooker Chipotle Chicken Burrito Bowls recipe. Tender chicken thighs, black beans, and spices come together in a warm blend that bursts with taste. With just a few steps and simple ingredients, you can whip up a crowd-pleaser for your family or a game night feast. Let’s dive into how to transform your dinner routine!
Why I Love This Recipe
- Flavorful and Spicy: This recipe brings a delightful kick to your meal with the perfect balance of chipotle chili powder and spices, making it a favorite for spice lovers.
- Easy Preparation: With minimal prep time, simply layering the ingredients in the slow cooker makes this dish incredibly simple and convenient for busy days.
- Healthy Ingredients: Packed with lean chicken, beans, and vegetables, these burrito bowls are a nutritious option that still feels indulgent.
- Customizable Toppings: Personalize your bowl with an array of toppings like avocado, cilantro, and cheese to suit your taste and make each serving unique.
Ingredients
Main Ingredients List
- 1.5 lbs boneless, skinless chicken thighs
- 1 can (15 oz) black beans, rinsed and drained
- 1 cup corn, frozen or canned
- 1 cup diced tomatoes (canned or fresh)
- 1/2 cup onion, diced
- 2 cloves garlic, minced
Spices and Seasonings
- 2 tablespoons chipotle chili powder
- 1 teaspoon cumin
- 1 teaspoon smoked paprika
- 1/2 teaspoon salt
- 1/4 teaspoon black pepper
Liquid Ingredients
- 1 cup chicken broth
- Juices from 1 lime
Optional Toppings
- Diced avocado
- Fresh cilantro
- Shredded cheese
- Sour cream
This recipe is simple and packed with flavor. First, I use chicken thighs because they stay juicy and tender. I add black beans for protein and fiber. The corn gives a sweet crunch, while the diced tomatoes add freshness. Onions and garlic bring depth to the dish.
For spices, chipotle chili powder gives a smoky heat. Cumin and smoked paprika add warmth and earthiness. Salt and black pepper enhance all the flavors.
The chicken broth adds moisture, and lime juice brightens the dish.
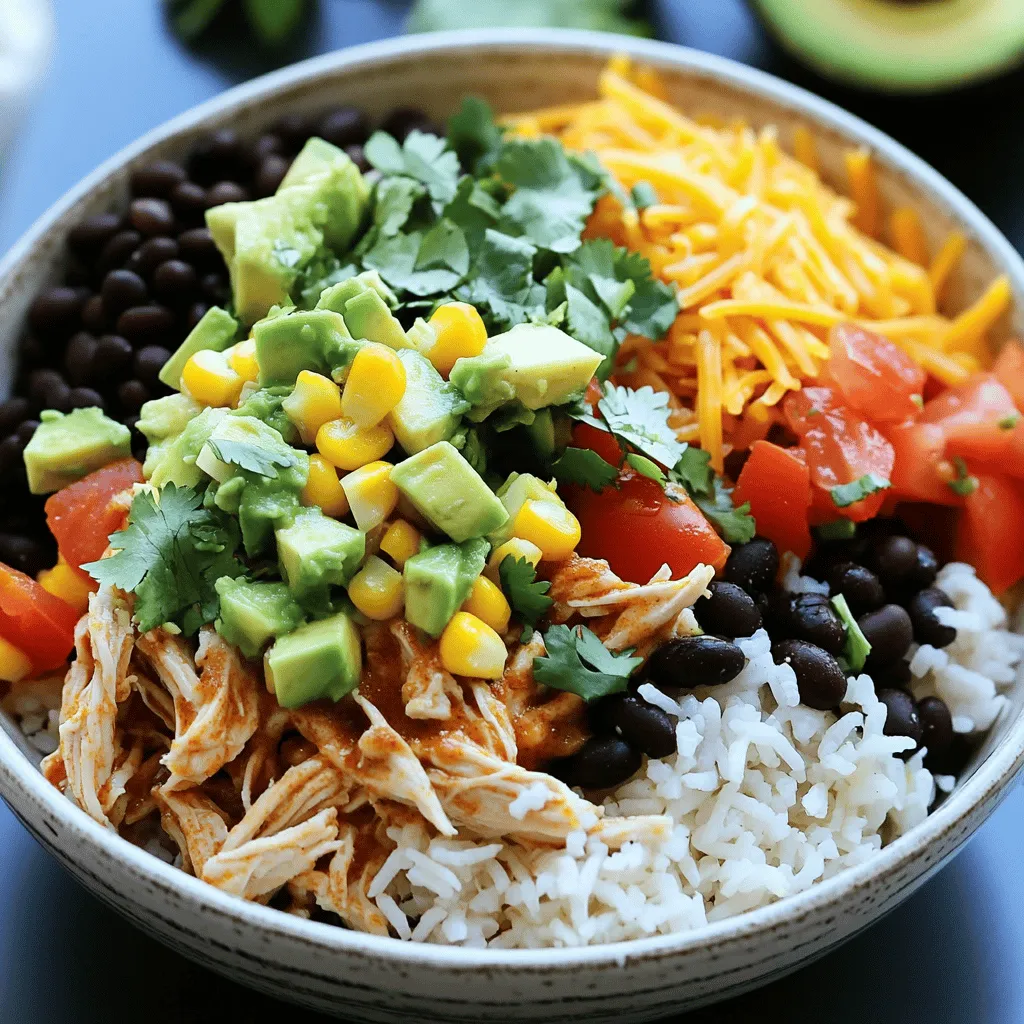
Finally, I love to top my burrito bowls with avocado for creaminess, fresh cilantro for brightness, shredded cheese for richness, and sour cream for tang. You can mix and match these toppings based on your taste.

Step-by-Step Instructions
Preparation Steps
- Prep the chicken: Start by placing the boneless chicken thighs at the bottom of the slow cooker. This helps the chicken soak up all the juices.
- Add vegetables: Layer the rinsed black beans, corn, diced tomatoes, diced onions, and minced garlic over the chicken. This creates a colorful base for your bowl.
Seasoning and Cooking
- Combine spices: In a small bowl, mix the chipotle chili powder, cumin, smoked paprika, salt, and black pepper. This spice blend gives the dish its bold flavor.
- Add liquid: Pour the chicken broth and lime juice over the mixture. This ensures the chicken stays moist as it cooks.
Cooking Process
- Set cooking time: Cover the slow cooker and cook on low for 6 to 8 hours or high for 3 to 4 hours. The chicken should be tender and shred easily when done.
- Shred the chicken: After cooking, use two forks to shred the chicken right in the slow cooker. Mix it with the beans and veggies for even flavor.
Serving
- Prepare rice: Cook the rice according to package instructions. This will serve as a nice bed for your burrito bowl.
- Serve with toppings: Spoon the shredded chicken mixture over the rice. Add your choice of toppings, like diced avocado, fresh cilantro, shredded cheese, and a dollop of sour cream. Enjoy your delicious meal!
Pro Tips
- Use Fresh Ingredients: Using fresh produce for your vegetables will enhance the flavors and make your burrito bowls more vibrant.
- Adjust Spice Level: If you prefer a milder dish, reduce the amount of chipotle chili powder or omit it altogether. You can also add a pinch of sugar to balance the heat.
- Meal Prep Friendly: This recipe is great for meal prep! Make a big batch and store leftovers in individual containers for quick lunches throughout the week.
- Customize Your Toppings: Feel free to get creative with toppings! Try adding pickled jalapeños, corn salsa, or even a drizzle of hot sauce for an extra kick.
Tips & Tricks
Best Practices
- To ensure tender chicken, use boneless, skinless thighs. They remain juicy and flavorful.
- Layer your ingredients properly. Start with the chicken at the bottom. Then add beans, corn, tomatoes, onions, and garlic. This helps the flavors blend well.
Flavor Enhancements
- Want more spice? Add a pinch of cayenne pepper or extra chipotle chili powder.
- For extra flavors, try adding lime zest or fresh herbs like cilantro before serving. They brighten the dish.
Meal Prep Ideas
- Prep your ingredients in advance. Chop veggies and measure spices the night before. This makes cooking easier.
- If you want to make ahead, cook the dish and store it in the fridge. It reheats well in the microwave or on the stove.
Variations
Ingredient Substitutions
You can switch up the protein in this recipe. If you prefer, use turkey or pork. Both work well in these burrito bowls. For a meat-free option, try using tofu or tempeh. They soak up flavors nicely and add good texture.
You can also change the beans or veggies. If black beans are not your favorite, use pinto or kidney beans. You can also add more vegetables. Bell peppers, zucchini, or spinach can boost the nutrition and taste.
Dietary Modifications
To make this dish gluten-free, ensure all your ingredients are certified gluten-free. Most beans and spices fit this bill. Use gluten-free broth to keep it safe.
For vegetarian adaptations, skip the chicken. Replace it with hearty chickpeas or lentils. They will add protein and fiber. Cook them the same way as the chicken, and enjoy a tasty meal.
Flavor Variations
You can mix up the spice blends. Try adding chili powder for more heat or oregano for a fresh twist. If you want it spicier, add diced jalapeños or hot sauce. These add a kick and make your burrito bowl exciting.
Feel free to experiment with different toppings. Besides avocado and cilantro, try pickled onions or sliced radishes. They add color and crunch, making your meal more fun to eat.
Storage Info
Refrigeration
To store leftovers, let the burrito bowls cool. Place them in an airtight container. Keep them in the fridge for up to four days. When ready to eat, check for freshness before reheating.
Freezing
For long-term storage, you can freeze the burrito bowls. Use freezer-safe containers or heavy-duty bags. Make sure to remove as much air as possible. They can last up to three months in the freezer. Label your containers with the date to track freshness.
Reheating Instructions
To reheat, the best method is using the microwave. Place the portion in a microwave-safe bowl. Cover it with a lid or a damp paper towel. Heat for 1-2 minutes, stirring halfway through. You can also reheat on the stovetop over low heat. Add a splash of water or broth to keep it moist. Cook until heated through, stirring often. Enjoy your meal!
FAQs
Common Questions
Can I use chicken breasts instead of thighs?
Yes, you can use chicken breasts. They will cook quickly and may be drier. Chicken thighs offer more flavor and stay moist during cooking.
How do I adjust the recipe for a smaller serving?
To serve fewer people, cut the ingredients in half. Use about 0.75 lbs of chicken and adjust beans and rice accordingly.
Can I make this recipe in an Instant Pot?
Yes, you can! Cook on high pressure for about 10-12 minutes. Make sure to adjust the liquid to keep it moist.
Cooking Queries
Why is my chicken dry?
Chicken can dry out if it cooks too long or at too high a temperature. Always check your slow cooker settings.
What can I serve with burrito bowls?
You can serve burrito bowls with tortilla chips, salsa, or a fresh salad. Add sides like guacamole or corn salad for variety.
Ingredient-Specific Questions
Can I use fresh corn instead of frozen?
Yes, fresh corn works great! Just cut it off the cob and add it to the slow cooker.
What type of rice works best with this recipe?
Long-grain rice is best for this dish. It keeps its shape and texture well when served under the chicken and toppings.
This recipe focuses on using simple, tasty ingredients to create a delicious dish. We highlighted key components like chicken thighs, black beans, and spices that bring flavor. I shared steps for cooking and helpful tips for meal prep and variations. You now have the tools to make it your own. Whether for a quick meal or a special occasion, this dish fits any need. Enjoy the cooking process, have fun experimenting, and make it yours!


![For a great Italian wedding soup, you need a few key items: - 1 cup acini di pepe pasta (or any small pasta) - 1 tablespoon olive oil - 1 medium onion, diced - 2 cloves garlic, minced - 2 medium carrots, diced - 2 celery stalks, diced - 6 cups chicken broth (low sodium) - 1 teaspoon dried oregano - 1 teaspoon dried thyme - Salt and pepper to taste - 1 cup fresh spinach or Swiss chard, chopped - ½ cup grated Parmesan cheese - 1 pound ground turkey (or chicken) - 1 teaspoon Italian seasoning - ¼ cup fresh parsley, chopped (for garnish) These ingredients work together to create a warm, comforting soup. The acini di pepe pasta adds a fun texture. The fresh veggies provide crunch and flavor. The meatballs bring hearty satisfaction. You can switch up some ingredients for your taste. Here are a few ideas: - Use spinach or Swiss chard for greens. Both add color and nutrients. - Add extra spices like red pepper flakes or fresh herbs to boost flavor. These optional ingredients let you personalize your soup. Don’t be afraid to experiment and make it your own. When it’s time to serve, pair your soup with some tasty options: - Serve with a slice of crusty bread for dipping. - A light salad on the side adds freshness to the meal. For garnishing, top your soup with fresh parsley and a sprinkle of Parmesan cheese. This makes the soup look extra special and inviting. For the complete cooking directions, check the Full Recipe. Enjoy crafting this delicious dish! To start, heat olive oil in a large pot over medium heat. Add the diced onion and sauté it until it turns soft and clear, about 3-4 minutes. Then, toss in the minced garlic, diced carrots, and celery. Cook these veggies for another 5 minutes. This step builds a great flavor base for the soup. Next, pour in 6 cups of chicken broth and bring it to a boil. The broth adds depth and richness to the soup. In a bowl, mix ground turkey with Italian seasoning, salt, and pepper. This simple mix creates tasty meatballs. Form the meat into small balls, about 1 inch wide. Once the broth is boiling, carefully add the meatballs. Reduce the heat to a gentle simmer. Let them cook for about 10 minutes. This allows the meatballs to cook fully while adding flavor to the broth. Next, stir in the acini di pepe pasta. Cook it according to the package instructions, usually about 7-9 minutes. The pasta adds heartiness to the soup. When the pasta is almost done, add chopped spinach or Swiss chard. Stir it in and let it wilt into the soup. This adds a fresh taste and bright color. Finally, mix in the grated Parmesan cheese. This adds creaminess and a savory finish. Taste and adjust salt and pepper if needed. Let the soup rest for a few minutes before serving. Enjoy this Italian wedding soup with a crusty bread slice for a complete meal. For the full recipe, check [Full Recipe]. Seasoning is key. I always add salt and pepper at each step. This builds deep flavor. Use homemade broth when you can. It gives a rich taste that store-bought broth lacks. If you use store-bought, choose low-sodium to control salt levels. Add herbs like oregano and thyme to boost the flavor. Fresh herbs work even better than dried. To save time, prep ingredients ahead. Chop veggies and form meatballs the night before. Store them in the fridge until you are ready. Cook pasta separately to keep it firm. This stops the pasta from becoming mushy in the soup. You can also cook it in a large pot of salted water while making the soup. For great meatballs, mix ground turkey with breadcrumbs and egg. This keeps them moist and tender. Aim for a consistency that holds shape but is not too dense. Choose acini di pepe pasta for the best texture. It adds a nice bite and fits perfectly in the soup. You can use small shells or ditalini if needed, but nothing beats the classic choice. {{image_2}} You can change the soup to fit your needs. If you have dietary restrictions, try these swaps: - Ground meat: Use ground beef or pork instead of turkey. - Pasta: If you don't have acini di pepe, use small shells or ditalini. - Broth: Use vegetable broth for a vegetarian version. - Greens: If you can't find spinach, try kale or arugula. These substitutions keep the soup tasty while meeting your needs. Italian wedding soup has many faces. Each region adds its own twist: - Southern Italy: You might find a spicier version with hot sausage. - Northern Italy: Some recipes use beef broth instead of chicken broth. - Local ingredients: Different herbs and vegetables may appear based on what's fresh. These regional touches highlight the rich culture behind this dish. Make the soup your own by adding fun ingredients: - Extra veggies: Try adding peas, green beans, or zucchini for more texture. - Legumes: Toss in some cannellini beans for added protein and fiber. - Spices: A dash of red pepper flakes or smoked paprika can change the flavor. These creative twists keep your Italian wedding soup exciting and flavorful. For the full recipe, check out Italian Love Soup . To store leftover Italian wedding soup, let it cool first. Pour it into an airtight container. This keeps the soup fresh and tasty. Store it in the fridge for up to three days. If you want to keep it longer, freezing is great too. Pour the soup into freezer-safe containers. Leave some space at the top for expansion. This helps prevent spills. To reheat the soup, you can use the stove or microwave. If using the stove, heat it over medium heat until it's hot. Stir it often to avoid sticking. For the microwave, place it in a microwave-safe bowl. Heat in one-minute intervals, stirring in between, until hot. In the fridge, this soup lasts about three days. After that, it may spoil. Signs of spoilage include an off smell or changes in color. If you see mold, throw it away. Always check your leftovers before eating. Making a large batch of Italian wedding soup is smart. You can enjoy it for several meals. Just double or triple the recipe. Store it in portions for easy meals later. On busy days, you can reheat the soup quickly. Use the microwave or stove as mentioned. This way, you have a warm meal ready in no time. With the soup on hand, you can enjoy a hearty dish without much fuss. For the full recipe, check out the Italian Love Soup. Italian wedding soup is a tasty dish from Italy. The name comes from "matrimonio," meaning marriage. It reflects the blend of flavors from meat and greens. This soup combines meatballs, small pasta, and fresh greens. It offers a hearty and warm meal, perfect for family gatherings. The dish showcases Italian cooking's charm, bringing people together at the table. Yes, you can make Italian wedding soup ahead of time. To do this, prepare the soup base without the pasta. Store it in an airtight container in the fridge for up to three days. When ready to serve, reheat the soup and add the pasta. This keeps the pasta from getting mushy. You can also freeze the soup base. Just remember to add the pasta when you reheat it. There are many fun ways to change up Italian wedding soup. You can swap out ground turkey for ground beef or pork. Try adding different greens, like kale or escarole, for variety. Using different types of pasta can also change the texture. For a unique twist, add beans for extra protein. Feel free to get creative and make it your own! To boost flavor, use fresh herbs like basil or dill. Adding a squeeze of lemon juice brightens the soup. You can also mix in red pepper flakes for a bit of heat. Consider using homemade broth for richer taste. Don't forget to taste and adjust salt and pepper. These simple tweaks can make your soup even more delicious. For the full recipe, please check the Italian Love Soup section. Italian Wedding Soup blends rich flavors with fresh ingredients. We covered key ingredients like pasta, meat, and vegetables. You learned how to make this dish step-by-step, from cooking the base to preparing meatballs. Tips and tricks help enhance flavors and save time. Variations allow for personal twists, accommodating dietary needs. Lastly, we discussed how to store your soup safely. With these insights, you can create a tasty and satisfying Italian Wedding Soup. Enjoy your cooking experience!](https://dailydishlab.com/wp-content/uploads/2025/07/6044dbfa-4b21-481c-9945-f2312ef87f99-768x768.webp)