
Caprese Quinoa Stuffed Peppers Tasty and Healthy Meal

Looking for a tasty and healthy meal? Try my Caprese Quinoa Stuffed Peppers! This dish combines fresh flavors and colorful veggies, making it perfect for a quick dinner. It’s filled with nutritious quinoa, juicy tomatoes, and creamy mozzarella. Whether you’re a busy parent or a cooking novice, this easy recipe is here to help you impress your family or friends. Let’s dive into the ingredients and get cooking!
Why I Love This Recipe
- Fresh Ingredients: This recipe utilizes vibrant, fresh produce like bell peppers, cherry tomatoes, and basil, which not only enhances the flavor but also adds a burst of color to your plate.
- Healthy and Nutritious: Quinoa is a fantastic source of protein and fiber, making these stuffed peppers a wholesome and satisfying meal option.
- Easy to Make: With simple steps and minimal preparation time, this recipe is perfect for busy weeknights or casual gatherings.
- Customizable: You can easily modify the filling by adding your favorite vegetables or proteins, making it versatile for different dietary preferences.
Ingredients
List of main ingredients
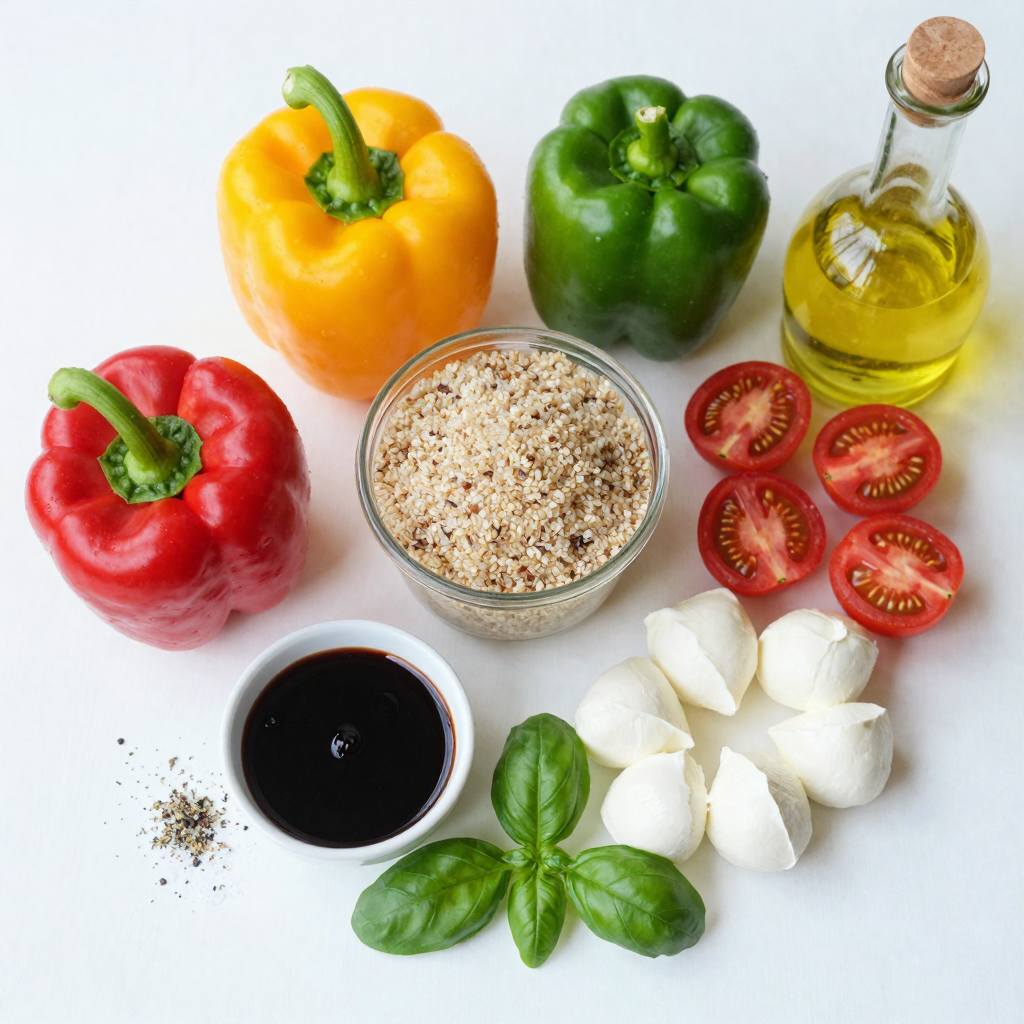
To make Caprese Quinoa Stuffed Peppers, you need:
- 4 medium bell peppers (red, yellow, or green)
- 1 cup quinoa, rinsed
- 2 cups vegetable broth
- 1 cup cherry tomatoes, halved
- 1 cup fresh mozzarella balls, halved
- 1 cup fresh basil leaves, chopped
- 2 tablespoons balsamic glaze
- 2 tablespoons olive oil
- Salt and pepper to taste
Optional ingredients for customization
You can add flavor or change things up with:
- 1 teaspoon dried oregano
- Crushed red pepper flakes for heat
- Spinach or kale for extra greens
- Grated Parmesan cheese for a richer taste
Recommended substitutes and variations
If you need alternatives, consider these:
- Use brown rice or farro in place of quinoa.
- Try any type of cheese if mozzarella is not available.
- Replace balsamic glaze with lemon juice for a zestier kick.
- Choose zucchini or eggplant if you want a different veggie base.
These ingredients help make a meal that is tasty and good for you.
Step-by-Step Instructions
Preparing the bell peppers
Start by preheating your oven to 375°F (190°C). Take your bell peppers, cut off the tops, and remove the seeds and membranes. You want them clean for stuffing. Place the peppers upright in a baking dish. This will help them hold the filling.
Cooking the quinoa
In a medium saucepan, combine 1 cup of rinsed quinoa and 2 cups of vegetable broth. Bring this mixture to a boil. Once it boils, reduce the heat, cover, and let it simmer. After about 15 minutes, check if the quinoa is fluffy and the liquid is gone. If it is, you’re ready to move on.
Mixing the filling and assembling peppers
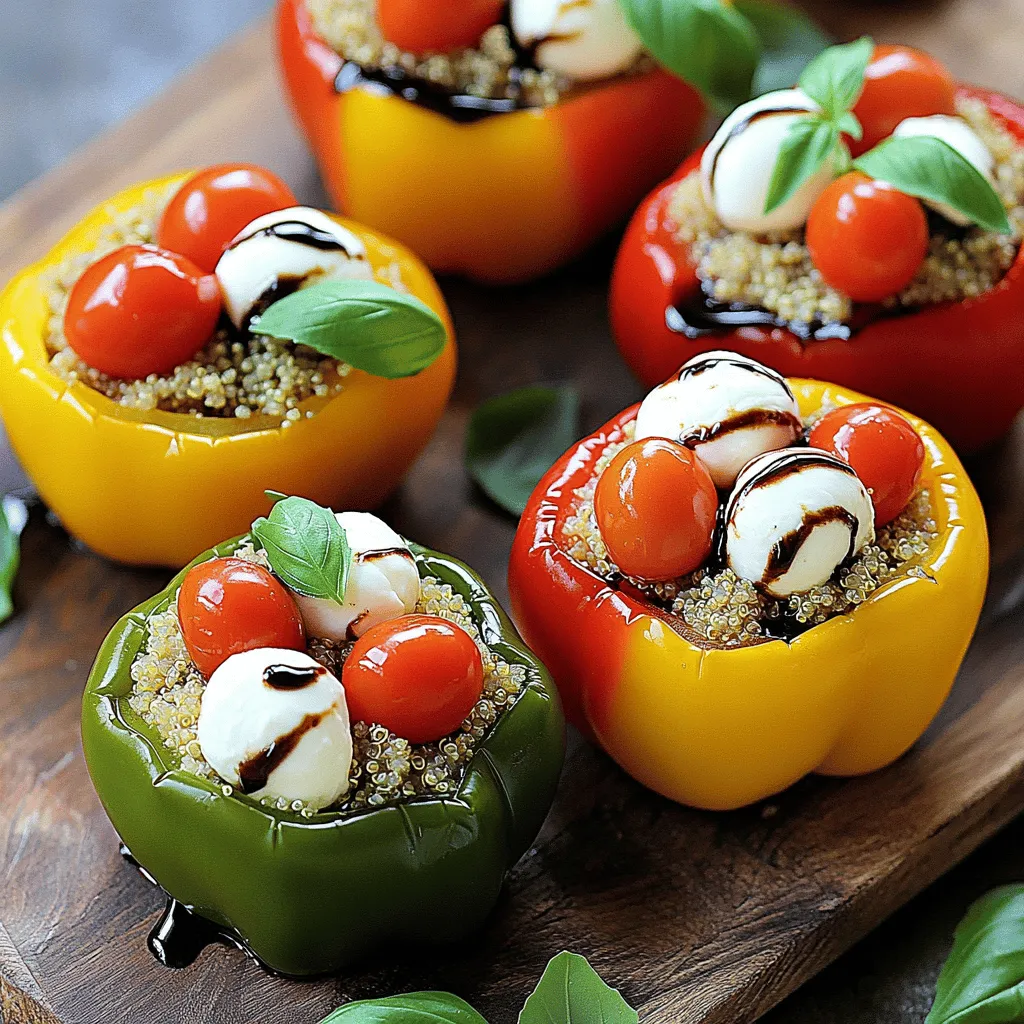
In a large mixing bowl, combine the cooked quinoa, halved cherry tomatoes, and mozzarella balls. Add in the chopped basil, balsamic glaze, olive oil, salt, and pepper. If you like, toss in 1 teaspoon of dried oregano. Mix gently until everything is well combined. Now, spoon the mixture into each bell pepper. Pack it tightly to fit as much filling as you can.
Baking instructions
Cover the baking dish with aluminum foil. Bake in the preheated oven for 25 minutes. After that, remove the foil and let them bake for another 10 to 15 minutes. This helps the peppers become tender and gives a nice caramelized top. Once done, let them cool for a few minutes before you serve. You can add more basil leaves on top for a fresh look.
Pro Tips
- Choose Colorful Peppers: Opt for a mix of red, yellow, and green bell peppers for a vibrant presentation and varied flavor.
- Cook Quinoa Perfectly: Rinse the quinoa thoroughly before cooking to remove its natural bitterness and achieve a fluffier texture.
- Customize the Filling: Feel free to add other ingredients like spinach, black beans, or corn to the quinoa mixture for added nutrition and flavor.
- Serve with Style: Drizzle extra balsamic glaze over the stuffed peppers right before serving to enhance both flavor and presentation.
Tips & Tricks
How to achieve the perfect quinoa texture
To get fluffy quinoa, rinse it well. This removes the bitter coating called saponin. Cook the quinoa in vegetable broth for better flavor. Bring it to a boil, then reduce the heat. Cover and let it simmer for about 15 minutes. Once done, let it sit for a few minutes before fluffing with a fork. This will help it stay light and airy.
Suggestions for enhancing flavor
For more flavor, add fresh herbs like parsley or thyme. You can try adding a teaspoon of dried oregano for a savory kick. A splash of lemon juice can brighten the dish. If you like spice, add some red pepper flakes. This will give your stuffed peppers a nice heat. Mix these ingredients into the quinoa before stuffing the peppers.
Presentation and garnishing tips
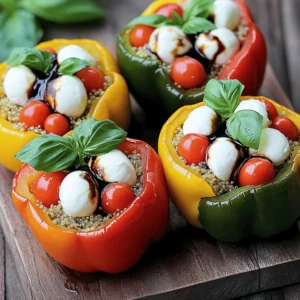
For a stunning presentation, place the stuffed peppers on a rustic wooden board. Drizzle extra balsamic glaze over the top for a glossy look. Garnish with fresh basil leaves for a pop of color. You can also sprinkle some grated cheese on top before baking. This adds a nice touch and a bit of extra flavor.
Variations
Different protein options
You can easily add protein to your Caprese quinoa stuffed peppers. If you want a heartier meal, try adding cooked chicken. Shred the chicken and mix it with the quinoa filling. For a meat-free option, use black beans or chickpeas. Both add protein and texture. Just rinse and drain them before adding to your mixture.
Vegetarian and vegan adaptations
This recipe is naturally vegetarian. To make it vegan, simply swap the mozzarella for a plant-based cheese. You can also skip the cheese altogether and boost flavor with extra basil and balsamic glaze. This keeps the dish fresh and vibrant while still being tasty.
Seasonal ingredient swaps
Feel free to switch up the ingredients based on what’s in season. In summer, add fresh zucchini or corn for a sweet crunch. In fall, consider diced butternut squash or even roasted pumpkin. These swaps keep your dish exciting and full of flavors throughout the year.
Storage Info
Best practices for storing leftovers
You can store leftovers in an airtight container. Let the peppers cool fully before sealing. This helps keep moisture in check. They will stay fresh for about 3 to 4 days in the fridge.
Reheating methods
To reheat, place a stuffed pepper on a microwave-safe plate. Heat for 1 to 2 minutes on high. Check if it’s hot in the center. You can also reheat in the oven. Preheat to 350°F (175°C) and bake for about 10 minutes. Cover with foil to keep them moist.
Freezing instructions for longer storage
If you want to freeze them, prepare the peppers as usual. After baking, let them cool completely. Wrap each pepper tightly in plastic wrap, then foil. Store in a freezer-safe bag. They can last up to 3 months in the freezer. To use, thaw overnight in the fridge. Reheat as mentioned above.
FAQs
Can I use other types of peppers?
Yes, you can use other types of peppers. Bell peppers are great, but try poblano or Anaheim peppers for a twist. They add a smoky flavor. You can even opt for mini sweet peppers for fun bites. Just make sure they hold the filling well.
How long can I store stuffed peppers in the fridge?
You can store stuffed peppers in the fridge for about three to four days. Make sure they cool completely before sealing them in an airtight container. This helps keep them fresh and tasty. Reheat them in the oven or microwave when you’re ready to eat.
What can I serve with Caprese Quinoa Stuffed Peppers?
Serve your stuffed peppers with a fresh salad or garlic bread. A simple side of greens pairs well too. You might also enjoy them with a light soup. The flavors blend nicely and create a balanced meal.
Is this recipe gluten-free?
Yes, this recipe is gluten-free. Quinoa is a great gluten-free grain. You can enjoy this dish without worry. Always check your vegetable broth to ensure it’s also gluten-free. This way, you can savor every bite without any concerns.
You learned about the ingredients, cooking steps, and tips for making great stuffed peppers. I shared ideas for protein options and storage info. Remember, while this recipe is flexible, it still packs flavor. Feel free to customize based on your taste. Whether you enjoy it fresh or as leftovers, it can fit any meal. Experiment with different ingredients for fun results. Now, get started and bring this tasty dish to your table!
Caprese Quinoa Stuffed Peppers
Ingredients
4 medium bell peppers (red, yellow, or green)
1 cup quinoa, rinsed
2 cups vegetable broth
1 cup cherry tomatoes, halved
1 cup fresh mozzarella balls, halved
1 cup fresh basil leaves, chopped
2 tablespoons balsamic glaze
2 tablespoons olive oil
Salt and pepper to taste
Optional: 1 teaspoon dried oregano
Instructions
Preheat your oven to 375°F (190°C).
Cut the tops off the bell peppers and remove the seeds and membranes. Place the peppers upright in a baking dish.
In a medium saucepan, combine the quinoa and vegetable broth. Bring to a boil, then reduce the heat, cover, and let it simmer for about 15 minutes or until the quinoa is fluffy and the liquid is absorbed.
In a large mixing bowl, combine the cooked quinoa, halved cherry tomatoes, mozzarella balls, chopped basil, balsamic glaze, olive oil, salt, and pepper (and oregano, if using). Mix gently until well incorporated.
Spoon the quinoa mixture into each bell pepper, packing it tightly.
Cover the baking dish with aluminum foil and bake in the preheated oven for 25 minutes.
Remove the foil and bake for an additional 10-15 minutes, until the peppers are tender and slightly caramelized on top.
Let them cool for a few minutes before serving. Garnish with additional basil leaves if desired.
Prep Time: 15 minutes | Total Time: 50 minutes | Servings: 4
– Presentation Tips: Serve the stuffed peppers on a rustic wooden board or white platter. Drizzle some extra balsamic glaze over the peppers for a decorative touch.
Caprese Quinoa Stuffed Peppers
Ingredients
- 4 medium bell peppers (red, yellow, or green)
- 1 cup quinoa, rinsed
- 2 cups vegetable broth
- 1 cup cherry tomatoes, halved
- 1 cup fresh mozzarella balls, halved
- 1 cup fresh basil leaves, chopped
- 2 tablespoons balsamic glaze
- 2 tablespoons olive oil
- to taste salt and pepper
- 1 teaspoon dried oregano (optional)
Instructions
- Preheat your oven to 375°F (190°C).
- Cut the tops off the bell peppers and remove the seeds and membranes. Place the peppers upright in a baking dish.
- In a medium saucepan, combine the quinoa and vegetable broth. Bring to a boil, then reduce the heat, cover, and let it simmer for about 15 minutes or until the quinoa is fluffy and the liquid is absorbed.
- In a large mixing bowl, combine the cooked quinoa, halved cherry tomatoes, mozzarella balls, chopped basil, balsamic glaze, olive oil, salt, and pepper (and oregano, if using). Mix gently until well incorporated.
- Spoon the quinoa mixture into each bell pepper, packing it tightly.
- Cover the baking dish with aluminum foil and bake in the preheated oven for 25 minutes.
- Remove the foil and bake for an additional 10-15 minutes, until the peppers are tender and slightly caramelized on top.
- Let them cool for a few minutes before serving. Garnish with additional basil leaves if desired.
![To make Easy Chicken and Dumplings, you'll need the following: - Chicken and vegetables needed: - 1 lb boneless, skinless chicken thighs, cut into bite-sized pieces - 1 medium onion, diced - 2 carrots, sliced - 2 celery stalks, sliced - 1 cup frozen peas - Spices and seasonings: - 4 cups chicken broth - 2 cloves garlic, minced - 1 teaspoon dried thyme - 1 teaspoon dried parsley - Salt and pepper to taste - Dumpling ingredients: - 2 cups all-purpose flour - 1 tablespoon baking powder - 1 teaspoon salt - 1 cup milk - 4 tablespoons unsalted butter, melted These ingredients create a warm and comforting meal. The chicken provides protein, while the vegetables add flavor and texture. The spices bring everything together, making each bite delightful. Don't forget the dumplings, as they are the star of the dish! For the full recipe, check out the details above. Start by sautéing the vegetables. In a large pot, heat a drizzle of olive oil over medium heat. Add the diced onion, sliced carrots, and sliced celery. Cook them for about 5 to 7 minutes until they are soft. This step adds a lot of flavor to the soup. Next, add the minced garlic. Cook it for another minute. This will make your kitchen smell amazing. Now, stir in the chicken pieces, dried thyme, dried parsley, salt, and pepper. Cook until the chicken is no longer pink. This should take about 5 minutes. After that, pour in the chicken broth. Bring it to a gentle boil. Once boiling, reduce the heat to low and let it simmer for 15 to 20 minutes. This helps all the flavors blend together perfectly. While the soup simmers, it’s time to make the dumplings. In a mixing bowl, combine 2 cups of all-purpose flour, 1 tablespoon of baking powder, and 1 teaspoon of salt. Mix these dry ingredients well. Now, stir in 1 cup of milk and 4 tablespoons of melted butter. Mix until just combined. Be careful not to overmix. Overmixing can make the dumplings tough. You want them light and fluffy. Once your soup is ready, gently fold in 1 cup of frozen peas. Then, drop spoonfuls of the dumpling batter into the simmering broth. Cover the pot with a lid. Let the dumplings cook undisturbed for about 15 to 20 minutes. This is key to getting them fluffy. Check your dumplings after 15 minutes. They should puff up and be cooked through. Taste the soup and adjust the seasoning if needed. For the full recipe, refer to the section above. Enjoy your comforting chicken and dumplings! To make chicken and dumplings shine, adjust your seasonings. Taste as you go. You may want more salt or herbs. This helps to bring out all the flavors. Each chicken piece needs to soak up those seasonings. Choosing the right chicken parts is key too. I recommend boneless thighs. They stay juicy and tender. You can also use breasts, but they may dry out faster. Experiment with what you like best. Sautéing and simmering are the heart of this dish. Start by sautéing the veggies well. It brings out their flavors. Keep the heat at medium. Too high, and you risk burning them. Simmering is just as important. Let the soup bubble gently. This helps all the tastes blend. For fluffy dumplings, don’t overmix the batter. Stir until just combined. This keeps them light and airy. Garnishing adds a lovely touch to your meal. Fresh parsley makes a simple, bright garnish. You can also sprinkle black pepper for a little kick. As for sides, serve with crusty bread or a fresh salad. These pair well with the rich soup. They balance the meal perfectly. Enjoy your comforting chicken and dumplings! For the complete recipe, check out the [Full Recipe]. {{image_2}} You can change up your chicken and dumplings with different veggies. Instead of carrots, try zucchini or bell peppers. Swap celery for green beans. These changes keep your dish fresh and exciting. If you want to use other proteins, you have options. Use shredded rotisserie chicken for quick prep. You can even try turkey or tofu for a meatless dish. Each choice brings unique flavors and textures. To boost flavor, add herbs and spices. Fresh thyme or rosemary works great. You can also sprinkle in a bit of paprika for warmth. These small tweaks make a big difference. Don’t stop at herbs. Incorporate other ingredients like corn or mushrooms. They add layers of taste and texture. You can also stir in a splash of cream for richness. All these enhancements make your meal even more delicious. For the full recipe, check out the Comforting Chicken and Dumplings section. After enjoying your easy chicken and dumplings, store any leftovers safely. Place them in an airtight container. This helps keep the flavors fresh. You can refrigerate the leftovers for up to three days. Always let the soup cool down before sealing it up. If you want to store it for longer, freezing is a great option. Use freezer-safe containers or bags. Make sure you remove as much air as possible to prevent freezer burn. You can freeze the chicken and dumplings for up to three months. Just remember to label your containers with the date. When it's time to enjoy your leftovers, reheating properly is key. The best way is to use the stovetop. Pour the chicken and dumplings into a pot over low heat. Stir often to heat it evenly. This method helps keep the dish moist. If you're short on time, you can use the microwave. Place the soup in a microwave-safe bowl. Cover it loosely to avoid spills. Heat it in short bursts, stirring in between. This keeps the dumplings from getting too tough. Sometimes, the soup may thicken after storing. If that happens, add a splash of chicken broth or water. Stir it well to adjust the consistency. Enjoy your comforting meal just like the first time! For a complete guide to making this dish, check out the Full Recipe. How to make chicken and dumplings from scratch? To make chicken and dumplings from scratch, start with fresh chicken, vegetables, and spices. Cook them in a pot with broth. For dumplings, mix flour, baking powder, and milk. Drop the dumpling batter into the simmering broth. Cook until the dumplings puff up. Can I use canned chicken broth? Yes, you can use canned chicken broth. It saves time and still tastes good. Just choose a low-sodium option if you prefer less salt. This makes your dish healthier and more flavorful. Can I substitute frozen peas? Yes, you can use other frozen vegetables. Carrots, corn, or green beans work well. They add different flavors and colors to your dish. What can I use instead of all-purpose flour? You can use gluten-free flour if needed. Almond flour or oat flour are good choices too. They can change the taste slightly but still make tasty dumplings. How long do dumplings take to cook? Dumplings take about 15-20 minutes to cook. You should not lift the lid while they cook. This helps them steam properly and stay fluffy. Can I make the dumplings ahead of time? It’s best to cook the dumplings fresh. However, you can prepare the batter ahead. Keep it in the fridge until you're ready to cook. This way, they stay light and fluffy. For a full recipe, check out the recipe section. This blog post explored how to make delicious chicken and dumplings. We started with the key ingredients, then moved on to preparing the soup and making the dumplings. I shared tips to ensure the perfect flavor and texture. You can also try variations for extra flair and learn how to store leftovers well. With these steps, anyone can create a warm, comforting dish. So, don’t hesitate to get started. Your homemade chicken and dumplings await!](https://dailydishlab.com/wp-content/uploads/2025/06/b55448b9-18f4-4b40-ba69-553d058622be-768x768.webp)
![- Eggplants: You need 2 medium eggplants. Slice them into 1/4-inch rounds. This helps them cook evenly. - Marinara Sauce: Use 2 cups of marinara sauce. You can make it fresh or use store-bought. It adds rich flavor. - Cheese Types: You will need 2 cups of shredded mozzarella cheese and 1 cup of grated Parmesan cheese. These cheeses melt well and create a creamy texture. - Breading Components: Gather 1 cup of all-purpose flour, 3 large eggs (beaten), and 2 cups of breadcrumbs. Italian-style breadcrumbs add great taste. - Seasonings and Garnish: Use 1 teaspoon of dried oregano and 1 teaspoon of garlic powder. These spices boost the flavor. For garnish, fresh basil leaves add color and freshness. Don’t forget olive oil for frying and salt and pepper for taste. With these ingredients, you will create a layered delight that is both tasty and satisfying. For the complete recipe, check the Full Recipe section. Preparing the Eggplant First, slice your eggplants into 1/4-inch rounds. Lay them on a clean towel. Sprinkle salt over the slices and let them sit for 30 minutes. This helps draw out moisture and bitterness. After 30 minutes, rinse the eggplants and pat them dry with a paper towel. This step is key for tasty eggplant. Setting Up a Breading Station Now, gather three bowls for breading. In the first bowl, add all-purpose flour. In the second bowl, beat three large eggs. In the third bowl, mix breadcrumbs with one teaspoon of dried oregano, one teaspoon of garlic powder, salt, and pepper. This setup speeds up the process and keeps things neat. Frying the Eggplant Heat olive oil in a large skillet over medium heat. Take each eggplant slice and dip it into the flour, shaking off excess. Next, dip it into the beaten eggs, then coat it well with the breadcrumb mix. Fry the breaded slices in batches until they turn golden brown and crisp. This should take about 3-4 minutes on each side. Once done, drain them on paper towels to remove extra oil. Assembling the Layers Grab a greased baking dish to start layering. Spread a thin layer of marinara sauce on the bottom. Place a third of the fried eggplant slices over the sauce. Add half of the marinara sauce on top, followed by a third of the mozzarella cheese and half of the Parmesan cheese. Repeat these layers. Finish with a final layer of eggplant, then top it off with the remaining marinara sauce and cheeses. Baking Directions Preheat your oven to 375°F (190°C). Cover the baking dish with foil and bake it for 25 minutes. After that, remove the foil and bake it for another 15-20 minutes. You want the cheese to be bubbly and golden brown. Resting Time Once the baking is done, let the Eggplant Parmesan rest for about 10 minutes. This helps it set and makes it easier to serve. Enjoy the delicious layers of flavor and texture! If you want the full recipe, check the [Full Recipe]. Drawing Out Moisture To make your eggplant perfect, start by drawing out moisture. Slice the eggplants into 1/4-inch rounds. Lay them on a clean towel and sprinkle salt over them. Let them sit for about 30 minutes. This step helps to reduce bitterness and makes them less soggy. After 30 minutes, rinse and pat them dry with a paper towel. This process is key for a great texture. Achieving Optimal Crispiness For a crispy texture, make sure to coat the eggplant well. First, dip each slice in flour, then in beaten eggs, and finally in breadcrumbs. Use Italian-style breadcrumbs for extra flavor. Fry them in hot olive oil until they are golden brown. Frying in batches helps keep the oil hot. This step ensures every piece of eggplant turns out crispy and delicious. Pairing with Side Dishes Eggplant Parmesan pairs well with many sides. A fresh green salad with a lemon vinaigrette adds brightness. Garlic bread brings a nice crunch and flavor. You can also serve it with pasta for a hearty meal. These sides complement the rich flavors of the dish. Presentation Ideas For a beautiful presentation, layer your Eggplant Parmesan in a clear dish. This way, people can see the colorful layers. Garnish with fresh basil leaves on top for a pop of color. You can also drizzle some extra marinara sauce around the plate. This makes it look elegant and inviting. Over-salting the Eggplant Be careful with salt when preparing eggplant. While salting helps draw out moisture, too much salt can ruin the dish. Always taste the eggplant after rinsing. Adjust the salt in your marinara sauce to balance flavors. This way, you avoid a salty dish. Incorrect Layering Order When assembling the layers, follow the right order. Start with marinara sauce, then eggplant, and then cheese. Repeat this pattern. If you mix up the layers, the dish may not cook evenly. Following the proper layering keeps everything in place and ensures a tasty meal. {{image_2}} Substitutes for Cheese You can use plant-based cheese. Look for nut-based or soy-based options. They melt well and add flavor. Nutritional yeast is a great choice too. It adds a cheesy taste without dairy. Egg Replacement Options If you want to skip eggs, try using flaxseed meal. Mix one tablespoon of flaxseed with three tablespoons of water. Let it sit for five minutes. This mix works well as a binder. Gluten-Free Breadcrumbs You can find gluten-free breadcrumbs at stores. They are made from rice or corn. They work just like regular breadcrumbs, giving you that nice crunch. Flour Options Instead of all-purpose flour, use almond flour or chickpea flour. Both options give a nutty flavor and work well in the recipe. Adding Vegetables Add layers of zucchini or spinach for more taste. They boost nutrition and add color to the dish. You can also mix in roasted red peppers for a sweet twist. Using Different Sauces Besides marinara, try pesto or a white sauce. Each sauce brings a new flavor. This keeps the dish fresh and exciting. You can even mix sauces for a unique taste. How do you store leftovers? After enjoying your Eggplant Parmesan, let it cool to room temperature. Place any leftovers in an airtight container. Store it in the fridge for up to three days. What are the best practices for reheating? To reheat, preheat your oven to 350°F (175°C). Place the Eggplant Parmesan in an oven-safe dish. Cover it with foil to keep it moist. Heat for about 20 minutes. Check if it’s warm all the way through before serving. How do you freeze Eggplant Parmesan? If you want to store it longer, freezing is a great option. First, let the dish cool completely. Cut it into portions if you prefer smaller servings. Wrap each piece tightly in plastic wrap. Then, place them in a freezer-safe container. It can last for up to three months in the freezer. What are the thawing and reheating instructions? When you’re ready to eat, move the Eggplant Parmesan to the fridge. Let it thaw overnight. Reheat it in the oven at 350°F (175°C) for about 25-30 minutes. Remove the foil halfway through to help the top crisp up. Enjoy your delicious dish again! For the complete recipe, check out the Full Recipe. How do you prevent eggplants from turning brown? To stop eggplants from browning, sprinkle salt on the slices. This draws out moisture. After 30 minutes, rinse and pat them dry. This method keeps them fresh and tasty. Can eggplant parmesan be made ahead of time? Yes, you can make eggplant parmesan ahead of time. Prepare it, then cover and chill it in the fridge. When ready to bake, just heat it in the oven. This saves time on busy days. What’s the best cheese to use for eggplant parmesan? The best cheese for eggplant parmesan is mozzarella. It melts well and adds creaminess. Parmesan adds a nice salty flavor. Using both gives a rich taste. Calories and serving size One serving of eggplant parmesan has about 300-400 calories. This depends on how much cheese and sauce you use. A serving size is usually one slice. Health benefits of eggplant Eggplant is low in calories and high in fiber. It helps with digestion and keeps you full. It also has antioxidants that may protect your heart. Eating eggplant adds nutrients to your meals. For more recipes, check out the Full Recipe for Layered Delight Eggplant Parmesan. In this post, we explored making eggplant Parmesan from start to finish. We covered ingredients, step-by-step instructions, and tips for success. You learned about variations for vegan and gluten-free options. I hope you feel confident to try this dish. Remember to avoid common mistakes and pair it well with sides. Enjoy your cooking and savor each bite of this tasty meal!](https://dailydishlab.com/wp-content/uploads/2025/06/de34a9c5-902e-4f12-9462-c26c35663e43-768x768.webp)