
Orange Creamsicle Overnight Oats Delightful Recipe

Start your day off with a refreshing twist! My Orange Creamsicle Overnight Oats recipe combines the creaminess of oats and yogurt with bright orange flavors. It’s easy to make, delicious, and perfect for busy mornings. In this post, you’ll find a simple guide on the key ingredients, tips for perfecting your oats, and endless variations. Ready to enjoy a delightful breakfast? Let’s dive in!
Why I Love This Recipe
- Delicious Flavor Combination: The blend of orange and cream flavors creates a refreshing and satisfying breakfast that tastes like dessert.
- Easy to Prepare: This recipe takes just 10 minutes to prepare and can be made ahead of time for a quick breakfast option.
- Nutritious Ingredients: Packed with rolled oats, Greek yogurt, and fresh orange juice, these overnight oats are a healthy way to start your day.
- Customizable: You can easily adjust the sweetness and add toppings like nuts or seeds to suit your taste preferences.
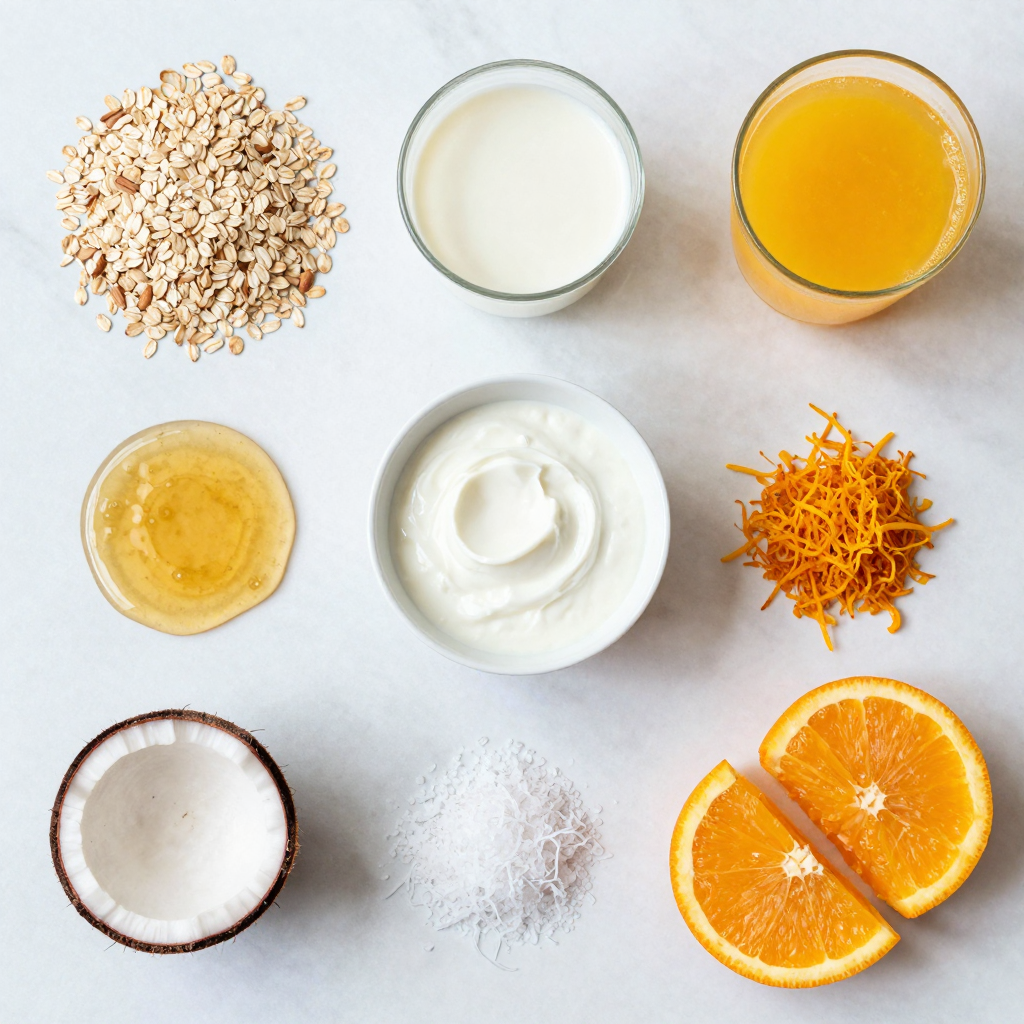
Ingredients
Main Ingredients List
- 1 cup rolled oats
- 1 cup almond milk (or milk of choice)
- 1/2 cup Greek yogurt (vanilla or plain)
Flavor Enhancers
- 1/4 cup fresh orange juice
- Zest of 1 orange
- 1 tablespoon honey or maple syrup
Optional Add-Ins
- 1/4 cup shredded coconut
- Slices of orange for garnish
To make Orange Creamsicle Overnight Oats, start with the main ingredients. Rolled oats give the base a hearty feel. Almond milk or any milk you prefer makes it creamy. Greek yogurt adds protein and tang.
Next, add the flavor enhancers. Fresh orange juice brings a bright burst. Orange zest gives it a fragrant kick. Honey or maple syrup adds sweetness, adjusting to your taste.
If you want to get creative, toss in some shredded coconut for texture. Garnish with orange slices for a pretty presentation. This mix of ingredients creates a delightful breakfast that feels like dessert.
Step-by-Step Instructions
Preparation Process
1. Start by taking a medium-sized bowl or a mason jar.
2. Combine 1 cup of rolled oats with 1 cup of almond milk.
3. Stir well until the oats are fully soaked in the milk.
4. Next, add 1/2 cup of Greek yogurt, 1/4 cup of fresh orange juice, and the zest of 1 orange.
5. For sweetness, mix in 1 tablespoon of honey or maple syrup.
6. Don’t forget to add 1 teaspoon of vanilla extract and a pinch of salt.
7. Stir everything until well blended.
Mixing and Refrigerating
1. If you want extra texture, fold in 1/4 cup of shredded coconut.
2. Cover the bowl or jar tightly with a lid or plastic wrap.
3. Place it in the fridge overnight, or for at least 4 hours.
4. This allows the oats to soak up the liquid and become soft.
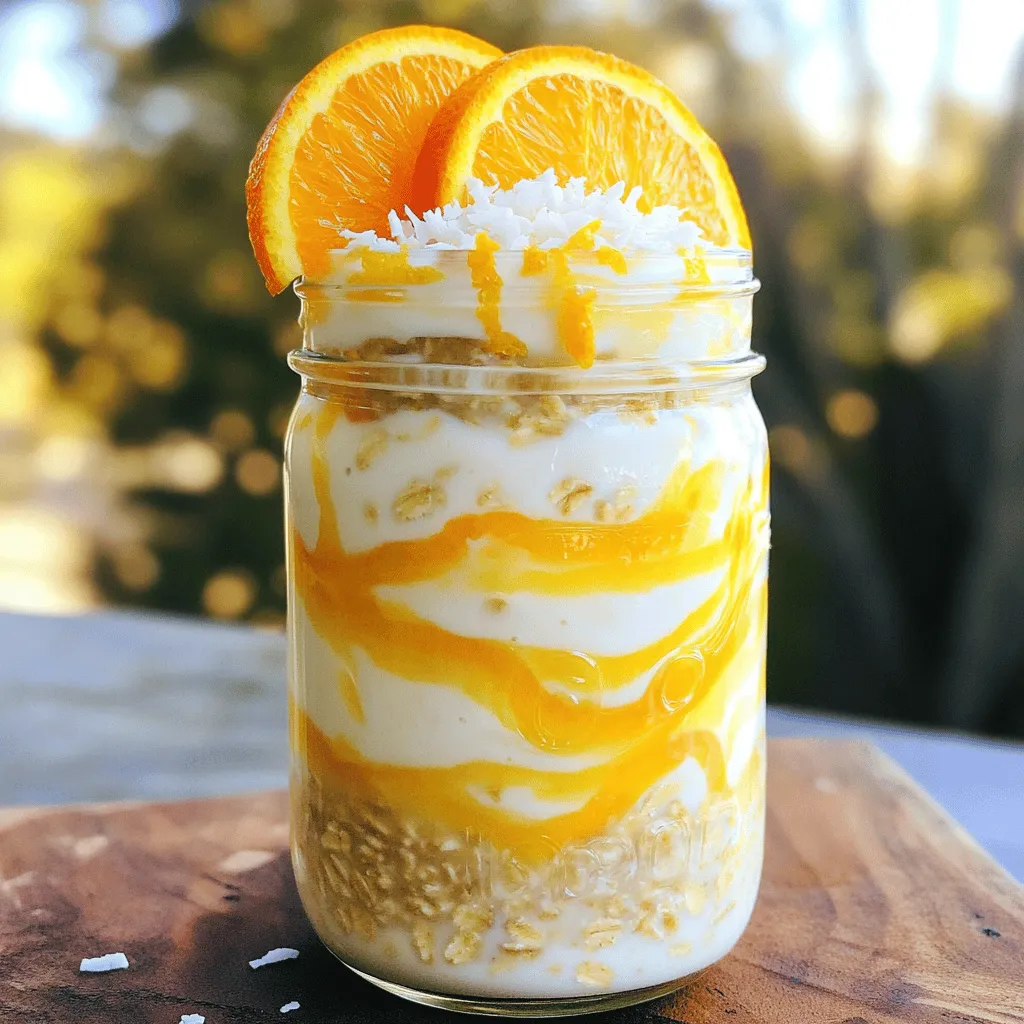
Serving Instructions
1. In the morning, take the oats out of the fridge.
2. Give the mixture a good stir.
3. If it’s too thick, add a splash of almond milk to loosen it up.
4. Spoon the oats into bowls.
5. Garnish with fresh orange slices and a sprinkle of shredded coconut if you like.
Pro Tips
- Use Fresh Ingredients: For the best flavor, always opt for freshly squeezed orange juice and fresh orange zest.
- Adjust Sweetness: Feel free to tweak the amount of honey or maple syrup according to your personal taste preference.
- Add Texture: Incorporating shredded coconut not only enhances flavor but also adds a delightful texture to your oats.
- Perfect Consistency: If the oats are too thick in the morning, simply stir in a splash of almond milk to achieve your desired creaminess.
Tips & Tricks
Perfecting Texture
To get the right texture, start with almond milk. If your oats feel too thick, add more almond milk. This makes them creamy. For the best flavor, use fresh orange juice and zest. These ingredients bring out the sweet orange taste.
Sweetness Adjustments
You can change the sweetness in your oats. If you want less sweetness, use less honey or maple syrup. For a different flavor, try other sweeteners. Agave nectar or stevia work well too.
Meal Prep Suggestions
When making overnight oats, think ahead. Prepare them in jars for easy storage. This makes it simple to grab and go. Store your oats in the fridge. They last about three to five days. For reheating, add a splash of milk and warm in the microwave. Enjoy your tasty oats!
Variations
Flavor Add-Ins
You can change up the flavor of your Orange Creamsicle Overnight Oats. Try adding other fruits like berries or bananas. These fruits bring new tastes and textures. They also add bright colors to your bowl.
You can also switch up the yogurt flavor. Coconut or strawberry yogurt adds a nice twist. These flavors mix well with the orange taste. Feel free to experiment until you find your favorite combo!
Dietary Considerations
If you want vegan options, swap the Greek yogurt for plant-based yogurt. Use a non-dairy milk like oat or coconut milk. This makes the recipe vegan but still creamy and tasty.
For gluten-free oats, choose certified gluten-free rolled oats. This ensures your oats are safe to eat. You can enjoy this recipe without worrying about gluten.
Creative Serving Ideas
Turn your overnight oats into a smoothie! Just blend the oats with some extra almond milk. This makes a quick breakfast that you can sip on the go.
You can also sneak oats into baked goods. Mix them into muffins or pancakes for added nutrition. This way, you can enjoy oats in different meals throughout the day!
Storage Info
Refrigeration Guidelines
You can store overnight oats in the fridge for up to five days. This makes them great for meal prep. For best results, use a glass jar or a tight-sealing container. These keep the oats fresh and prevent them from drying out.
Freezing Options
Yes, you can freeze overnight oats! They last up to three months in the freezer. Just put them in a freezer-safe container. When you’re ready to eat, move them to the fridge. Let them defrost overnight. You can also warm them in the microwave for a quick meal.
Signs of Spoilage
Look for changes in smell, texture, or color to know if oats should be tossed. If they smell sour or show mold, it’s time to discard them. To keep your oats fresh, store them in airtight containers and keep them chilled. This helps maintain their flavor and texture.
FAQs
How long do overnight oats last in the fridge?
Overnight oats last about 3 to 5 days in the fridge. Store them in a sealed container. This keeps them fresh and tasty. If you see any change in smell or color, it’s best to throw them out. I enjoy making a few servings at once to save time.
Can I use steel-cut oats instead of rolled oats?
You can use steel-cut oats, but the texture will change. Steel-cut oats take longer to soak and soften. They may need more liquid and time in the fridge. If you prefer a chewier bite, steel-cut oats can work well. Just remember to adjust your soaking time to at least 8 hours.
Is this recipe suitable for meal prep?
Yes, this recipe is great for meal prep! You can make multiple servings in one go. Just double or triple the ingredients. Use mason jars for easy storage. Each jar can be a single serving. This makes breakfast quick and easy throughout the week. Enjoy a delicious meal without the morning rush!
Overnight oats are easy, tasty, and healthy. We explored key ingredients like rolled oats, almond milk, and Greek yogurt. I shared steps for preparation, mixing, and chilling. You learned tips for texture, sweetness, and meal prep. I also offered ideas for variations and storage.
In summary, overnight oats let you enjoy a quick breakfast every morning. Use your favorite flavors and personalize them. With these tips, you can make this dish your own and keep it fresh!
Orange Creamsicle Overnight Oats
Ingredients
1 cup rolled oats
1 cup almond milk (or milk of choice)
1/2 cup Greek yogurt (vanilla or plain)
1/4 cup orange juice (freshly squeezed for best flavor)
Zest of 1 orange
1 tablespoon honey or maple syrup (adjust for sweetness)
1 teaspoon vanilla extract
Pinch of salt
1/4 cup shredded coconut (optional)
Slices of orange for garnish
Instructions
In a medium-sized bowl or a mason jar, combine the rolled oats and almond milk. Stir well to ensure the oats are fully submerged in the liquid.
Add the Greek yogurt, orange juice, orange zest, honey (or maple syrup), vanilla extract, and a pinch of salt to the mixture. Stir until everything is well combined.
If using shredded coconut, fold it into the mixture for added texture and flavor.
Cover the bowl or jar with a lid or plastic wrap and refrigerate overnight (or at least 4 hours) to let the oats absorb the liquid and soften.
In the morning, give the oats a good stir. If the mixture is too thick, add a splash more almond milk to reach your desired consistency.
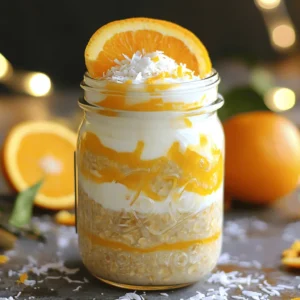
Spoon the overnight oats into serving bowls and garnish with slices of fresh orange and a sprinkle of shredded coconut if desired.
Prep Time: 10 minutes | Total Time: 10 minutes + Overnight | Servings: 2 servings
Orange Creamsicle Overnight Oats
Ingredients
- 1 cup rolled oats
- 1 cup almond milk (or milk of choice)
- 0.5 cup Greek yogurt (vanilla or plain)
- 0.25 cup orange juice (freshly squeezed for best flavor)
- 1 unit Zest of 1 orange
- 1 tablespoon honey or maple syrup (adjust for sweetness)
- 1 teaspoon vanilla extract
- 1 pinch salt
- 0.25 cup shredded coconut (optional)
- as needed slices slices of orange for garnish
Instructions
- In a medium-sized bowl or a mason jar, combine the rolled oats and almond milk. Stir well to ensure the oats are fully submerged in the liquid.
- Add the Greek yogurt, orange juice, orange zest, honey (or maple syrup), vanilla extract, and a pinch of salt to the mixture. Stir until everything is well combined.
- If using shredded coconut, fold it into the mixture for added texture and flavor.
- Cover the bowl or jar with a lid or plastic wrap and refrigerate overnight (or at least 4 hours) to let the oats absorb the liquid and soften.
- In the morning, give the oats a good stir. If the mixture is too thick, add a splash more almond milk to reach your desired consistency.
- Spoon the overnight oats into serving bowls and garnish with slices of fresh orange and a sprinkle of shredded coconut if desired.

![- 1 cup canned pumpkin puree - 1/2 cup granulated sugar - 1/2 cup brown sugar - 2 large eggs - 1 cup all-purpose flour To create the Snickerdoodle Pumpkin Cobbler, you need some key ingredients. Canned pumpkin puree gives the dish its warm, earthy flavor. Both granulated and brown sugars add sweetness and depth. Two large eggs help bind everything together, while all-purpose flour forms the base. - 1/2 cup chopped walnuts or pecans - 2 tablespoons cinnamon-sugar mixture (for topping) You can add chopped walnuts or pecans for a nutty crunch. A sprinkle of cinnamon-sugar on top gives it a sweet finish. This step is all about personal touch and taste. - 1 teaspoon ground cinnamon - 1/2 teaspoon ground nutmeg - 1/4 teaspoon ground ginger - 1 teaspoon baking powder - 1/2 teaspoon baking soda - 1/4 teaspoon salt Spices are crucial for flavor. Ground cinnamon adds warmth. Nutmeg and ginger offer a hint of spice. Baking powder and baking soda help the cobbler rise. A pinch of salt balances the sweetness. For the full recipe, you can check the [Full Recipe]. First, preheat your oven to 350°F (175°C). Next, grease a 9x9-inch baking dish with non-stick spray or butter. This step is crucial to prevent sticking. In a large mixing bowl, combine the pumpkin puree, granulated sugar, brown sugar, and vanilla extract. Whisk them together until the mixture is smooth. This blend adds sweetness and a lovely flavor to your cobbler. In another bowl, mix the dry ingredients. Combine the cinnamon, nutmeg, ginger, baking powder, baking soda, salt, and flour. Stir them well to ensure even distribution of the spices. Gradually add the dry mix to the wet ingredients. Alternate with the milk as you mix. Be gentle here; over-mixing can make the cobbler tough. Once just combined, stir in the melted butter. If you like, add chopped walnuts or pecans for extra crunch. Pour the batter into your prepared baking dish. Spread it evenly for a consistent bake. Before placing it in the oven, sprinkle the top with the cinnamon-sugar mixture. This adds a sweet crust that contrasts nicely with the soft filling. Bake in the preheated oven for 30-35 minutes. Check for doneness by inserting a toothpick in the center. If it comes out clean, your cobbler is ready. Let it cool slightly before serving. Enjoy it warm for the best taste, especially with a scoop of ice cream. For the complete recipe, refer to the Full Recipe above. - Not measuring ingredients accurately: Always use dry measuring cups for flour and sugar. This helps keep the balance right. A kitchen scale is your best friend for precision. - Over-mixing the batter: Mix until just combined. Over-mixing makes the cobbler tough. You want it soft and fluffy, not dense. - Resting the batter before baking: Let your batter sit for a few minutes. This helps the flavors blend well. It can also improve the texture. - Adjusting spices to personal taste: Feel free to change up the spices! If you love nutmeg, add a bit more. If you want it spicier, increase the ginger. Make it yours! - Pairing with ice cream or whipped cream: Serve warm with a scoop of vanilla ice cream. The cold ice cream contrasts nicely with the warm cobbler. Whipped cream is a great choice too! - Presentation ideas for gatherings: Cut into squares and serve in bowls. Sprinkle some cinnamon on top for a pop of color. Add a dollop of whipped cream for a lovely finish. This makes your dessert look fancy! For the full recipe, check out the Snickerdoodle Pumpkin Cobbler section above. {{image_2}} You can change the nuts in this dish or skip them. If you like walnuts, use them. Pecans work great too. If you want a nut-free option, just leave them out. For sugar, swap granulated sugar for coconut sugar or honey. These options add a different flavor and sweetness. Coconut sugar gives a rich taste, while honey adds a nice touch. Want to jazz up your cobbler? Try adding chocolate chips or butterscotch chips. These sweet bites melt and blend with the pumpkin. You can also explore spices like allspice or cloves. These spices add warmth and depth to the cobbler. Don't be afraid to mix and match your favorites to create new flavors. For gluten-free friends, use gluten-free flour. Many brands work well and keep the taste great. If you need to avoid eggs, try flaxseed or applesauce as a substitute. Each option helps to keep the cobbler moist and tasty. You can enjoy the same warm dessert while meeting your dietary needs. For the full recipe, check the link above. After enjoying your Snickerdoodle Pumpkin Cobbler, let it cool down. Then, cover it with plastic wrap or keep it in an airtight container. Store it in the fridge for up to three days. The cobbler stays tasty and fresh when stored properly. To enjoy your cobbler warm, you can reheat it. The best way is to use an oven. Preheat the oven to 350°F (175°C) and place the cobbler in for about 10-15 minutes. This keeps the texture nice and soft. If you use a microwave, heat it in short bursts of 20 seconds. Check to avoid drying it out. If you want to save some for later, freezing works well. Cut the cobbler into squares first. Wrap each piece in plastic wrap, then place them in a freezer bag. This way, you can take only what you need. For the best taste, eat it within three months. When ready to enjoy, thaw it in the fridge overnight before reheating. - Prep time: 15 mins - Total time: 50 mins - Servings: 9 Yes, you can prepare this cobbler ahead of time. Mix the batter and pour it into the greased dish. Cover it tightly with plastic wrap and store it in the fridge for up to a day. When you're ready, bake it straight from the fridge. Just add a few extra minutes to the baking time. You can serve it with a scoop of vanilla ice cream or a dollop of whipped cream. A drizzle of caramel sauce adds a nice touch, too. Fresh whipped cream garnished with a sprinkle of cinnamon works great as well. Look for a golden-brown color on top. A toothpick inserted in the center should come out clean. If it comes out with wet batter, give it a few more minutes. The edges should be slightly puffed and firm to touch. Yes, fresh pumpkin can be used instead of canned pumpkin puree. To do this, cook the pumpkin until soft, then mash it. Make sure to drain any excess water. This will give your cobbler a fresh taste and a nice texture. In this blog post, you discovered how to make a delicious Snickerdoodle Pumpkin Cobbler. We talked about essential ingredients, like canned pumpkin and sugars, and shared optional ones to enhance flavor. I provided step-by-step instructions for preparation, baking, and common mistakes to watch out for. Remember to store leftovers properly to keep them fresh. This dessert is easy to make, fun to personalize, and perfect for gatherings. Enjoy baking this delightful treat that brings warmth and sweetness to any occasion!](https://dailydishlab.com/wp-content/uploads/2025/07/2d25911d-0f51-4f98-ae6a-a9dc8136342e-768x768.webp)
![To make these delightful cinnamon apple muffins, you need the following ingredients: - 2 cups all-purpose flour - 1 teaspoon baking soda - 1 teaspoon baking powder - 1 teaspoon ground cinnamon - 1/2 teaspoon salt - 1/2 cup unsalted butter, softened - 1 cup packed brown sugar - 2 large eggs - 1 teaspoon vanilla extract - 1 cup buttermilk - 2 apples, peeled, cored, and diced (preferably Granny Smith for tartness) - 1/2 cup chopped walnuts (optional) - Extra cinnamon sugar for topping (1 tablespoon sugar mixed with 1/2 teaspoon cinnamon) The right mix of these ingredients creates a warm, inviting flavor. I love how the sweet apples and warm cinnamon blend. The buttermilk adds moisture, making the muffins soft and fluffy. You can also add walnuts for a nice crunch, but they are optional. This simple list allows you to bake a batch that brings joy to any kitchen. Follow the [Full Recipe] for step-by-step instructions. - Preheat your oven to 350°F (175°C). - Line a muffin tin with paper liners or grease it well. - In a medium bowl, whisk together the flour, baking soda, baking powder, ground cinnamon, and salt. - In a large mixing bowl, cream softened butter and brown sugar until light and fluffy. - Add eggs one at a time, mixing well after each. Stir in the vanilla extract. - Gradually mix in the dry ingredients and buttermilk. Alternate adding each, starting and ending with dry ingredients. - Fold diced apples and walnuts into the batter. - Spoon the batter into the muffin tin, filling each cup about three-quarters full. - Sprinkle the tops with cinnamon sugar for added crunch and sweetness. - Bake for 18-22 minutes, or until a toothpick comes out clean. This simple method leads to tasty cinnamon apple muffins. For the full recipe, refer to the section above. Enjoy the warm, fluffy bites of joy! - Make sure all your ingredients are at room temperature. This helps them mix better. - Use a toothpick to check for doneness. Insert it in the center; it should come out clean. - Serve your muffins warm with a pat of butter. This adds richness and flavor. - You can also dust them with powdered sugar for a sweet touch. - For a cozy display, place them on a rustic wooden board. It looks inviting! - To achieve a moist muffin, do not overmix the batter. Mix just until combined. - Avoid dense muffins by measuring flour correctly. Too much flour can weigh them down. - Use a light hand when folding in the apples. This keeps the air in the batter. These tips will help you bake delicious cinnamon apple muffins every time! For a full recipe, check the earlier section. {{image_2}} You can switch things up by using different fruits. Instead of apples, try pears or berries. Both options bring a fresh taste to your muffins. If you love dried fruits, add cranberries to the mix. They add a nice chew and burst of flavor. If you want gluten-free muffins, use almond or oat flour instead of regular flour. Both options work well and keep the muffins soft. For those who prefer vegan options, replace eggs with flax eggs and use plant-based milk. These changes make the recipe accessible for everyone. To add more depth, mix in spices like nutmeg or ginger. They pair well with cinnamon and give your muffins a warm flavor. You can also swirl in caramel or chocolate chips for a sweet surprise. These little changes can take your muffins to a whole new level. Check out the Full Recipe for all the details on making these delightful treats! To keep your muffins fresh, store them at room temperature. Place them in an airtight container. This helps retain moisture. If you don't have a container, wrap them tightly in plastic wrap. They will stay soft for about three days. Be sure to keep them away from direct sunlight and heat. For longer storage, freeze your muffins. Allow them to cool completely first. Place them in a freezer-safe bag or container. Remove as much air as possible to prevent freezer burn. They can last up to three months in the freezer. When you want to enjoy one, reheat it for the best texture. You can microwave it for about 20-30 seconds. If you prefer the oven, bake at 350°F (175°C) for about 10 minutes. This keeps the muffins soft and fluffy. For the full recipe, check out the previous section. To make your muffins rise higher, focus on the batter's consistency. Use the right amount of flour. If your batter is too thick, add a touch more liquid. Air pockets help muffins rise, so mix gently but well. Also, make sure your oven is preheated to 350°F (175°C). An oven that is too cool can lead to flat muffins. Yes, you can use different apples. Granny Smith apples are tart and work well. Honeycrisp apples add a nice sweetness and crunch. Fuji apples are also great for a sweeter taste. Try to pick apples that are firm and fresh for the best results. Muffins usually last about 2-3 days at room temperature. Store them in an airtight container. If you want them to last longer, freeze them. In the freezer, they can last up to three months. Just make sure to wrap them well to prevent freezer burn. You can replace buttermilk with milk and vinegar. Just mix 1 cup of milk with 1 tablespoon of vinegar. Let it sit for a few minutes to thicken. Another option is to use yogurt or sour cream. These will also give your muffins a nice texture. For the full recipe, check out the [Full Recipe]. In this blog post, we covered how to make delicious apple muffins step by step, from gathering ingredients to baking tips. We also explored fun variations and smart storage methods. Remember, the right techniques make all the difference in your baking. Whether you stick to the classic recipe or try new flavors, these muffins will delight everyone. Enjoy the process, share them with friends, and savor each bite. Happy baking!](https://dailydishlab.com/wp-content/uploads/2025/06/22877687-0dd6-40e4-bb31-9a2a429db395-768x768.webp)