
Teriyaki Chicken Pineapple Skillet Easy Dinner Delight
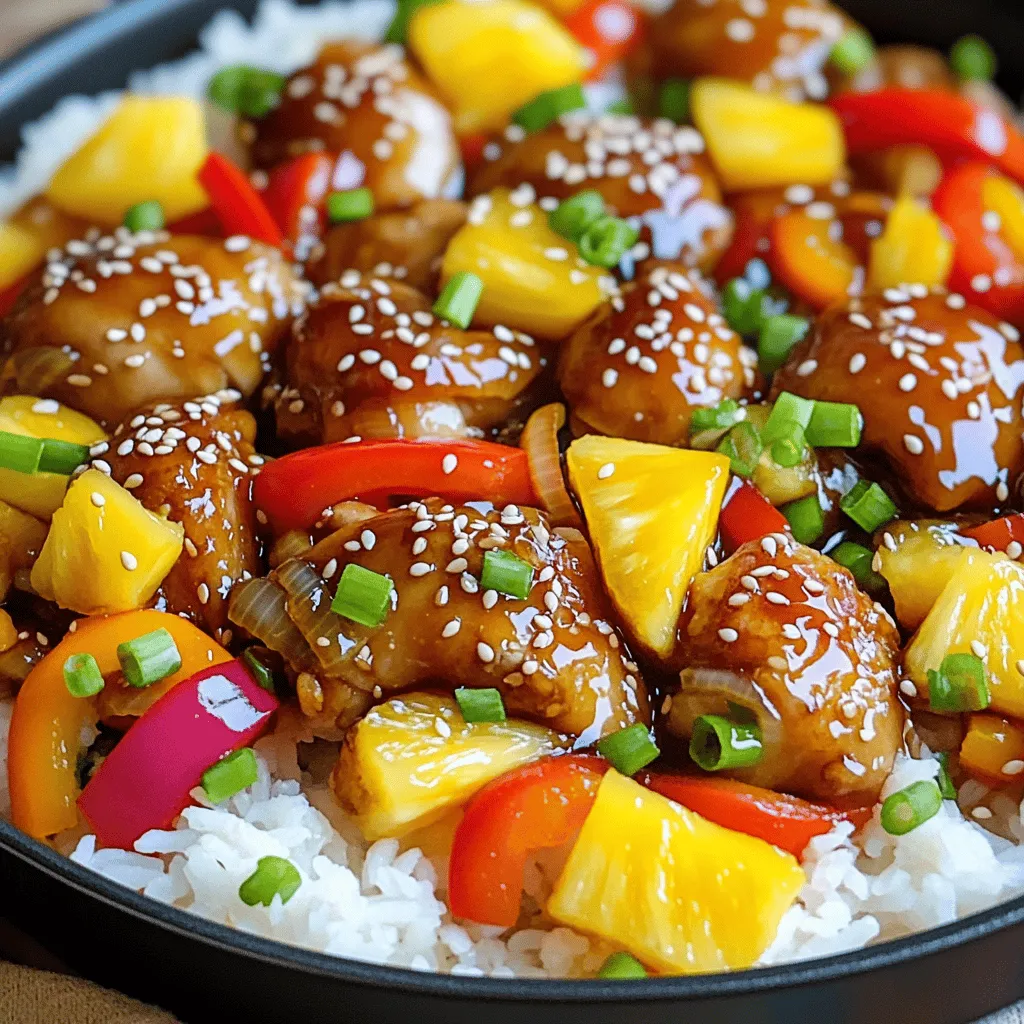
Imagine a dish that mixes sweet and savory with a tropical twist. My Teriyaki Chicken Pineapple Skillet is the perfect easy dinner delight! You’ll love how chicken, vibrant veggies, and juicy pineapple come together in one pot. This simple recipe takes just a few steps to make a satisfying meal. Ready to impress your taste buds? Let’s gather our ingredients and get cooking!
Why I Love This Recipe
- Quick and Easy: This recipe comes together in just 25 minutes, making it a perfect choice for busy weeknights.
- Flavorful Combination: The sweet and tangy teriyaki sauce pairs beautifully with the juicy chicken and fresh pineapple.
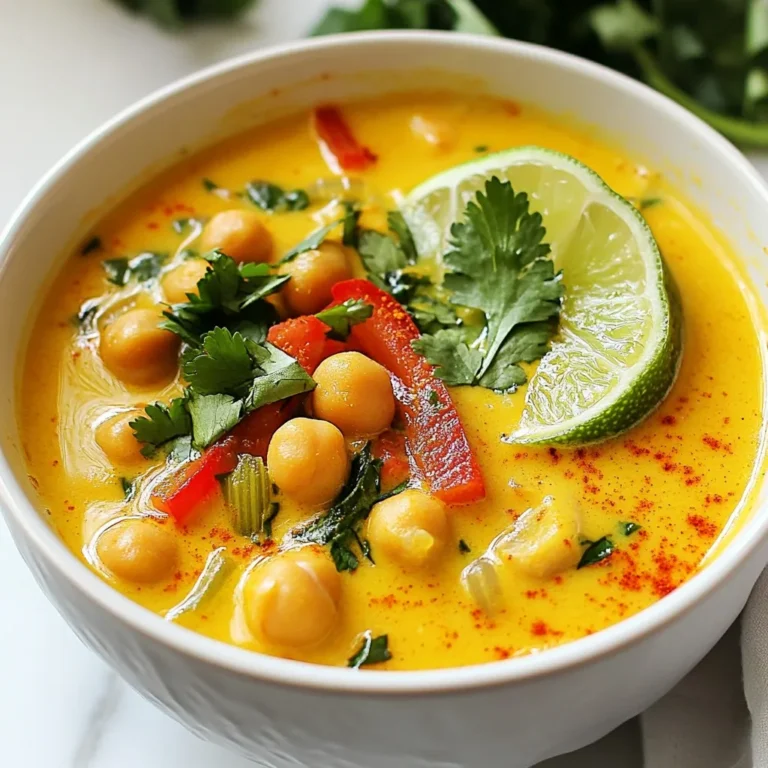
- Colorful Presentation: The vibrant colors of bell pepper, pineapple, and green onions make this dish visually appealing.
- Healthy and Satisfying: With lean chicken, fresh veggies, and served over quinoa or rice, this meal is both nutritious and filling.
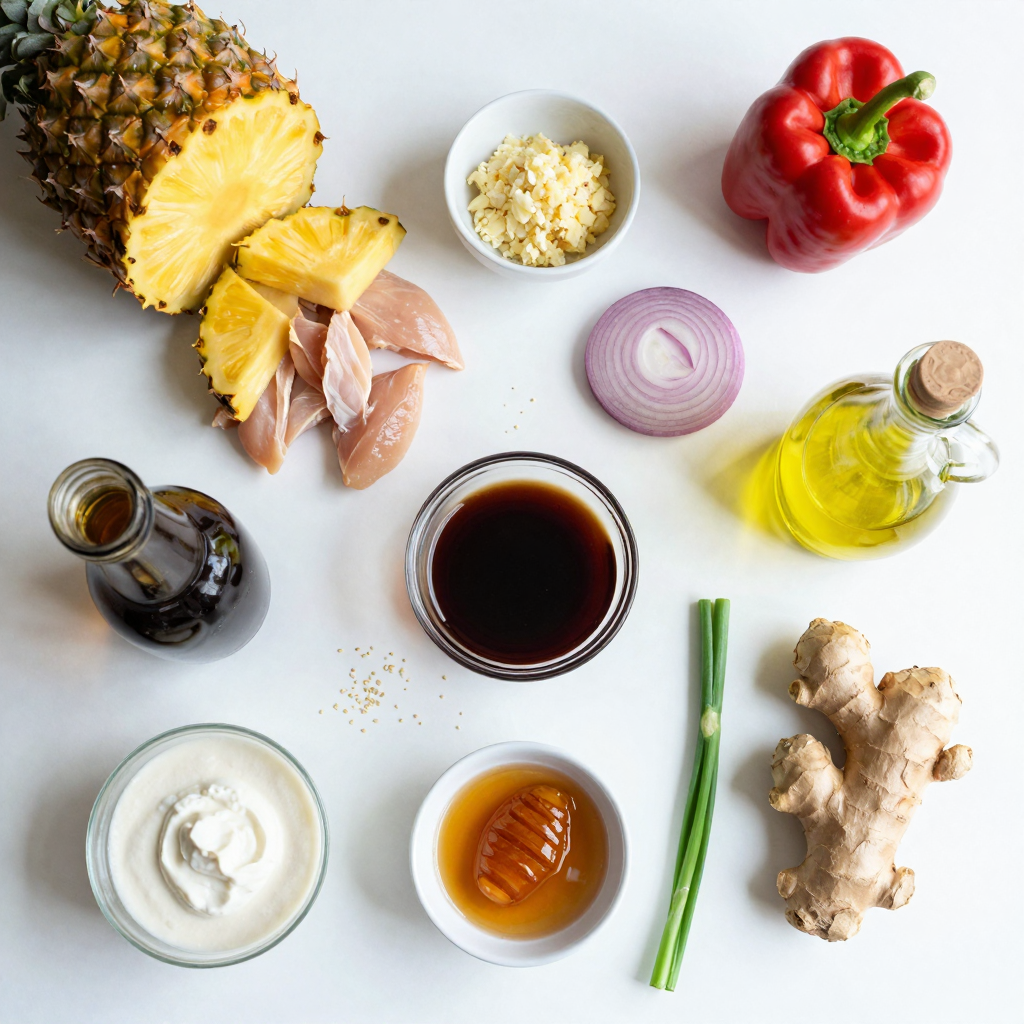
Ingredients
Main ingredients for Teriyaki Chicken Pineapple Skillet
- 1 lb boneless, skinless chicken thighs, cut into bite-sized pieces
- 1 cup pineapple chunks (fresh or canned)
- 1 tablespoon olive oil
- 1 bell pepper (red or yellow), sliced
- 1 small onion, sliced
- 3 cloves garlic, minced
The chicken thighs provide a tender and juicy base. Pineapple adds sweetness and a tropical twist. The bell pepper brings crunch and color. The onion and garlic give a rich flavor.
Key spices and condiments
- 1/4 cup low-sodium soy sauce
- 2 tablespoons honey
- 1 tablespoon rice vinegar
- 1 teaspoon grated fresh ginger
- 1 tablespoon cornstarch mixed with 2 tablespoons water (slurry)
- 2 thinly sliced green onions, for garnish
- Sesame seeds, for garnish
Low-sodium soy sauce keeps the dish flavorful without being too salty. Honey balances the flavors with sweetness. Rice vinegar adds a tangy kick. Fresh ginger gives warmth and depth to the sauce. The cornstarch slurry thickens the dish for a nice texture.
Serving suggestions (rice/quinoa)
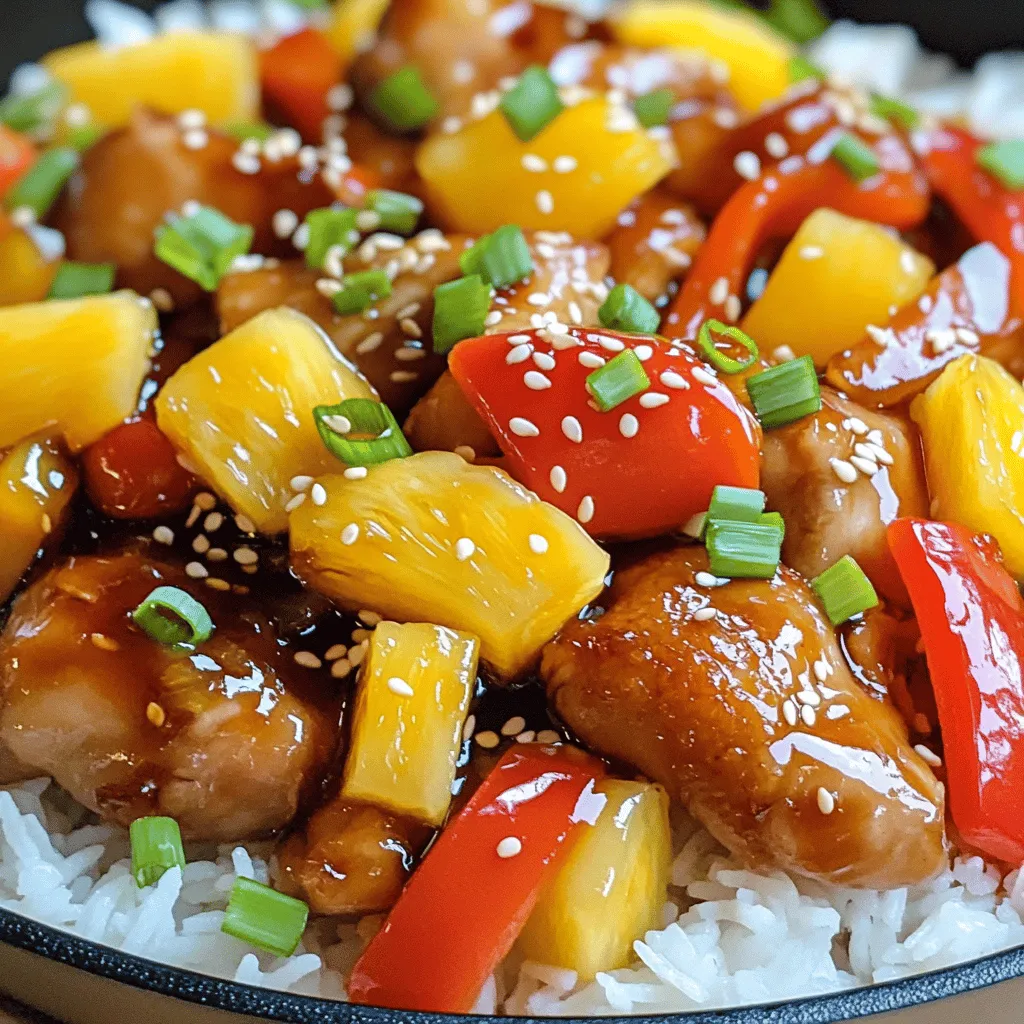
Serve this dish over cooked rice or quinoa. Both options soak up the sauce well. Rice offers a classic touch, while quinoa adds protein. Top with green onions and sesame seeds for a fresh finish. Enjoy this vibrant meal with family or friends!
Step-by-Step Instructions
Preparation of chicken and vegetables
Start by cutting the chicken thighs into bite-sized pieces. This helps them cook evenly. Slice the bell pepper and onion thinly. Mince the garlic and set all the veggies aside. If you use fresh pineapple, cut it into chunks, or grab a can for quick prep. This step makes cooking smoother and faster.
Cooking process in the skillet
Heat the olive oil in a large skillet over medium-high heat. Once hot, add the chicken pieces. Cook them for about 5-7 minutes. You want them browned and cooked through. Next, add the sliced onion and minced garlic. Stir and cook for 2-3 minutes until the onion turns translucent. This adds flavor to your dish.
Then, add the sliced bell pepper and pineapple chunks to the skillet. Cook everything for another 3 minutes, stirring occasionally. This keeps the veggies crisp. In a small bowl, mix the soy sauce, honey, rice vinegar, and grated ginger. Pour this mixture over the chicken and veggies. Bring it to a gentle simmer for 3-4 minutes.
Now, stir in the cornstarch slurry to thicken the sauce. Cook for another 1-2 minutes until the sauce thickens. This will coat the chicken and veggies nicely.
Final touches and serving instructions
Serve the teriyaki chicken mixture over cooked rice or quinoa. This adds a nice base to your meal. Garnish with sliced green onions and a sprinkle of sesame seeds. These toppings give extra color and crunch. Enjoy this easy dinner delight!
Pro Tips
- Choose Fresh Ingredients: Using fresh pineapple and vegetables enhances the flavor and texture of the dish. If using canned pineapple, opt for those packed in juice rather than syrup for a healthier option.
- Marinate the Chicken: For an extra flavor boost, consider marinating the chicken in the soy sauce, honey, and ginger mixture for at least 30 minutes before cooking. This step infuses the meat with deeper flavors.
- Adjust the Sweetness: Feel free to adjust the amount of honey based on your personal preference for sweetness. You can also substitute with maple syrup or agave nectar for a different flavor profile.
- Serving Suggestions: Pair this dish with a side of steamed vegetables or a crunchy salad to add balance and freshness to your meal. Quinoa is a great alternative to rice for added protein.
Tips & Tricks
How to choose the best chicken thighs
When picking chicken thighs, look for fresh meat. Choose thighs that feel firm and moist. The color should be a nice pink, not gray. If you can, buy organic or free-range chicken. These options often taste better and are healthier.
Tips for achieving the perfect sauce consistency
To get the sauce just right, mix cornstarch with water to make a slurry. This thickens the sauce quickly and easily. Add it slowly to the skillet while stirring. Watch the sauce closely; it will thicken fast. If it’s too thick, add a little water or broth. If too thin, add more slurry.
Best practices for meal prep and cooking
Prep all your ingredients before you cook. This makes the process smooth and quick. Cut the chicken, slice the vegetables, and measure the sauce. Use a large skillet to give everything room to cook. Stir often to prevent sticking and burning. Keep your heat at medium-high for the best results. Enjoy the lovely smell as it cooks!
Variations
Alternative ingredients for a unique twist
You can switch up the chicken with shrimp or tofu. Shrimp cooks fast and adds sweet flavor. Tofu gives a nice texture and is great for plant lovers. You can also use mango instead of pineapple. It adds a tropical taste and a juicy bite. Adding some chili flakes makes it spicy if you want heat. Switch the bell pepper for broccoli or snap peas for a crunchy feel.
Vegetarian options for Teriyaki Pineapple Skillet
For a vegetarian version, use firm tofu or tempeh instead of chicken. Cut the tofu into cubes and sauté until golden. You could also use chickpeas for a protein boost. They soak up the flavors well. Make sure to use vegetable broth instead of chicken broth if you like. This keeps the dish fully plant-based and just as tasty.
Serving with different sides or toppings
While rice or quinoa is great, try serving it with noodles too. Soba or rice noodles work well. You can also use cauliflower rice for a low-carb option. Top with crushed peanuts for crunch or add fresh herbs like cilantro for flavor. A squeeze of lime juice over the dish can brighten up the flavors too. This makes every bite exciting and fresh!
Storage Info
Best ways to store leftovers
To keep your teriyaki chicken pineapple skillet fresh, let it cool first. Place it in an airtight container. This helps lock in flavor and moisture. Store it in the fridge for up to three days. If you notice any excess liquid, just drain it before sealing the container.
Reheating instructions for optimal flavor
Reheat your leftovers in a skillet for the best taste. Add a splash of water to keep it moist. Heat it over medium until it’s hot. Stir it gently to prevent sticking. You can also use the microwave. Heat it in a bowl, covered, for about one to two minutes. Stir halfway through to ensure even heating.
Freezing options and tips
If you want to save some for later, freezing is a great choice. First, let the dish cool completely. Then, place it in a freezer-safe container. Be sure to leave some space at the top for expansion. You can freeze it for up to three months. When ready to enjoy, thaw it in the fridge overnight. Reheat it on the stove for the best flavor.
FAQs
Can I use chicken breast instead of thighs?
Yes, you can use chicken breast. Chicken breasts are leaner than thighs. This change may make the dish less juicy. If you prefer, cook the breasts for less time. They cook faster than thighs.
How can I make this recipe gluten-free?
To make this dish gluten-free, use gluten-free soy sauce. Many brands offer this option. Check labels to ensure no gluten is present. You can also use tamari, which is naturally gluten-free. This keeps the teriyaki flavor intact.
What are some common side dishes to serve with this dish?
Serve this teriyaki chicken with rice or quinoa. Both are great for soaking up sauce. You can also add steamed broccoli or snap peas for crunch. A simple green salad pairs nicely, too. Enjoy mixing flavors and textures!
In this blog post, we explored how to make Teriyaki Chicken Pineapple Skillet. We covered key ingredients, cooking steps, and useful tips. You learned about choosing chicken thighs, achieving sauce perfection, and serving with rice or quinoa. We also shared fun variations, storage tips, and answered common questions.
With this guide, you can create a tasty dish that suits your taste. Enjoy your cooking adventure and share this recipe with friends!

Teriyaki Chicken Pineapple Skillet
Ingredients
1 lb (450g) boneless, skinless chicken thighs, cut into bite-sized pieces
1 cup pineapple chunks (fresh or canned)
1 tablespoon olive oil
1 bell pepper (red or yellow), sliced
1 small onion, sliced
3 cloves garlic, minced
1/4 cup low-sodium soy sauce
2 tablespoons honey
1 tablespoon rice vinegar
1 teaspoon grated fresh ginger
1 tablespoon cornstarch mixed with 2 tablespoons water (slurry)
2 thinly sliced green onions, for garnish
Sesame seeds, for garnish
Cooked rice or quinoa, for serving
Instructions
Heat the olive oil in a large skillet over medium-high heat. Add the chicken pieces and sauté for about 5-7 minutes, or until they are browned and cooked through.
Once the chicken is cooked, add the sliced onion and garlic to the skillet. Stir and cook for an additional 2-3 minutes until the onion becomes translucent.
Add the sliced bell pepper and pineapple chunks to the skillet. Cook for another 3 minutes, stirring occasionally.
In a small bowl, whisk together the soy sauce, honey, rice vinegar, and grated ginger. Pour this mixture over the chicken and vegetables in the skillet.
Bring the mixture to a gentle simmer and allow it to cook for 3-4 minutes. Stir in the cornstarch slurry to thicken the sauce; continue to cook for an additional 1-2 minutes until the sauce thickens to your desired consistency.
Serve the teriyaki chicken mixture over cooked rice or quinoa. Garnish with sliced green onions and a sprinkle of sesame seeds.
Prep Time: 10 minutes | Total Time: 25 minutes | Servings: 4
Teriyaki Chicken Pineapple Skillet
Ingredients
- 1 lb boneless, skinless chicken thighs, cut into bite-sized pieces
- 1 cup pineapple chunks (fresh or canned)
- 1 tablespoon olive oil
- 1 whole bell pepper (red or yellow), sliced
- 1 small onion, sliced
- 3 cloves garlic, minced
- 1 4 cup low-sodium soy sauce
- 2 tablespoons honey
- 1 tablespoon rice vinegar
- 1 teaspoon grated fresh ginger
- 1 tablespoon cornstarch mixed with 2 tablespoons water (slurry)
- 2 whole thinly sliced green onions, for garnish
- 1 tablespoon sesame seeds, for garnish
- 1 serving cooked rice or quinoa, for serving
Instructions
- Heat the olive oil in a large skillet over medium-high heat. Add the chicken pieces and sauté for about 5-7 minutes, or until they are browned and cooked through.
- Once the chicken is cooked, add the sliced onion and garlic to the skillet. Stir and cook for an additional 2-3 minutes until the onion becomes translucent.
- Add the sliced bell pepper and pineapple chunks to the skillet. Cook for another 3 minutes, stirring occasionally.
- In a small bowl, whisk together the soy sauce, honey, rice vinegar, and grated ginger. Pour this mixture over the chicken and vegetables in the skillet.
- Bring the mixture to a gentle simmer and allow it to cook for 3-4 minutes. Stir in the cornstarch slurry to thicken the sauce; continue to cook for an additional 1-2 minutes until the sauce thickens to your desired consistency.
- Serve the teriyaki chicken mixture over cooked rice or quinoa. Garnish with sliced green onions and a sprinkle of sesame seeds.
. First, preheat your oven to 350°F (175°C). This makes sure your casserole cooks evenly. Next, grab a large baking dish. Spread a thin layer of alfredo sauce on the bottom. This helps prevent sticking. Now, let’s sauté some garlic and onion. In a skillet, heat a tablespoon of oil over medium heat. Add the minced garlic and diced onion. Cook until the onion is clear, about 4-5 minutes. This step brings out great flavor. Next, add the shredded chicken, black beans, corn, cumin, chili powder, salt, and pepper. Mix well and cook for 3-4 minutes. This allows the flavors to blend nicely. Now, let’s dip the tortillas in alfredo sauce. Coat both sides lightly for the best flavor. Lay 6 tortillas flat in the baking dish. Overlap them slightly, if needed. Next, it's time to assemble the layers. Spread half of the chicken and bean mixture over the tortillas. Then, sprinkle half of the shredded cheese on top. Repeat this process with the remaining tortillas and chicken mixture. Finish by pouring the rest of the alfredo sauce and topping with the last of the cheese. To bake, cover the dish with aluminum foil, shiny side in. Bake for 25 minutes. This keeps moisture in. After that, remove the foil and bake for another 10-15 minutes. You want the cheese to be bubbly and golden brown. Let the casserole cool for 5 minutes before serving. Garnish with fresh cilantro for a tasty touch. For the full recipe, check out the complete details. You can make this casserole a day before. Just prepare each part and store them in the fridge. Keep the tortillas, chicken mixture, and sauce separate until you are ready to bake. This way, the flavors blend well. When ready, layer as directed in the Full Recipe. Bake it straight from the fridge for about 10 extra minutes. Taste is key. Adjust the seasoning to fit your preference. If you like it spicier, add more chili powder. For a creamier texture, stir in a bit more alfredo sauce. You can also mix in a splash of milk or cream for extra richness. This makes every bite so much better. Pair your casserole with simple side dishes like a fresh salad or rice. These balance the cheesy richness of the enchiladas. For garnish, sprinkle fresh cilantro on top. You could also add sliced green onions or diced tomatoes for color. This makes your dish look as good as it tastes! {{image_2}} You can switch up the protein in this dish. Instead of chicken, try beef or shrimp. Ground beef adds a nice flavor. Shrimp gives a light touch. Both options work well with the creamy sauce. For a vegetarian version, use black beans or lentils. They add protein and keep it satisfying. Boost the flavor by adding spices. Try a pinch of cayenne for heat. You can also mix in smoked paprika for a smoky taste. Adding vegetables makes it even better. Bell peppers, spinach, or zucchini all work great. They add color and nutrients to your meal. If you need a gluten-free meal, corn tortillas are your best choice. They hold up well and taste great. You can also find gluten-free alfredo sauce at the store. Check labels to ensure it meets your needs. This way, everyone can enjoy the casserole without worry. For the full recipe, be sure to check out the ingredients and instructions. To keep your Chicken and Cheese Enchiladas Alfredo Casserole fresh, use airtight containers. Glass or plastic containers with tight lids work best. This keeps the casserole from drying out and helps it stay tasty. In the fridge, the casserole lasts about three to four days. You can freeze the casserole before or after baking. If you freeze it before baking, wrap it tightly in plastic wrap and then again in foil. This helps prevent freezer burn. If you choose to freeze it after baking, wait for it to cool first. Then, store it in a freezer-safe container. When you are ready to eat, thaw the casserole overnight in the fridge. To reheat, place it in the oven at 350°F (175°C) until warm all the way through. You can also microwave it for a quicker option, but check often to avoid overcooking. Enjoy your delicious casserole, even days later! For the full recipe, check out the complete details. How to reheat Chicken and Cheese Enchiladas Alfredo Casserole? To reheat, preheat your oven to 350°F (175°C). Place the casserole in a baking dish and cover with foil. Bake for about 20 minutes or until hot. You can also use a microwave. Heat in short intervals, stirring in between, until warm. Can I make it ahead of time? Yes, you can prepare the casserole a day before. Assemble it and store it in the fridge. Just bake it when you’re ready to serve. This saves time and adds flavor as it sits. What can I serve with Chicken and Cheese Enchiladas Alfredo Casserole? I love serving this casserole with a fresh salad or some Mexican rice. You can also add guacamole, sour cream, or fresh salsa. These sides balance the richness and make the meal more delicious. What’s the best way to adjust the spice level? To change the spice level, you can add more or less chili powder. If you want it milder, skip the chili powder. For more heat, add diced jalapeños or a dash of hot sauce. How to tell when it's done baking? You’ll know it’s done when the cheese is bubbly and golden brown. The casserole should be hot all the way through. A knife inserted in the center should come out warm. Enjoy the full recipe to make this dish shine! This blog post covered a delicious Chicken and Cheese Enchiladas Alfredo Casserole. We discussed the key ingredients, including chicken, tortillas, and cheese. I offered tips on how to prepare, layer, and bake the dish for perfect results. Remember to try the variations to suit your taste. In summary, this dish is easy to make and full of flavor. It works well for gatherings or busy weeknights. Enjoy this tasty casserole and make it your own!](https://dailydishlab.com/wp-content/uploads/2025/06/c52f16b1-e126-40f1-801c-467dac7db649-768x768.webp)
![To make black bean stuffed peppers, you need fresh, wholesome items. Here is what you'll need: - 4 large bell peppers (any color) - 1 can (15 oz) black beans, rinsed and drained - 1 cup cooked quinoa - 1 cup corn kernels (fresh or frozen) - 1 cup diced tomatoes (canned or fresh) - ½ cup diced red onion - 1 teaspoon cumin - 1 teaspoon smoked paprika - ½ teaspoon garlic powder - ½ teaspoon chili powder - Salt and pepper to taste - 1 cup shredded cheese (cheddar or pepper jack) - Fresh cilantro, chopped (for garnish) These ingredients blend to create a tasty and filling meal. The black beans offer protein and fiber. The quinoa adds more nutrients, while the peppers provide color and crunch. This recipe serves four people. Each stuffed pepper is a complete meal. You can pair them with a salad or bread for a larger dinner. If you want leftovers, consider making extra peppers. They keep well in the fridge for a few days. I often choose fresh ingredients when I can. Fresh bell peppers taste better and add more nutrition. However, canned items make cooking easier. For example, canned black beans save time. Rinse them well to reduce sodium. Use fresh corn when it’s in season for the best flavor. For tomatoes, choose canned or fresh based on your preference. Both work well in this dish. Start by preheating your oven to 375°F (190°C). Take your bell peppers and cut off the tops. Be careful not to cut too much. Remove the seeds and membranes inside. Keep the peppers whole. They will hold the filling. You can use any color you like. Red, yellow, or green all work well. Set them aside while you prepare the filling. In a large bowl, mix together the following ingredients: - 1 can (15 oz) black beans, rinsed and drained - 1 cup cooked quinoa - 1 cup corn kernels (fresh or frozen) - 1 cup diced tomatoes (canned or fresh) - ½ cup diced red onion - 1 teaspoon cumin - 1 teaspoon smoked paprika - ½ teaspoon garlic powder - ½ teaspoon chili powder - Salt and pepper to taste Stir everything until well combined. The mixture should be colorful and fragrant. This filling is packed with flavor and nutrition. You can taste it to check the seasoning. Adjust with more salt or spices if needed. Spoon the filling into each bell pepper. Fill them generously, but don’t overfill. Place the stuffed peppers upright in a baking dish. If they seem wobbly, you can add a little water to the dish. This helps steam the peppers as they cook. Cover the dish with aluminum foil. Bake for 30 minutes. After that, remove the foil and sprinkle cheese on top. Use about 1 cup of shredded cheese, like cheddar or pepper jack. Bake for another 10-15 minutes. You want the cheese to melt and bubble. Once done, take them out and let cool for a few minutes. Garnish with fresh cilantro for a pop of color. Enjoy your tasty Black Bean Stuffed Peppers! For the full recipe, click [Full Recipe]. To keep your peppers firm, avoid overcooking them. Pre-baking the peppers for just 10 minutes helps. This gives them a head start without making them mushy. If you want extra crunch, skip the water in the baking dish. Instead, bake the peppers dry. The filling will steam them nicely. Taste your filling before you stuff the peppers. If it needs more flavor, add spices. You can increase the garlic powder or chili powder for a kick. For a fresh flavor, try adding lime juice. It brightens the dish and makes each bite pop. Don’t forget to adjust the salt to your liking! Cheese adds creaminess and flavor. I love using shredded cheddar or pepper jack. If you want a twist, try crumbled feta or goat cheese. For a crunchy topping, sprinkle crushed tortilla chips before serving. Fresh cilantro adds color and taste. You can also drizzle some avocado or sour cream on top for extra goodness. For the full recipe, check out the Black Bean Fiesta Stuffed Peppers. {{image_2}} You can easily add meat to your stuffed peppers. Ground beef or turkey works well. Just brown the meat in a pan before mixing it with the other filling ingredients. This adds more protein and flavor. If you like, you can also use shredded chicken or pulled pork. These options make the dish heartier. They can balance the beans and grains nicely. If you want to change the grain, quinoa is not the only option. You can use brown rice, farro, or even couscous. Each grain gives a different taste and texture. Brown rice is chewier, while couscous cooks faster and is fluffier. Farro has a nutty flavor that adds depth. Feel free to mix it up based on what you have at home. For those who enjoy heat, you can spice things up easily. Add fresh jalapeños or red pepper flakes to the filling. You can also use hotter chili powders. If you prefer a milder dish, reduce the chili powder and cumin. Adding a dollop of sour cream or yogurt on top also cools the heat. Adjust the spices to match your taste and enjoy a perfect meal. Check out the Full Recipe for details on making these tasty stuffed peppers! After you enjoy your Black Bean Stuffed Peppers, store leftovers in an airtight container. Make sure they cool down to room temperature first. Place a layer of plastic wrap or parchment paper between layers if stacking. This keeps them fresh and prevents sticking. Stored this way, they last for up to four days in the fridge. Want to save some for later? You can freeze these stuffed peppers! Let them cool completely. Wrap each pepper in plastic wrap, then in foil. This method prevents freezer burn. You can also place them in a freezer-safe bag. They will stay good for about three months. When you're ready to eat, thaw them in the fridge overnight. To reheat, remove the peppers from the fridge or freezer. If frozen, let them thaw first. Preheat your oven to 350°F (175°C). Place the peppers in a baking dish. Cover with foil to keep them moist. Bake for 20-25 minutes until heated through. You can also microwave them for 2-3 minutes, but the oven keeps them crispy. Enjoy your meal again! For the full recipe, check the [Full Recipe]. Yes, you can make these peppers ahead. Prepare the filling and stuff the peppers. Then, cover and refrigerate them. Bake them later when you are ready to eat. This saves time and makes dinner easy. You can use pinto beans or kidney beans instead. Chickpeas are also a great choice. If you prefer a meat option, ground turkey works well too. Each choice brings a different taste, but all can make your dish delightful. Yes, you can cook stuffed peppers on the stovetop. Use a large skillet with a lid. Add a little water or broth to the skillet. Place the stuffed peppers in the pan, cover, and cook on low heat. This method takes about 25 to 30 minutes. Check them often to avoid burning. In this blog post, we covered all about stuffed peppers. We reviewed ingredients, portions, and the choice between fresh and canned. Next, I shared step-by-step instructions for prepping and baking. I shared tips to avoid soggy peppers and enhance flavors. You learned variations like adding meat or grains and how to store leftovers. Stuffed peppers are not just tasty but also easy to prepare. Enjoy your cooking and make it your own!](https://dailydishlab.com/wp-content/uploads/2025/07/2ade4988-b5b7-4125-b2de-b7911ae6a9e2-768x768.webp)

![- 2 cups cooked shredded chicken - 1 can (15 oz) black beans, drained and rinsed - 1 can (15 oz) corn, drained - 1 packet taco seasoning - 1 cup salsa The main ingredients create the base of your casserole. The chicken offers protein and flavor. Black beans add fiber and a nice texture. Corn brings a touch of sweetness. Taco seasoning gives it that classic taco flavor. Salsa adds moisture and a pop of zest. - 1 cup sour cream - 2 cups shredded cheddar cheese (divided) The creamy layer makes this dish rich and smooth. Sour cream balances the spices with its coolness. The cheddar cheese melts beautifully, adding a great taste. Using two cups lets you have some on top for that golden finish. - 8 small corn tortillas, cut into quarters - 1 jalapeño, diced (optional) - Fresh cilantro, sliced avocado, and lime wedges for serving Corn tortillas are the backbone of this casserole. They soak up flavors and keep the layers together. You can add jalapeños for a spicy kick. Fresh cilantro, avocado, and lime make great garnishes. They brighten the dish and add freshness. For the full recipe, check out the details provided earlier. - Preheat oven to 350°F (175°C). - In a large mixing bowl, combine cooked chicken, black beans, corn, taco seasoning, and salsa. Mix well until combined. This step is key. It brings all the flavors together. The chicken adds protein, while beans and corn give texture. Taco seasoning provides that classic flavor we all love. Salsa adds moisture and zest. - In another bowl, mix sour cream with 1 cup of cheddar cheese. This makes a creamy layer. - In a 9x13 inch baking dish, spread half of the tortilla quarters. - Layer half of the chicken mixture over the tortillas. - Spread half of the sour cream and cheese mixture on top. You want to build layers for great taste. The tortillas give a base. The chicken mixture adds heartiness, and the creamy layer keeps it rich. - Repeat these layers using the remaining tortillas, chicken mixture, and creamy layer. - Top with the last cup of cheddar cheese. If using jalapeños, add them now. This final layer of cheese melts beautifully. It forms a golden crust that is hard to resist. - Cover the dish with foil. Bake for 30 minutes. - After 30 minutes, remove the foil. Bake for another 10-15 minutes until bubbly and golden. Baking warms everything through. The covered dish helps steam the casserole. Once uncovered, the cheese gets that nice golden color. For the full recipe, refer to the earlier section. Enjoy the process! To make your chicken taco casserole truly shine, use homemade or high-quality taco seasoning. The right seasoning packs a punch and enhances the flavor of your dish. Also, let the casserole cool slightly before serving. This small step brings out the flavors even more, making every bite enjoyable. Serve your casserole hot, and don’t skip the garnishes! Fresh cilantro and avocado add a burst of flavor. You can also pair it with a side salad or rice. These sides make for a complete meal that everyone will love. To make this dish, you will need a few simple tools: - Large mixing bowl - 9x13 inch baking dish - Aluminum foil These tools help ensure your casserole cooks evenly and looks great on your table. Don't forget to check the full recipe for detailed steps! {{image_2}} You can easily mix things up in your chicken taco casserole. If you want a different flavor, swap the chicken for ground turkey or beef. Both meats add a unique taste and texture. You can also use black-eyed peas or pinto beans instead of black beans. This change keeps the dish hearty and adds extra protein. Do you like heat? Add more jalapeños for a spicy kick. You can also include diced green chiles for extra flavor. These spicy ingredients boost the taste and make your casserole really pop. Adjust the amount based on your spice preference. If you're looking for a meatless meal, try a vegetarian version. You can substitute the chicken with a mix of extra vegetables like bell peppers, zucchini, or mushrooms. You can also use plant-based proteins like lentils or tofu. This way, you can enjoy a tasty and filling casserole without any meat. For the full recipe, check out the [Full Recipe]. After you enjoy your chicken taco casserole, store leftovers in an airtight container. This keeps the flavors fresh. You can refrigerate it for up to 3-4 days. Just make sure to let it cool before sealing. If you want to keep it longer, freezing works well. You can freeze the casserole in individual portions or freeze the whole dish. It stays good for up to 3 months. When you're ready to eat, just thaw it in the fridge overnight. To reheat, you have two options. You can heat it in the oven at 350°F until it is warmed through. If you're in a hurry, use the microwave. Just make sure it heats evenly so every bite is nice and hot. Enjoy your meal! Yes, leftover rotisserie chicken works great for this recipe. It saves time and adds flavor. Just shred or chop the chicken before mixing it in. This method makes the dish even easier. You'll love how the chicken blends with the other ingredients. You can use flour tortillas as a substitute. They will work just as well. Cut them into quarters like corn tortillas. This small change won’t affect the taste much. You'll still enjoy the same delicious flavors in your casserole. Ensure to use gluten-free tortillas and check seasonings for gluten. Many brands offer gluten-free options. Look for taco seasoning that is labeled gluten-free. These small changes keep this dish safe for everyone. Enjoy your flavorful casserole without worry! This chicken taco casserole is a tasty and simple dish to make. We covered key ingredients like cooked chicken, black beans, and corn. The creamy layer with sour cream and cheddar adds flavor, while the tortillas bring it together. You can customize it with different meats or make it vegetarian. Store leftovers easily, or freeze them for later. Enjoy this dish hot with your favorite garnishes. I hope you find joy in making this recipe and sharing it with others.](https://dailydishlab.com/wp-content/uploads/2025/06/a9a43d40-fc95-41bf-8f1f-f0e9c5c83338-768x768.webp)