No-Bake Chocolate Peanut Butter Krispie Cups Delight
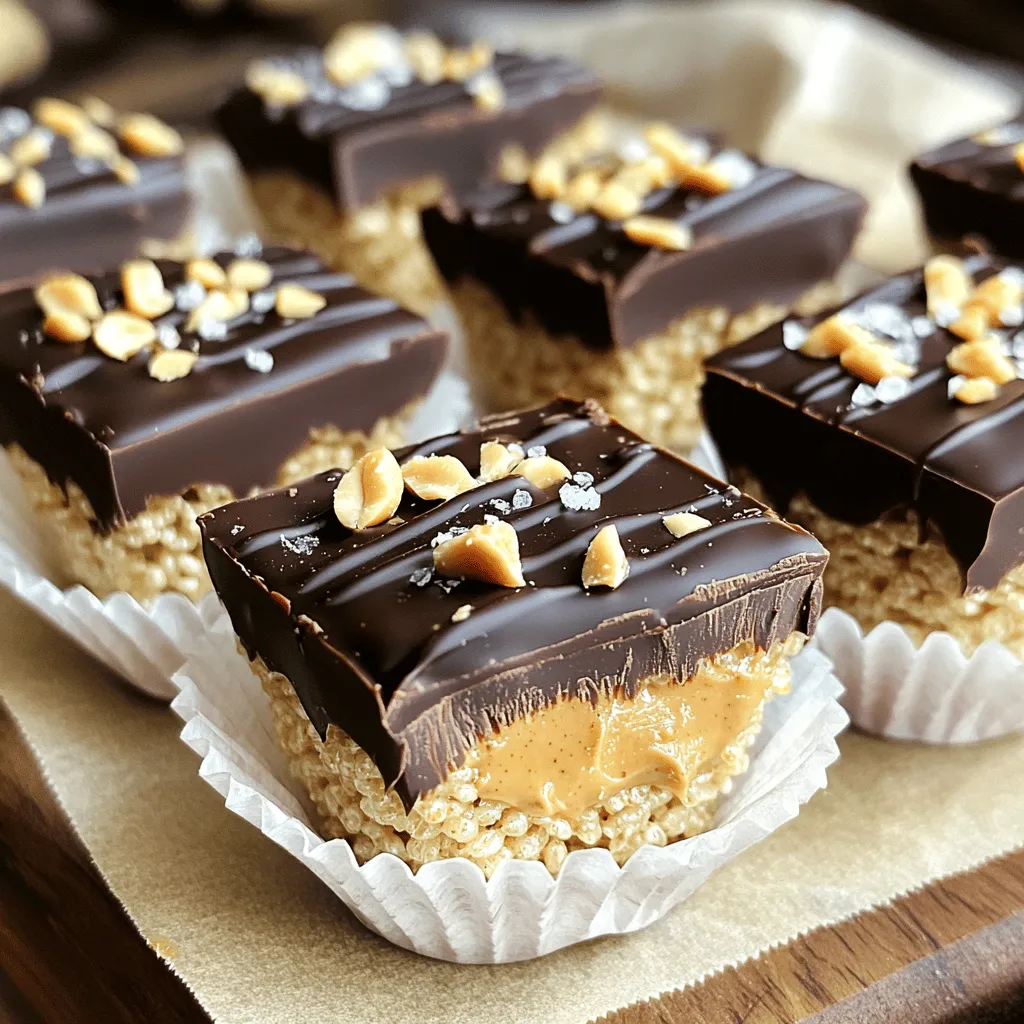
Get ready for a treat that’s both easy and delicious! My No-Bake Chocolate Peanut Butter Krispie Cups are a perfect sweet snack. With creamy peanut butter, crispy rice cereal, and rich dark chocolate, these cups will please your taste buds. Plus, they come together in no time. Let’s dive into the simple steps and enjoy a delightful dessert that you and your family will love!
Why I Love This Recipe
- Quick and Easy: This recipe requires no baking, making it perfect for a fast dessert or snack.
- Healthy Ingredients: With peanut butter, honey, and crispy rice cereal, these cups are a guilt-free treat.
- Customizable: Add your favorite toppings like crushed peanuts or mini chocolate chips for a personal touch.
- Perfect for Sharing: These delightful cups are great for parties, gatherings, or just to enjoy with family.
Ingredients
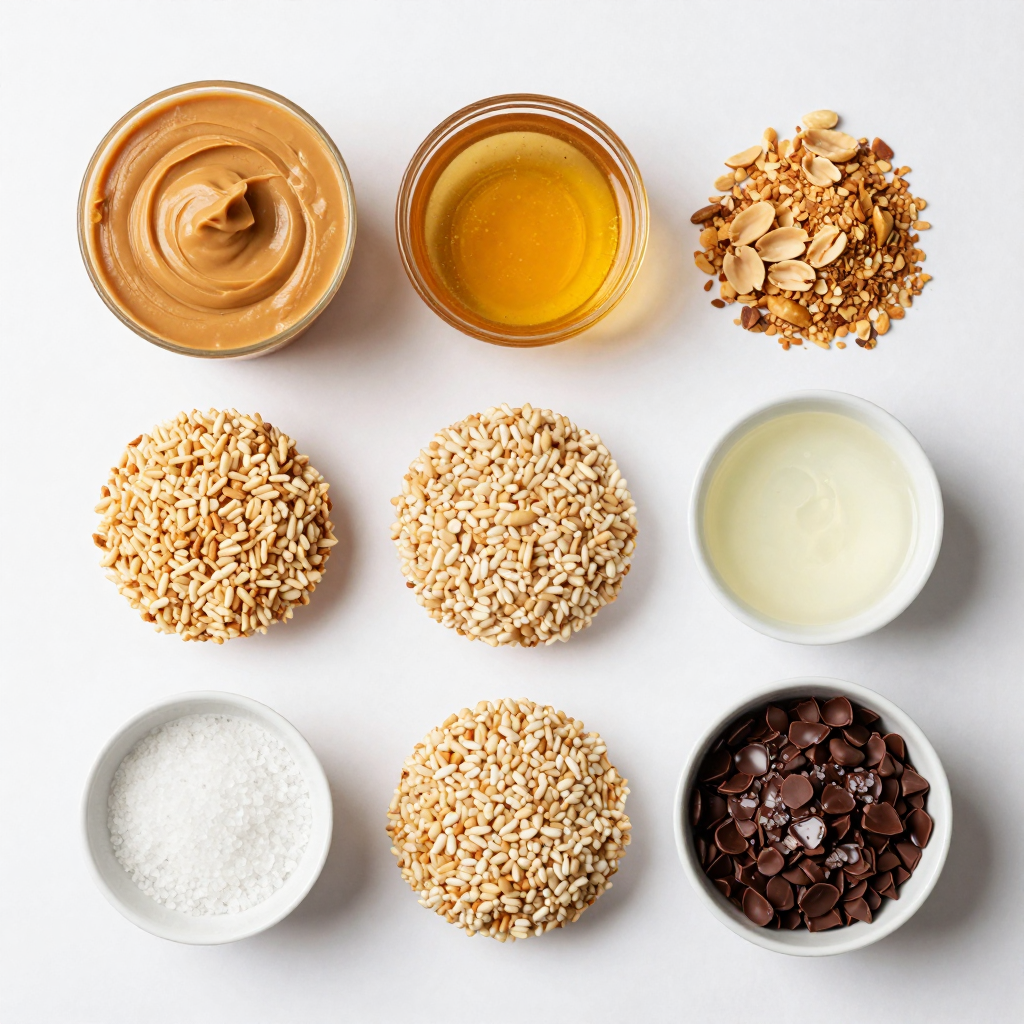
List of Required Ingredients
- 1 cup creamy peanut butter
- 1/2 cup honey or maple syrup
- 3 cups crispy rice cereal
- 1 cup dark chocolate chips
- 1/4 cup coconut oil
- 1/4 teaspoon sea salt
- Optional toppings: crushed peanuts, sea salt flakes, or mini chocolate chips
To create these No-Bake Chocolate Peanut Butter Krispie Cups, you need simple ingredients. Start with creamy peanut butter. It gives a rich taste and smooth texture. Honey or maple syrup adds sweetness. Choose what you like best.
The crispy rice cereal gives a nice crunch. Using dark chocolate chips adds a deep flavor. Coconut oil helps melt the chocolate smoothly. The sea salt helps balance the sweetness. You can also add toppings for extra fun. Crushed peanuts, sea salt flakes, or mini chocolate chips work great.
Gather these ingredients before you start. It makes the cooking process much easier. You can find most of these items at your local store. Now, you are ready to make a tasty treat!
Step-by-Step Instructions
Preparing the Peanut Butter Mixture
First, take a medium saucepan. Place it on low heat. Add 1 cup of creamy peanut butter and 1/2 cup of honey or maple syrup. Stir continuously until it melts. This should take just a few minutes. Remove the saucepan from the heat when it is smooth and well mixed.
Combining the Cereal
Next, grab a large mixing bowl. Pour in 3 cups of crispy rice cereal. Take the melted peanut butter mixture and pour it over the cereal. Sprinkle in 1/4 teaspoon of sea salt. Mix it all together until each piece of cereal gets coated. This step is key for flavor.
Creating the Chocolate Layer
Now, return to the same saucepan. Add 1 cup of dark chocolate chips and 1/4 cup of coconut oil. Heat this on low while stirring. You want it to melt completely and become creamy. Once smooth, it’s ready to use.
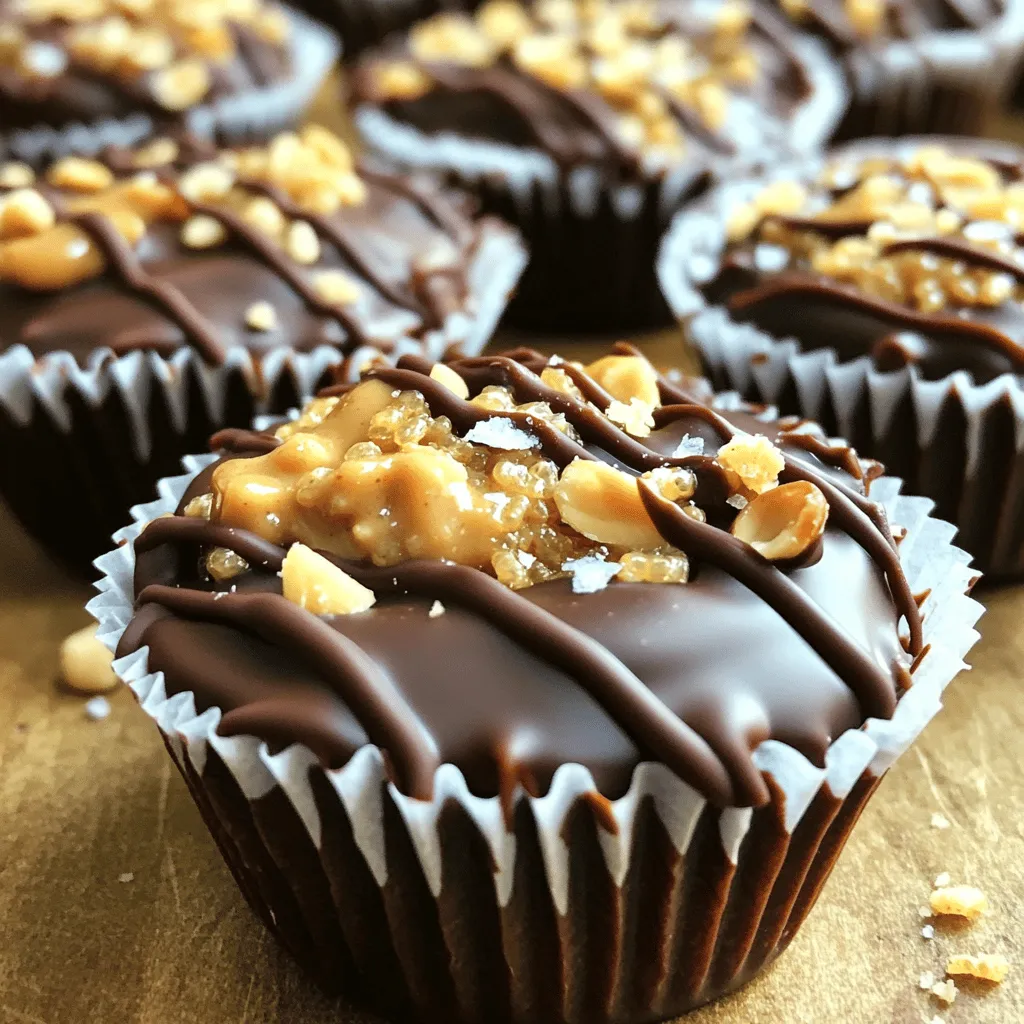
Setting the Cups in the Refrigerator
Line a muffin tin with paper liners. Spoon the peanut butter cereal mix into each liner. Press down to make a strong base, filling each liner halfway. Now, spoon the melted chocolate over the cereal layer in each cup. Make sure to cover it completely. You can add optional toppings like crushed peanuts or sea salt flakes on top for extra crunch. Finally, put the muffin tin in the fridge for at least 30 minutes. This helps the cups set. Once firm, gently remove them from the liners and enjoy!
Pro Tips
- Use Natural Peanut Butter: Opt for natural peanut butter without added sugars or oils for a healthier option that enhances flavor.
- Chill Before Serving: Allow the cups to chill for at least 30 minutes in the refrigerator to ensure they hold their shape and are easier to remove from the liners.
- Experiment with Sweeteners: Try different sweeteners like agave nectar or brown rice syrup to customize the sweetness level to your liking.
- Mix and Match Toppings: Get creative with toppings by adding shredded coconut, mini marshmallows, or your favorite nuts for extra texture and taste.
Tips & Tricks
How to Make Perfectly Layered Cups
To make great layers in your cups, start with the peanut butter mix. Make sure you press it down well in each muffin liner. A tight base holds everything together. Next, pour the melted chocolate on top. Be sure to cover the peanut butter mix fully. This keeps the layers clean and tasty. You can sprinkle some crushed peanuts or sea salt on top, too. These add crunch and flavor.
Substitutions for Ingredients
If you need to swap ingredients, there are great options. Use almond butter or sunflower seed butter instead of peanut butter. For sweeteners, maple syrup works well if you want a different taste. You can also use light corn syrup if you prefer. For the cereal, you can choose puffed rice or even granola. Just keep the same amount, so it stays crunchy.
Best Practices for Melting Chocolate
Melting chocolate can be tricky, but here are some tips. Always use low heat to avoid burning. Stir the chocolate chips often as they melt. You can add a bit of coconut oil to make it smooth. If the chocolate hardens too fast, just warm it again gently. Using a double boiler works well, too. This method helps control the heat and makes melting easier.
Variations
Nut-Free Option
You can easily make these cups nut-free. Simply swap the peanut butter for sun butter or soy nut butter. Both options give you similar creaminess without any nuts. This way, everyone can enjoy the treat, even those with nut allergies.
Vegan Version
For a vegan version, use maple syrup instead of honey. Also, choose dairy-free chocolate chips. Combine these swaps for a tasty, plant-based delight. You won’t lose any of the yummy flavor.
Flavor Add-Ins: Suggestions
Want to spice things up? Try adding extras like mini marshmallows or shredded coconut. You can also mix in some crispy cereal bits for a fun crunch. Another great idea is to add a dash of cinnamon or a splash of vanilla extract. These small changes make your cups unique and exciting.
Storage Info
How to Store No-Bake Chocolate Peanut Butter Krispie Cups
You can store your No-Bake Chocolate Peanut Butter Krispie Cups in an airtight container. Keep them in the fridge for the best taste and texture. This helps them stay fresh and firm. The cool air keeps the chocolate from melting and the cups from losing shape.
Freezing Instructions
If you want to keep them longer, freezing is a great option. Place each cup in a single layer in a freezer-safe container. You can also wrap them in plastic wrap first. When you want to eat them, let them thaw in the fridge for a few hours. This keeps their flavor rich and delicious.
Shelf Life and Best Use Timeline
These tasty cups last about a week in the fridge. For frozen cups, they can stay good for up to three months. However, I recommend enjoying them within a month for the best taste. After that, the texture may change and not be as pleasant. Enjoy your treats while they are still fresh!
FAQs
Can I use other types of nut butter?
Yes, you can use other nut butters. Almond butter and cashew butter work well. You can also try sunflower seed butter for a nut-free option. Each nut butter will change the taste a bit. Choose one you enjoy.
How can I make these gluten-free?
To make these cups gluten-free, use gluten-free crispy rice cereal. Always check the label. Most brands offer gluten-free options. This small change keeps your dessert safe for all.
What can I do if the chocolate hardens too quickly?
If your chocolate hardens too fast, try melting it over low heat. You can also add a bit more coconut oil. This will help keep it smooth and creamy. Stir it well to mix.
Can I make these ahead of time for parties?
Yes, you can make these cups ahead of time. They store well in the fridge for up to a week. You can also freeze them for longer storage. Just let them thaw before serving.
You learned how to craft no-bake chocolate peanut butter cups. We covered all the ingredients needed and gave clear step-by-step instructions. I shared tips to help you make the best cups and offered some creative variations to try.
Store your treats well, and enjoy the options for flavors. These cups are easy, fun, and perfect for sharing. Now, get started and treat yourself!

No-Bake Chocolate Peanut Butter Krispie Cups
Ingredients
1 cup creamy peanut butter
1/2 cup honey or maple syrup
3 cups crispy rice cereal
1 cup dark chocolate chips
1/4 cup coconut oil
1/4 teaspoon sea salt
Optional toppings: crushed peanuts, sea salt flakes, or mini chocolate chips
Instructions
In a medium saucepan over low heat, combine the peanut butter and honey (or maple syrup). Stir continuously until melted and well combined. Remove from heat.
In a large mixing bowl, add the crispy rice cereal and pour the melted peanut butter mixture over it. Add the sea salt and mix until the cereal is evenly coated.
Line a muffin tin with paper liners. Spoon the peanut butter cereal mixture into each liner, pressing down to form a compact layer at the bottom. Fill each liner to about halfway.
In the same saucepan, melt the dark chocolate chips and coconut oil over low heat, stirring until smooth and creamy.
Spoon the melted chocolate over the peanut butter cereal layer in each muffin liner, covering it completely.
Sprinkle optional toppings such as crushed peanuts or sea salt flakes on top of the chocolate layer for extra flavor and crunch.
Place the muffin tin in the refrigerator for at least 30 minutes to allow the cups to set completely. Once firm, remove from the liners and serve.
Prep Time: 15 minutes | Total Time: 45 minutes | Servings: 12 cups
No-Bake Chocolate Peanut Butter Krispie Cups
Ingredients
- 1 cup creamy peanut butter
- 1/2 cup honey or maple syrup
- 3 cups crispy rice cereal
- 1 cup dark chocolate chips
- 1/4 cup coconut oil
- 1/4 teaspoon sea salt
- to taste optional toppings: crushed peanuts, sea salt flakes, or mini chocolate chips
Instructions
- In a medium saucepan over low heat, combine the peanut butter and honey (or maple syrup). Stir continuously until melted and well combined. Remove from heat.
- In a large mixing bowl, add the crispy rice cereal and pour the melted peanut butter mixture over it. Add the sea salt and mix until the cereal is evenly coated.
- Line a muffin tin with paper liners. Spoon the peanut butter cereal mixture into each liner, pressing down to form a compact layer at the bottom. Fill each liner to about halfway.
- In the same saucepan, melt the dark chocolate chips and coconut oil over low heat, stirring until smooth and creamy.
- Spoon the melted chocolate over the peanut butter cereal layer in each muffin liner, covering it completely.
- Sprinkle optional toppings such as crushed peanuts or sea salt flakes on top of the chocolate layer for extra flavor and crunch.
- Place the muffin tin in the refrigerator for at least 30 minutes to allow the cups to set completely. Once firm, remove from the liners and serve.
![To make Peach Cream Cheese Danish, you need these key items: - 1 package (8 oz) cream cheese, softened - 1/4 cup granulated sugar - 1 teaspoon vanilla extract - 1 package (1 lb) refrigerated crescent roll dough - 2 ripe peaches, sliced thin - 1 tablespoon lemon juice - 1 teaspoon ground cinnamon - 1 egg, beaten (for egg wash) - Powdered sugar for drizzling These ingredients create a creamy filling and a flaky crust. The peaches add a sweet touch. You can add a few extra ingredients for more taste: - 1 tablespoon honey for sweetness - 1/2 teaspoon almond extract for a nutty note - Chopped nuts for crunch These extras can take your danish to the next level. Try them out for a twist! Gather these tools for easy cooking: - Mixing bowls - Whisk or electric mixer - Baking sheet - Parchment paper - Knife and cutting board Having the right tools makes the process smooth. You will feel like a pro in no time! For the complete recipe, check out the Full Recipe link. To start, gather your cream cheese, sugar, and vanilla extract. Beat the softened cream cheese in a bowl. Add the granulated sugar and vanilla extract next. Mix until you have a smooth and creamy filling. This step is simple but key. You want a rich flavor that pairs well with the peaches. Set this bowl aside as you move on. Now, let’s work with the crescent roll dough. Open the package and unroll it on a floured surface. Pinch the seams to form a rectangle. This helps keep the dough intact. Cut the dough into squares about 4 inches by 4 inches. Make a small indentation in the center of each square. This is where your filling will go. Next, take your sliced peaches. Toss them with lemon juice and ground cinnamon. This mix adds a bright taste. Place a tablespoon of the cream cheese filling in the center of each dough square. Top it with a few peach slices. You can fold the corners over the filling to create a pocket. This keeps the delicious filling inside. Before baking, brush the tops with a beaten egg. This gives the danishes a lovely golden color. Preheat your oven to 375°F (190°C). Line a baking sheet with parchment paper to prevent sticking. Bake the danishes for 15-18 minutes. Look for a golden brown color and puffed dough. Let them cool for a few minutes. Drizzle with powdered sugar for that sweet touch. Enjoy your Peach Cream Cheese Danish as a delightful treat! For the complete recipe, check the [Full Recipe]. To make your Peach Cream Cheese Danish shine, use ripe peaches. They add sweetness and flavor. You can also sprinkle a bit of extra sugar on the peaches before baking. It helps them caramelize and enhances their taste. For a rich creaminess, ensure your cream cheese is at room temperature. This makes it easy to blend with sugar and vanilla. Don’t rush this step. A smooth filling gives the best texture. If your danishes don't puff up, check your oven temperature. An oven that is too cool can lead to flat pastries. Also, ensure you seal the edges well. If they open during baking, the filling will spill out. If the dough is too sticky, add a bit of flour when rolling it out. This will help prevent sticking and make it easier to shape. These danishes are perfect warm. You can serve them with a scoop of vanilla ice cream or a dollop of whipped cream. For a fun twist, try pairing them with a cup of coffee or tea. They also make a great breakfast treat or a delightful dessert. You can find the full recipe to perfect your own Peach Cream Cheese Danish. Enjoy! {{image_2}} You can change up the fruit in your Danish. Try using apples, berries, or pears. Each fruit gives a new taste. Apples add crunch, while berries bring a sweet-tart flavor. For pears, use ripe ones for the best texture. You can mix fruits too! Combine peaches with blueberries for a fun twist. This way, you can create your favorite flavor each time. If you need gluten-free options, look for gluten-free crescent roll dough. Many brands have tasty choices that work well. For a vegan version, swap cream cheese for plant-based cream cheese. Use a vegan egg wash or skip it for a golden look. You can also replace sugar with maple syrup or agave for sweetening. These changes let everyone enjoy the Danish! Want to make your Danish even better? Add spices like nutmeg or ginger for warmth. You can mix in a splash of almond extract for a nutty taste. Try adding a dollop of jam on top of the cream cheese too. You can experiment with different flavors! The possibilities are endless, and you can find your perfect combo. Check the Full Recipe to see how to make your new favorite treat! To keep your Peach Cream Cheese Danish fresh, place it in an airtight container. This will help preserve its flavor and texture. You can store it in the fridge for up to three days. Just make sure it is completely cool before sealing it. If you prefer to keep it longer, freezing is a great option. When you want to enjoy your leftover Danish, reheating is simple. Preheat your oven to 350°F (175°C). Place the Danish on a baking sheet for about 10-15 minutes. This will warm it up nicely and keep the pastry crisp. You can also use a microwave if you're in a hurry, but the oven gives better results. If you want to freeze the Danish, wrap each piece tightly in plastic wrap. Then, place them in a freezer-safe bag. They can last up to three months in the freezer. When you're ready to eat, just thaw them in the fridge overnight. Reheat in the oven for the best taste. For the full recipe, check the earlier sections. Yes, you can use canned peaches. They save time and are easy to find. Just make sure to drain them well. Canned peaches can be softer than fresh ones. This may change the texture slightly. If you want a firmer bite, fresh peaches are best. You will know the danishes are done when they turn golden brown. The dough should be puffy and cooked through. You can also check the bottom. It should feel firm and have a slight crunch. If they look undercooked, give them a few more minutes. Yes, you can prepare the dough ahead of time. Just keep it covered in the fridge. Make sure to use it within a day or two. If you want to freeze it, roll it out and wrap it tightly. When ready, thaw it in the fridge overnight before using. For the complete recipe, check out the Full Recipe link. Enjoy your baking! You now know how to make a delicious Peach Cream Cheese Danish. We covered key ingredients, step-by-step instructions, and handy tips. You can adjust flavors and even swap out fruits. Remember, storing leftovers properly keeps them fresh. Don't shy away from experimenting with options like vegan swaps. Making this treat is fun and easy! Enjoy baking and sharing your tasty danish creations!](https://dailydishlab.com/wp-content/uploads/2025/07/e83a1769-6d69-4dce-85bf-b37ffbe7d076-768x768.webp)
![- 2 cups fresh strawberries - 1/4 cup granulated sugar - 1 teaspoon vanilla extract - 2 cups whipped cream - 1 pound pound cake - 1 cup vanilla pudding - Mint leaves for garnish Fresh strawberries are the star of this dish. Choose ripe, sweet ones for the best flavor. The sugar helps draw out their juices, creating a tasty syrup. Vanilla extract adds depth to the whipped cream and pudding, enhancing the overall taste. I like to use a pound cake for its light, soft texture. You can buy it or make it from scratch. Vanilla pudding adds creaminess and richness to the layers. Finally, mint leaves add a pop of color and a refreshing touch on top. - Flavor variations for whipped cream - Additional fruits to mix in - Alternative cake options You can personalize your trifle with various options. For whipped cream, try adding lemon zest or almond extract for a new twist. Mix in more fruits like blueberries or raspberries for added flavor and color. If you want to change the cake, you could use angel food cake or sponge cake. Both options keep the dessert light and airy. Feel free to play with flavors and textures to make your own unique trifle. For the full recipe, check the earlier section. First, toss 2 cups of sliced strawberries with 1/4 cup of granulated sugar. This simple step helps bring out their sweet flavor. Let them sit for about 15 minutes. This process is called macerating. As the strawberries sit, they release their juices. These juices will add moisture and sweetness to your trifle. Grab your trifle dish or a large glass bowl. Start by layering the ingredients. Place cubes of pound cake at the bottom. Next, drizzle some of the strawberry juice over the cake. This makes the cake soft and tasty. Now, spread a layer of vanilla pudding over the soaked cake. Add the macerated strawberries on top. Make sure to distribute them evenly. Spoon a layer of whipped cream over the strawberries. Smooth it out gently. Repeat these layers until your dish is full. Finish with one last layer of whipped cream. To make your trifle look pretty, garnish the top. Place a few whole strawberries and some fresh mint leaves on the whipped cream. This adds a pop of color. Chill your trifle in the fridge for at least 1 hour. This helps the flavors blend together. For a fun twist, serve it in individual glass cups. It makes for a charming presentation. Enjoy your Strawberry Shortcake Trifle Delightful Summer Treat! For a stunning trifle, focus on layering. Start with a layer of pound cake cubes. Soak them with the juice from the strawberries. This adds flavor and keeps the cake moist. Next, pour a layer of vanilla pudding. It should be smooth but not too runny. If your pudding is too thick, add a splash of milk. This will help it spread easily. After pudding, add the strawberries. Place them evenly for a nice look. Finally, top with whipped cream. A gentle swirl makes it pretty. Repeat these steps until you fill your dish. End with whipped cream on top for a lovely finish. You can save time by using store-bought items. Grab pre-made vanilla pudding and whipped cream. This cuts down on prep time. You can also use ready-made pound cake. Just cube it, and you are set. If you're in a rush, layer ingredients in jars. This is fast and fun for serving. You can make individual servings quickly. Plus, it looks great at parties! Even with shortcuts, your trifle will taste amazing. You can still enjoy the full flavors of the Strawberry Shortcake Trifle with these easy steps. For the full recipe, check out the details above. {{image_2}} You can switch up the classic Strawberry Shortcake Trifle in fun ways. One tasty option is the Chocolate Strawberry Shortcake Trifle. Use chocolate cake instead of pound cake. Layer it with strawberries and chocolate pudding. Top it all with whipped cream. This twist adds rich flavors and a fun look. Another great choice is a lemon-infused variation. Substitute lemon pudding for vanilla pudding. You can also add lemon zest to the whipped cream. This will give the trifle a bright, zesty taste. It complements the strawberries nicely. You’ll have a refreshing treat perfect for hot days. If you need gluten-free options, use gluten-free cake. You can find mixes in stores or make your own. Just make sure the other ingredients are also gluten-free. This way, everyone can enjoy this dessert. For vegan adaptations, swap the whipped cream with a plant-based version. Use coconut cream or almond whipped cream. Replace the pudding with a vegan version too. You can make it with silken tofu and a bit of sweetener. These changes keep the trifle tasty while meeting dietary needs. For the full recipe, click here: [Full Recipe]. To store leftovers, cover the trifle with plastic wrap. Make sure it fits tightly to keep air out. You can also use a lid if your dish has one. This keeps the trifle fresh and tasty. The shelf life of the trifle is about 2-3 days in the fridge. After that, the layers may start to blend together. The strawberries can lose their texture, too. Always check for freshness before you dig in. If you want to refresh the trifle before serving, here are some tips. First, scoop out the top layer and set it aside. This lets you see if the layers need some help. Add fresh whipped cream to the top for a light touch. You can also add more sliced strawberries to make it look pretty. If the cake is too soft, consider adding a new layer of pound cake. This can help restore some of the texture and taste. Enjoy your delightful summer treat! Can I use frozen strawberries? Yes, you can use frozen strawberries. Thaw them first and drain any extra juice. This way, they still add great flavor to your trifle. How do I make it ahead of time? You can make your trifle a day before you serve it. Just layer everything and cover it well. Chill it in the fridge overnight. This helps the flavors mix nicely. What can I substitute for pound cake? If you don’t have pound cake, you can use angel food cake or sponge cake. Both options keep the trifle light and fluffy. You can also use cookies for a fun twist. For the full recipe, check the earlier section. Enjoy your delicious strawberry shortcake trifle! In this post, we covered how to make a delicious strawberry shortcake trifle. I shared the key ingredients, like fresh strawberries, whipped cream, and pound cake. You learned step-by-step instructions for preparation, assembly, and presentation. Tips helped you perfect your trifle and save time. Remember to explore flavor variations and dietary options. The trifle is easy to store and refresh, ensuring you enjoy every bite. Now, it's time to create your own tasty masterpiece!](https://dailydishlab.com/wp-content/uploads/2025/07/b9031d10-5e28-4fea-a2af-b8fc9fc435a5-768x768.webp)