
Creamy Broccoli Sun Dried Tomato Orzo Delight

Welcome to the creamy world of Broccoli Sun Dried Tomato Orzo Delight! Imagine tender orzo pasta wrapped in a rich, creamy sauce, with bursts of sun-dried tomatoes and fresh broccoli. This dish is quick, satisfying, and perfect for any meal. I’ll guide you through simple steps to make this scrumptious dish. Ready to impress your taste buds? Let’s dive into the recipe!
Why I Love This Recipe
- Deliciously Creamy: This dish combines the richness of heavy cream with the flavors of sun-dried tomatoes, creating a delightful and comforting meal.
- Quick and Easy: With a total prep and cook time of just 25 minutes, this recipe is perfect for busy weeknights or last-minute gatherings.
- Versatile Ingredients: Using orzo, broccoli, and sun-dried tomatoes makes this dish both nutritious and adaptable to various dietary preferences.
- Beautiful Presentation: The fresh basil garnish not only adds flavor but also enhances the visual appeal, making it a feast for the eyes as well.
Ingredients
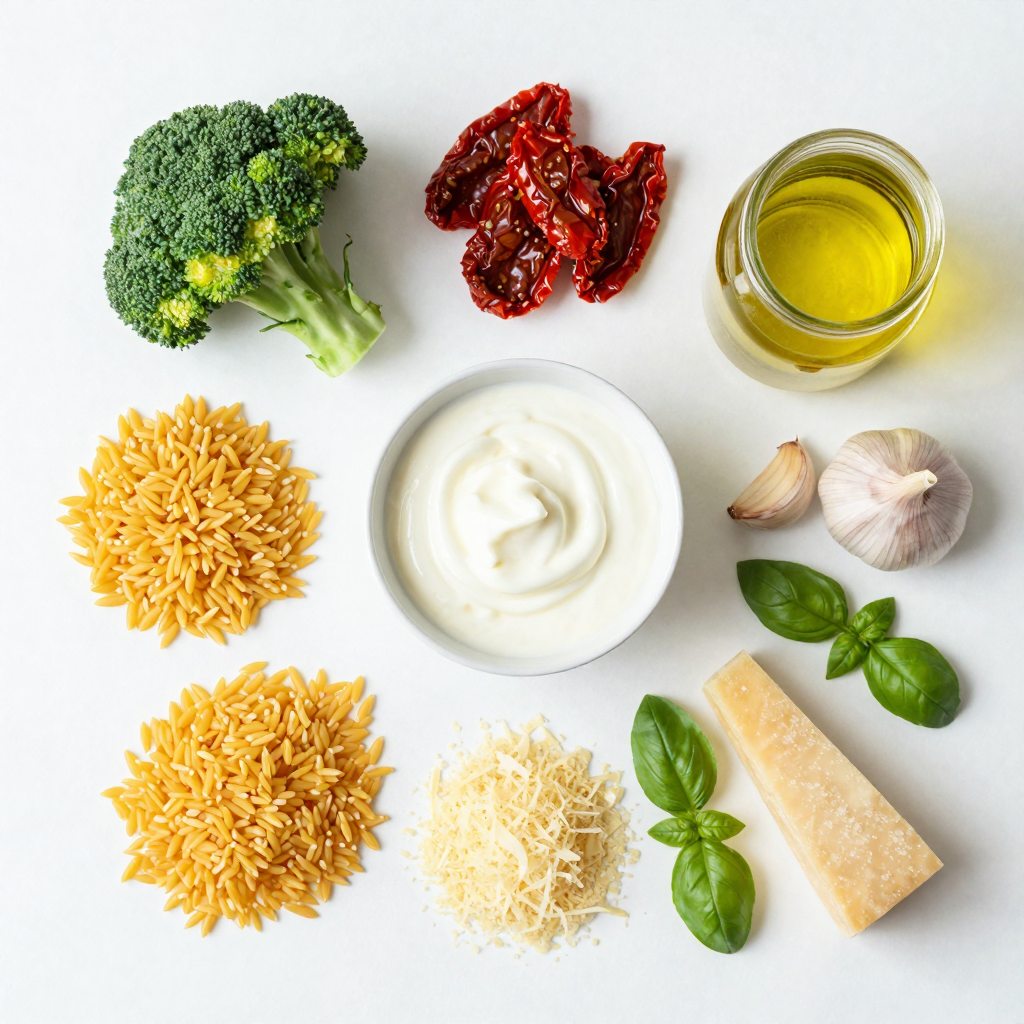
Main Ingredients
- 1 cup orzo pasta
- 2 cups broccoli florets
- 1/2 cup sun-dried tomatoes, chopped
- 1 cup vegetable broth
- 1 cup heavy cream (or coconut cream for a dairy-free option)
- 1/4 cup grated Parmesan cheese (or nutritional yeast for vegan option)
- 2 cloves garlic, minced
- 1 tablespoon olive oil
To create the creamy broccoli sun-dried tomato orzo, you need a few main ingredients. First, orzo pasta serves as the base of this dish. It cooks quickly and has a nice texture. Next, you’ll need fresh broccoli florets. They add color and nutrition. Sun-dried tomatoes bring a rich, tangy flavor that really stands out.
For the creamy part, you can use heavy cream or coconut cream. Both options work well, depending on your preference. Parmesan cheese gives it a nice savory kick, but you can swap it for nutritional yeast if you’re vegan. Olive oil and garlic add depth to the dish, making each bite flavorful.
Seasoning and Garnish
- Salt and pepper
- Fresh basil
Seasoning is key. Use salt and pepper to enhance the flavors of the dish. Fresh basil adds a touch of brightness and a lovely aroma. You can sprinkle it right before serving for a fresh finish. This combination makes every spoonful delightful and satisfying.
Step-by-Step Instructions
Cooking the Orzo and Broccoli
1. Start by boiling salted water in a large pot. Use enough water to cover the pasta well.
2. Add 1 cup of orzo pasta to the boiling water. Cook it for about 8 to 10 minutes.
3. When the orzo has 3 minutes left, add 2 cups of broccoli florets. This will blanch the broccoli perfectly.
4. Once cooked, drain the pasta and broccoli. Set them aside for later use.
Preparing the Creamy Sauce
1. In a large skillet, heat 1 tablespoon of olive oil over medium heat.
2. Add 2 cloves of minced garlic and sauté for 1 to 2 minutes. Watch closely so the garlic does not burn.
3. Next, mix in 1/2 cup of chopped sun-dried tomatoes. Cook for another 2 minutes, stirring often.
4. Pour in 1 cup of vegetable broth and bring it to a simmer.
5. Reduce the heat to low and add 1 cup of heavy cream. Let it simmer for 3 to 5 minutes. This helps the sauce thicken slightly.
Combining Ingredients
1. Carefully add the cooked orzo and broccoli to the skillet. Stir gently to coat them with the sauce.
2. Mix in 1/4 cup of grated Parmesan cheese, or use nutritional yeast for a vegan option.
3. Season with salt and pepper to taste. Stir well to combine all the flavors.
4. Remove the skillet from heat and let it sit for a minute. This will help the sauce thicken a bit more.
5. Serve the dish right away, garnished with fresh basil leaves for a nice touch.
Pro Tips
- Perfectly Cooked Orzo: Be sure to check the orzo a minute before the package cooking time is up to prevent it from becoming mushy.
- Customize Your Creaminess: Adjust the amount of cream based on your preference; you can add more for a richer dish or less for a lighter version.
- Fresh Herbs Add Flavor: Consider adding fresh herbs like thyme or parsley for an extra layer of flavor beyond just the basil garnish.
- Meal Prep Friendly: This dish can be made ahead of time; simply reheat gently on the stove with a splash of broth or water to loosen the sauce.
Tips & Tricks
Cooking Tips
- Perfect orzo cooking time: Cook the orzo for about 8-10 minutes. Check the package for exact times. Add the broccoli florets in the last 3 minutes. This will keep the broccoli bright and crisp. Drain the orzo and broccoli together, then set them aside.
- How to achieve the right creaminess: Use heavy cream or coconut cream for a rich texture. Let the sauce simmer for 3-5 minutes to thicken. Stir in the cheese at the end for added creaminess. This gives the dish a nice, velvety feel.
Ingredient Substitutions
- Gluten-free orzo options: You can find gluten-free orzo made from rice or corn. This keeps the dish friendly for those with gluten sensitivities. Check your local grocery store or specialty shops.
- Dairy-free alternatives for cream and cheese: Swap heavy cream for coconut cream. For cheese, nutritional yeast works well. It gives a cheesy flavor without the dairy. Both options keep the dish creamy and delicious.
Presentation Suggestions
- Best ways to serve: Serve the orzo in a large bowl or individual plates. This makes it look appealing. You can also serve it with a side salad or garlic bread for a complete meal.
- Garnishing tips for aesthetic appeal: Fresh basil adds color and flavor. Chop it finely and sprinkle it on top. You can also add a sprinkle of extra cheese for a touch of elegance. A drizzle of olive oil can also enhance the look of the dish.

Variations
Protein Additions
You can add protein to your creamy broccoli sun-dried tomato orzo to make it heartier. Chicken works well. Just sauté diced chicken in the skillet before adding garlic. Shrimp is another tasty choice. Add it to the skillet after the garlic, cooking until it turns pink. If you prefer plant-based options, try adding chickpeas. They add protein and a nice texture. Just stir them in when you mix the orzo and sauce.
Flavor Tweaks
To enhance the flavor, consider adding spices. A pinch of red pepper flakes gives a nice kick. You can also try smoked paprika for a smoky taste. Fresh herbs can make a big difference too. Basil is great, but you can use thyme or parsley for a fresh twist. Toss in your herbs right before serving for the best flavor.
Using Seasonal Ingredients
Seasonal vegetables can elevate this dish. In spring, consider adding peas or asparagus. In the fall, try adding roasted butternut squash. These veggies pair well with the creamy sauce. You can also adapt the recipe for summer. Fresh tomatoes can replace sun-dried tomatoes for a lighter version. This helps keep your dish fresh and exciting all year round.
Storage Info
Storing Leftovers
To keep your creamy broccoli sun-dried tomato orzo fresh, store it in an airtight container. Refrigerate within two hours of cooking. This helps prevent bacterial growth. You can keep it in the fridge for up to three days. If you want to save it for longer, freezing is a great option. Portion the orzo into smaller containers. This makes it easier to thaw and use later. You can freeze it for up to three months. Just remember to leave some space in the containers. The orzo will expand as it freezes.
Reheating Tips
When reheating, maintain the creaminess of the dish. Start by adding a splash of vegetable broth or water to the orzo. This will help it retain moisture. Heat gently on the stove over low heat. Stir often to avoid sticking. If using a microwave, cover the dish. Heat in short intervals, stirring in between. This will ensure even warming without drying it out.
Shelf Life
In the fridge, your creamy orzo can last for three days. If you freeze it, it stays good for up to three months. After thawing, use the orzo within one day. Always check for any off smells or changes in texture before eating. This keeps your meals safe and tasty!
FAQs
How can I make this dish vegan?
You can easily make this dish vegan by swapping a few ingredients. Use coconut cream instead of heavy cream. For cheese, replace Parmesan with nutritional yeast. This adds a cheesy flavor without dairy. Ensure your vegetable broth is vegan-friendly. These changes keep all the creamy goodness while being plant-based.
Can I use a different type of pasta?
Yes, you can choose other pasta types if you like. Try using quinoa pasta, whole wheat pasta, or even gluten-free pasta. These will still pair well with the broccoli and sun-dried tomatoes. Just cook according to package instructions and follow the rest of the recipe.
Is there a way to make this recipe gluten-free?
Absolutely! To make this dish gluten-free, use gluten-free orzo. Many brands offer this option now. Always check the package for cooking times, as they may differ. You can also make sure your vegetable broth is gluten-free. With these swaps, you can enjoy this creamy delight without any gluten worries.
This dish combines well-loved ingredients like orzo, broccoli, and sun-dried tomatoes. You learned how to cook these elements while creating a creamy sauce. Cooking tips and ingredient swaps help you customize this meal to your taste. Whether you want to add protein or switch to vegan options, the recipe has you covered. Store leftovers well, and enjoy them later. Experiment with spices and seasonal veggies for even more fun. Now, you have everything you need to make a delicious and easy meal. Enjoy your cooking journey!

Creamy Broccoli Sun Dried Tomato Orzo
Ingredients
1 cup orzo pasta
2 cups broccoli florets
1/2 cup sun-dried tomatoes, chopped
1 cup vegetable broth
1 cup heavy cream (or coconut cream for a dairy-free option)
1/4 cup grated Parmesan cheese (or nutritional yeast for vegan option)
2 cloves garlic, minced
1 tablespoon olive oil
Salt and pepper to taste
Fresh basil, for garnish
Instructions
In a large pot, bring salted water to a boil. Add the orzo pasta and cook according to package instructions, about 8-10 minutes. Add broccoli florets during the last 3 minutes of cooking to blanch. Drain and set aside.
In a large skillet, heat the olive oil over medium heat. Add minced garlic and sauté for 1-2 minutes until fragrant, being careful not to burn it.
Add the chopped sun-dried tomatoes and cook for another 2 minutes, stirring occasionally.
Pour in the vegetable broth and bring to a simmer. Reduce heat to low and stir in the heavy cream. Let it simmer for about 3-5 minutes until the mixture thickens slightly.
Add the cooked orzo and broccoli to the skillet, stirring to coat with the creamy sauce. Finish by mixing in the grated Parmesan cheese (or nutritional yeast) and season with salt and pepper to taste.
Remove from heat and let it sit for a minute to thicken a bit more.
Serve immediately, garnished with fresh basil leaves.
Prep Time: 10 minutes | Total Time: 25 minutes | Servings: 4
Creamy Broccoli Sun Dried Tomato Orzo
Ingredients
- 1 cup orzo pasta
- 2 cups broccoli florets
- 0.5 cup sun-dried tomatoes, chopped
- 1 cup vegetable broth
- 1 cup heavy cream (or coconut cream for a dairy-free option)
- 0.25 cup grated Parmesan cheese (or nutritional yeast for vegan option)
- 2 cloves garlic, minced
- 1 tablespoon olive oil
- to taste Salt and pepper
- for garnish Fresh basil
Instructions
- In a large pot, bring salted water to a boil. Add the orzo pasta and cook according to package instructions, about 8-10 minutes. Add broccoli florets during the last 3 minutes of cooking to blanch. Drain and set aside.
- In a large skillet, heat the olive oil over medium heat. Add minced garlic and sauté for 1-2 minutes until fragrant, being careful not to burn it.
- Add the chopped sun-dried tomatoes and cook for another 2 minutes, stirring occasionally.
- Pour in the vegetable broth and bring to a simmer. Reduce heat to low and stir in the heavy cream. Let it simmer for about 3-5 minutes until the mixture thickens slightly.
- Add the cooked orzo and broccoli to the skillet, stirring to coat with the creamy sauce. Finish by mixing in the grated Parmesan cheese (or nutritional yeast) and season with salt and pepper to taste.
- Remove from heat and let it sit for a minute to thicken a bit more.
- Serve immediately, garnished with fresh basil leaves.


![For a tasty beef stir fry, you need some key items. They include: - 1 lb (450g) flank steak, sliced thinly against the grain - 2 tablespoons soy sauce - 1 tablespoon cornstarch - 2 tablespoons vegetable oil These ingredients form the base of your dish. The flank steak gives a rich flavor, while the soy sauce adds a nice salty touch. Seasonings turn a good dish into a great one. For this stir fry, you will use: - 3 cloves garlic, minced - 1 tablespoon ginger, grated - 2 tablespoons oyster sauce - 1 teaspoon sesame oil - Salt and pepper to taste Garlic and ginger bring a warm, aromatic flavor. Oyster sauce adds depth, while sesame oil gives a nutty note. Fresh veggies make your stir fry colorful and healthy. I suggest: - 1 red bell pepper, sliced - 1 yellow bell pepper, sliced - 1 cup broccoli florets - 1 cup snap peas These vegetables stay crisp and bright in the stir fry. They add texture and flavor, making your meal more fun to eat. Follow this [Full Recipe] for a complete guide to making your easy beef stir fry. Start by slicing the flank steak thinly. This helps the beef cook fast and stay tender. Place the sliced beef in a bowl. Add soy sauce and cornstarch. Mix these well to coat the beef. Let it sit for about 15 minutes. This time helps the beef soak up the flavor. While it marinates, you can prepare your veggies. Heat one tablespoon of vegetable oil in a large skillet or wok over high heat. Once hot, add the marinated beef. Stir-fry for about 3 to 4 minutes. You want the beef to brown and cook through. Once it’s done, remove the beef from the skillet. Set it aside while you cook the veggies. This keeps the beef juicy and tasty. In the same skillet, add the last tablespoon of vegetable oil. Add minced garlic and grated ginger. Stir-fry these for about 30 seconds until they smell great. Next, add the sliced red and yellow bell peppers, broccoli, and snap peas. Stir-fry everything for about 5 to 7 minutes. You want the colors bright and the veggies tender-crisp. Return the cooked beef to the skillet. Pour in oyster sauce and sesame oil. Add salt and pepper to taste. Toss everything together for 1 to 2 minutes. Make sure the beef and veggies are coated in the sauce. Now, it’s ready to serve over cooked rice or noodles. For the full recipe, check out the details above. Marinating beef adds great taste. I recommend using soy sauce and cornstarch. Mix these with the beef and let it sit for 15 minutes. This makes the beef tender and juicy. The soy sauce gives it a salty kick. Cornstarch helps create a nice sear when you cook it. To get the best texture, heat your pan well. Start with high heat before adding the beef. Cook it for just 3-4 minutes. If you overcook it, the beef becomes tough. After cooking, remove it from the pan. This keeps it tender. Then, cook your veggies. Stir-fry them until they are bright and crisp. This keeps their nutrients and crunch. One big mistake is overcrowding the pan. If you add too much beef or veggies at once, they steam instead of fry. Fry in batches if needed. Another mistake is not prepping all your ingredients first. Stir fry cooks fast. Have everything ready before you start. Lastly, don’t skip the sauces. They add depth and make your dish pop. For the full recipe, check out the details above! {{image_2}} If you want to switch things up, try chicken or tofu. Both work well in stir fry. Chicken breast, sliced thin, cooks fast and absorbs flavors. Tofu brings a nice texture and is great for vegans. Use firm or extra-firm tofu for the best results. Just press it to remove excess water before cooking. You can change the veggies based on what you have. Carrots add sweetness and color. Zucchini is tender and cooks quickly. You can also use mushrooms for a savory flavor. Snap peas and green beans are great for crunch too. Mix and match to keep it fun and fresh. Want to try something new? Add some pineapple for sweetness. A splash of lime juice gives a zesty kick. You can also sprinkle sesame seeds on top for a nutty taste. If you like heat, add chili flakes or sriracha. These little changes can make your beef stir fry exciting each time you make it. For the full recipe, check out the detailed instructions above. To keep your Easy Beef Stir Fry fresh, let it cool first. Place it in an airtight container. You can store it in the fridge for up to three days. Make sure not to leave it out at room temperature for too long. Bacteria can grow quickly in warm food. Reheating is simple. You can use the microwave or a skillet. If using a microwave, heat in short bursts. Stir the food in between to heat it evenly. If using a skillet, add a splash of water or oil. Heat over medium heat while stirring until warm. You can freeze Easy Beef Stir Fry for up to three months. Use a freezer-safe container or bag. Be sure to squeeze out as much air as you can. When you want to eat it, thaw it in the fridge overnight. Reheat as mentioned before for the best taste. For the full recipe, check the earlier sections. You can make Easy Beef Stir Fry spicier by adding chili sauce or fresh chilies. A dash of sriracha or crushed red pepper can boost the heat. Start with small amounts and taste as you go. This way, you can find the perfect level of spice for your dish. Yes, you can use other cuts of beef for this stir fry. Cuts like sirloin, ribeye, or even ground beef will work. Just remember to slice them thinly. This helps them cook quickly and stay tender. Each cut adds a unique flavor and texture to your meal. Easy Beef Stir Fry pairs well with rice or noodles. You can use white rice, brown rice, or even cauliflower rice. Noodles like soba or rice noodles are also great options. For added crunch, serve with a side of fresh salad or crispy spring rolls. Easy Beef Stir Fry lasts about 3 to 4 days in the fridge. Store it in an airtight container to keep it fresh. When you reheat it, make sure it’s warmed through to avoid any cold spots. Enjoy it again for a quick lunch or dinner! For the full recipe, check out the Quick & Colorful Beef Stir Fry section. In this blog post, I covered the key ingredients and straightforward steps to make an easy beef stir fry. You learned about the best vegetables, seasonings, and cooking tips. Avoid common mistakes to get the right taste and texture. Explore variations for different diets and flavor twists. Remember to store leftovers properly and reheat them correctly for the best taste. Making stir fry is simple, fun, and opens up many options. Enjoy your cooking journey and savor your meals!](https://dailydishlab.com/wp-content/uploads/2025/06/724361ab-9d8c-4328-84bd-9e8ad7b606f6-768x768.webp)

![To make this tasty dish, you need some key items. Here is what you will need: - 2 cups cooked pasta (penne or rotini works best) - 1 lb chicken breast, diced - 8 oz mushrooms, sliced - 2 cups broccoli florets (fresh or frozen) - 3 cups Alfredo sauce (store-bought or homemade) - 1 cup shredded mozzarella cheese - ½ cup grated Parmesan cheese - 2 tablespoons olive oil - 2 cloves garlic, minced - Salt and pepper to taste - 1 teaspoon Italian seasoning These ingredients create a rich and creamy flavor that everyone will love. The right seasonings make your casserole pop. Salt and pepper add basic flavor. Italian seasoning gives it a nice herbal touch. I often use fresh garlic to add depth. The garlic will make your kitchen smell amazing as it cooks. Don’t skip these steps; they make a big difference! Garnishes can make your dish look more inviting. I like to use fresh parsley for a burst of color. You can also add extra cheese on top if you want a cheesier finish. These little touches make your casserole feel special and more appealing. Use what you enjoy most! If you want the full details, check the Full Recipe. Start by gathering your ingredients. You need cooked pasta, chicken, mushrooms, broccoli, and sauce. Also, have mozzarella and Parmesan cheese ready. Dice the chicken and slice the mushrooms. This helps the cooking go fast. Mince the garlic too. Don’t forget to measure out the olive oil and seasonings. In a large skillet, heat olive oil over medium heat. Once hot, add the diced chicken. Season it with salt, pepper, and Italian seasoning. Cook for 5-7 minutes until the chicken turns white. It should not be pink inside. Next, add minced garlic and sliced mushrooms. Sauté these for 3-4 minutes. The mushrooms will become soft and tasty. Finally, stir in the broccoli florets. Cook for an extra 2 minutes until they turn bright green. In a big bowl, mix the cooked pasta with the chicken and vegetables. Pour in the Alfredo sauce and stir well. Make sure everything is coated evenly. Transfer this mixture to a greased baking dish. Spread it out evenly. Now, top it with mozzarella and Parmesan cheese. Bake it in a preheated oven at 375°F for 25-30 minutes. Look for bubbly, golden cheese on top. When it’s ready, let it cool for 5 minutes before serving. You can find the Full Recipe for more details and serving tips. To cook chicken well, use a skillet over medium heat. First, add olive oil and let it warm. Then, add diced chicken to the hot oil. Season with salt, pepper, and Italian seasoning. Cook for 5-7 minutes until the chicken turns white and is no longer pink. This step ensures juicy chicken for your casserole. The key to creamy Alfredo sauce is gentle heating. If you use store-bought sauce, warm it on low heat. If you make it from scratch, stir constantly to avoid lumps. You want it smooth and silky. Mix the sauce well with pasta before adding other ingredients. This helps coat everything evenly and keeps it creamy. Ovens can vary, so check your casserole while it bakes. I suggest baking for 25-30 minutes. If the top isn’t golden, leave it for a few more minutes. To avoid overcooking, always look for bubbling cheese. When the cheese is melted and golden, it’s ready to serve. Adjust your time based on your oven’s heat. {{image_2}} You can switch out the chicken for other meats. Try diced turkey or cooked ham. Shrimp works well too. Each option adds a different taste to the dish. You can also use ground beef for a heartier flavor. Just make sure it's fully cooked. If you want a meatless meal, skip the chicken. Replace it with tofu or tempeh. Both will soak up the sauce and add protein. You can also use chickpeas for a fun twist. This way, you keep it filling and tasty. Boost the health of your casserole by adding more vegetables. Spinach, bell peppers, or zucchini are great choices. You can mix in frozen peas or corn too. Just remember to keep the cooking time in mind. You want all the veggies to be tender but not mushy. They add color and flavor to your dish! To keep your Chicken and Mushroom Alfredo Casserole fresh, store it in an airtight container. Place it in the fridge right after it cools down. It will stay good for up to three days. Make sure to label the container with the date. This helps you track how long it has been stored. When you’re ready to enjoy your leftovers, preheat your oven to 350°F (175°C). Place the casserole in an oven-safe dish. Cover it with foil to keep it moist. Heat for about 20 minutes or until it's warm all the way through. You can also use the microwave. Just heat in short bursts and stir in between until hot. If you want to save the casserole for later, freezing is a great option. Allow the dish to cool completely before freezing. Use a freezer-safe container or wrap it tightly in plastic wrap and foil. It can last for up to three months in the freezer. To reheat, thaw it overnight in the fridge and then bake as mentioned above. Enjoy your creamy, cheesy meal anytime! Yes, you can make this dish ahead of time. Prepare the casserole, but do not bake it. Cover it tightly with plastic wrap or foil. Store it in the fridge for up to two days. When you are ready to eat, bake it straight from the fridge. Just add a few extra minutes to the cooking time. This keeps the flavors fresh and tasty. If you need a substitute, try cream cheese mixed with milk. This gives a creamy texture. You can also use a white sauce made from butter, flour, and milk. For a lighter option, consider using Greek yogurt mixed with a bit of cheese. These options will still keep your casserole rich and delicious. Yes, frozen chicken and vegetables work well in this recipe. If using frozen chicken, thaw it first. Cut it into small pieces before cooking. For frozen vegetables, you can add them straight to the skillet. Just cook them a little longer to ensure they heat through. This makes the prep easy and quick, while still tasting great. You can find the full recipe for Chicken and Mushroom Alfredo Casserole [Full Recipe]. This blog covered everything you need for Chicken and Mushroom Alfredo Casserole. We discussed the ingredients, from required items to tasty garnishes. I shared easy steps for preparing, cooking, and assembling the dish. Plus, I gave tips for perfect chicken and sauce. We explored variations, storage, and answered common questions. Creating this dish can be simple and fun. You can enjoy different flavors and textures. Don't hesitate to try your own spin on it. Enjoy your cooking adventure!](https://dailydishlab.com/wp-content/uploads/2025/06/668e601b-10d5-4ca8-81a3-3ea93e17acf1-768x768.webp)