Greek Lemon Garlic Roasted Potatoes Flavorful Delight
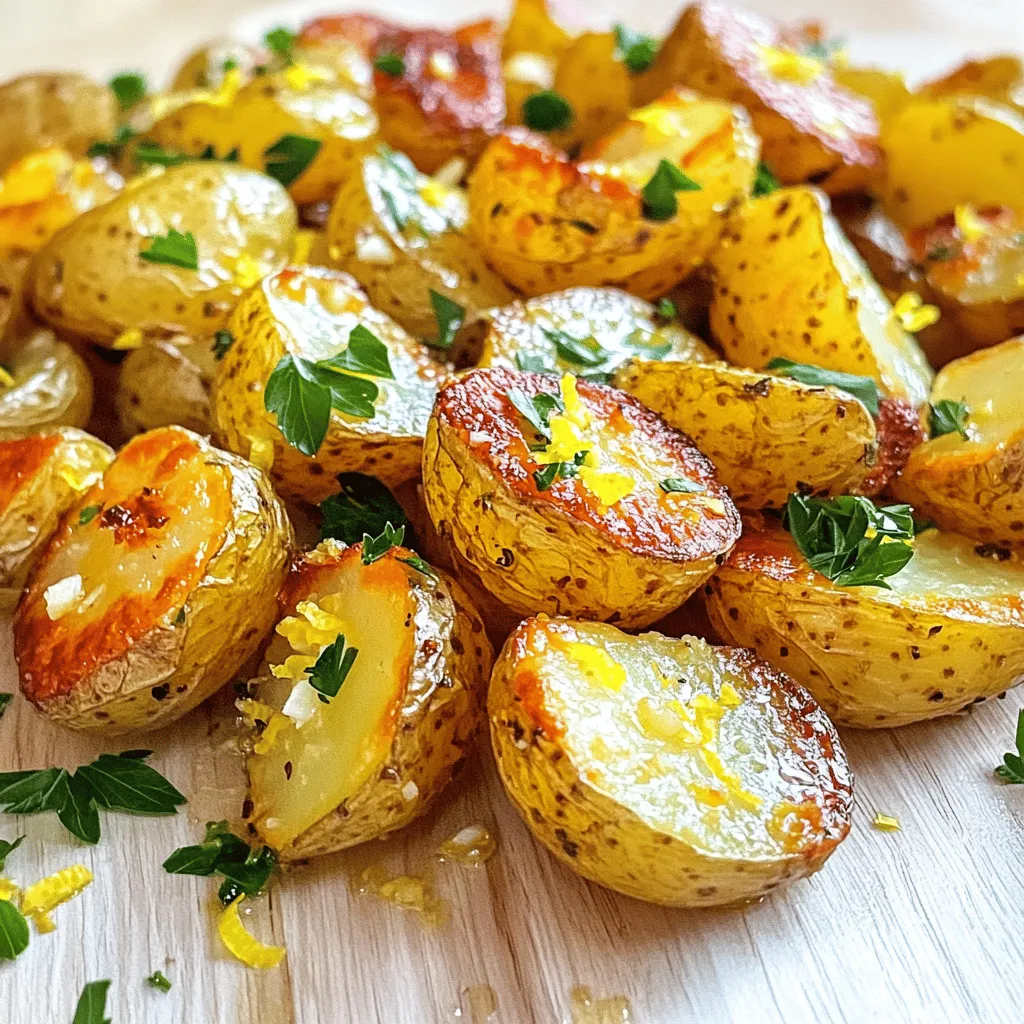
Get ready to elevate your dinner game with Greek Lemon Garlic Roasted Potatoes! These tender, zesty bites are bursting with flavor and simple to make. Whether you’re a beginner or a seasoned chef, this recipe will impress your family and friends. Join me as we dive into the perfect blend of lemon, garlic, and herbs that will turn ordinary potatoes into a flavorful delight. Let’s cook!
Why I Love This Recipe
- Fresh and Zesty: The combination of lemon and garlic adds a vibrant flavor that brightens up the dish, making it a perfect side for any meal.
- Simple Preparation: With just a few ingredients and easy steps, these roasted potatoes are quick to make, saving you time in the kitchen.
- Versatile Side Dish: These potatoes pair well with a variety of main dishes, from grilled meats to vegetarian options, making them a staple for any occasion.
- Healthy Ingredients: Using baby potatoes, olive oil, and fresh herbs makes this dish not just delicious but also a healthier choice for your table.
Ingredients
To create the perfect Greek Lemon Garlic Roasted Potatoes, gather these fresh ingredients:
- 2 pounds baby potatoes, halved
- 4 cloves garlic, minced
- 1/4 cup extra virgin olive oil
- Zest and juice of 2 lemons
- 1 teaspoon dried oregano
- 1 teaspoon dried thyme
- Salt and pepper to taste
- Fresh parsley or dill, for garnish
Each ingredient plays a key role in building flavor. The baby potatoes offer a tender bite, while garlic adds a rich, savory taste. The olive oil helps achieve that crispy texture, and the lemon brightens every bite. Oregano and thyme bring warmth and depth, balancing the freshness of the lemon.
Using fresh herbs like parsley or dill for garnish not only adds a pop of color but also enhances the dish’s aroma. All these components work together to create a delightful side that pairs well with various main dishes. Enjoy the ease of making this dish while savoring its vibrant flavors!

Step-by-Step Instructions
Preheat the Oven
First, you need to preheat your oven to 425°F (220°C). This step is important for crispy potatoes. While the oven heats, grab a large baking sheet and line it with parchment paper. This keeps the potatoes from sticking and makes clean-up easy.
Prepare the Potatoes
Next, take 2 pounds of baby potatoes and halve them. This helps them cook faster and get crispier. In a large mixing bowl, add the halved potatoes along with 4 cloves of minced garlic. Pour in 1/4 cup of extra virgin olive oil, and add the zest and juice of 2 lemons. Then, sprinkle in 1 teaspoon each of dried oregano and dried thyme. Don’t forget to add salt and pepper to taste. Toss everything together until the potatoes are well coated. This mixture gives the potatoes a great flavor.
Roasting Process
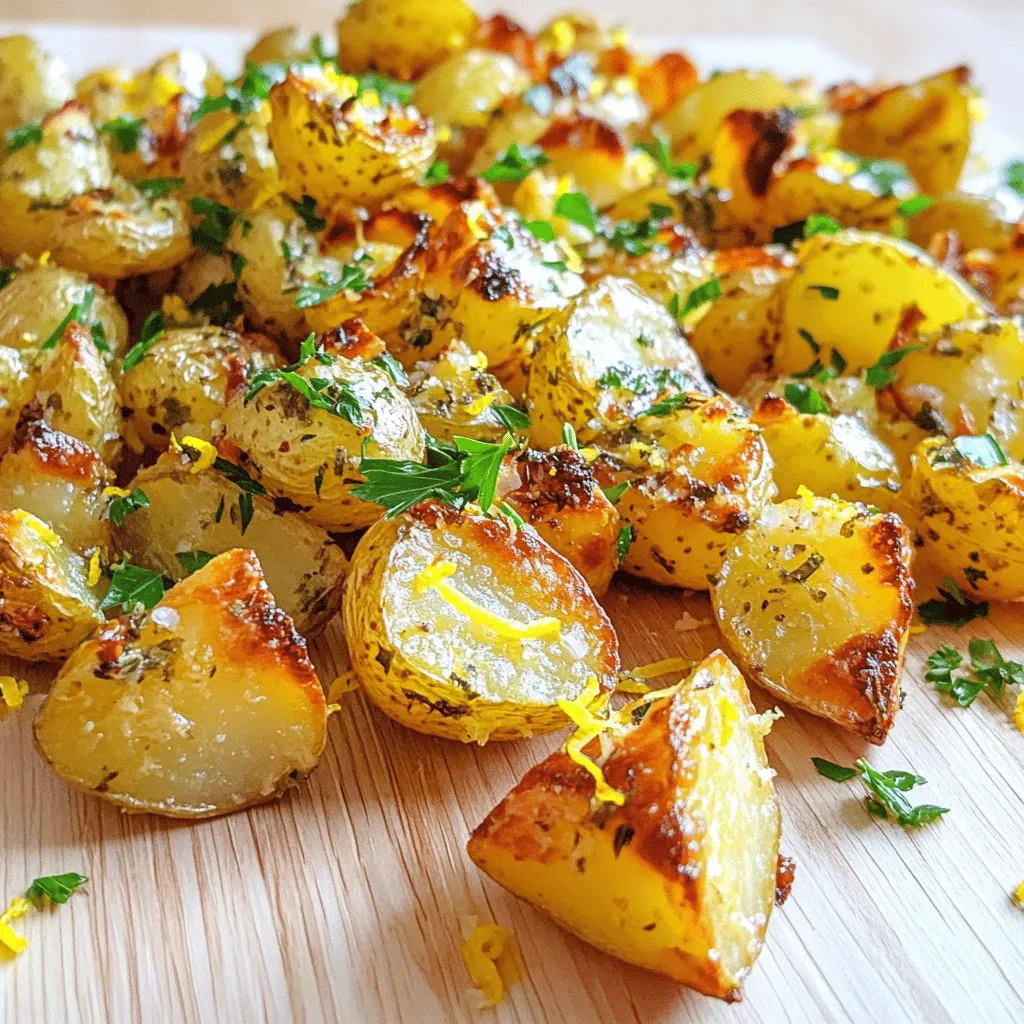
Now, spread the coated potatoes on the baking sheet in a single layer. Make sure they aren’t overcrowded. This allows them to roast evenly. Place the baking sheet in the preheated oven. Roast the potatoes for 30 to 35 minutes. Flip them halfway through for even browning. When they’re golden brown and crispy on the outside, they are ready. Once done, remove them from the oven and let them cool for a few minutes. Transfer the roasted potatoes to a serving dish and garnish with fresh parsley or dill for some extra flair.
Pro Tips
- Use Fresh Ingredients: Fresh garlic and lemons enhance the flavor of the dish significantly. Whenever possible, opt for fresh over dried.
- Don’t Overcrowd the Pan: Make sure the potatoes are spread out in a single layer. Overcrowding can lead to steaming instead of roasting, preventing that crispy texture.
- Adjust the Cooking Time: Depending on the size of your potatoes, you may need to adjust the roasting time. Check for doneness by piercing with a fork; they should be tender inside and crispy outside.
- Add Extra Herbs: For a more aromatic experience, consider adding fresh herbs like rosemary or thyme before roasting for an additional burst of flavor.
Tips & Tricks
How to Achieve Crispiness
To make your potatoes crispy, follow a few key steps. First, choose a high oven temperature. I recommend 425°F (220°C). This heat helps the outside get golden brown. Next, make sure to coat the potatoes well with olive oil. This oil creates a barrier that keeps moisture away. Finally, spread the potatoes in a single layer. Crowding them traps steam, which makes them soggy.
Best Potatoes for Roasting
I find that baby potatoes work best for this recipe. They have a creamy texture and hold up well in the oven. If you can’t find baby potatoes, you can use Yukon Gold or red potatoes. These types are also great choices because they roast evenly. Just cut them into smaller pieces for quicker cooking.
Garnishing Ideas
Garnishing adds color and freshness to your dish. I love using fresh parsley or dill for this recipe. Simply chop them finely and sprinkle on top before serving. You can also add a sprinkle of lemon zest for extra brightness. This small touch makes a big difference and impresses your guests.
Variations
Adding Herbs
You can change the herb mix to boost flavor. Try adding fresh herbs like rosemary or basil. These herbs blend well with lemon and garlic. You can also add fresh dill or parsley for a bright touch. Dried herbs work too. Use a mix of oregano, thyme, or even sage. Just remember to adjust the amount to your taste.
Spicy Version
If you like heat, make a spicy version. Add red pepper flakes to the mix before roasting. Start with half a teaspoon, then taste and add more if needed. You can also try a splash of hot sauce in the olive oil. This gives a nice kick without being too hot. The heat pairs well with the lemon and garlic.
Vegan Options
This recipe is already vegan-friendly. It’s full of flavor and nutrients. If you want to make it heartier, add chickpeas. Toss them with the potatoes for extra protein. You can also add some vegetables, like bell peppers or zucchini. Just chop them up and mix them in. They roast nicely and add color and crunch.
Storage Info
Refrigeration Tips
You can keep leftover Greek lemon garlic roasted potatoes in the fridge. Use an airtight container for best results. They stay fresh for 3 to 5 days. When you want to eat them, check for any signs of spoilage first.
Freezing Instructions
You can freeze these potatoes if you have extras. Let them cool completely before freezing. Place portions in freezer bags or containers. They can last up to 3 months in the freezer. When you’re ready to eat them, thaw in the fridge overnight.
Reheating Guidelines
To reheat, you can use the oven for best results. Preheat your oven to 400°F (200°C). Spread the potatoes on a baking sheet and heat for about 10 to 15 minutes. This helps them regain their crispiness. Alternatively, you can use a microwave, but they may become soft.
FAQs
Can I use regular potatoes instead of baby potatoes?
Yes, you can use regular potatoes. Just cut them into small pieces. This helps them cook evenly. Aim for similar sizes to baby potatoes. Larger pieces may take longer to roast.
How do I know when the potatoes are done?
The potatoes are done when they are golden brown and crispy. You can test them with a fork. If the fork goes in easily, they are ready. Roasting time is about 30 to 35 minutes. Flip them halfway for even cooking.
Can I make this recipe in advance?
Yes, you can prepare the potatoes a day ahead. Just mix all the ingredients and store them in the fridge. When ready to cook, spread them on a baking sheet. Roast as directed for best results.
This blog post shared a simple and tasty recipe for roasted baby potatoes. You learned about the main ingredients, step-by-step cooking, and clever tips for a crispy finish. We also explored fun variations and helpful storage info.
You can enjoy this dish in many ways. Feel free to change it up to fit your taste. Fresh herbs, spicy twists, or storing methods enhance the dish’s value. Happy cooking!

Greek Lemon Garlic Roasted Potatoes
Ingredients
2 pounds baby potatoes, halved
4 cloves garlic, minced
1/4 cup extra virgin olive oil
Zest and juice of 2 lemons
1 teaspoon dried oregano
1 teaspoon dried thyme
Salt and pepper to taste
Fresh parsley or dill, for garnish
Instructions
Preheat your oven to 425°F (220°C) and line a large baking sheet with parchment paper.
In a large mixing bowl, combine the halved baby potatoes, minced garlic, olive oil, lemon zest, lemon juice, oregano, thyme, salt, and pepper. Toss everything together until the potatoes are evenly coated.
Spread the coated potatoes in a single layer on the prepared baking sheet, ensuring they are not overcrowded.
Roast the potatoes in the preheated oven for 30-35 minutes, flipping them halfway through, until they are golden brown and crispy on the outside and tender on the inside.
Once done, remove the potatoes from the oven and let them cool for a few minutes.
Transfer the roasted potatoes to a serving dish and garnish with fresh parsley or dill for a burst of color and freshness.
Prep Time: 10 min | Total Time: 45 min | Servings: 4
Greek Lemon Garlic Roasted Potatoes
Ingredients
- 2 pounds baby potatoes, halved
- 4 cloves garlic, minced
- 0.25 cup extra virgin olive oil
- 2 lemons zest and juice
- 1 teaspoon dried oregano
- 1 teaspoon dried thyme
- to taste salt and pepper
- for garnish fresh parsley or dill
Instructions
- Preheat your oven to 425°F (220°C) and line a large baking sheet with parchment paper.
- In a large mixing bowl, combine the halved baby potatoes, minced garlic, olive oil, lemon zest, lemon juice, oregano, thyme, salt, and pepper. Toss everything together until the potatoes are evenly coated.
- Spread the coated potatoes in a single layer on the prepared baking sheet, ensuring they are not overcrowded.
- Roast the potatoes in the preheated oven for 30-35 minutes, flipping them halfway through, until they are golden brown and crispy on the outside and tender on the inside.
- Once done, remove the potatoes from the oven and let them cool for a few minutes.
- Transfer the roasted potatoes to a serving dish and garnish with fresh parsley or dill for a burst of color and freshness.
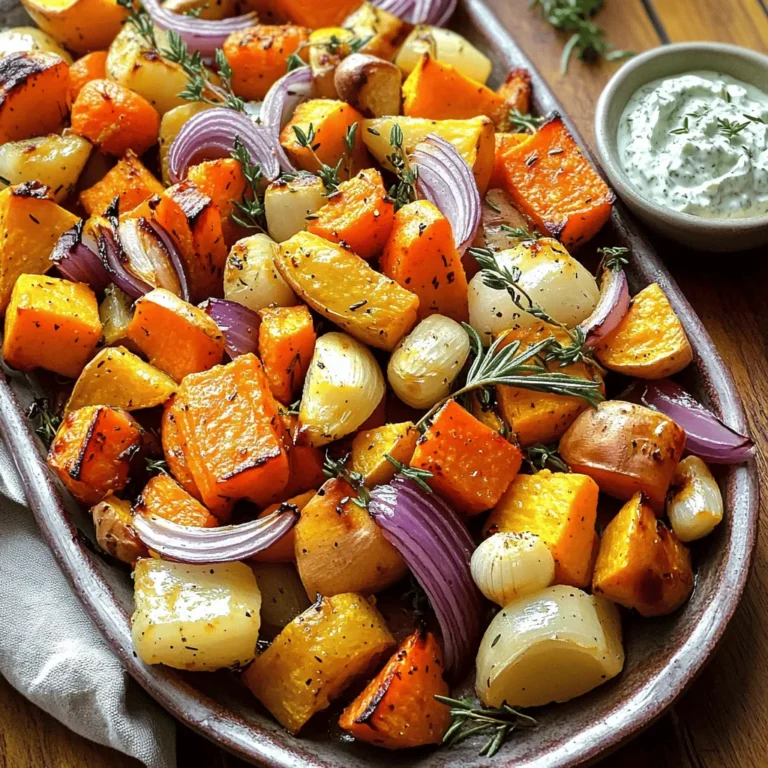
![For these tasty bowls, you need: - 2 boneless, skinless chicken breasts - 1 cup jasmine rice - 1 cucumber, thinly sliced - 1 carrot, julienned - Fresh cilantro leaves for garnishing - Lime wedges for serving - Sliced red chili (optional, for heat) These ingredients create a base full of flavor and texture. The chicken offers protein, while the jasmine rice adds a nice touch of sweetness. The veggies give crunch and freshness. The marinade brings all the flavors together. Here’s what you need: - 3 tablespoons fish sauce - 2 tablespoons honey - 1 tablespoon soy sauce (low-sodium is fine) - 2 cloves garlic, minced - 1 tablespoon fresh ginger, grated - 1/2 teaspoon black pepper This mix makes the chicken tender and packed with taste. Fish sauce adds a salty depth, while honey balances it with sweetness. Garlic and ginger provide warmth and depth. Feel free to add more veggies to your bowls. Some great options include: - Bell peppers, sliced - Snap peas, trimmed - Radishes, thinly sliced You can also switch up the garnishes. Consider adding: - Chopped green onions - Sesame seeds - Fresh mint leaves These additions enhance the meal's look and flavor. They also add extra nutrients, making your meal even better. For the full recipe, check out the Vietnamese Chicken Meal Prep Bowls section. To start, you need to make the marinade. In a mixing bowl, whisk together: - 3 tablespoons fish sauce - 2 tablespoons honey - 1 tablespoon soy sauce - 2 cloves garlic, minced - 1 tablespoon fresh ginger, grated - 1/2 teaspoon black pepper Mix well until everything blends together. This marinade gives the chicken a great flavor. Next, add the chicken breasts to the bowl. Make sure each breast is coated with the marinade. Cover the bowl and let it sit in the fridge for at least 30 minutes. If you have time, let it marinate for up to 2 hours for more flavor. While the chicken marinates, it’s time to cook the jasmine rice. In a medium pot, combine: - 1 cup jasmine rice - 1 3/4 cups water or low-sodium chicken broth - A pinch of salt Bring the mixture to a boil over medium-high heat. Once it boils, lower the heat and cover with a lid. Let it simmer for about 15 minutes until the rice is fluffy. After cooking, keep it covered for an extra 5 minutes. This helps the rice steam and become perfect. Now, heat a non-stick skillet on medium-high heat. Add a little cooking oil once it’s hot. Carefully place the marinated chicken in the skillet. Cook each side for 6-7 minutes. You want the chicken to be golden-brown and fully cooked. Use a meat thermometer to ensure it reaches 165°F (75°C). Once cooked, take the chicken out of the skillet. Let it rest for a few minutes on a cutting board. After it rests, slice the chicken into thin strips. This makes it tender and easy to eat. Now for the fun part: assembling the bowls! Start by dividing the cooked jasmine rice into 4 airtight containers. Top each serving of rice with sliced chicken. Then, add: - Thinly sliced cucumber - Julienned carrots Garnish each bowl with fresh cilantro leaves. Place lime wedges on the side for a burst of flavor when you eat. If you like some heat, add sliced red chili on top. Allow the bowls to cool before sealing them with lids. You can store them in the fridge for up to 4 days. These meal prep bowls are perfect for quick lunches or dinners. For the complete recipe, check out the [Full Recipe]. To make meal prep easy, I like to set up a workspace. First, gather all your tools. This includes cutting boards, knives, and bowls. Having everything close by cuts down on time. I also recommend cooking in batches. Make extra rice or chicken. This way, you can use them in other meals too. To ensure juicy chicken, marinate it well. A good marinade adds flavor and moisture. I suggest marinating for at least 30 minutes. For best results, go for 2 hours. When cooking, use medium-high heat. This helps create a nice golden color. Always check the chicken's temperature. It should reach 165°F (75°C). Letting it rest after cooking is key. This keeps the juices in the meat. There are many ways to boost flavor in your meal prep bowls. Try adding fresh herbs like mint or basil. You can also squeeze lime juice over each bowl. For extra crunch, add chopped peanuts or cashews. If you like spice, toss in some sliced chili. These small touches make a big difference. For the full recipe, check out the complete guide on Vietnamese Chicken Meal Prep Bowls. {{image_4}} You can easily swap chicken for other proteins. Shrimp is a great choice. Cook the shrimp for just 2-3 minutes until they turn pink. Tofu works well too. Use firm tofu and press it first to remove extra moisture. This helps it absorb flavors. Another option is beef. Use thinly sliced flank steak instead of chicken. Cook it quickly over high heat for a tender bite. If you want a vegetarian or vegan meal prep bowl, try using tempeh or seitan. Both have a great texture and soak up flavors well. Marinate them just like the chicken. Cook tempeh for about 5-7 minutes in a skillet. For a vegan option, skip the fish sauce and use soy sauce instead. You can also add more veggies like bell peppers or mushrooms for added taste and nutrition. Make your bowls unique with different toppings. Try adding sliced radishes for crunch. You can also add avocado for creaminess. Fresh herbs like mint or basil work wonders too. For extra flavor, drizzle some sriracha or hoisin sauce on top. You can even add nuts for a tasty crunch. These simple tweaks let you enjoy a new meal every time. To see the full recipe, check out the [Full Recipe]. To keep your Vietnamese Chicken Meal Prep Bowls fresh, use airtight containers. Divide the bowls into four portions. Store rice, chicken, and veggies separately if you can. This will help maintain texture and flavor. Let the meal prep bowls cool before sealing them. This step helps prevent steam from making everything soggy. When you're ready to enjoy your meal prep bowls, use the microwave. Place a bowl in the microwave for 1-2 minutes. Stir halfway through to heat evenly. Check that the chicken reaches 165°F (75°C) before eating. If you prefer, you can reheat on the stove. Just add a splash of water to prevent sticking. These bowls last for up to four days in the fridge. After that, the flavors may fade. Always check for any off smells or changes in color before eating. If you want to store them longer, consider freezing. Just make sure to label them, so you know what's inside. Enjoy your delicious meal prep with confidence! To make Vietnamese Chicken Meal Prep Bowls, start with chicken breasts. First, mix fish sauce, honey, soy sauce, garlic, ginger, and black pepper in a bowl. This creates a tasty marinade. Coat the chicken in this marinade and let it sit for 30 minutes in the fridge. While it marinates, cook jasmine rice in water or broth for about 15 minutes. Heat a skillet, add oil, and cook the chicken for 6-7 minutes on each side until it’s golden and reaches 165°F. Slice the chicken and assemble the bowls with rice, chicken, cucumber, and carrots. Don’t forget the cilantro and lime! For more details, check the Full Recipe. Vietnamese Chicken Meal Prep Bowls pair well with light sides. Here are some great choices: - Steamed broccoli - Pickled vegetables - Fresh spring rolls - Asian-style slaw - Edamame These sides add color and different textures to your meal. They also keep the meal fresh and exciting. Yes, you can freeze Vietnamese Chicken Meal Prep Bowls. Just make sure to cool them completely before sealing them in airtight containers. They can last in the freezer for up to three months. When you want to eat them, thaw them in the fridge overnight and reheat in the microwave. This keeps your meal fresh and tasty. Vietnamese Chicken Meal Prep Bowls are healthy and balanced. Here is a rough idea of the nutrition per serving: - Calories: 400 - Protein: 30g - Carbohydrates: 45g - Fat: 10g - Fiber: 3g - Sugar: 6g This dish provides protein, carbs, and healthy fats. You can adjust ingredients for your dietary needs. In this blog post, we covered the key ingredients and step-by-step instructions for making Vietnamese Chicken Meal Prep Bowls. We discussed marinades and cooking tips to ensure great flavor. You can also explore various protein options and learn how to store and reheat these bowls effectively. These meal prep bowls are easy to customize and perfect for busy days. With simple steps and tasty ingredients, you can enjoy delicious, healthy meals throughout the week. Happy cooking!](https://dailydishlab.com/wp-content/uploads/2025/06/450469d4-7878-479c-828a-ae6f4f51905d-768x768.webp)