Strawberry Shortcake Ice Cream Bars Refreshing Delight
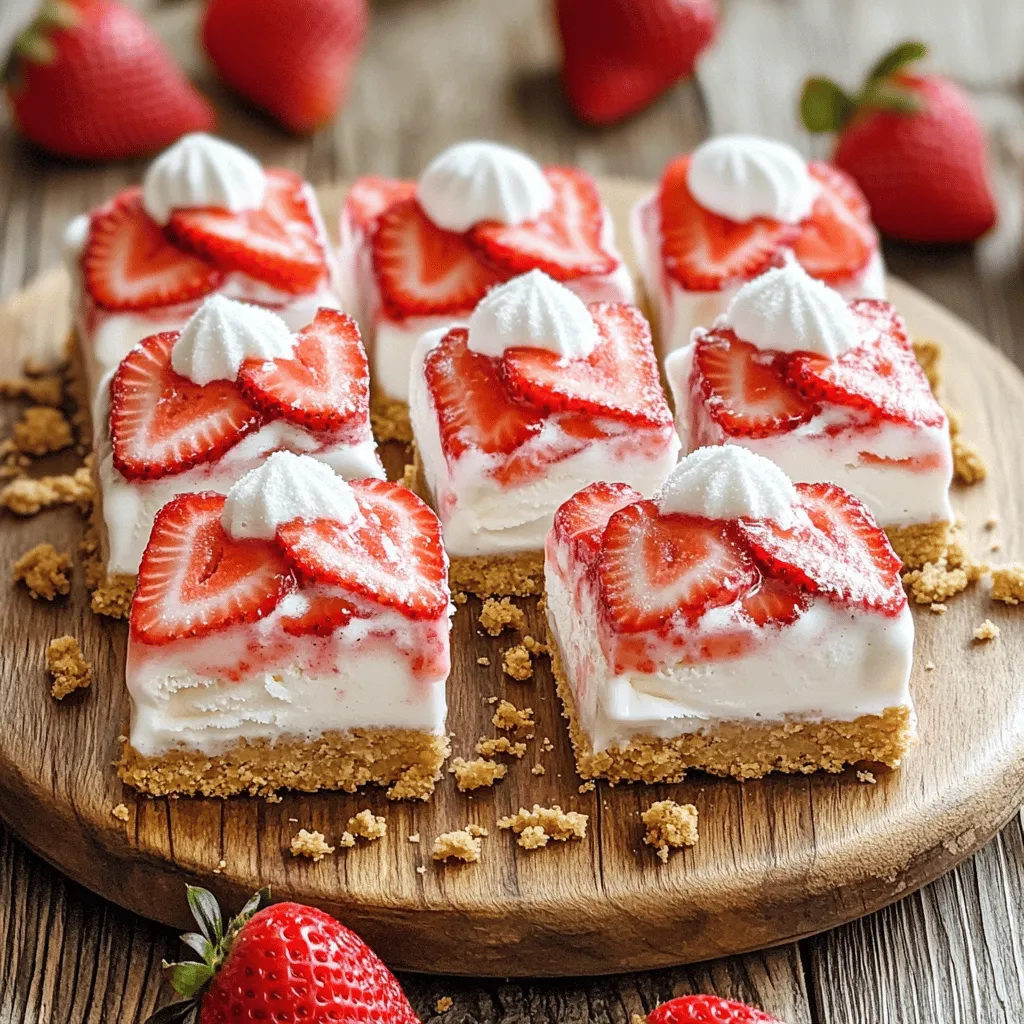
Are you ready for a sweet treat that screams summer? Strawberry Shortcake Ice Cream Bars are the perfect way to indulge. With fresh strawberries, creamy ice cream, and a crunchy crust, these bars are a refreshing delight. Whether you make them for a party or enjoy them alone, you’ll love every bite. Let’s dive into the simple steps and tips to create this delicious dessert that will impress your friends and family!
Why I Love This Recipe
- Fresh Strawberry Flavor: The combination of fresh strawberries with sugar and lemon juice creates a bright and refreshing taste that is perfect for summer.
- Easy to Make: This recipe requires minimal effort, making it a quick and simple dessert option for gatherings or family treats.
- Perfectly Creamy: The layers of vanilla ice cream and whipped cream provide a delightful creaminess that complements the fruit beautifully.
- Fun to Serve: These ice cream bars are easy to cut and serve, making them a fun and interactive dessert for parties and picnics.
Ingredients
Fresh Ingredients Needed
- 2 cups fresh strawberries, hulled and sliced
- 2 tablespoons sugar
- 1 teaspoon lemon juice
Fresh strawberries are the star of this treat. Choose ripe, juicy ones for the best flavor. Slice them evenly. This helps them mix well with sugar and lemon juice. The sugar draws out the natural juices. Lemon juice adds a zesty kick. Let them sit for 15 minutes. This step makes the strawberries sweet and syrupy.
Essential Non-Fresh Ingredients
- 2 cups vanilla ice cream, softened
- 1 cup whipped cream
- 1 cup graham cracker crumbs
Vanilla ice cream gives a creamy base. Softening it makes spreading easier. Whipped cream adds lightness. Choose your favorite brand or make your own. Graham cracker crumbs provide a crunchy crust. You can crush whole crackers or buy pre-made crumbs. Either way, they add great texture.
Binding Agents
- ½ cup unsalted butter, melted
- ½ teaspoon vanilla extract
- Pinch of salt
Unsalted butter binds the crust together. Melt it first for easy mixing. Vanilla extract enhances the flavor. Just a pinch of salt balances the sweetness. These ingredients help create a delicious base for your bars. Mixing them well is key to a tasty crust.

Step-by-Step Instructions
Preparing the Strawberry Mixture
First, take two cups of fresh strawberries and slice them. In a medium bowl, combine the sliced strawberries with two tablespoons of sugar and one teaspoon of lemon juice. Toss them well so every piece gets coated. This step is key! Let the strawberries sit for about 15 minutes. This allows them to release their juices, making them sweeter.
Creating the Crust
Next, grab a separate bowl. Mix one cup of graham cracker crumbs with half a cup of melted unsalted butter, half a teaspoon of vanilla extract, and a pinch of salt. Stir until everything is well combined. Now, take this mixture and press it firmly into the bottom of a 9×9-inch baking dish. Make sure it forms an even layer for the crust.
Layering Ingredients
Now, it’s time for the fun part! Pour two cups of softened vanilla ice cream over your crust. Smooth it out to cover every edge. Then, take your strawberry mixture and spoon it evenly over the ice cream layer. Make sure to spread it out for delicious bites in every bar. Finally, spread one cup of whipped cream over the strawberries. This will give your bars a nice, creamy finish.
Pro Tips
- Use Fresh Strawberries: Fresh strawberries provide the best flavor and texture for this recipe. If strawberries are out of season, consider using frozen ones, but make sure to thaw and drain them well before using.
- Soften Ice Cream Properly: Allow the vanilla ice cream to soften at room temperature for about 10-15 minutes before spreading it over the crust. This will make it easier to spread and create a smoother layer.
- Chill the Whipped Cream: For a more stable whipped cream layer, chill the mixing bowl and beaters before whipping the cream. This helps achieve better volume and texture.
- Slice with a Warm Knife: To cut the bars easily, dip a sharp knife in warm water and wipe it dry before slicing. This will help create cleaner cuts and prevent the ice cream from sticking to the knife.
Tips & Tricks
Perfecting Your Ice Cream Bars
To make great ice cream bars, focus on texture. You want the vanilla ice cream to be soft but not runny. Let it sit out for a few minutes before mixing. This helps it spread easily over the crust. For the strawberries, sweetness matters. Taste them first. If they are too tart, add a bit more sugar. A touch of lemon juice brightens their flavor.
Serving Suggestions
When serving, make it look nice. Slice the bars neatly and place them on a colorful platter. You can add fresh mint leaves for a pop of color. They go great with drinks, too. Try lemonade or iced tea. Their sweetness pairs well with the creaminess of the bars.
Common Mistakes to Avoid
One big mistake is over-mixing the crust. When you mix graham cracker crumbs and butter, just combine them until they hold together. If you mix too much, the crust can become tough. Another mistake is not freezing long enough. Make sure to freeze the bars for at least 4 to 6 hours. This ensures they hold their shape when sliced.

Variations
Using Different Berries
You can switch up the berries in this recipe. Try using blueberries or raspberries instead of strawberries. Blueberries add a sweet burst of flavor. Raspberries bring a nice tartness that pairs well with ice cream. Simply replace the strawberries with two cups of your chosen berries. Toss them with sugar and lemon juice just like you do with strawberries.
Alternative Ice Cream Flavors
Have fun with ice cream flavors! While vanilla is classic, chocolate or mint ice cream can be great choices too. Chocolate ice cream gives a rich, creamy taste that complements the berries well. Mint ice cream adds a cool twist and refreshing taste. Just swap the vanilla ice cream for your favorite flavor in the recipe.
Gluten-Free Options
If you need a gluten-free option, you can make a gluten-free graham cracker crust. Many brands offer gluten-free graham crackers. Use these in place of regular graham crackers. Crush them just like you would the regular ones. Mix them with melted butter and a pinch of salt as usual. This way, everyone can enjoy these delicious bars!
Storage Info
Freezing Instructions
To store your Strawberry Shortcake Ice Cream Bars, cover the dish tightly. Use plastic wrap or aluminum foil. This keeps the bars fresh and prevents freezer burn. You can also cut the bars into individual pieces. Wrap each piece in plastic wrap and place them in an airtight container.
Shelf Life
These frozen treats can last for up to three months in the freezer. However, for the best taste and texture, try to enjoy them within a month. Over time, the flavors may fade, and the texture may change.
Reheating or Thawing Tips
To thaw the bars, take them out of the freezer. Let them sit at room temperature for about 5-10 minutes. This softens them slightly, making them easier to cut. Avoid using a microwave, as it can make them mushy. Enjoy your delightful treat at the perfect temperature!
FAQs
Can I make Strawberry Shortcake Ice Cream Bars ahead of time?
Yes, you can make these bars a day in advance. This gives the bars time to freeze properly. Prep time is about 20 minutes. After that, freeze for at least 4-6 hours. For best results, freeze overnight. This way, the layers set well, and the bars taste great.
How do I know when the bars are fully frozen?
The bars are ready when they feel firm to the touch. Check if the top looks solid and not sticky. If you press down lightly, it should hold its shape. If it feels soft, let it freeze longer. Proper firmness ensures a great texture when you cut them.
What can I use instead of graham cracker crumbs?
If you don’t have graham crackers, try crushed cookies. Vanilla wafers work well for a sweet kick. You can also use crushed pretzels for a salty twist. Even oats mixed with butter can create a nice crust. Choose what you like best!
You now know how to make delicious Strawberry Shortcake Ice Cream Bars. Fresh strawberries, sugar, and lemon juice blend well with creamy ice cream and a crunchy crust. Remember to follow each step closely for the best results. Avoid common mistakes like over-mixing the crust, and try various berries or ice cream flavors for fun twists. Store them properly to enjoy later. Get creative with your presentation and pair with your favorite drinks for an impressive treat. Enjoy your sweet creation!

Strawberry Shortcake Ice Cream Bars
Ingredients
2 cups fresh strawberries, hulled and sliced
2 tablespoons sugar
1 teaspoon lemon juice
2 cups vanilla ice cream, softened
1 cup whipped cream
1 cup graham cracker crumbs
½ cup unsalted butter, melted
½ teaspoon vanilla extract
Pinch of salt
Instructions
Prepare the Strawberry Mixture: In a medium bowl, combine the sliced strawberries, sugar, and lemon juice. Toss to coat the strawberries in sugar and let them sit for about 15 minutes to release their juices.
Make the Crust: In a separate bowl, mix the graham cracker crumbs, melted butter, vanilla extract, and a pinch of salt until well combined. Press this mixture firmly into the bottom of a 9×9-inch square baking dish to form an even layer for the crust.
Add Ice Cream Layer: Pour the softened vanilla ice cream over the graham cracker crust, smoothing it out into an even layer. Make sure to spread it all the way to the edges.
Layer the Strawberries: Spoon the prepared strawberry mixture evenly over the ice cream layer. Be sure to distribute it evenly to create delightful bites throughout the bars.
Top with Whipped Cream: Spread the whipped cream over the strawberries in an even layer, covering them completely.
Freeze the Bars: Cover the baking dish with plastic wrap or aluminum foil and freeze for at least 4-6 hours, or until completely firm.
Cut and Serve: Once frozen, remove the dish from the freezer. Allow it to sit at room temperature for a few minutes before cutting into bars for easier slicing.
Enjoy: Serve the Strawberry Shortcake Ice Cream Bars on a platter for a delightful treat.
Prep Time: 20 minutes | Total Time: 6 hours (includes freezing) | Servings: 9
Strawberry Shortcake Ice Cream Bars
Ingredients
- 2 cups fresh strawberries, hulled and sliced
- 2 tablespoons sugar
- 1 teaspoon lemon juice
- 2 cups vanilla ice cream, softened
- 1 cup whipped cream
- 1 cup graham cracker crumbs
- ½ cup unsalted butter, melted
- ½ teaspoon vanilla extract
- 1 pinch salt
Instructions
- Prepare the Strawberry Mixture: In a medium bowl, combine the sliced strawberries, sugar, and lemon juice. Toss to coat the strawberries in sugar and let them sit for about 15 minutes to release their juices.
- Make the Crust: In a separate bowl, mix the graham cracker crumbs, melted butter, vanilla extract, and a pinch of salt until well combined. Press this mixture firmly into the bottom of a 9x9-inch square baking dish to form an even layer for the crust.
- Add Ice Cream Layer: Pour the softened vanilla ice cream over the graham cracker crust, smoothing it out into an even layer. Make sure to spread it all the way to the edges.
- Layer the Strawberries: Spoon the prepared strawberry mixture evenly over the ice cream layer. Be sure to distribute it evenly to create delightful bites throughout the bars.
- Top with Whipped Cream: Spread the whipped cream over the strawberries in an even layer, covering them completely.
- Freeze the Bars: Cover the baking dish with plastic wrap or aluminum foil and freeze for at least 4-6 hours, or until completely firm.
- Cut and Serve: Once frozen, remove the dish from the freezer. Allow it to sit at room temperature for a few minutes before cutting into bars for easier slicing.
- Enjoy: Serve the Strawberry Shortcake Ice Cream Bars on a platter for a delightful treat.
![To make a delightful lemon zucchini sheet cake, gather these key ingredients: - 2 cups grated zucchini (about 2 medium zucchinis) - 1 cup granulated sugar - 1/2 cup vegetable oil - 1/2 cup unsweetened applesauce - 1/4 cup fresh lemon juice These ingredients work together to create a moist cake. The grated zucchini adds moisture and a subtle flavor. The sugar sweetens the cake, while the oil and applesauce keep it soft. Fresh lemon juice gives a bright and zesty taste. You can enhance your cake with a few optional ingredients: - Zest of 2 lemons - Whipped cream for serving - Fresh mint for garnish Adding lemon zest boosts the lemon flavor. Whipped cream makes a lovely topping, and fresh mint adds a pop of color and freshness. These options elevate your cake and make it even more enjoyable. If you want the full recipe, check out the complete details. First, preheat your oven to 350°F (175°C). This step helps the cake rise nicely. Next, grease and line a 9x13 inch sheet pan with parchment paper. This makes it easy to remove the cake later. In a large bowl, combine 1 cup of granulated sugar, 1/2 cup of vegetable oil, 1/2 cup of unsweetened applesauce, 3 large eggs, and 2 teaspoons of vanilla extract. Whisk these ingredients together until they blend well. This mix adds moisture and sweetness to your cake. Now, stir in 2 cups of grated zucchini, the zest of 2 lemons, and 1/4 cup of fresh lemon juice into your wet mix. The zucchini gives the cake a great texture. The lemon adds a lovely fresh flavor that brightens every bite. In another bowl, whisk together 2 cups of all-purpose flour, 1 teaspoon of baking powder, 1 teaspoon of baking soda, and 1/2 teaspoon of salt. This mix helps the cake rise and gives it structure. Gradually add the dry ingredients to the wet mixture. Stir gently until just combined. Be careful not to overmix; small lumps are okay. Overmixing can make the cake tough. Pour the batter into your prepared sheet pan. Use a spatula to smooth the top. Bake in your preheated oven for 25-30 minutes. To check if it's done, insert a toothpick into the center. If it comes out clean, your cake is ready! Let it cool in the pan for about 10 minutes before moving it to a wire rack to cool completely. You can find the full recipe [Full Recipe]. To make your Lemon Zucchini Sheet Cake moist, use both applesauce and oil. Applesauce adds moisture without extra fat. It gives a sweet taste and keeps the cake light. Oil helps keep the cake tender. Use half a cup of each. This mix makes your cake deliciously soft and moist. When you mix your batter, stop when it looks combined. Lumps are okay! Overmixing makes the cake tough. You want a light, airy texture. Just stir until no dry flour shows. Enjoy the small lumps; they will bake out and keep your cake fluffy. The baking time is key to a perfect cake. Use the toothpick test to check for doneness. Insert a toothpick into the center of the cake. If it comes out clean, your cake is ready. If it has wet batter on it, bake a few more minutes. Keep an eye on it so you don’t overbake. A perfectly baked cake is moist and soft. Try these tips for a delightful result! For the complete recipe, check the Full Recipe. {{image_2}} You can enhance your Lemon Zucchini Sheet Cake with fun add-ins. Consider adding nuts for crunch. Chopped walnuts or pecans work great. They add texture and a nutty flavor. If you love chocolate, mix in some chocolate chips. The sweet chocolate pairs well with the tangy lemon. You can also try adding dried fruits like raisins or cranberries. These will give your cake a chewy surprise. When it comes to frosting, you have choices. A lemon glaze is light and fresh. It adds a burst of flavor that complements the cake. To make it, mix powdered sugar with lemon juice until smooth. Drizzle it over the cooled cake for a sweet touch. On the other hand, cream cheese frosting gives a rich, creamy finish. It balances the tartness of the lemon. If you prefer a thicker layer, go for the cream cheese option. Both choices make your cake even more delightful. Want to make this cake gluten-free? It's easy! Substitute all-purpose flour with a gluten-free blend. Look for a mix that includes xanthan gum for better texture. Almond flour can also be a great option. Just note that it may change the taste slightly. You might need to adjust the baking time. Keep an eye on it while it bakes. With these swaps, everyone can enjoy this tasty cake! For the complete steps, check the Full Recipe. To keep your Lemon Zucchini Sheet Cake fresh, store it in the fridge. Place the cake in an airtight container. If you don't have one, wrap it tightly in plastic wrap. This helps prevent the cake from drying out. Remember to wait until it cools completely before storing it. Chilling the cake also helps it stay moist longer. To freeze your cake, first, let it cool down. Cut it into squares or leave it whole. Wrap each piece in plastic wrap, then in aluminum foil. This double wrap prevents freezer burn. Place the wrapped cake in a freezer-safe bag or container. When you're ready to enjoy it, take it out and let it thaw in the fridge overnight. This method keeps the cake soft and tasty. Your Lemon Zucchini Sheet Cake can last up to a week in the fridge. If stored correctly in the freezer, it can last for about three months. Always check for signs of spoilage, like off smells or mold. If it looks good and smells fine, it should be safe to eat! Yes, you can make this cake dairy-free! Here are some easy swaps: - Use almond milk or soy milk instead of any dairy milk. - Replace any butter with coconut oil or a dairy-free butter. - Ensure your applesauce is unsweetened and dairy-free. These swaps keep the cake moist and tasty. To check if your cake is done, look for these signs: - A toothpick inserted in the center comes out clean. - The edges of the cake pull away from the pan slightly. - The top feels firm and springs back when touched. These signs help ensure perfect baking every time. If you can't find zucchini, try these alternatives: - Grated carrots add sweetness and moisture. - Use finely shredded summer squash for a similar texture. - Apples can work well, adding a fruity flavor. These options can add fun twists to your cake! This blog post walks you through the steps to make a delicious Lemon Zucchini Sheet Cake. You learned about the must-have ingredients and some optional ones to add zest. I shared tips to keep your cake moist and avoid overmixing. You can even try variations, like adding nuts or going gluten-free. Baking should be fun and easy. Now, gather your ingredients and get started! Enjoy your baking adventure and make this cake shine!](https://dailydishlab.com/wp-content/uploads/2025/07/f8d12cbe-606d-4e9f-b3a7-8aa2f948db73-768x768.webp)