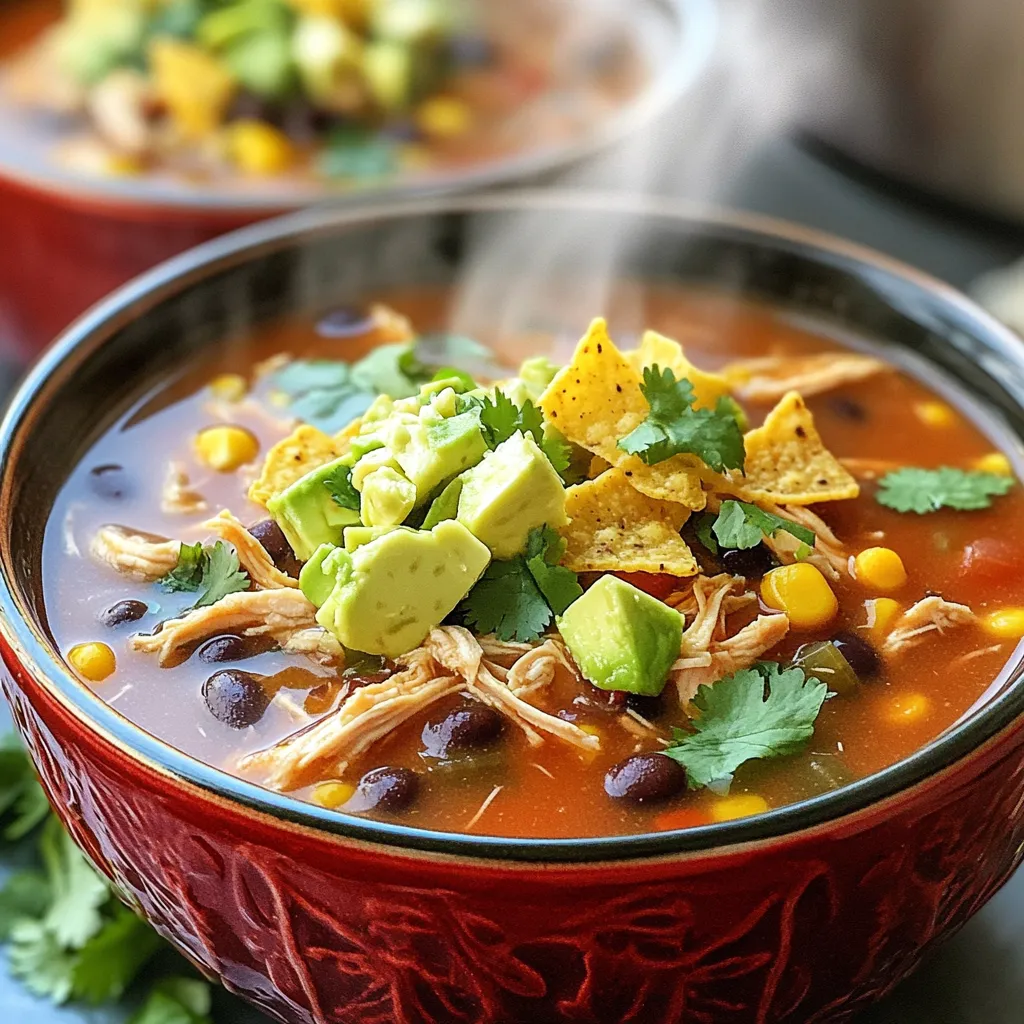
Instant Pot Chicken Taco Soup Flavorful and Satisfying
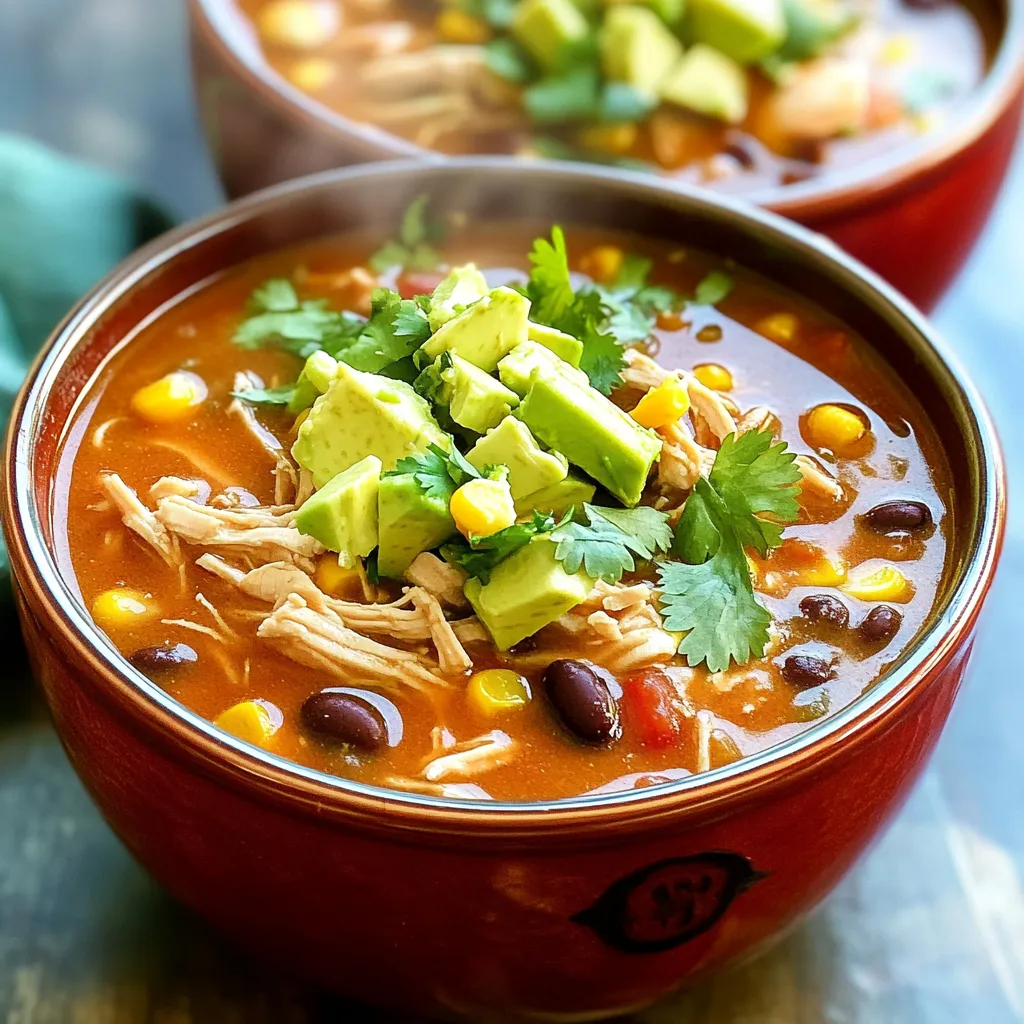
Looking for a hearty meal that’s quick and easy? You’ve come to the right place! My Instant Pot Chicken Taco Soup is both flavorful and satisfying. Packed with tender chicken, black beans, and diced tomatoes, this recipe takes just minutes to prepare. I’ll guide you step-by-step, ensuring you create a delicious soup that warms your soul. Ready to dive into the tastiest bowl? Let’s get cooking!
Why I Love This Recipe
- Quick and Easy: This soup comes together in just 35 minutes, making it perfect for busy weeknights.
- Flavorful Ingredients: The combination of black beans, corn, and taco seasoning creates a deliciously robust flavor profile.
- Healthy and Nutritious: Packed with protein and fiber, this soup is a wholesome option for a satisfying meal.
- Customizable: Easily adjust toppings like avocado and tortilla chips to suit your taste preferences.
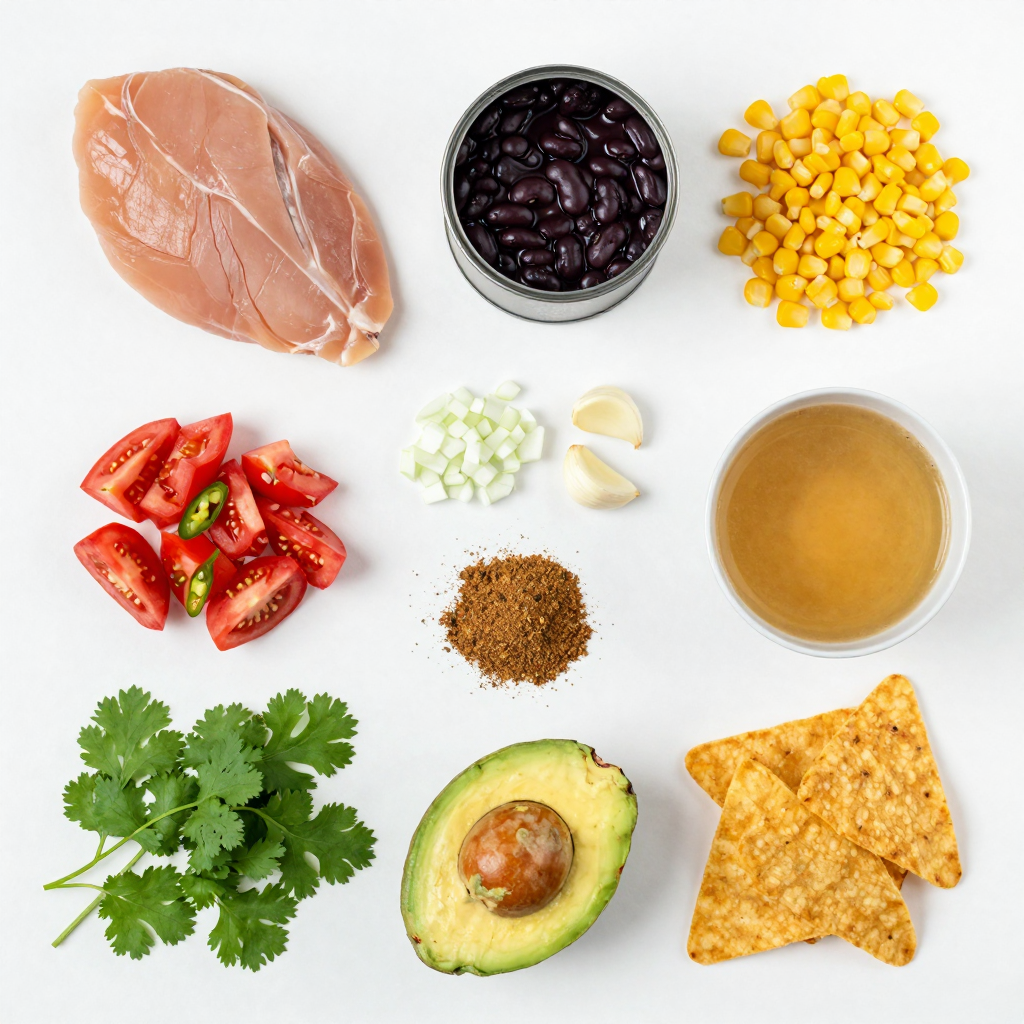
Ingredients
Main Ingredients List
- 1 lb boneless, skinless chicken breasts
- 1 can black beans, rinsed and drained
- 1 can corn, drained
- 1 can diced tomatoes with green chilies
- 1 small onion, diced
- 2 cloves garlic, minced
- 1 cup chicken broth
The main ingredients bring a lot of flavor. The chicken gives the soup its heartiness. Black beans and corn add texture and nutrition. Diced tomatoes with green chilies give the soup a nice kick. Onion and garlic enhance the overall taste and aroma.
Seasonings and Toppings
- 1 tablespoon taco seasoning
- 1 teaspoon cumin
- Salt and pepper to taste
- Fresh cilantro, chopped
- 1 avocado, diced
- Tortilla chips
The seasonings are key to making this soup pop. Taco seasoning adds a classic flavor that everyone loves. Cumin brings warmth and depth. Salt and pepper let you adjust the taste to your liking. Fresh cilantro and avocado make great toppings. They add freshness and creaminess, making each bite special. Don’t forget the tortilla chips for that crunch!
Step-by-Step Instructions
Preparing the Chicken
To start, place the boneless chicken breasts at the bottom of the Instant Pot. This step ensures even cooking. Make sure the chicken is fresh for the best flavor.
Adding Ingredients
Next, layer the ingredients. Add the diced onion and minced garlic on top of the chicken. Then, toss in the black beans, corn, and diced tomatoes. Pour in the chicken broth. Sprinkle the taco seasoning and cumin over everything. Stir gently to combine. This action helps the chicken soak in all the flavors.
Cooking the Soup
Now, it’s time to cook. Close the lid securely and set the steam valve to sealing. Choose the “Manual” or “Pressure Cook” setting. Adjust the timer to 15 minutes on high pressure. Once the timer goes off, let the pressure release naturally for 10 minutes. After that, do a quick release for any remaining pressure. This method keeps the chicken juicy.
Shredding and Serving
After opening the lid, take out the chicken breasts. Use two forks to shred the chicken. Return the shredded chicken back to the pot. Stir everything together to mix the flavors. For serving, scoop the soup into bowls. Top with diced avocado and chopped cilantro. Add a handful of tortilla chips for added crunch. This presentation makes the dish feel special.
Pro Tips
- Use Frozen Chicken: Using frozen chicken breasts can save time. Just add an additional 5 minutes to the pressure cooking time.
- Customize the Toppings: Feel free to add other toppings like sour cream, cheese, or jalapeños for extra flavor.
- Make it Spicy: If you enjoy a kick, add diced jalapeños or a splash of hot sauce to the soup before cooking.
- Leftovers Storage: This soup stores well in the fridge for up to 3 days. For longer storage, freeze in airtight containers for up to 3 months.
Tips & Tricks
Perfecting Your Instant Pot Chicken Taco Soup
To make sure your chicken is tender, follow these tips:
- Use fresh chicken: Fresh chicken breasts cook better and stay juicy.
- Don’t overcook: Set your timer to 15 minutes. This gives you tender meat without drying it out.
- Natural pressure release: Let the pressure release naturally for 10 minutes. This helps keep the chicken moist.
Shred the chicken after cooking. Use two forks to pull it apart gently. Return it to the pot and stir well.
Adjusting Spice Levels
You can customize the heat for your taste. Here’s how:
- Taco seasoning: Start with one tablespoon. You can always add more later.
- Cumin: This spice adds depth. Use one teaspoon, but feel free to increase for more flavor.
- Fresh peppers: For extra heat, add diced jalapeños or serranos.
Taste the soup before serving. Adjust the salt and pepper to your liking.
Alternative Cooking Methods
If you don’t have an Instant Pot, you can still enjoy this soup. Here are some options:
- Slow cooker: Place all ingredients in your slow cooker. Cook on low for 6-8 hours or high for 3-4 hours.
- Stovetop: In a pot, combine all ingredients. Bring to a boil, then reduce heat. Simmer for 30-40 minutes until the chicken is cooked.
These methods give you tasty chicken taco soup with minimal effort. Enjoy!
Variations
Vegetarian Option
To make a vegetarian version of this soup, swap chicken for extra beans or lentils. You can use:
- 1 can (15 oz) chickpeas, rinsed and drained
- 1 can (15 oz) black beans, rinsed and drained
- 1 cup diced bell peppers
These swaps will keep it hearty and filling. You might want to add a little extra broth for a good texture.
Flavor Enhancements
For more flavor, consider adding cheese or lime. You can mix in:
- 1 cup shredded cheese, like cheddar or Monterey Jack
- Juice of 1 lime
A sprinkle of chili powder adds warmth. You can also add spices like smoked paprika or cayenne for extra kick.
Serving Suggestions
Top your soup with fun ingredients. Ideas for toppings include:
- Diced avocado
- Fresh cilantro
- Sliced jalapeños
Serve with tortilla chips for crunch. You can also pair it with a side salad for a colorful meal.
Storage Info
Refrigerating Leftovers
To store your chicken taco soup in the fridge, follow these steps:
- Let the soup cool to room temperature.
- Transfer it to an airtight container.
- Store in the fridge for up to 4 days.
Make sure the lid is tight to keep the soup fresh. This helps maintain its flavor and texture. When you’re ready to eat, just open the container and enjoy!
Freezing Instructions
If you want to keep your soup longer, freezing is a great option:
- Allow the soup to cool completely.
- Pour it into freezer-safe bags or containers.
- Leave some space at the top. The soup will expand when frozen.
- Label the bags with the date and type of soup.
You can freeze it for up to 3 months. This way, you can enjoy a warm bowl anytime!
Reheating Tips
When it’s time to eat your soup, reheating it properly is key:
- For the microwave, heat in short bursts. Stir in between to ensure even warming.
- On the stove, pour the soup into a pot. Heat on low, stirring often until hot.
These methods help keep the flavors intact and prevent the soup from burning. Enjoy your delicious chicken taco soup!
FAQs
Can I use frozen chicken?
Yes, you can use frozen chicken in this soup. Just make sure to add a few extra minutes to the cooking time. If you use frozen chicken, set the pressure cooking time to 18-20 minutes. This helps ensure the chicken cooks through. Always check that the chicken reaches 165°F for safety.
How long does it take to cook?
Cooking in the Instant Pot takes about 15 minutes at high pressure. Add 10 minutes for natural pressure release. This means the total time is around 35 minutes from start to finish. It’s fast and easy!
What can I serve with Chicken Taco Soup?
You can serve this soup in many ways. Here are some ideas:
- Tortilla chips for crunch
- Avocado for creaminess
- Fresh cilantro for a burst of flavor
- Sour cream for a cool touch
- Rice for a filling side
These sides make the meal more fun and tasty!
This blog post covered how to make an easy Instant Pot Chicken Taco Soup. You learned about the main ingredients, like chicken, beans, and tomatoes. We explored simple steps, from preparing the chicken to serving hot bowls of soup. I shared tips for making your soup just right and ideas for variations, such as vegetarian options. Lastly, I gave advice on storing and reheating your soup. Use these tips to make a meal that warms your heart and brings joy to your table. Enjoy your cooking adventure!

Instant Pot Chicken Taco Soup
Ingredients
1 lb (450g) boneless, skinless chicken breasts
1 can (15 oz) black beans, rinsed and drained
1 can (15 oz) corn, drained
1 can (14.5 oz) diced tomatoes with green chilies
1 small onion, diced
2 cloves garlic, minced
1 cup chicken broth
1 tablespoon taco seasoning (homemade or store-bought)
1 teaspoon cumin
Salt and pepper to taste
Fresh cilantro, chopped (for garnish)
1 avocado, diced (for topping)
Tortilla chips (for serving)
Instructions
Prep the Chicken: Place the boneless chicken breasts at the bottom of the Instant Pot.
Add Ingredients: Add the diced onion, minced garlic, black beans, corn, diced tomatoes (with their juice), chicken broth, taco seasoning, and cumin over the chicken. Stir gently to combine, ensuring the chicken is submerged.
Season: Season with salt and pepper to taste.
Pressure Cook: Close the lid of the Instant Pot, ensuring the steam valve is set to sealing. Select the “Manual” or “Pressure Cook” setting and adjust the timer to 15 minutes on high pressure.
Release Pressure: Once the cooking time is complete, allow the pressure to release naturally for 10 minutes, then do a quick release for any remaining pressure.
Shred Chicken: Open the lid and remove the chicken breasts. Shred the chicken using two forks and return the shredded chicken to the pot. Stir to combine the flavors.
Serve: Scoop the soup into bowls, topping with diced avocado, chopped cilantro, and a handful of tortilla chips for crunch.
– Prep Time: 10 minutes | Total Time: 35 minutes | Servings: 6
Instant Pot Chicken Taco Soup
Ingredients
- 1 lb boneless, skinless chicken breasts
- 1 can (15 oz) black beans, rinsed and drained
- 1 can (15 oz) corn, drained
- 1 can (14.5 oz) diced tomatoes with green chilies
- 1 small onion, diced
- 2 cloves garlic, minced
- 1 cup chicken broth
- 1 tablespoon taco seasoning
- 1 teaspoon cumin
- to taste salt and pepper
- to taste fresh cilantro, chopped (for garnish)
- 1 avocado, diced (for topping)
- to serve tortilla chips
Instructions
- Place the boneless chicken breasts at the bottom of the Instant Pot.
- Add the diced onion, minced garlic, black beans, corn, diced tomatoes (with their juice), chicken broth, taco seasoning, and cumin over the chicken. Stir gently to combine, ensuring the chicken is submerged.
- Season with salt and pepper to taste.
- Close the lid of the Instant Pot, ensuring the steam valve is set to sealing. Select the 'Manual' or 'Pressure Cook' setting and adjust the timer to 15 minutes on high pressure.
- Once the cooking time is complete, allow the pressure to release naturally for 10 minutes, then do a quick release for any remaining pressure.
- Open the lid and remove the chicken breasts. Shred the chicken using two forks and return the shredded chicken to the pot. Stir to combine the flavors.
- Scoop the soup into bowls, topping with diced avocado, chopped cilantro, and a handful of tortilla chips for crunch.
![- 1 cup stone-ground grits (preferably) - 4 cups water or low-sodium chicken broth - 1 lb large shrimp, peeled and deveined - 1 cup sharp cheddar cheese, shredded The heart of shrimp and grits lies in its key ingredients. Stone-ground grits provide a rich, creamy base. They have a coarse texture that enhances the dish. You must use high-quality grits for the best flavor. Large shrimp add a nice sweetness and texture. They should be fresh and deveined for easy cooking. Sharp cheddar cheese brings a salty, rich taste that melts beautifully into the grits. This combination creates a comforting dish that warms the soul. - 4 slices turkey bacon, chopped - Sliced green onions, for garnish While the key ingredients are vital, optional ingredients can elevate your dish. Turkey bacon adds a crispy, smoky flavor. You can cook it in the same skillet as the shrimp. This adds depth and richness to your meal. Sliced green onions provide a fresh, crunchy contrast. They also add a pop of color to your plate. Feel free to add these for extra flair! - 1 teaspoon smoked paprika - ½ teaspoon cayenne pepper (adjust according to spice preference) Seasoning is crucial for flavor. Smoked paprika gives a warm, smoky taste. It enhances the shrimp and grits without overwhelming them. Cayenne pepper adds heat. You can adjust the amount based on your spice preference. Together, these seasonings create a balanced flavor that makes shrimp and grits truly delightful. The right seasoning can transform your dish from good to great! For the full recipe, check out the [Full Recipe]. First, you need to boil water or chicken broth. Use a medium saucepan for this. Bring it to a rolling boil over high heat. Once boiling, gradually whisk in 1 cup of stone-ground grits. This helps avoid lumps. After adding the grits, lower the heat to a gentle simmer. Cover the saucepan and cook for about 20-25 minutes. Stir occasionally until the grits become creamy. Once cooked, stir in 1 cup of sharp cheddar cheese. The cheese gives a rich flavor. Season with salt and pepper to taste. Keep the grits warm over low heat. While the grits cook, grab a large skillet. Heat it over medium heat and add 4 slices of chopped turkey bacon. Cook until crispy, turning occasionally. Use a slotted spoon to remove the bacon. Leave the bacon fat in the skillet. In the same skillet, add 1 small finely chopped onion. Sauté for about 4-5 minutes until soft and translucent. Next, stir in 2 minced garlic cloves, 1 teaspoon of smoked paprika, and ½ teaspoon of cayenne pepper. Cook for about a minute. This mix will smell amazing! Now, add 1 pound of peeled and deveined shrimp. Cook for 3-4 minutes, flipping halfway through. When the shrimp turn pink and opaque, they are ready. Season with salt and pepper to taste. Add 2 tablespoons of unsalted butter and stir gently until melted. To serve, spoon a generous helping of cheesy grits onto each plate. This creamy base is comforting and delicious. Top with the shrimp mixture. This allows all the flavors to blend nicely. Finally, sprinkle the crispy bacon over the dish. Garnish with sliced green onions for a pop of color and crunch. Enjoy this savory shrimp and grits delight! For the full recipe, check out the details above. Using stone-ground grits makes a big difference. They have a rich taste and great texture. These grits cook slowly, giving them a creamy finish. For added creaminess, mix in butter or cream. You can adjust the consistency by changing the liquid amount. If you like thicker grits, use less water. For smoother grits, add more liquid. Seasoning is key for great shrimp. I love using smoked paprika and cayenne pepper. These spices add depth and warmth. You can also try garlic powder or lemon zest for a fresh twist. Cook the shrimp just right; about 3-4 minutes is perfect. They should turn pink and opaque. Overcooking makes them tough, so keep an eye on them. Serving shrimp and grits nicely makes a big impact. Use a large white plate to make the colors pop. Start with a big scoop of cheesy grits as your base. Then, layer the shrimp mixture on top. For a final touch, sprinkle crispy turkey bacon over the dish. Add sliced green onions for color and crunch. Drizzling melted butter adds a nice shine too. These small details make your meal feel special. For the complete recipe, check the Full Recipe. {{image_4}} When it comes to shrimp and grits, the options are endless. You can play with flavors and ingredients to make this dish your own. - Adding andouille sausage: This spicy sausage brings a rich flavor. It adds a nice kick to the dish. Just slice it and sauté with the onions. The smoky taste works well with shrimp. - Using different types of cheese: While sharp cheddar is a classic choice, feel free to experiment. Gouda or pepper jack can give a new twist. Each cheese adds its own character to the creamy grits. - Cauliflower grits: If you're looking for a lighter option, try cauliflower grits. Simply steam cauliflower and blend it until smooth. It gives a similar texture with fewer carbs. - Low-sodium bacon options: You can still enjoy that savory flavor without too much salt. Turkey bacon or even tempeh can work well. These options keep the dish tasty while being healthier. - Cajun-style shrimp and grits: Bring the heat with Cajun spices. Use a blend of paprika, onion powder, and cayenne. This gives a vibrant flavor that will awaken your taste buds. - Incorporating international spices: Try adding spices like curry powder or turmeric. These spices offer a new take on shrimp and grits. They bring warmth and a touch of the exotic to your plate. Feel free to mix and match these ideas to create your perfect shrimp and grits. For the full recipe, check out the details in the main article. To keep your shrimp and grits fresh, store them in airtight containers. This method helps prevent moisture loss and keeps flavors intact. Place the leftovers in the fridge within two hours of cooking. They will stay fresh for up to three days. Beyond that, the shrimp may lose quality and texture. When reheating grits, add a splash of water or broth. This helps restore creaminess. Heat them slowly over low heat. Stir often to avoid sticking. For the shrimp, use a skillet on low heat. This method warms them gently, keeping them tender. Avoid microwaving shrimp as it can make them tough. You can freeze shrimp and grits, but it's best to freeze them separately. For grits, let them cool completely and then transfer to freezer-safe bags. They will last up to three months in the freezer. For shrimp, place them in a single layer on a baking sheet to freeze first. Once frozen, transfer to a bag. This prevents clumping. When ready to eat, thaw both in the fridge overnight. Reheat as described above for the best results. Shrimp and grits come from the Lowcountry of the southern U.S. It started as a breakfast dish for working-class folks. In the early days, fishermen ate shrimp with their grits. Grits are made from ground corn, a staple in southern cooking. Over time, this dish evolved into a beloved meal across the region. Today, chefs put their own spins on it, making it popular in fine dining. To amp up the heat, you can add more cayenne pepper. You can also try hot sauce, like Tabasco, for a kick. Consider diced jalapeños or red pepper flakes for a different flavor. If you prefer a smoky element, add chipotle peppers in adobo sauce. Remember to taste as you go, so you find the right level of heat for you. Yes, you can substitute grits with other grains. Polenta is a popular choice and has a similar texture. Quinoa can also work, offering a nutty flavor and extra protein. Another option is farro, which gives a chewy bite. Just adjust the cooking time and liquid according to the grain you choose. Several sides pair nicely with shrimp and grits. A fresh salad can add a crisp contrast. Consider a simple mixed green salad with a light vinaigrette. Roasted vegetables also work well, adding color and nutrition. You might enjoy collard greens or sautéed green beans for a classic southern touch. Try serving cornbread for a comforting side that complements the dish beautifully. In summary, shrimp and grits is a dish that blends flavor and comfort. We explored key ingredients, from stone-ground grits to large shrimp. I shared steps to prepare creamy grits and flavorful shrimp, plus tips to enhance the taste. You can customize variations like healthy options or Cajun styles. Lastly, I provided storage info to keep your leftovers fresh. Enjoy making this dish your own and impressing those at your table!](https://dailydishlab.com/wp-content/uploads/2025/06/fc5e452b-7ec2-413c-a498-40e4879e0d90-768x768.webp)
![To make a tasty Easy Broccoli Cheese Casserole, you need a few simple ingredients. Each one plays a key role in creating a rich flavor and creamy texture. Here’s what you will need: - 4 cups fresh broccoli florets - 1 cup cooked quinoa - 2 cups shredded cheddar cheese - 1 cup cream of mushroom soup - 1/2 cup milk - 1/4 cup sour cream - 1 teaspoon garlic powder - 1/2 teaspoon onion powder - Salt and pepper to taste - 1/2 cup breadcrumbs - 2 tablespoons olive oil Fresh broccoli florets give this dish its bright color and crunch. I like using cooked quinoa for a boost of protein. It makes the casserole more filling. The shredded cheddar cheese melts beautifully, adding a rich, creamy layer. Cream of mushroom soup is the secret to a dreamy texture. Milk and sour cream make everything extra smooth. Don’t forget the spices! Garlic powder and onion powder add depth to the flavor. You can adjust the salt and pepper to match your taste. The breadcrumbs on top add a nice crispiness, thanks to the olive oil. For the Full Recipe, check the detailed instructions. Enjoy making this dish with your family! First, preheat your oven to 350°F (175°C). This helps the casserole cook evenly. Next, grab a 9x13 inch baking dish and lightly grease it. This prevents sticking. Now, let’s steam the broccoli florets. Place them in a steamer for about 4-5 minutes. You want them tender but not mushy. Once done, set them aside to cool. In a large mixing bowl, combine the cooked quinoa, 1 1/2 cups of shredded cheddar cheese, cream of mushroom soup, milk, sour cream, garlic powder, onion powder, salt, and pepper. Mix everything well. You want a smooth, cheesy blend. This mix is the heart of your casserole, so make sure it's well combined. Now it’s time to fold in the steamed broccoli. Gently stir it into the cheesy mixture until coated. This adds a nice green color and texture. Pour this mixture into your prepared baking dish, spreading it out evenly. For the topping, mix breadcrumbs with olive oil in a small bowl. Sprinkle this mixture over the casserole. Finally, add the remaining 1/2 cup of shredded cheddar cheese on top. Place the casserole in the preheated oven. Bake it for 25-30 minutes. You will know it’s done when the top is golden brown and the cheese is bubbly. This creates a nice crust. After baking, let it cool for a few minutes before serving. This helps the flavors settle and makes it easier to serve. Enjoy your Easy Broccoli Cheese Casserole! For the full recipe, check the earlier section. To cook broccoli for the best texture, steam it lightly. This method keeps it bright green and crisp. Steam the florets for about 4-5 minutes. They should be tender but not mushy. This step helps them hold their shape and adds a nice bite to your casserole. Choosing the right cheese is key for flavor. I recommend using sharp cheddar. It melts well and gives a rich taste. If you want a creamier texture, try adding mozzarella. Mixing different cheeses can also add depth to your dish. You can easily make ingredient substitutions. If you don’t have quinoa, use rice or even pasta. For a lighter option, swap cream of mushroom soup with plain yogurt. This change keeps the dish creamy while cutting calories. Add-ins can boost flavor and nutrition. Consider mixing in cooked chicken or turkey for protein. Diced bell peppers or carrots can add color and crunch. You can also throw in some nuts for a nice crunch. These options make it fun and unique every time you make it. For the full recipe, check out the [Full Recipe]. {{image_2}} For a lighter version of this casserole, swap out some ingredients. Use low-fat cheese to cut calories. You can also replace cream of mushroom soup with a homemade version or low-sodium broth. This gives you control over the fat and salt levels. If you want a gluten-free option, use gluten-free breadcrumbs. You can also make your own with gluten-free bread if you prefer. These small changes keep the dish tasty while making it healthier. To add more flavor, you can include other vegetables. Bell peppers, carrots, or even spinach work well. These not only boost nutrition but also add great color. Mixing in proteins like cooked chicken or turkey makes the dish heartier. It turns a side dish into a full meal. For the best flavor, try adding fresh herbs like thyme or rosemary. These herbs brighten up the taste and add a nice aroma. You can also use a mix of cheeses for a more complex flavor profile. Just remember to keep it balanced so the broccoli shines through. For the complete recipe, check out the Full Recipe section. To keep your Easy Broccoli Cheese Casserole fresh, let it cool first. Once cool, cover it tightly with plastic wrap or aluminum foil. Store it in the fridge for up to three days. Use a clean spoon when serving, so you avoid cross-contamination. This way, you can enjoy your leftovers without worry. If you want to freeze your casserole, here’s what to do. First, let it cool completely. Then, cut it into portions. Wrap each piece in plastic wrap, then place them in a freezer bag. This helps keep the flavor and texture intact. When you are ready to eat, thaw it overnight in the fridge. Reheat in the oven at 350°F (175°C) until hot. This method works well to enjoy your Easy Broccoli Cheese Casserole later. For the complete recipe, check out the Full Recipe. How can I make this broccoli cheese casserole in advance? You can prepare this casserole a day ahead. Simply follow the recipe until you layer the casserole in the dish. Cover it tightly with plastic wrap and store it in the fridge. When ready to bake, remove the wrap and add a few extra minutes to the baking time. This method saves time and lets the flavors mix well. Can I use frozen broccoli instead of fresh? Yes, frozen broccoli works well in this casserole. Just thaw and drain it before mixing. This saves prep time and still gives you that great broccoli flavor. Make sure to squeeze out extra water to avoid a soggy casserole. What is the calorie count per serving? Each serving of this broccoli cheese casserole has about 300 calories. This count can vary based on your specific ingredients. If you use low-fat cheese or a lighter soup, the calories may drop. Does this casserole freeze well? Yes, this casserole freezes nicely. After baking, let it cool completely. Then, cover it tightly with foil or plastic wrap. Store it in the freezer for up to three months. When you want to eat it, thaw it overnight in the fridge and reheat in the oven. This helps keep the flavors fresh and delicious. For the full recipe, check out the Cheesy Broccoli Bliss Casserole! This blog covered a simple and tasty broccoli cheese casserole. You learned about the key ingredients, from fresh broccoli to spices. I shared step-by-step instructions for mixing and baking. Also, you discovered tips for perfecting the dish and ways to customize it. Finally, we discussed storage methods for leftovers. I hope you feel ready to make this dish! Enjoy your cooking and create a meal that everyone will love.](https://dailydishlab.com/wp-content/uploads/2025/07/a9a80e4c-75b2-4ae9-8984-ae1ea083217d-768x768.webp)