
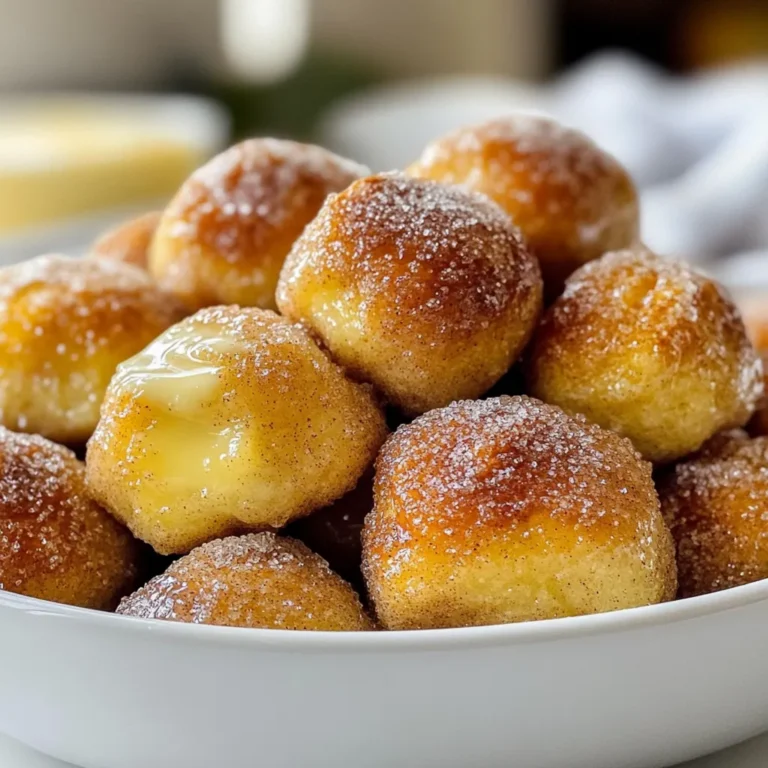
No Bake Key Lime Pie Bars Delightful and Simple Treat
Craving a sweet, tangy treat without an oven? You’re in the right place! These No Bake Key Lime Pie Bars are easy to make and perfect for any occasion. With a creamy filling and a crunchy crust, they’ll delight your taste buds. Join me as I guide you step by step to create this refreshing dessert. Let’s dive in and whip up something delicious together!
Why I Love This Recipe
- Refreshing Flavor: The bright and tangy lime flavor is incredibly refreshing, making it perfect for warm weather or any occasion.
- No Baking Required: This recipe is simple and doesn’t require any baking, which means less time in the kitchen and more time enjoying your creation.
- Versatile Presentation: These bars can be dressed up with whipped cream and lime slices for a beautiful presentation, perfect for parties or gatherings.
- Easy to Make: The straightforward steps and minimal ingredients make this recipe accessible for bakers of all skill levels.
Ingredients
Key Ingredients for No Bake Key Lime Pie Bars
To make these bars, you need simple and fresh ingredients. Here’s what you will use:
- 1 ½ cups graham cracker crumbs
- ½ cup unsweetened shredded coconut
- ½ cup unsalted butter, melted
- 1 cup sweetened condensed milk
- ½ cup fresh lime juice (about 4 limes)
- Zest of 2 limes
- 1 cup heavy cream
- 2 tablespoons powdered sugar
- Lime slices for garnish
Each ingredient plays a key role in flavor and texture. The graham crackers form a crunchy base. The shredded coconut adds a nice chew. Fresh lime juice gives that bright, zesty flavor. The sweetened condensed milk adds creaminess. Finally, whipped cream lightens the filling.
Optional Garnishes
While the bars are tasty on their own, garnishes can make them even better. Here are some ideas:
- Lime slices
- Fresh lime zest
- A dollop of whipped cream
Adding these can enhance both the look and taste of your bars. They also bring a pop of color to your dessert.
Ingredient Substitutions
If you don’t have some ingredients, you can still make these bars. Here are some swaps:
- Use crushed cookies instead of graham crackers for the crust.
- Swap unsweetened coconut for sweetened coconut if you like it sweeter.
- For vegan options, try coconut cream instead of heavy cream.
- If you lack fresh limes, bottled lime juice works too, but fresh is best.
These substitutions keep your recipe flexible. You can adapt it to what you have at home.

Step-by-Step Instructions
Preparing the Crust
To make the crust, first grab a bowl. Add 1 ½ cups of graham cracker crumbs and ½ cup of unsweetened shredded coconut. Mix them well. Then, pour in ½ cup of melted unsalted butter. Stir until all the crumbs get moist.
Next, take an 8×8-inch square pan. Press the mixture into the bottom evenly. Use a flat-bottomed glass to pack it down tightly. This helps the crust hold together. Chill the pan in the fridge for 15 minutes.
Making the Lime Filling
While the crust chills, let’s make the lime filling. In a separate bowl, add 1 cup of sweetened condensed milk. Squeeze in ½ cup of fresh lime juice. This is about 4 limes. Don’t forget to add the zest of 2 limes for extra flavor. Whisk these ingredients together until smooth.
In another bowl, whip 1 cup of heavy cream with 2 tablespoons of powdered sugar. Beat until soft peaks form. This will make your filling light and fluffy. Now, gently fold the whipped cream into the lime mixture. Keep folding until no white streaks remain.
Assembling the Bars
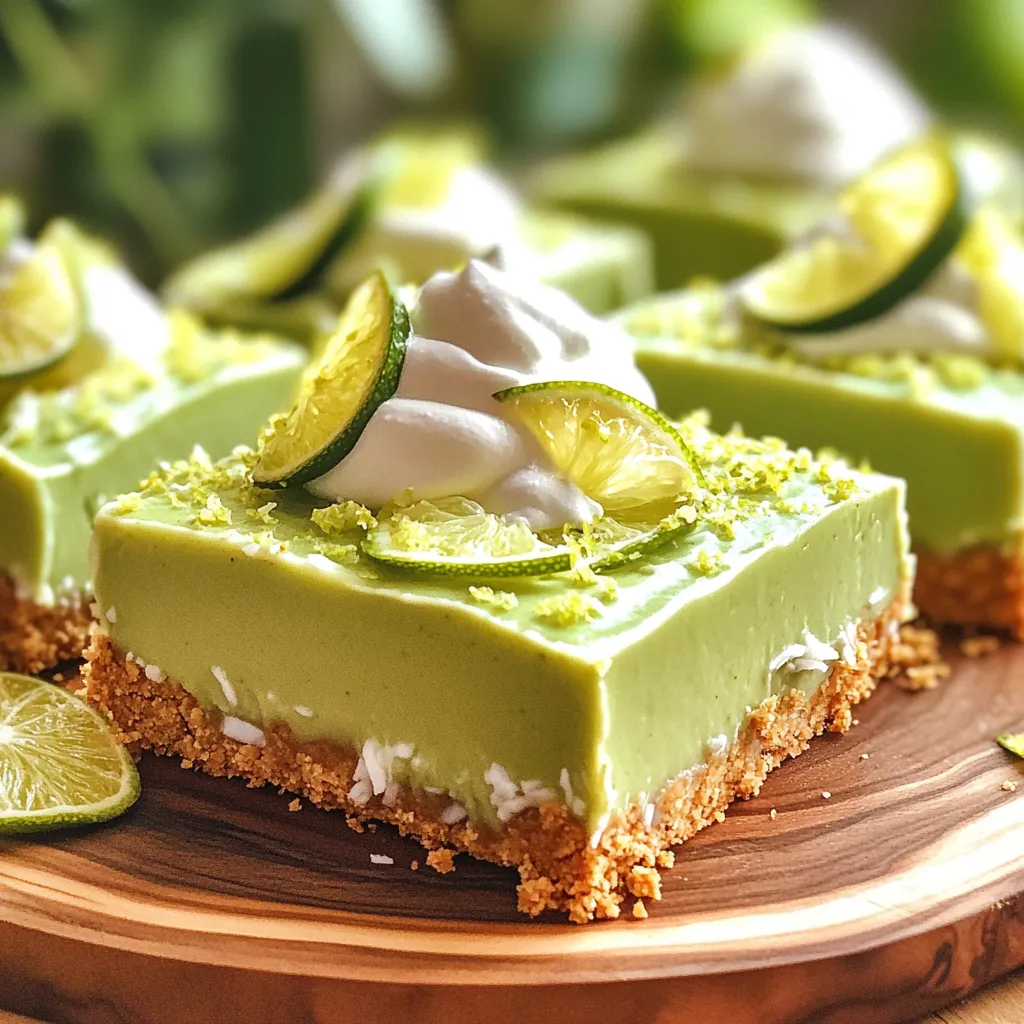
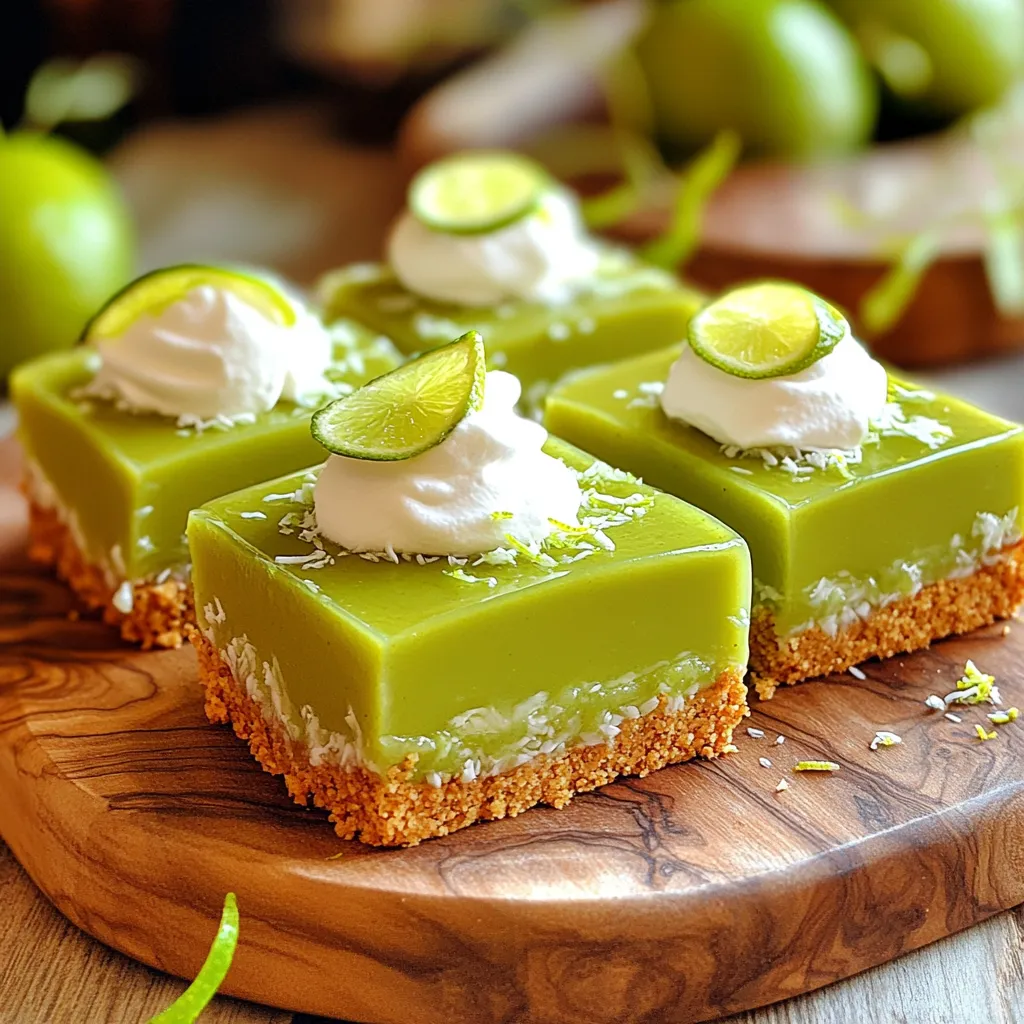
Once the crust is ready, pour the lime filling over it. Use a spatula to spread it evenly across the crust. After that, place the pan back in the fridge. Let it chill for at least 4 hours or until it sets completely.
When the bars are set, you can cut them into squares. Serve them cold, and add lime slices on top for garnish if you want. Enjoy your zesty no-bake key lime pie bars!
Pro Tips
- Use Fresh Limes: For the best flavor, always use fresh limes instead of bottled lime juice. Fresh juice enhances the tanginess of the pie.
- Chill the Crust: Chilling the graham cracker crust for at least 15 minutes helps it firm up, making it easier to cut into bars later.
- Whip Cream to Soft Peaks: Be careful not to over-whip the cream; soft peaks will give your filling a light and airy texture.
- Garnish Creatively: Elevate your presentation by adding lime zest and edible flowers along with lime slices for a pop of color.
Tips & Tricks
Tips for Achieving the Perfect Whipped Cream
To make perfect whipped cream, start with cold heavy cream. Cold cream whips better. Use a clean bowl and beaters to whip. This helps avoid any unwanted flavors. Whip until you see soft peaks. Soft peaks mean it’s light and fluffy. Add powdered sugar to sweeten it. This sugar also helps it hold its shape.
Common Mistakes to Avoid
Don’t skip chilling the crust. This step helps it set well. If your bars are too soft, they need more chill time. Mixing the lime mixture too fast can add air. This will make it hard to fold in the cream. Always fold gently. This keeps the mixture light and airy. Avoid over-whipping the cream. Over-whipped cream can turn grainy and lose its fluffiness.
How to Tell When the Bars are Set
Check the bars after four hours in the fridge. They should feel firm to the touch. If they jiggle, they need more time. Cut a small piece to test the set. If it holds its shape, it’s ready. The bars should slice cleanly without falling apart. For best results, serve them chilled.
Variations
Adding Different Citrus Flavors
You can change things up with other citrus fruits. Try using lemon or orange juice instead of lime juice. This swap gives a new taste to your bars. Lemon adds a sharp flavor, while orange brings a sweet touch. Mix and match with zest too for even more flavor.
Vegan and Dairy-Free Alternatives
For a vegan or dairy-free version, switch the sweetened condensed milk. Use coconut cream instead. This keeps the bars creamy and adds a nice coconut flavor. Also, replace heavy cream with whipped coconut cream. You can find this at many stores or make it at home.
Creative Twists on Presentation
Make your bars stand out with fun toppings. Instead of just lime slices, try adding berries or mint leaves. You can also sprinkle some toasted coconut on top. For a fancy touch, serve the bars on a colorful plate. Use small dessert cups for individual servings. This makes each bite special!
Storage Info
Best Practices for Refrigeration
To keep your No Bake Key Lime Pie Bars fresh, store them in the fridge. Use an airtight container for the best results. This will help keep the bars moist and firm. Be sure to place parchment paper between layers if you stack them. This prevents sticking and keeps the bars looking nice.
Freezing No Bake Key Lime Pie Bars
You can freeze these bars for later enjoyment! Cut them into squares first. Wrap each square in plastic wrap. Then, place them in a freezer-safe bag or container. Make sure to label the bag with the date. They will taste great even after being frozen.
How Long Do They Last?
In the fridge, these bars last about 5 to 7 days. If you freeze them, they can last up to 2 months. Just remember to thaw them in the fridge before eating. This keeps the texture nice and creamy. Enjoy your zesty treat whenever you want!
FAQs
Can I use bottled lime juice instead of fresh?
Yes, you can use bottled lime juice. However, fresh lime juice gives a brighter taste. Fresh limes also add zest, which enhances flavor. If you use bottled juice, choose one with no added sugars. Fresh is always best for this recipe.
How can I prevent the crust from getting soggy?
To keep the crust crisp, make sure to press it firmly. Use a flat-bottomed glass to pack it down well. Chilling it for 15 minutes helps to set it before adding the filling. Ensure the filling is not too wet. Letting it cool helps, too.
Can I make these bars ahead of time?
Yes, you can make these bars a day in advance. They taste better after chilling for a while. Just keep them covered in the fridge. This way, the flavors blend nicely, and they stay fresh. You can enjoy them anytime!
This blog post covered how to make no-bake key lime pie bars. We explored key ingredients, along with options for garnishes and swaps. We also walked through step-by-step instructions, tips for whipped cream, and common mistakes to watch for. Variations added a fresh twist, while storage info helped you keep them longer.
In summary, these bars are easy, tasty, and fun to share. You can now make them perfect for any occasion! Enjoy your baking!
No Bake Key Lime Pie Bars
Ingredients
1 ½ cups graham cracker crumbs
½ cup unsweetened shredded coconut
½ cup unsalted butter, melted
1 cup sweetened condensed milk
½ cup fresh lime juice (about 4 limes)
Zest of 2 limes
1 cup heavy cream
2 tablespoons powdered sugar
Lime slices for garnish
Instructions
In a bowl, combine graham cracker crumbs and shredded coconut. Stir in melted butter until all crumbs are moistened.
Press the mixture evenly into the bottom of an 8×8-inch square pan to create the crust. Use a flat-bottomed glass to pack it tightly. Chill in the refrigerator for 15 minutes.
In a separate bowl, whisk together sweetened condensed milk, fresh lime juice, and lime zest until well combined.
In another bowl, whip the heavy cream and powdered sugar until soft peaks form.
Gently fold the whipped cream into the lime mixture until no white streaks remain.
Pour the lime filling over the chilled crust and spread it evenly with a spatula.
Return the pan to the refrigerator and let it chill for at least 4 hours, or until set.
Once set, cut into bars and serve chilled, garnished with lime slices if desired.
Prep Time: 20 minutes | Total Time: 4 hours 20 minutes | Servings: 9 bars
– Presentation Tips: Place bars on a serving platter, garnish with a sprinkle of lime zest, and serve with a dollop of whipped cream on top for an extra treat.
No Bake Key Lime Pie Bars
Ingredients
- 1.5 cups graham cracker crumbs
- 0.5 cups unsweetened shredded coconut
- 0.5 cups unsalted butter, melted
- 1 cups sweetened condensed milk
- 0.5 cups fresh lime juice
- 2 limes Zest of 2 limes
- 1 cups heavy cream
- 2 tablespoons powdered sugar
- as needed Lime slices for garnish
Instructions
- In a bowl, combine graham cracker crumbs and shredded coconut. Stir in melted butter until all crumbs are moistened.
- Press the mixture evenly into the bottom of an 8x8-inch square pan to create the crust. Use a flat-bottomed glass to pack it tightly. Chill in the refrigerator for 15 minutes.
- In a separate bowl, whisk together sweetened condensed milk, fresh lime juice, and lime zest until well combined.
- In another bowl, whip the heavy cream and powdered sugar until soft peaks form.
- Gently fold the whipped cream into the lime mixture until no white streaks remain.
- Pour the lime filling over the chilled crust and spread it evenly with a spatula.
- Return the pan to the refrigerator and let it chill for at least 4 hours, or until set.
- Once set, cut into bars and serve chilled, garnished with lime slices if desired.
- Presentation Tips: Place bars on a serving platter, garnish with a sprinkle of lime zest, and serve with a dollop of whipped cream on top for an extra treat.


![To make a tasty Mint Chocolate Chip Cheesecake, you need these main items: - 16 oz cream cheese, softened - 1 cup granulated sugar - 2 large eggs - 1 teaspoon peppermint extract These ingredients create a rich and creamy filling. The cream cheese gives the cheesecake its smooth texture. Sugar adds sweetness, while eggs help it set. Peppermint extract brings that fresh mint taste. The crust is simple and delicious. For it, gather: - 1 ½ cups chocolate sandwich cookie crumbs - ½ cup unsalted butter, melted Combining these makes a crunchy base. The chocolate crumbs add flavor, and the melted butter helps bind them together. You can add a few fun touches if you want: - Green food coloring (optional, for a minty hue) - Whipped cream (for topping) The green food coloring makes your cheesecake look extra festive. Whipped cream adds a nice finish on top, making it even more appealing. You can use the full recipe to guide you in making this delightful dessert. Start by preheating your oven to 325°F (160°C). In a medium bowl, combine 1 ½ cups of chocolate sandwich cookie crumbs with ½ cup of melted unsalted butter. Mix until the crumbs are coated well. Press this mixture evenly into the bottom of a 9-inch springform pan. Bake the crust for 10 minutes. Once done, take it out and let it cool. In a large mixing bowl, beat 16 ounces of softened cream cheese with a hand mixer until smooth. Gradually add 1 cup of granulated sugar, mixing until combined. Next, add 1 teaspoon of vanilla extract and 1 teaspoon of peppermint extract. If you want a fun minty color, add a few drops of green food coloring. Mix for another minute. Now, add 2 large eggs one at a time. Mix just until combined after each egg. Be careful not to overmix. Then, add 1 cup of sour cream and mix until smooth. Gently fold in 1 cup of mini chocolate chips. Pour the cheesecake mixture over the cool crust. Smooth the top with a spatula. Bake it in your preheated oven for 45-50 minutes. Look for the edges to be set, while the center has a slight jiggle. After baking, turn off the oven and crack the door. Let the cheesecake cool gradually for about an hour. Once it cools, cover it with plastic wrap. Refrigerate for at least 4 hours, or overnight for the best flavor and texture. Before serving, top with whipped cream and sprinkle more mini chocolate chips on top. Enjoy your Mint Chocolate Chip Cheesecake! For the complete recipe, check out the [Full Recipe]. To get a smooth texture, start with room temperature ingredients. Cold cream cheese can clump up. Mix the cream cheese slowly. Avoid overmixing. If you mix too fast, air bubbles can form. Those bubbles can crack your cheesecake. When baking, look for a slight jiggle in the center. This means it's not overcooked. Use an oven thermometer to check the heat. Ovens can be off by a few degrees. If you bake at the wrong temp, your cheesecake may not set right. Serve your cheesecake with a swirl of whipped cream. Sprinkle extra mini chocolate chips on top. This makes your cake look fancy and delicious. You can also add fresh mint leaves for a pop of color. Enjoy every creamy bite! For the full recipe, revisit the ingredients and instructions above. {{image_2}} You can make your mint chocolate chip cheesecake even better by adding extra flavors. A drop of vanilla or almond extract can change the taste. Vanilla adds warmth and depth, while almond gives a nice nutty touch. Use about half a teaspoon to start. Taste as you go to find your perfect mix. If you want a different crust, try using graham cracker crumbs instead of chocolate cookies. This gives a nice contrast to the minty filling. For gluten-free options, use gluten-free cookie crumbs. Just make sure the crumbs are finely crushed, so they hold together well. You can even use nuts for a crunchy and fun twist. Serving your cheesecake can be as fun as making it! Instead of cutting it into slices, try serving it in individual cups. This makes for a cute and easy dessert for parties. You can also use decorative plates. Add a sprig of mint or a drizzle of chocolate sauce on top for a fancy touch. These small details can impress your guests and make your dessert stand out. For the full recipe, check the link above. To keep your Mint Chocolate Chip Cheesecake fresh, cover it tightly. Use plastic wrap or foil. This keeps moisture in and prevents odors from other foods. Store it in the fridge for up to five days. The cheesecake tastes best after it chills overnight. This time lets the flavors blend well. You can freeze slices of cheesecake for later. Wrap each slice in plastic wrap. Then, place the wrapped slices in a freezer bag. Press out as much air as you can. This helps avoid freezer burn. To enjoy, thaw the slices in the fridge overnight. This keeps the texture smooth and creamy. In the fridge, your cheesecake lasts about five days. In the freezer, it can last up to three months. After this time, the taste and texture may change. Enjoy your Mint Chocolate Chip Cheesecake while it’s fresh for the best flavor. Making Mint Chocolate Chip Cheesecake takes about 5 hours in total. This includes: - Prep time: 30 minutes to gather and mix ingredients. - Bake time: 45-50 minutes in the oven. - Cooling time: 1 hour in the oven after baking. - Chilling time: At least 4 hours in the fridge for the best flavor. This breakdown helps you plan your day for this creamy delight. Yes, you can make this cheesecake in advance! In fact, it tastes better after chilling overnight. Here are some benefits of making it ahead: - Flavor develops: Chilling allows the mint and chocolate flavors to blend. - Convenience: You can serve it fresh without last-minute stress. - Storage: Wrap it well in plastic wrap to keep it fresh in the fridge. You can make this cheesecake up to 2 days ahead of when you plan to serve it. If you need a cream cheese substitute, you have options! Here are some alternatives: - Greek yogurt: Use plain Greek yogurt for a tangy flavor and creamy texture. - Ricotta cheese: This gives a lighter texture but still creamy. - Tofu: Silken tofu can work for a dairy-free option. Blend until smooth. Each option changes the taste a bit, but they all work in this recipe. This blog post covered how to make a delicious Mint Chocolate Chip Cheesecake. We explored the ingredients needed, including cream cheese and chocolate cookies. You learned the step-by-step method, from prepping the crust to baking and cooling. We shared tips for a smooth texture and perfect bake. Consider trying different flavors or crusts for variety. Lastly, we discussed how to store your cheesecake for freshness. Enjoy your homemade treat, and impress friends with your baking skills!](https://dailydishlab.com/wp-content/uploads/2025/07/65fe9dc3-6e9f-4190-956f-c2db90901af1-768x768.webp)