
Air Fryer Coconut Shrimp Crispy and Flavorful Delight
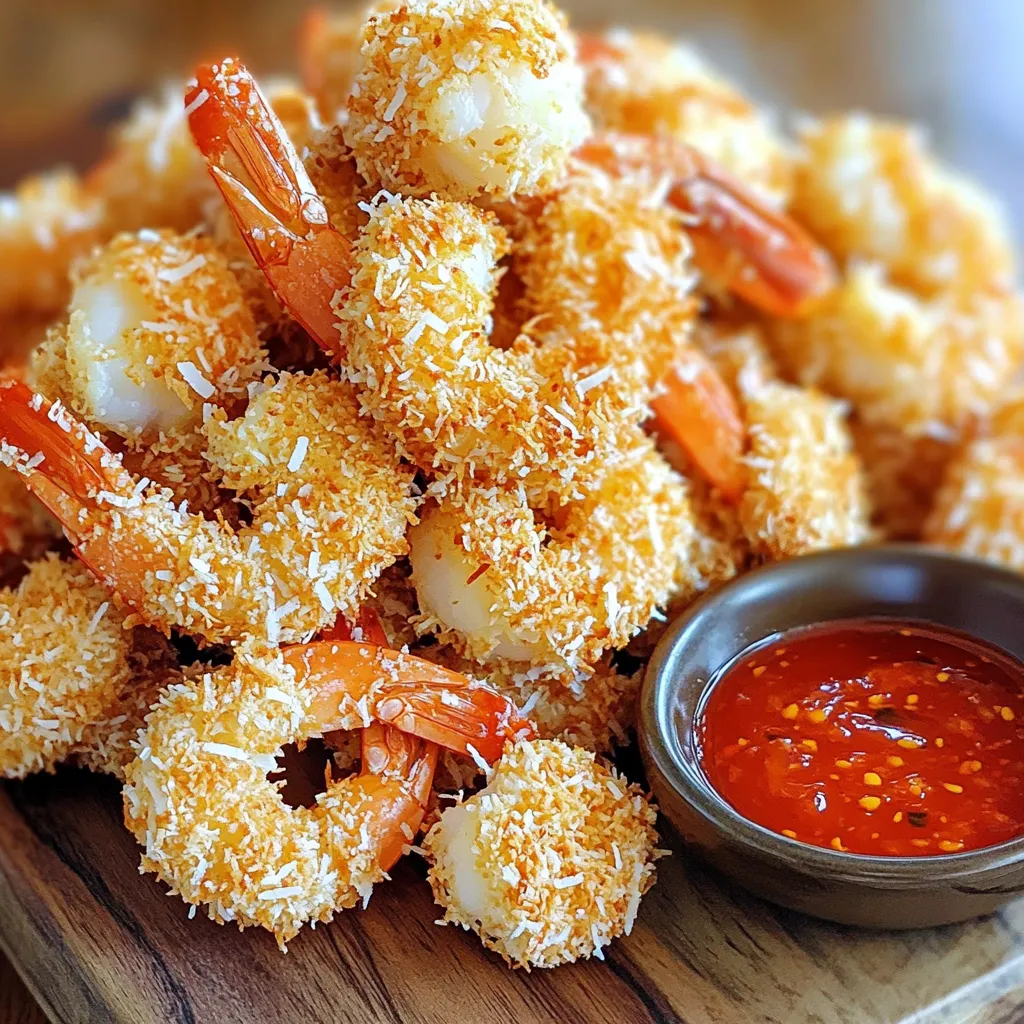
Are you ready to impress your family and friends with a dish that’s crunchy, sweet, and savory? My Air Fryer Coconut Shrimp recipe brings restaurant-quality flavor right to your kitchen. You’ll love how easy it is to prepare with just a few simple ingredients. In this post, I’ll guide you through creating these crispy delights step by step, ensuring they are perfectly cooked every time. Let’s dive in and get cooking!
Why I Love This Recipe
- Easy Preparation: This recipe is simple to follow, making it a great choice for both novice and experienced cooks.
- Healthier Alternative: Using an air fryer allows you to enjoy crispy coconut shrimp with less oil than traditional frying methods.
- Flavorful Coating: The combination of coconut and panko breadcrumbs creates a deliciously crunchy texture that enhances the shrimp’s natural sweetness.
- Perfect for Entertaining: These shrimp make a fantastic appetizer for gatherings or a fun dinner option that impresses guests.
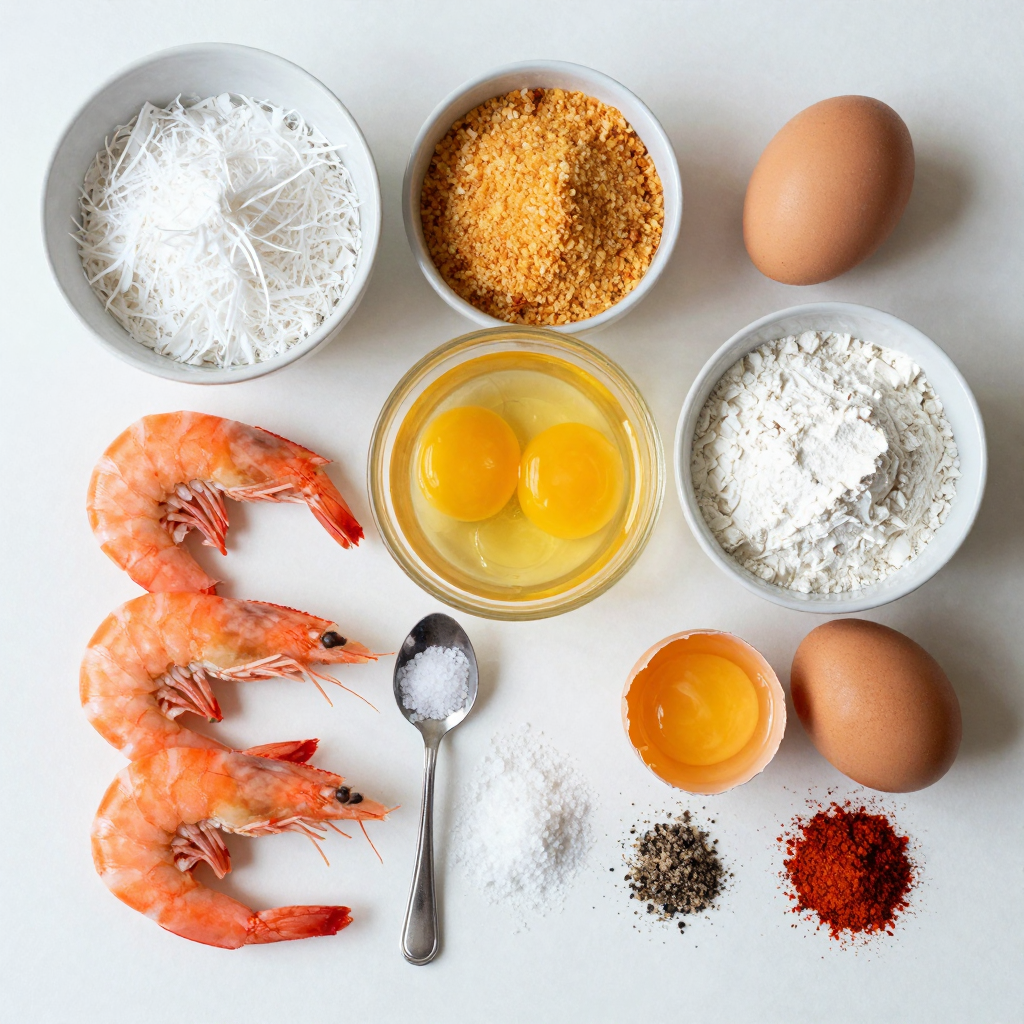
Ingredients
List of Ingredients
- 1 lb large shrimp, peeled and deveined
- 1 cup unsweetened shredded coconut
- 1 cup panko breadcrumbs
- 1/2 cup all-purpose flour
- 2 large eggs
- 1 teaspoon garlic powder
- 1 teaspoon salt
- 1/2 teaspoon black pepper
- 1/2 teaspoon paprika
- Cooking spray or oil for spraying
Nutritional Information
Each serving of these air fryer coconut shrimp has about 300 calories. The breakdown is as follows:
- Protein: 20g
- Carbohydrates: 30g
- Fat: 15g
This dish is a tasty way to enjoy shrimp while keeping it light and crispy. The mix of coconut and panko gives the shrimp a delightful crunch. You’ll love how easy it is to make this gourmet treat right at home. With a simple list of ingredients, anyone can enjoy this dish. You can even customize it with your favorite spices!
Step-by-Step Instructions
Preparation of Shrimp
To start, you need to prepare the shrimp. First, if the shrimp still have shells, peel them off. Next, devein each shrimp by making a small cut along the back. This removes the dark vein. Rinse the shrimp under cold water to clean them. After rinsing, pat them dry with paper towels. Dry shrimp help the coating stick better.
Setting Up the Breading Station
Now, let’s set up your breading station. In a bowl, mix 1/2 cup of all-purpose flour with 1 teaspoon of garlic powder, 1 teaspoon of salt, 1/2 teaspoon of black pepper, and 1/2 teaspoon of paprika. This mix adds great flavor. In another bowl, whisk 2 large eggs until they are smooth. In a third bowl, combine 1 cup of unsweetened shredded coconut and 1 cup of panko breadcrumbs. This mix gives the shrimp a crunchy finish.
Breading and Cooking the Shrimp
Now for the fun part: breading and cooking the shrimp! First, take a shrimp and dredge it in the flour mixture, coating it well. Next, dip the floured shrimp into the egg, letting any excess drip off. Finally, roll the shrimp in the coconut-panko mix, pressing lightly.
Before cooking, preheat your air fryer to 400°F (200°C) for about 5 minutes. Lightly spray the air fryer basket with cooking spray. Arrange the breaded shrimp in a single layer, ensuring space between them for even cooking.
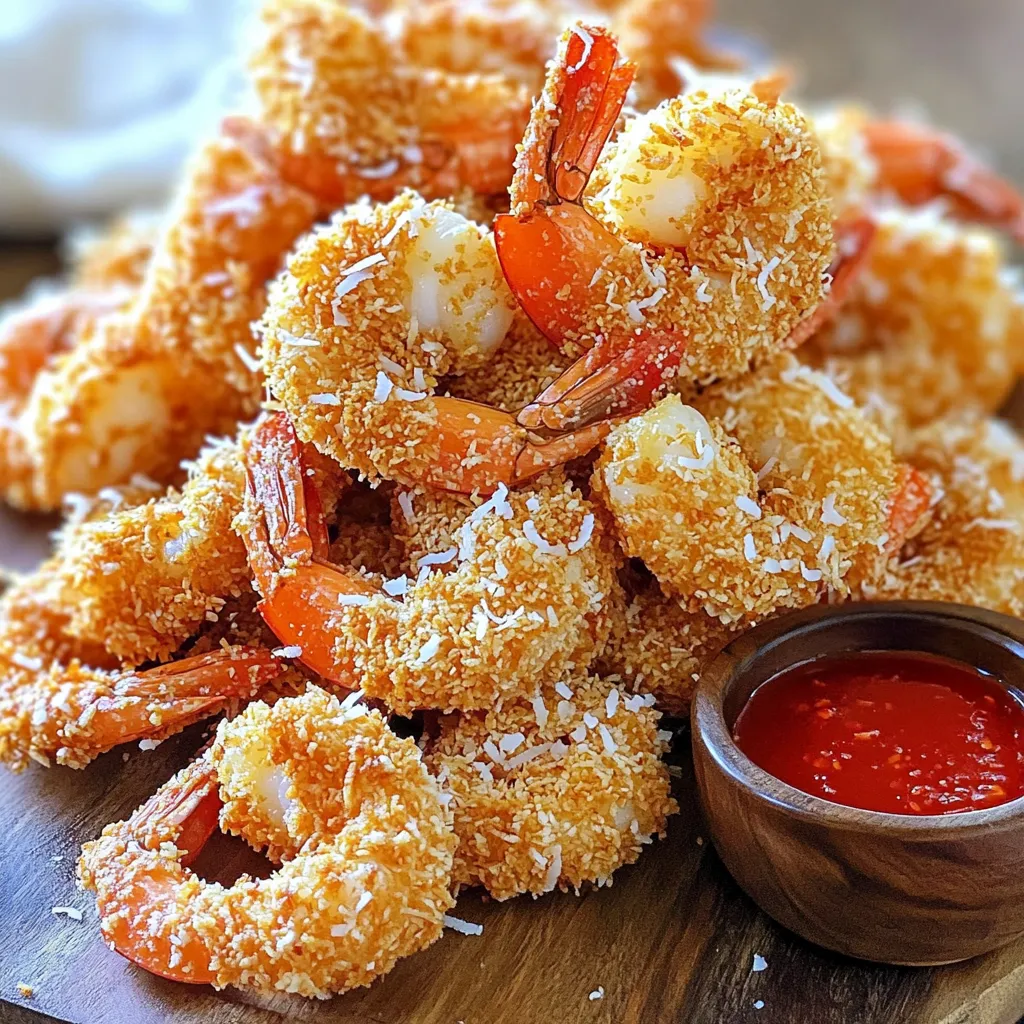
Cook the shrimp for 8-10 minutes, flipping them halfway through. They should turn golden brown and crispy. Once cooked, remove them and repeat with any remaining shrimp. Enjoy these crispy delights with your favorite dipping sauce.
Pro Tips
- Use Fresh Shrimp: For the best flavor and texture, use fresh, high-quality shrimp that are peeled and deveined.
- Customize Your Coating: Feel free to mix in some spices or herbs into the panko and coconut mixture for added flavor, like cayenne pepper or lime zest.
- Don’t Overcrowd the Basket: Arrange the shrimp in a single layer and avoid overcrowding to ensure they cook evenly and become crispy.
- Check for Doneness: Shrimp cook quickly; they are done when they are opaque and have turned pink. Keep an eye on them to avoid overcooking.
Tips & Tricks
Achieving the Perfect Crispy Texture
To get that perfect crispy texture, drying the shrimp is key. Water can make the coating soggy. After rinsing, pat the shrimp dry with paper towels. This helps the breading stick well. For breading, a good process helps too. Start by dredging the shrimp in flour. Then dip them in beaten eggs before rolling them in the coconut and panko mix. Press lightly to ensure even coverage.
Cooking Spray vs. Oil
Using cooking spray or oil can impact crispiness. Cooking spray is easy and quick. It also provides a light coat. On the other hand, oil can give a richer flavor. If you choose oil, use a light oil like canola or avocado. These oils can handle high heat well. Each method gives a nice crunch, so pick what you like best.
Serving Suggestions
For dips, sweet chili sauce pairs great with coconut shrimp. It adds a nice kick. You can also try spicy aioli for a creamy touch. When plating, arrange the shrimp in a circle. Add a small bowl of sauce in the center. This makes it look fancy and fun. A sprinkle of fresh herbs on top adds color too. Enjoy!
Variations
Flavor Variations
You can easily customize the flavor of your air fryer coconut shrimp. Here are some ideas:
- Adding spices to the flour mixture: Mix in a pinch of cayenne pepper for heat, or try adding some curry powder for a unique twist. You can also use smoked paprika for a deeper flavor.
- Using different types of shrimp: While large shrimp work best, medium or even jumbo shrimp can add variety to your dish. You can also try using shrimp with different flavors, like garlic or lemon-marinated shrimp.
Alternative Breading Options
Switch up the breading for a different texture or dietary needs.
- Coconut flour for gluten-free version: Use coconut flour instead of all-purpose flour. This swap will keep the shrimp crispy while making it gluten-free.
- Other breadcrumb alternatives: If you want to avoid panko, try crushed cornflakes or almond flour. Both options add crunch and flavor.
Serving with Different Side Dishes
Pair your coconut shrimp with delightful sides to make a full meal.
- Suggestions for accompaniments: Serve your shrimp with a tangy dipping sauce like sweet chili or spicy aioli. You could also try a zesty mango salsa for a fruity touch.
- Pairing with sides like rice or salad: A bed of coconut rice or a fresh green salad can balance the rich flavors of the shrimp. You can also add a side of grilled veggies for extra color and nutrition.
Storage Info
Storing Leftovers
To keep your air fryer coconut shrimp fresh, use airtight containers. Glass or plastic containers work well for this. You can store them in the fridge for up to three days. Make sure they cool down before sealing. This helps keep them crispy longer.
Reheating Instructions
To reheat your shrimp and keep them crispy, use the air fryer. Preheat it to 350°F (175°C). Place the shrimp in a single layer. Heat for about 5 minutes. This method keeps them crunchy. Avoid using a microwave, as it makes them soggy.
Freezing Coconut Shrimp
You can freeze coconut shrimp for later use. First, let them cool completely. Lay them on a baking sheet and freeze until firm. Once frozen, transfer them to a freezer bag. They can last up to three months in the freezer. When ready to eat, thaw them overnight in the fridge. Reheat using the air fryer to restore crispiness.
FAQs
Can I use frozen shrimp?
Yes, you can use frozen shrimp. Just make sure to thaw them properly before cooking. To thaw the shrimp, place them in the fridge overnight. If you need them fast, put them in a bowl of cold water for about 15-20 minutes. Change the water every few minutes to keep it cold. Once thawed, rinse and pat them dry with paper towels. This step helps ensure they are ready for a perfect crispy coating.
How to ensure the shrimp stay crispy?
To keep your shrimp crispy, avoid common mistakes. First, ensure the shrimp are dry before breading. Excess moisture makes it hard for the coating to stick. Second, do not overcrowd the air fryer basket. Each shrimp needs space for hot air to flow. Flip the shrimp halfway through cooking to brown both sides evenly. Finally, use cooking spray lightly to help achieve that golden, crispy finish.
What are the best dipping sauces?
The right sauce enhances your coconut shrimp. Here are a few tasty options:
- Sweet Chili Sauce: Just pour it from the bottle. It’s sweet and spicy.
- Spicy Aioli: Mix mayo with a bit of sriracha for a creamy kick.
- Mango Salsa: Chop fresh mango, red onion, and cilantro. Add lime juice for a fresh dip.
These sauces are quick to make and pair well with the shrimp. Enjoy experimenting with flavors!
You now know how to make delicious coconut shrimp from scratch. We covered the ingredients, preparation, and cooking process step-by-step. You learned tips for crispiness and explored various flavor options. Plus, I shared storage advice and answered common questions.
You can impress friends and family with your tasty coconut shrimp. Enjoy experimenting and serving this dish your way!

Air Fryer Coconut Shrimp
Ingredients
1 lb large shrimp, peeled and deveined
1 cup unsweetened shredded coconut
1 cup panko breadcrumbs
1/2 cup all-purpose flour
2 large eggs
1 teaspoon garlic powder
1 teaspoon salt
1/2 teaspoon black pepper
1/2 teaspoon paprika
Cooking spray or oil for spraying
Instructions
Start by preparing the shrimp. If they are still in the shell, peel and devein them, and then rinse under cold water. Pat them dry with paper towels.
Set up a breading station: In one bowl, mix the all-purpose flour with garlic powder, salt, black pepper, and paprika. In a second bowl, whisk the eggs. In a third bowl, combine the shredded coconut and panko breadcrumbs.
Dredge each shrimp first in the flour mixture, coating well, then dip into the egg to allow the coconut and breadcrumb mixture to stick. Finally, roll the shrimp in the coconut-panko mixture, pressing lightly to ensure a good coating.
Preheat the air fryer to 400°F (200°C) for about 5 minutes.
Lightly spray the air fryer basket with cooking spray to prevent sticking. Arrange the breaded shrimp in a single layer in the basket, making sure there is space between each shrimp for even cooking. You may need to do this in batches.
Cook the shrimp in the air fryer for 8-10 minutes or until they are golden brown and crispy, flipping them halfway through the cooking time.
Once they are cooked, remove the shrimp from the air fryer and repeat the process with any remaining shrimp.
Serve hot with a dipping sauce of your choice, such as sweet chili sauce or a spicy aioli.
Prep Time: 15 mins | Total Time: 25 mins | Servings: 4
Air Fryer Coconut Shrimp
Ingredients
- 1 lb large shrimp, peeled and deveined
- 1 cup unsweetened shredded coconut
- 1 cup panko breadcrumbs
- 1 2 large eggs
- 1 2 all-purpose flour
- 1 teaspoon garlic powder
- 1 teaspoon salt
- 1 2 black pepper
- 1 2 paprika
- 1 spray cooking spray or oil for spraying
Instructions
- Start by preparing the shrimp. If they are still in the shell, peel and devein them, and then rinse under cold water. Pat them dry with paper towels.
- Set up a breading station: In one bowl, mix the all-purpose flour with garlic powder, salt, black pepper, and paprika. In a second bowl, whisk the eggs. In a third bowl, combine the shredded coconut and panko breadcrumbs.
- Dredge each shrimp first in the flour mixture, coating well, then dip into the egg to allow the coconut and breadcrumb mixture to stick. Finally, roll the shrimp in the coconut-panko mixture, pressing lightly to ensure a good coating.
- Preheat the air fryer to 400°F (200°C) for about 5 minutes.
- Lightly spray the air fryer basket with cooking spray to prevent sticking. Arrange the breaded shrimp in a single layer in the basket, making sure there is space between each shrimp for even cooking. You may need to do this in batches.
- Cook the shrimp in the air fryer for 8-10 minutes or until they are golden brown and crispy, flipping them halfway through the cooking time.
- Once they are cooked, remove the shrimp from the air fryer and repeat the process with any remaining shrimp.
- Serve hot with a dipping sauce of your choice, such as sweet chili sauce or a spicy aioli.
![To make Lemon Herb Grilled Shrimp Skewers, you need fresh and simple ingredients. Here’s what you will need: - 1 pound large shrimp, peeled and deveined - 2 tablespoons olive oil - 2 tablespoons fresh lemon juice - Zest of 1 lemon - 3 cloves garlic, minced - 1 tablespoon fresh parsley, chopped - 1 tablespoon fresh basil, chopped - 1 teaspoon dried oregano - Salt and pepper to taste - Lemon wedges and fresh herbs for garnish These ingredients are easy to find. Fresh shrimp is key for a great flavor. The olive oil helps the shrimp stay juicy while grilling. Lemon juice and zest add a bright taste. Garlic, parsley, basil, and oregano bring a nice herb flavor. The salt and pepper help enhance all these wonderful tastes. For garnish, lemon wedges and fresh herbs make your dish look pretty and inviting. You can find the complete Lemon Herb Grilled Shrimp Skewers recipe within this article. Enjoy preparing this delicious dish! To make the marinade, start by grabbing a large bowl. Add the following ingredients: - 2 tablespoons olive oil - 2 tablespoons fresh lemon juice - Zest of 1 lemon - 3 cloves garlic, minced - 1 tablespoon fresh parsley, chopped - 1 tablespoon fresh basil, chopped - 1 teaspoon dried oregano - Salt and pepper to taste Mix all these ingredients well. You want a smooth and uniform blend. This marinade will give the shrimp a bright, fresh flavor that shines through when you grill them. Now, it’s time to add the shrimp. Use 1 pound of large shrimp that are peeled and deveined. Toss the shrimp in the marinade until they are fully coated. Cover the bowl and put it in the fridge. Let it sit for at least 30 minutes. If you have time, marinating for up to 2 hours will enhance the flavor even more. Before grilling, preheat your grill to medium-high heat. If you use wooden skewers, soak them in water for about 30 minutes. This helps prevent them from burning. Next, prepare the skewers. Thread about 5-6 shrimp onto each skewer. Make sure to leave space between them for even cooking. Place the skewers on the grill and cook for 2-3 minutes on each side. The shrimp will turn opaque when they are fully cooked. Be careful not to overcook them, as this can make them dry. Once cooked, take the skewers off the grill and let them rest for a minute. This will help keep them juicy. Serve them with lemon wedges and fresh herbs for a lovely touch. For the complete recipe, check the full recipe section. To know when shrimp are done cooking, watch for their color. Cooked shrimp turn from gray to pink and become opaque. You want them to curl slightly but not tightly. If they curl too much, they may overcook. To keep shrimp juicy, avoid cooking them too long. Cook them for just 2-3 minutes on each side over medium-high heat. The key is to remove them from the grill as soon as they change color. For extra flavor, try adding more herbs or spices. Fresh dill or cilantro can bring a fresh twist. You might also add a pinch of red pepper flakes for heat. Marinating shrimp is crucial for flavor absorption. Let them soak in the marinade for at least 30 minutes. For even bolder taste, marinate for up to 2 hours. Ensure every shrimp gets coated well in the mix. For the full recipe, check the [Full Recipe]. {{image_2}} You can swap shrimp for chicken or tofu. Chicken thighs work great. Cut them into bite-sized pieces. Marinate just like the shrimp. Grill until fully cooked. Tofu gives a nice twist too. Use firm tofu for the best results. Press it first to remove excess water. This helps the tofu soak up all that tasty marinade. Want to spice things up? Add some red pepper flakes or a dash of hot sauce. You can also try different citrus. Lime or orange juice can bring new life to the dish. For a Mediterranean vibe, use olives and feta cheese. Add sun-dried tomatoes for an extra kick. If you lean towards Asian flavors, try soy sauce and sesame oil. These simple changes can make your shrimp skewers a whole new experience. Explore the [Full Recipe] for more ideas and details. To keep your Lemon Herb Grilled Shrimp Skewers fresh, store them in an airtight container. Place a paper towel at the bottom to absorb moisture. This helps to keep the shrimp firm. You can refrigerate them for up to 3 days. If you want to store them for longer, freeze the skewers. Wrap them tightly in plastic wrap and then put them in a freezer bag. This method can keep them fresh for about 2 months. When you’re ready to eat, just thaw them in the fridge overnight. To reheat grilled shrimp skewers, avoid the microwave if possible. It can make the shrimp rubbery. Instead, use a skillet on low heat. Add a splash of olive oil to keep them moist. Heat for about 2-3 minutes, flipping often. You can also reheat them in the oven. Preheat your oven to 350°F (175°C). Place the skewers on a baking sheet and cover with foil. Heat for about 5-7 minutes. This method helps maintain their flavor and juiciness. For more details on how to make these delicious shrimp skewers, check the Full Recipe. Yes, you can still enjoy shrimp skewers without a grill. Use a stovetop grill pan or broiler. Both methods work well to give you that nice char and flavor. If you use a grill pan, heat it over medium-high heat. Lightly oil the pan before adding your skewers. If using a broiler, place the skewers on a baking sheet and keep them close to the heat source. Rotate the skewers halfway through cooking for even results. Fresh shrimp have a clean, briny smell. Look for shrimp that are firm and have a translucent appearance. Their shells should be shiny, not dull or slimy. If the shrimp have black spots or a strong odor, they are likely not fresh. Always check the sell-by date and buy from a trusted source. You can serve Lemon Herb Grilled Shrimp Skewers with various sides. A fresh green salad pairs nicely, adding crunch and brightness. Grilled vegetables, like zucchini and bell peppers, also complement the shrimp's flavor. For a starch, consider serving rice or couscous. These will soak up the delicious marinade and juices. For the complete Lemon Herb Grilled Shrimp Skewers recipe, click [Full Recipe]. This blog post covered everything you need to know for perfect Lemon Herb Grilled Shrimp Skewers. I shared the ingredients, step-by-step instructions, and tips for storing and reheating. Whether you grill or try different proteins, you can make a tasty dish. Remember, the key is to not overcook the shrimp and to experiment with flavors. Enjoy your cooking adventure, and impress your friends and family with your new skills. Happy grilling!](https://dailydishlab.com/wp-content/uploads/2025/07/43bf45d0-0185-44b0-8263-e73ce7d0c6d7-768x768.webp)
![- 2 pounds baby potatoes - 4 tablespoons unsalted butter, melted - 4 cloves garlic, minced - 1 tablespoon fresh parsley, chopped - 1 teaspoon sea salt - ½ teaspoon black pepper - ¼ teaspoon smoked paprika (optional) - Lemon zest (from 1 lemon) - Large pot - Baking sheet - Parchment paper - Measuring cup - Fork or potato masher Gather these ingredients to make your smashed potatoes shine. The baby potatoes are key; they cook evenly and have a great texture. The garlic brings a rich taste, while the butter adds a smooth finish. Fresh parsley not only brightens the dish but also adds color. You’ll also need some basic tools. The large pot helps cook the potatoes, and the baking sheet is perfect for roasting. Parchment paper prevents sticking, making cleanup easy. A measuring cup ensures you get the butter just right. Lastly, a fork or masher helps you smash the potatoes to the perfect flatness without breaking them apart. For a full experience, check the [Full Recipe] for step-by-step guidance. - Preheat your oven to 450°F (230°C). - Fill a large pot with water and add a pinch of salt. - Bring the pot to a boil over high heat. - Add 2 pounds of baby potatoes to the pot. - Cook the potatoes until fork-tender, about 15-20 minutes. - Drain the potatoes and let them cool for about 5 minutes. - Line a baking sheet with parchment paper. - Place the cooled potatoes on the sheet. - Use the bottom of a measuring cup or a fork to smash each potato gently. - In a small bowl, mix 4 tablespoons of melted butter with 4 minced garlic cloves. - Add 1 teaspoon of sea salt and ½ teaspoon of black pepper. - If you want, add ¼ teaspoon of smoked paprika. - Brush or drizzle this garlic butter over each smashed potato. - Bake the potatoes in the preheated oven for 20-25 minutes. - Keep an eye on them until they are golden and crispy on the edges. - Remove from the oven and sprinkle with fresh parsley and lemon zest before serving. - You can find the Full Recipe for more details. To get the best crispy texture, adjust your baking time. Bake the smashed potatoes for 20-25 minutes. If you want them crispier, leave them in for a few more minutes. Just keep an eye on them! The size of the potatoes also plays a big role. Use baby potatoes for even cooking. Smaller potatoes smash well and bake faster. For more flavor, try adding different spices. Smoked paprika adds a nice smoky taste. You can also sprinkle in some onion powder or chili flakes for heat. When it comes to garlic, fresh garlic gives the best taste. I recommend using whole cloves and mincing them yourself. This ensures the garlic flavor is strong and fresh. Presentation is key! Serve your smashed potatoes on a big white platter. Drizzle any leftover garlic butter over the top. Garnish with fresh parsley for a pop of color. Fresh herbs like chives or thyme also look great and add flavor. This makes your dish not only tasty but also beautiful to serve. {{image_2}} You can switch up your potato choice for smashed potatoes. While baby potatoes work great, try red or yellow potatoes for a different taste. These potatoes add creaminess and a slight sweetness. If you want to swap butter, olive oil is a fantastic choice. It brings a rich flavor and is a bit healthier. You can also use coconut oil for a unique twist. Adding cheese can elevate your smashed potatoes. Grated Parmesan adds a salty, nutty taste. For a creamier option, use cheddar cheese. Just sprinkle it on top before the final bake. You can also play with spices. Try adding rosemary or thyme for an earthy flavor. Smoked paprika adds warmth and a hint of smokiness. Experiment with different spices to find your favorite combo. Want to make this dish vegan? Simply replace butter with a plant-based butter. Use a neutral oil, like canola, for the garlic mixture. If you need low-sodium options, cut back on salt. Use fresh herbs instead to boost flavor. Lemon juice can also add brightness without extra salt. For more details, check out the Full Recipe. To keep your smashed potatoes fresh, store them in the fridge. Place leftovers in an airtight container. This helps prevent moisture loss. Use a glass or plastic container with a tight lid. They will stay good for about 3 to 5 days. If you want to keep them longer, consider freezing instead. When it's time to enjoy your leftovers, you have several options. The best way to reheat smashed potatoes is in the oven. Preheat your oven to 350°F (175°C). Place the potatoes on a baking sheet and cover them with foil. This keeps them moist. Bake for about 15 minutes. If you want a crispy finish, remove the foil for the last 5 minutes. To avoid soggy potatoes, do not microwave them. Microwaving can make the texture mushy. For longer storage, freezing is a great option. Cool the smashed potatoes completely before freezing. Place them in a freezer-safe bag or container. Make sure to squeeze out any extra air. They can last up to 2 months in the freezer. When you’re ready to eat them, thaw in the fridge overnight. Reheat them in the oven for the best texture. Avoid thawing in the microwave to keep them from getting soggy. To make your smashed potatoes extra crispy, I suggest two key steps. First, ensure your oven is hot, around 450°F (230°C). This helps achieve that golden crunch. Second, after smashing the potatoes, brush them well with garlic butter. This adds flavor and helps crisp up the edges. Yes, you can prepare the garlic butter ahead of time. Simply melt the butter and mix in minced garlic and other ingredients. Store it in the fridge for up to a week. This way, your cooking process becomes quicker when you’re ready to make the potatoes. Smashed potatoes pair well with many dishes. They go great with roasted chicken, grilled steak, or even a fresh salad. You can also serve them with a dip or sauce for added flavor. Feel free to get creative! Absolutely! While parsley is a classic choice, you can use other herbs too. Fresh chives, thyme, or rosemary work wonderfully. This gives your smashed potatoes a unique twist and flavor profile. Smashed potatoes can last in the fridge for about 3 to 5 days. Store them in an airtight container to keep them fresh. When ready to eat, just reheat them in the oven for the best texture. - [Explore the complete Garlic Butter Smashed Potatoes recipe here.](#) This post covered how to make Garlic Butter Smashed Potatoes. We discussed ingredients, steps, tips, and variations. You learned how to prepare, smash, and bake potatoes for a crispy treat. I shared ways to enhance flavor and provided storage advice. With this recipe, you can impress anyone at your next meal. Enjoy experimenting and making it your own!](https://dailydishlab.com/wp-content/uploads/2025/07/1cd4206a-28a3-462f-8de7-03118f6b2243-768x768.webp)