Savory Slow Cooker Salsa Verde Chicken Recipe
Are you ready to savor a meal that practically cooks itself? My Savory Slow Cooker Salsa Verde Chicken is the answer to your weeknight dinners. With just a few simple ingredients, you can create a tasty dish that’s perfect for the whole family. This recipe is easy, flavorful, and designed to satisfy your hunger. Let’s dive into the fun of slow cooking and discover how to make this delicious dish!
Why I Love This Recipe
- Flavorful and Easy: This recipe combines savory chicken with zesty salsa verde, making it a deliciously simple meal for any night of the week.
- Versatile Serving Options: Serve it in warm tortillas, over rice, or with a side of your favorite vegetables for a customizable meal.
- Healthy Ingredients: Packed with protein from the chicken and fiber from the black beans and corn, this dish is both nutritious and satisfying.
- Hands-Free Cooking: With the slow cooker, you can set it and forget it, allowing you to go about your day while dinner cooks itself!
Ingredients
Complete List of Ingredients
- 2 lbs boneless, skinless chicken breasts
- 1 jar (16 oz) salsa verde
- 1 can (15 oz) black beans, drained and rinsed
- 1 cup corn kernels (fresh, frozen, or canned)
- 1 medium onion, diced
- 3 cloves garlic, minced
- 1 teaspoon cumin
- 1 teaspoon chili powder
- Salt and pepper to taste
- Fresh cilantro, chopped (for garnish)
- Lime wedges (for serving)
Optional Added Ingredients
- Bell peppers or jalapeños for extra spice
- Avocado for garnish
Ingredient Substitutions
- Chicken alternatives (thighs or tofu for vegetarian)
- Low-sodium salsa verde options
This dish relies on simple but flavorful ingredients. Start with the chicken. I love using boneless, skinless chicken breasts for their tenderness. Salsa verde adds zest and depth. You can pick your favorite brand or even make your own if you feel adventurous.
Next, black beans and corn provide texture and nutrition. They add a nice contrast to the chicken. Diced onion and minced garlic bring out a savory aroma as they cook. The cumin and chili powder elevate the dish with warm spices.
Feel free to mix it up! You can add bell peppers for a crunch or jalapeños if you like heat. Avocado is a great topping that adds creaminess. If you prefer, use chicken thighs for a richer flavor or tofu for a vegetarian version. Low-sodium salsa is perfect for those watching their salt intake.

Step-by-Step Instructions
Preparation Steps
- Start by placing 2 lbs of boneless, skinless chicken breasts at the bottom of the slow cooker.
- Next, pour 1 jar (16 oz) of salsa verde evenly over the chicken.
- Add 1 medium diced onion, 3 minced garlic cloves, 1 can (15 oz) of drained black beans, and 1 cup of corn kernels.
- Sprinkle 1 teaspoon of cumin and 1 teaspoon of chili powder on top.
- Season with salt and pepper to taste.
Cooking Directions
- Cover the slow cooker with the lid. Set it to cook on low for 6-8 hours or on high for 3-4 hours.
- Check the chicken to see if it is fully cooked and tender.
- After cooking, take two forks and shred the chicken in the slow cooker. Mix it well with the salsa for more flavor.
Serving Suggestions
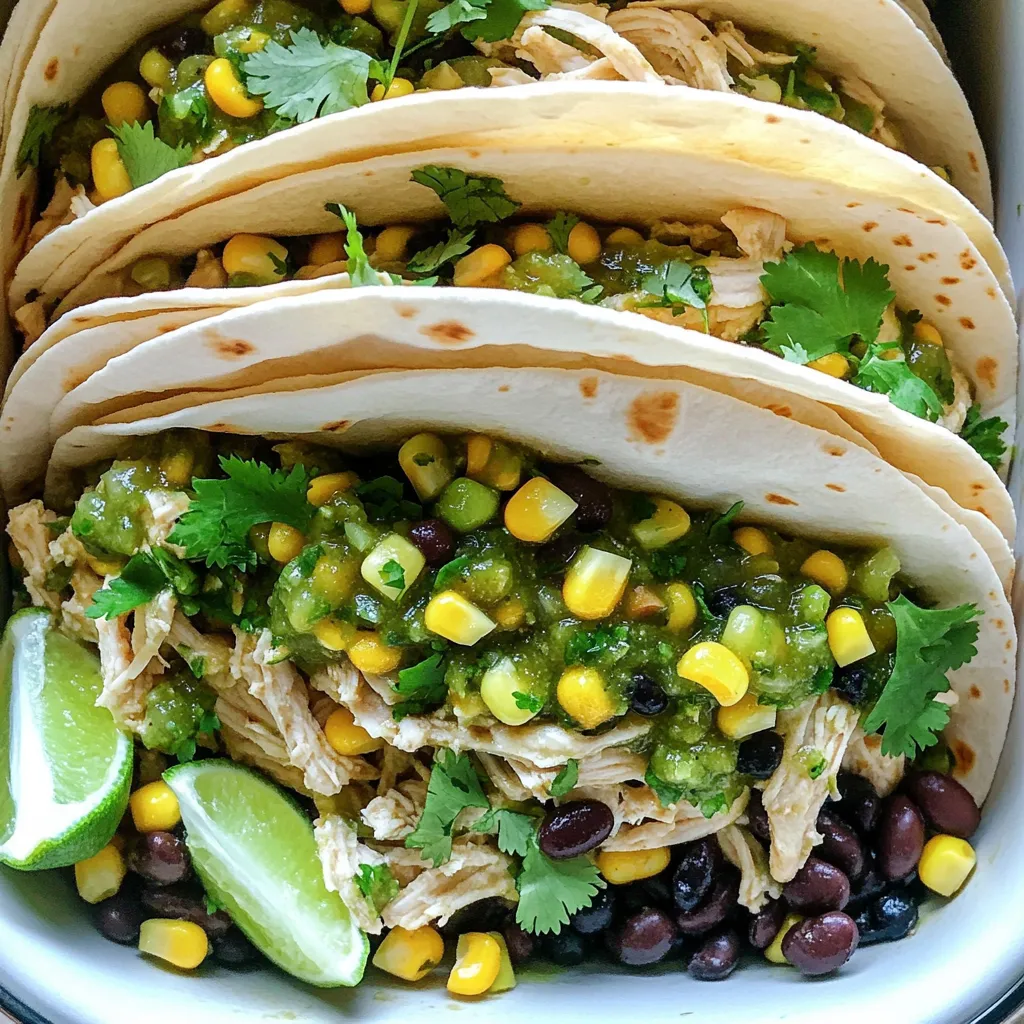
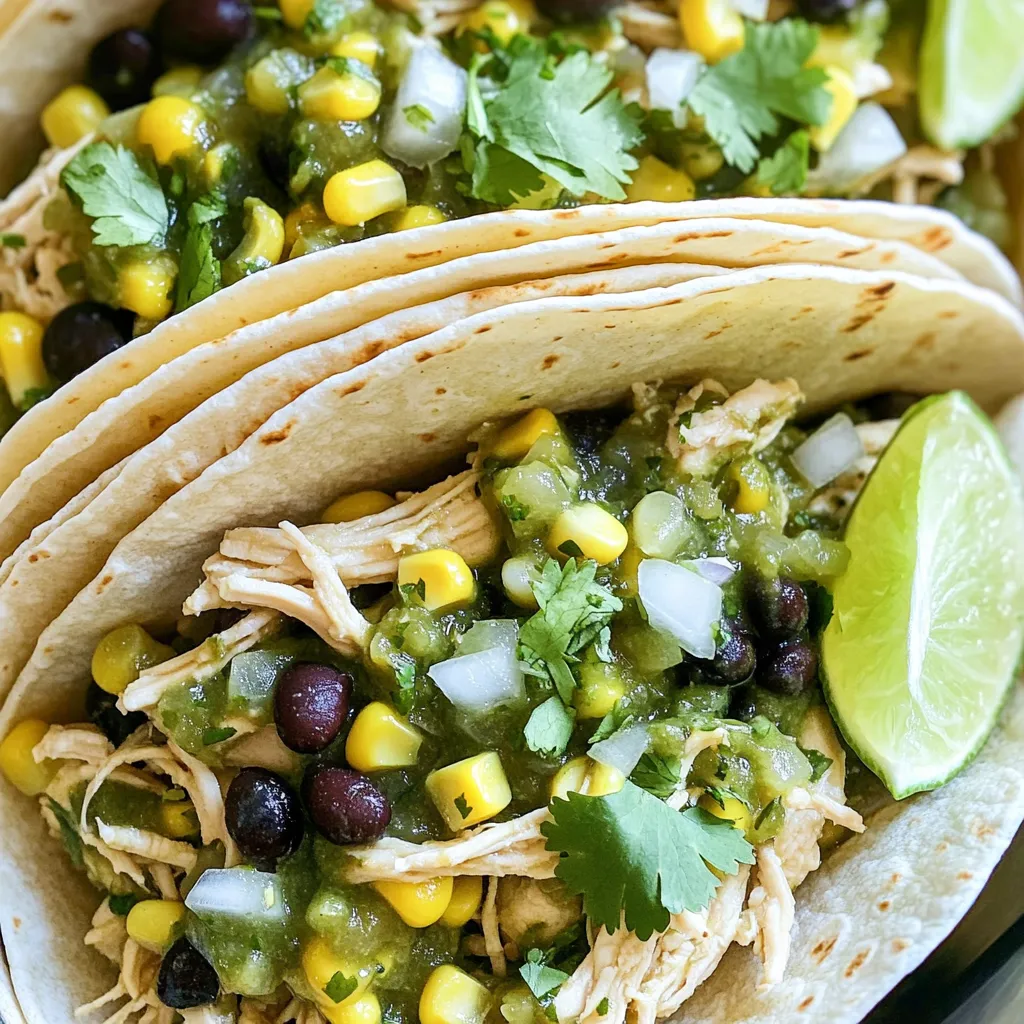
- Serve the shredded chicken in warm tortillas or over a bed of rice.
- You can also add it to salads for a fresh twist.
- For garnish, sprinkle chopped fresh cilantro on top and add lime wedges on the side.
This method creates a simple yet tasty dish, perfect for any meal. Enjoy!
Pro Tips
- Use Fresh Ingredients: Fresh garlic and onions can elevate the flavor of your dish. Whenever possible, opt for fresh produce instead of pre-packaged options.
- Adjust Spice Levels: If you prefer a spicier dish, consider adding diced jalapeños or a splash of hot sauce to the slow cooker along with the other ingredients.
- Shredding Technique: For perfectly shredded chicken, let it rest for a few minutes after cooking before shredding. This allows the juices to redistribute, making the chicken more tender.
- Meal Prep Friendly: This recipe is great for meal prep! You can double the batch and freeze half for a quick meal later in the week.
Tips & Tricks
Best Practices for Perfecting the Recipe
To keep your chicken moist, use boneless, skinless chicken breasts. Cooking on low heat helps lock in moisture. Avoid lifting the lid too often, as this releases steam. Seasoning is key. Use salt and pepper generously to enhance the flavors. The spices like cumin and chili powder add depth and warmth.
Making it Easy
Prepare this dish ahead of time for busy nights. You can cut the onion and garlic in advance. Store them in the fridge until you’re ready to cook. For even more ease, use frozen corn and canned black beans. This saves time without losing flavor. Just rinse the beans before adding them to your slow cooker.
Enhancing Flavor
To boost the flavor, consider adding fresh herbs like cilantro or oregano. This adds freshness and brightness to the dish. A splash of lime juice right before serving can bring all the flavors together. It adds a zesty touch that makes it pop. Enjoy your flavorful creation with warm tortillas or over rice for a delightful meal!
Variations
Different Cooking Methods
You can easily make salsa verde chicken in different ways. If you have an Instant Pot, you can use it for faster cooking. Set it to high pressure for 10-12 minutes. This method keeps the chicken juicy and full of flavor.
For stovetop cooking, start by browning the chicken in a pan. Then, add salsa and spices. Let it simmer for about 30-40 minutes. This method gives you great control over the heat.
Flavor Variations
To change things up, try different salsas. Mango or pineapple salsa adds a sweet twist. You can also mix in cheese while cooking. Creamy cheeses like Monterey Jack or cheddar melt beautifully into the dish.
Feel free to experiment with spices too. Adding smoked paprika or chipotle powder can bring a smoky flavor. Adjust the spices to match your taste.
Dietary Adjustments
If you want a vegan option, swap the chicken for firm tofu or jackfruit. Use a vegan salsa to keep it plant-based.
For gluten-free options, make sure your salsa and other ingredients are certified gluten-free. This recipe is easy to tweak for various diets, making it a great choice for everyone.
Storage Info
Refrigeration
To store leftovers, let the dish cool to room temperature. Then, transfer it to an airtight container. This keeps the chicken fresh and prevents odors from spreading. Store it in the fridge for up to four days.
When reheating, I recommend using the microwave or stovetop. If using the microwave, heat in short bursts. Stir often to ensure even heating. If using the stovetop, add a splash of water to keep it moist.
Freezing Instructions
For freezing, place the cooled dish in a freezer-safe container. Make sure to leave some space at the top for expansion. You can freeze it for up to three months. Label the container with the date for easy tracking.
When ready to eat, thaw it overnight in the fridge. To reheat, warm it on the stovetop or in the microwave, stirring occasionally. This keeps the flavors intact and ensures even heating.
Shelf Life
In the fridge, Slow Cooker Salsa Verde Chicken stays fresh for about four days. In the freezer, it lasts up to three months. Always check for signs of spoilage before enjoying leftovers. If it smells off or looks strange, it’s best to toss it.
FAQs
How long does it take to cook Slow Cooker Salsa Verde Chicken?
Cooking time is key to tasty chicken. On low, it takes 6 to 8 hours. On high, it cooks in 3 to 4 hours. The chicken should be tender and cooked through when done. Always check that it reaches an internal temperature of 165°F. This ensures it is safe to eat.
Can I use frozen chicken for this recipe?
Yes, you can use frozen chicken breasts! Just place them in the slow cooker without thawing. However, increase the cooking time by about an hour. This helps the chicken cook evenly. Make sure to check that it is fully cooked before serving.
What can I serve with Slow Cooker Salsa Verde Chicken?
This dish pairs well with many sides. Here are some ideas:
- Warm tortillas for a tasty wrap.
- Rice for a hearty base.
- Fresh salads to add crunch.
- Avocado slices for creaminess.
- Cornbread for a sweet touch.
Feel free to mix and match based on your taste!
This recipe for Slow Cooker Salsa Verde Chicken is simple and flexible. You learned about the key ingredients, preparation steps, and cooking methods. Tips like using fresh herbs or trying different types of salsa can boost flavors. Plus, you can adjust for dietary needs and store leftovers safely. This dish not only saves time but also makes dinner tasty and fun. With these ideas, you can easily customize it to fit your tastes. Enjoy creating your own version of this easy, delicious meal!

Slow Cooker Salsa Verde Chicken
Ingredients
2 lbs boneless, skinless chicken breasts
1 jar (16 oz) salsa verde
1 can (15 oz) black beans, drained and rinsed
1 cup corn kernels (fresh, frozen, or canned)
1 medium onion, diced
3 cloves garlic, minced
1 teaspoon cumin
1 teaspoon chili powder
Salt and pepper to taste
Fresh cilantro, chopped (for garnish)
Lime wedges (for serving)
Instructions
In the slow cooker, place the chicken breasts at the bottom.
Pour the jar of salsa verde evenly over the chicken.
Add the diced onion, minced garlic, cumin, chili powder, black beans, and corn on top of the salsa.
Season with salt and pepper to taste.
Cover and cook on low for 6-8 hours or on high for 3-4 hours until the chicken is cooked through and tender.
Once cooked, shred the chicken with two forks directly in the slow cooker, stirring it into the salsa mixture for even flavor distribution.
Serve the shredded chicken in warm tortillas or over rice, and garnish with fresh cilantro and lime wedges.
Prep Time, Total Time, Servings: 15 min | 6-8 hours | 6 servings
Slow Cooker Salsa Verde Chicken
Ingredients
- 2 lbs boneless, skinless chicken breasts
- 16 oz jar salsa verde
- 15 oz can black beans, drained and rinsed
- 1 cup corn kernels (fresh, frozen, or canned)
- 1 medium onion, diced
- 3 cloves garlic, minced
- 1 teaspoon cumin
- 1 teaspoon chili powder
- to taste salt and pepper
- for garnish fresh cilantro, chopped
- for serving lime wedges
Instructions
- In the slow cooker, place the chicken breasts at the bottom.
- Pour the jar of salsa verde evenly over the chicken.
- Add the diced onion, minced garlic, cumin, chili powder, black beans, and corn on top of the salsa.
- Season with salt and pepper to taste.
- Cover and cook on low for 6-8 hours or on high for 3-4 hours until the chicken is cooked through and tender.
- Once cooked, shred the chicken with two forks directly in the slow cooker, stirring it into the salsa mixture for even flavor distribution.
- Serve the shredded chicken in warm tortillas or over rice, and garnish with fresh cilantro and lime wedges.
. To get crispy chickpeas, start by drying them well. Drain and rinse your chickpeas, then pat them with a kitchen towel. Removing moisture is key. If they are wet, they won't crisp up. For roasting, use olive oil and spices. Toss the dried chickpeas in a bowl with olive oil, smoked paprika, garlic powder, salt, and pepper. Spread them out on a baking sheet lined with parchment paper. Make sure they are in a single layer. Roast at 400°F for 25-30 minutes. Shake the pan halfway to ensure even cooking. Chickpeas are full of protein and fiber. They help keep you full and satisfied. They are low in fat and great for heart health. Including fresh veggies boosts the bowl's nutrition. Spinach adds iron, while tomatoes give antioxidants. Cucumbers add hydration and crunch. Avocados offer healthy fats, making this bowl a well-rounded meal. Pair your Buddha bowl with a side of whole grain bread for extra carbs. You can also serve it with a light soup to add warmth. For meal prep, make extra roasted chickpeas and quinoa. Store them separately in the fridge. Assemble your bowl right before eating. This way, everything stays fresh and crunchy. Try the Full Recipe to create your own delicious bowl! {{image_2}} You can add many protein sources to your Buddha bowl. Some great options are: - Grilled chicken or turkey - Tofu or tempeh - Cooked lentils - Hard-boiled eggs If you follow a vegan diet, chickpeas are perfect. For gluten-free options, choose quinoa or brown rice. These swaps help meet different dietary needs. Spices can change your Buddha bowl flavor. Here are some to try: - Cumin for a warm taste - Curry powder for a kick - Chili powder for heat Dressings can also enhance flavor. Try these: - Tahini dressing for creaminess - Lemon vinaigrette for brightness - A spicy yogurt sauce for tang You can easily swap greens and veggies in your bowl. Here are some ideas: - Kale instead of spinach - Arugula for a peppery taste - Roasted sweet potatoes instead of cucumber For vegan and gluten-free options, avoid dairy. Use avocado or hummus as creamy toppings. These swaps keep your bowl fresh and exciting. For the full recipe, check out the Crispy Chickpea Buddha Bowl. You can easily store leftover Buddha bowl ingredients. Start by placing the chickpeas, quinoa, and veggies in separate airtight containers. This keeps them fresh and tasty. Store them in the fridge for up to three days. If you want to keep them longer, freeze the chickpeas and quinoa. They can last for about two months in the freezer. Just remember to cool them down before sealing. To reheat the chickpeas and quinoa, use the oven or a skillet. For the oven, preheat it to 350°F (175°C). Spread the chickpeas on a baking sheet and heat for about 10 minutes. This keeps them crispy. For the quinoa, add a splash of water and cover with a lid in a skillet. Heat on low for a few minutes, stirring occasionally. This helps it stay fluffy. You can simplify your cooking by prepping ahead. Cook the quinoa and chickpeas in advance. Store them in the fridge to use later in your bowls. Chop the veggies and keep them ready too. Assemble your Buddha bowl just before serving. This keeps everything fresh and crunchy. You’ll enjoy a delicious meal without much hassle. For the full recipe, check out the details above! To make chickpeas crispy, start by drying them well. Use a clean kitchen towel to pat them dry. Moisture makes them soggy, so this step is key. Next, toss the chickpeas with olive oil and spices. I like using smoked paprika and garlic powder for flavor. Spread them out in a single layer on a baking sheet. This helps them cook evenly. Roast them in a preheated oven at 400°F for about 25-30 minutes. Shake the pan halfway to ensure they crisp up all over. Keep a close eye on them to avoid burning. Yes, you can make this Buddha bowl in advance. Prepare the chickpeas and cook the quinoa ahead of time. Store them separately in airtight containers. You can also chop the veggies and keep them in the fridge. This way, you save time on busy days. When it's time to eat, just warm up the chickpeas and quinoa. Assemble the bowl quickly for a fresh meal. You can add many ingredients to your Buddha bowl. Try roasted sweet potatoes for a sweet touch. Bell peppers add crunch and color. You can also include shredded carrots or sliced radishes. Nuts and seeds bring extra texture and nutrition. Consider using different greens like kale or arugula. For protein, add grilled chicken or tofu if you like. The options are endless, so mix and match to suit your taste! Making a Crispy Chickpea Buddha Bowl takes about 40 minutes total. You’ll need about 10 minutes to prep the ingredients. This includes drying the chickpeas and cooking the quinoa. The roasting time for the chickpeas is around 25-30 minutes. While they roast, you can chop veggies and prepare the bowl. This makes it easy to create a delicious meal without a lot of fuss. For the full recipe, check out the earlier section. This Buddha bowl blends tasty ingredients like chickpeas, quinoa, and fresh greens. You learn how to roast chickpeas to perfection and layer them with vibrant toppings. Feel free to explore variations and add your favorite proteins or spices. Remember, meal prep makes this dish quick and healthy. Enjoy your time creating a colorful bowl that’s packed with nutrition. You’ll love how simple it is to make a delicious meal that nourishes your body. Try it for lunch or dinner; it’s versatile and satisfying!](https://dailydishlab.com/wp-content/uploads/2025/06/d75a3dbd-2a4e-410e-b458-9a4c182386e3-768x768.webp)
![- 1 lb ground beef or turkey - 1 small onion, finely chopped - 2 cloves garlic, minced - 1 cup shredded cheddar cheese - 1 cup marinara sauce - 1 tablespoon Worcestershire sauce - 1 teaspoon dried oregano - Salt and freshly ground black pepper to taste - 4 large garlic bread rolls (choose ones with a sturdy texture, like ciabatta or French rolls) - 2 tablespoons butter, softened To make Cheesy Garlic Bread Sloppy Joes, gather the main ingredients first. Ground beef or turkey forms the base of this dish. Add finely chopped onion and minced garlic for flavor. The cheese brings creaminess, while marinara sauce provides the tangy depth. Next, boost the taste with flavor enhancers. Worcestershire sauce adds a savory kick. Dried oregano gives an aromatic touch. Don’t forget salt and black pepper to balance the flavors. Finally, select sturdy garlic bread rolls. These rolls will hold up well to the filling. A good butter spread on the inside adds richness. For the full recipe, check out the [Full Recipe]. 1. Start by heating a large skillet over medium heat. Add 1 lb of ground beef or turkey. Cook it for about 5 to 7 minutes. Break it apart with a spatula as it cooks. You want it to brown evenly. 2. Once the meat is browned, add 1 small finely chopped onion and 2 cloves of minced garlic. Sauté these for 3 to 4 minutes. The onion should turn translucent and smell great. Stir often so nothing sticks. 3. Mix in 1 cup of marinara sauce, 1 tablespoon of Worcestershire sauce, and 1 teaspoon of dried oregano. Add salt and freshly ground black pepper to taste. Let this simmer for about 10 minutes. Stir now and then. This helps the flavors blend and the sauce thicken. 4. While the meat mixture simmers, preheat your oven to 375°F (190°C). This temperature is perfect for toasting. 5. Prepare your garlic bread rolls by cutting them in half horizontally. You want to spread a thin layer of softened butter on the inside of each half. Choose sturdy rolls like ciabatta or French rolls for the best texture. 6. Place the buttered rolls on a baking sheet, cut sides up. Toast them in the oven for about 5 to 7 minutes. Look for golden brown edges to know they are ready. 7. Once the rolls are toasted, remove them from the oven. Generously scoop the hearty meat mixture onto the bottom halves of the toasted garlic bread. 8. Sprinkle 1 cup of shredded cheddar cheese on each loaded bottom half. Make sure you cover it evenly for a nice cheesy topping. 9. Return the baking sheet with the cheesy, loaded rolls to the oven. Bake for an additional 5 minutes, or until the cheese is melted and bubbly. 10. Finally, take them out and garnish with finely chopped fresh parsley. This adds a nice pop of color. Serve right away, placing the top halves of the garlic bread on the side for your guests to add to their sandwiches. For the complete recipe, check out the Full Recipe section above. To boost the taste of your Cheesy Garlic Bread Sloppy Joes, consider these tips: - Seasoning suggestions: Add a pinch of smoked paprika for a smoky kick. A dash of cayenne pepper can give it some heat. You can also try a teaspoon of Italian herbs for extra flavor. - Cheese alternatives: Cheddar cheese is great, but you can mix it up. Try mozzarella for a gooey texture or pepper jack for some spice. For perfect results, follow these cooking tips: - Best stovetop practices: Use medium heat to brown meat evenly. Stir the meat regularly to avoid burning. Cook the onions until soft for great flavor. - Oven settings for perfect toasting: Preheat your oven to 375°F (190°C). Toast the rolls until they are golden but not too hard. A few minutes is all you need. Make your meal even better with these ideas: - Complementary side dishes: Serve with potato chips or a fresh side salad. Both add nice crunch and contrast to your sloppy joes. - Garnishing with parsley: Sprinkle freshly chopped parsley on top for a pop of color. It also adds a fresh taste that brightens the dish. For a full recipe, check out the Cheesy Garlic Bread Sloppy Joes. {{image_4}} You can swap ground beef or turkey for other meats. Ground chicken works great and is leaner. If you prefer a plant-based option, use lentils or a meat substitute. Both choices keep the dish tasty and filling. Boost the flavor by adding spices. Chili powder adds a nice kick. You can also mix in vegetables like bell peppers or mushrooms. These additions make the filling even heartier and more nutritious. The type of bread can change your cheesy garlic bread sloppy joes. Try using different rolls like hoagie or brioche. Each bread adds its own flavor and texture. Experiment to find your perfect match. For the full recipe, check out the [Full Recipe]. To keep Cheesy Garlic Bread Sloppy Joes fresh, store them properly. Place leftovers in an airtight container. This helps keep the flavors intact. Store in the fridge for up to three days. Make sure to let them cool before sealing. When reheating, you have two good options: the microwave and the oven. The microwave is quick but may make the bread soggy. Heat on medium power for about one to two minutes. The oven gives a better result. Preheat to 350°F (175°C) and heat for about 10 minutes. This keeps the bread crispy while warming the filling. Freezing is a great choice for longer storage. To freeze, let the sloppy joes cool completely. Then, scoop the filling into a freezer-safe bag. Remove as much air as possible and seal. You can freeze the mixture for up to three months. To thaw, place the bag in the fridge overnight. Heat it up in the microwave or oven when you're ready to enjoy. Making Cheesy Garlic Bread Sloppy Joes takes about 30 minutes from start to finish. You will spend roughly 10 minutes prepping the ingredients. Cooking the meat and mixing everything takes about 10 more minutes. Finally, baking the rolls takes another 5 to 7 minutes. This timing makes it a quick and tasty meal option. Yes, you can prepare the meat mixture ahead of time. Cook the ground beef or turkey, onions, and garlic as directed. Let it cool, then store it in an airtight container in the fridge for up to three days. When you're ready, simply reheat the mixture and continue with the recipe. This saves time during busy weeknights. If you don't have garlic bread rolls, don't worry! You can use other sturdy breads. Options like ciabatta, French rolls, or even bagels work well. Just make sure they can hold the meat mixture without falling apart. You can also make your own garlic bread by spreading butter and garlic on regular rolls before toasting them. Enjoy experimenting with different breads! This blog covered how to make Cheesy Garlic Bread Sloppy Joes, highlighting key ingredients like beef, cheese, and marinara. I shared step-by-step instructions and helpful tips to boost flavor. You can also explore various meat and bread options to suit your taste. Remember, leftovers store well and reheating is quick. This dish offers easy meals and fun variations. Try making it your own! Enjoying your time in the kitchen makes cooking rewarding and enjoyable.](https://dailydishlab.com/wp-content/uploads/2025/06/1eb0e08b-e1bd-4549-a6fe-2db60bc0ee8e-768x768.webp)