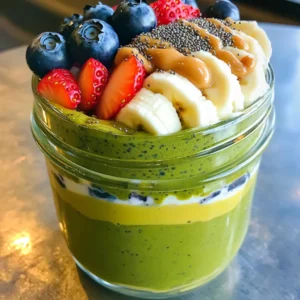
High-Protein Matcha Overnight Oats Easy and Tasty Recipe
Are you ready to jumpstart your mornings with a nutritious boost? High-protein matcha overnight oats offer a delicious way to fuel your day. With simple ingredients like rolled oats, matcha powder, and creamy almond milk, you’ll love how easy it is to prepare. In this article, I’ll share a quick recipe that’s not only tasty but also packed with protein. Let’s dive into making this healthy breakfast!
Why I Love This Recipe
- Nutritious Energy Boost: This recipe is packed with high-quality protein and healthy fats, providing sustained energy to kickstart your day.
- Simple and Convenient: With just a few minutes of prep, you can create a delicious meal that’s ready to eat in the morning, perfect for busy lifestyles.
- Customizable Flavor: You can easily modify the toppings and sweeteners to suit your taste, making it a versatile breakfast option.
- Deliciously Satisfying: The unique combination of matcha and protein not only tastes great but also keeps you feeling full until your next meal.
Ingredients
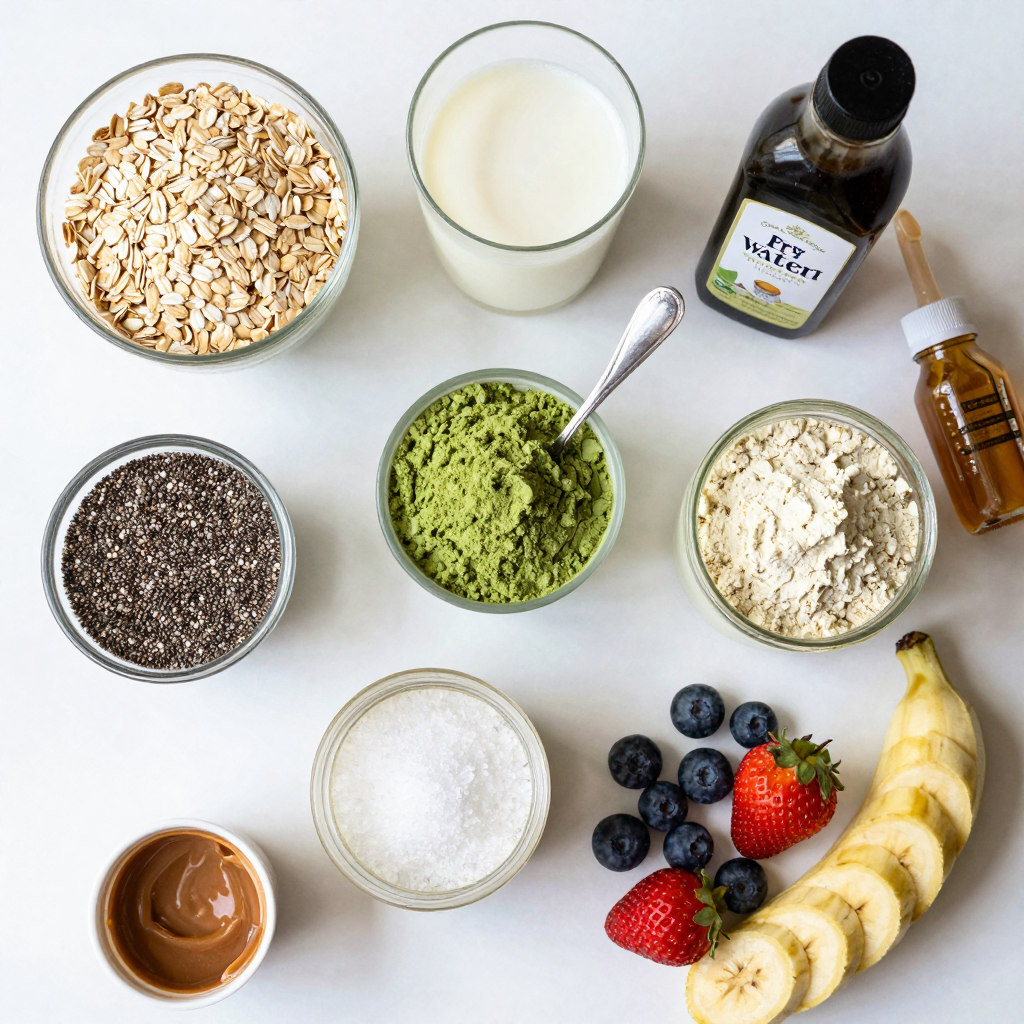
To make high-protein matcha overnight oats, gather these simple ingredients:
- 1 cup rolled oats
- 1 cup unsweetened almond milk (or any milk of choice)
- 2 tablespoons chia seeds
- 1 tablespoon matcha powder
- 1 scoop vanilla protein powder (or plant-based version)
- 1 tablespoon honey or maple syrup
- 1/2 teaspoon vanilla extract
- Pinch of salt
- Fresh berries for topping
- Sliced bananas for garnish
- Optional: nut butter for drizzling
These ingredients work together to create a tasty and healthy breakfast. Each item plays a key role. The oats provide fiber and texture. The almond milk adds creaminess. Chia seeds give a nice crunch and help thicken the mix. Matcha powder brings a unique flavor and boosts energy.
The protein powder increases the protein content. Honey or maple syrup sweetens the dish. The vanilla extract adds a lovely aroma. A pinch of salt enhances all the flavors. Fresh berries and bananas make great toppings and add nutrition. Nut butter is a fun option for extra richness.
Gather these ingredients, and you’re ready to make a delicious breakfast that is easy and quick!
Step-by-Step Instructions
Preparation Steps
- In a medium bowl or airtight container, combine:
- 1 cup rolled oats
- 1 cup unsweetened almond milk (or any milk of choice)
- 2 tablespoons chia seeds
- 1 tablespoon matcha powder
- 1 scoop vanilla protein powder (or plant-based version)
- 1 tablespoon honey or maple syrup
- 1/2 teaspoon vanilla extract
- Pinch of salt
- Whisk the mixture well until smooth. Stir until no clumps of matcha or protein powder remain.
- Cover the bowl or container tightly. Refrigerate overnight or for at least 4 hours. This step lets the oats and chia seeds absorb the liquid and thicken.
Serving Suggestions
- In the morning, stir the oats before serving. If it feels too thick, add a splash of almond milk.
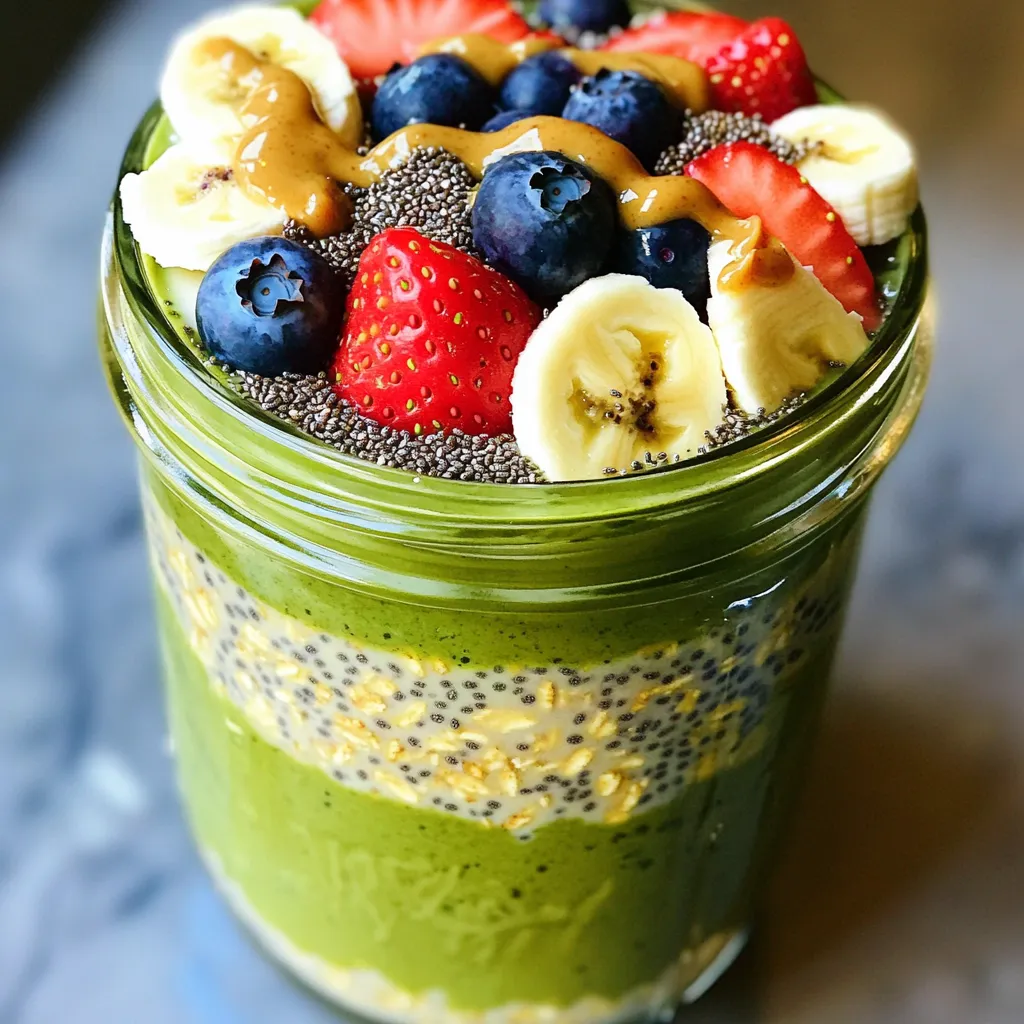
- Divide the oats into bowls or jars.
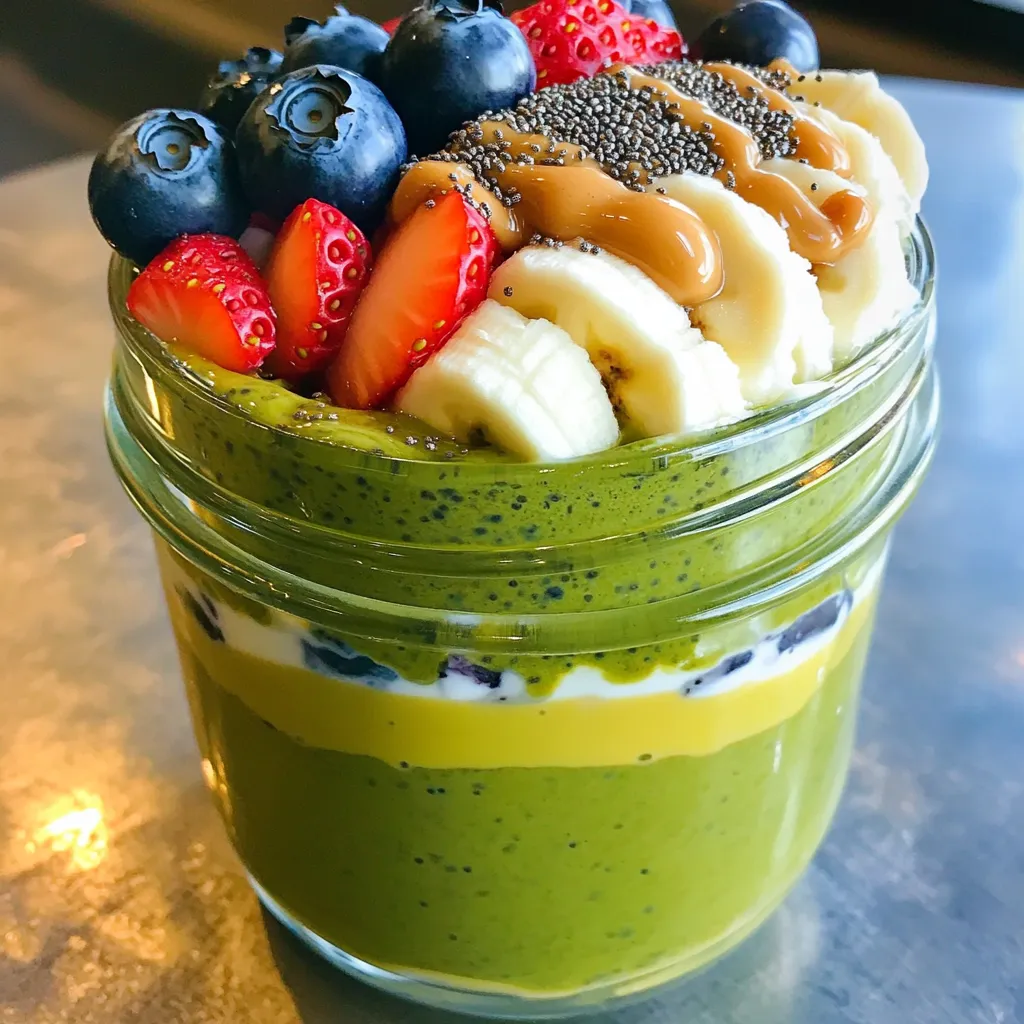
- Top with fresh berries, sliced bananas, and a drizzle of nut butter if desired.
- Enjoy your nutritious high-protein matcha overnight oats!
Pro Tips
- Store in Airtight Container: To maintain freshness and flavor, always store your overnight oats in an airtight container in the refrigerator.
- Customize Your Sweetness: Adjust the amount of honey or maple syrup based on your taste preferences. You can also experiment with other natural sweeteners.
- Experiment with Add-Ins: Feel free to add extras like nuts, seeds, or dried fruit to enhance the texture and nutritional value of your oats.
- Use a Milk of Your Choice: While almond milk is great, you can substitute with any milk you prefer, such as coconut, soy, or oat milk for different flavors.
Tips & Tricks
Enhancing Flavor
You can make your oats sweeter with honey or maple syrup. Just add more if you like it sweeter. A splash of vanilla or almond extract brings out the flavor. These small changes can really uplift your dish.
Improving Texture
Want creamier oats? Use more almond milk in your mix. This gives it a smooth feel. If you have time, let the oats soak longer, up to 24 hours. This will make them even softer and more delicious.
Nutritional Benefits
These oats are packed with protein from oats and protein powder. They help you feel full and energized. Matcha adds antioxidants, which are great for your health. This makes your breakfast not only tasty but also good for you.
Variations
Different Protein Options
You can switch up your protein source to keep things fresh. Try using chocolate or unflavored protein powder instead of vanilla. This adds a new taste twist. Another option is to substitute Greek yogurt for a creamy texture. It packs in protein and makes your oats rich and smooth.
Flavor Enhancements
Spice things up by adding a sprinkle of cinnamon or nutmeg. These spices add warmth and depth to your oats. You can also mix in superfoods like cacao or flaxseed. Cacao gives a rich chocolate flavor, while flaxseed boosts your fiber intake. Both choices enhance the nutritional value of your dish.
Topping Alternatives
Toppings can change your breakfast game. Use seasonal fruits like peaches or apples for a fresh touch. Dried fruits like raisins or cranberries work too. They add sweetness and chewiness. Drizzling nut butter like almond or peanut butter on top gives a nutty flavor. You can also use coconut yogurt for a dairy-free option. These toppings make your matcha overnight oats even more delightful!
Storage Info
Refrigeration Guidelines
To keep your high-protein matcha overnight oats fresh, store them in airtight containers. This helps maintain flavor and texture. You can safely keep them in the fridge for up to 3 days. After this time, the oats may lose their taste and texture.
Freezing Tips
If you want to store your oats for longer, freezing is a great option. Pour the oats into freezer-safe containers. Make sure to leave some space at the top, as they will expand when frozen. To thaw, simply move them to the fridge overnight. If you’re in a hurry, you can also use the microwave. Heat them in short bursts until warm. Stir well before eating, and adjust the consistency with a splash of almond milk if needed. Enjoy your nutritious meal even after freezing!
FAQs
How long do matcha overnight oats keep?
Matcha overnight oats stay fresh in the fridge for up to three days. Keep them in an airtight container. The oats will soak up the liquid and thicken over time. If they sit too long, they may become mushy.
Can I make overnight oats without chia seeds?
Yes, you can make overnight oats without chia seeds. They add fiber and help thicken the oats, but you can skip them. Instead, try using more oats or add a little extra protein powder.
What are the best toppings for matcha overnight oats?
Great toppings for matcha overnight oats include:
- Fresh berries like blueberries and strawberries
- Sliced bananas
- A drizzle of nut butter
- A sprinkle of nuts or seeds
These toppings add flavor and texture, making your oats even more delicious.
Can I use instant oats instead of rolled oats?
You can use instant oats, but the texture will change. Instant oats cook faster and may become mushy when soaked. Rolled oats provide a heartier bite, so I recommend using them for better results.
Is matcha safe for everyone to consume?
Matcha is generally safe for most people. It contains caffeine, so those sensitive to it should limit intake. Pregnant or nursing women should also consult their doctor. Always choose high-quality matcha for the best taste and health benefits.
This article explored how to make delicious matcha overnight oats. We covered key ingredients, easy preparation steps, and ways to enhance flavors. You learned about variations and storage tips to keep oats fresh. These simple recipes offer strong nutrition and tasty options for anyone. Try your own mix and enjoy a healthy breakfast that fits your taste. With so many ways to adapt this recipe, your mornings can be exciting and nutritious!
High-Protein Matcha Overnight Oats
Ingredients
1 cup rolled oats
1 cup unsweetened almond milk (or any milk of choice)
2 tablespoons chia seeds
1 tablespoon matcha powder
1 scoop vanilla protein powder (or plant-based version)
1 tablespoon honey or maple syrup (adjust to taste)
1/2 teaspoon vanilla extract
Pinch of salt
Fresh berries (e.g., blueberries, strawberries) for topping
Sliced bananas for garnish
Optional: nut butter (e.g., almond or peanut) for drizzling
Instructions
In a medium bowl or airtight container, combine the rolled oats, almond milk, chia seeds, matcha powder, protein powder, honey (or maple syrup), vanilla extract, and a pinch of salt.
Whisk the mixture well until all ingredients are combined and smooth. Ensure there are no clumps of matcha powder or protein powder.
Securely cover the bowl or container, and refrigerate overnight (or for at least 4 hours) to allow the oats and chia seeds to absorb the liquid and thicken.
In the morning, give the oats a good stir. If the mixture is too thick, you can add a splash of almond milk to reach your desired consistency.
Divide the oats into serving bowls or jars. Top with fresh berries, sliced bananas, and a drizzle of nut butter if desired.
Enjoy your delicious, nutritious high-protein matcha overnight oats!
Prep Time: 10 minutes | Total Time: 4 hours (overnight) | Servings: 2
High-Protein Matcha Overnight Oats
Ingredients
- 1 cup rolled oats
- 1 cup unsweetened almond milk
- 2 tablespoons chia seeds
- 1 tablespoon matcha powder
- 1 scoop vanilla protein powder
- 1 tablespoon honey or maple syrup
- 0.5 teaspoon vanilla extract
- 1 pinch salt
- 1 serving fresh berries
- 1 serving sliced bananas
- 1 serving nut butter
Instructions
- In a medium bowl or airtight container, combine the rolled oats, almond milk, chia seeds, matcha powder, protein powder, honey (or maple syrup), vanilla extract, and a pinch of salt.
- Whisk the mixture well until all ingredients are combined and smooth. Ensure there are no clumps of matcha powder or protein powder.
- Securely cover the bowl or container, and refrigerate overnight (or for at least 4 hours) to allow the oats and chia seeds to absorb the liquid and thicken.
- In the morning, give the oats a good stir. If the mixture is too thick, you can add a splash of almond milk to reach your desired consistency.
- Divide the oats into serving bowls or jars. Top with fresh berries, sliced bananas, and a drizzle of nut butter if desired.
- Enjoy your delicious, nutritious high-protein matcha overnight oats!
![When making Pickle Ranch Chicken and Broccoli Casserole, you need some key ingredients. Here’s what you will need: - 2 cups cooked chicken, shredded - 3 cups broccoli florets, steamed - 1 cup pickles, chopped (dill works best) - 1 cup ranch dressing - 1 cup shredded cheddar cheese - 1/2 cup cream cheese, softened - 1 teaspoon garlic powder - 1 teaspoon onion powder - 1/2 teaspoon salt - 1/4 teaspoon black pepper - 1/4 cup breadcrumbs (optional, for topping) These ingredients create a tasty and rich flavor. The pickles add a fun twist that makes this dish special. You can add your own flair to this casserole. Here are some ideas: - Use rotisserie chicken for quick prep. - Swap broccoli for green beans or spinach. - Try ranch dip instead of ranch dressing for a thicker mix. - Change the cheese! Use mozzarella or pepper jack for more kick. These optional ingredients can help you customize the dish to your taste. Understanding the nutrition in your meal is key. Here’s a simple breakdown per serving: - Calories: About 320 - Protein: 24g - Carbohydrates: 10g - Fat: 20g - Fiber: 2g This casserole is not just tasty, but it also gives you good protein and flavor. Enjoy the Full Recipe to see how simple it is to make this dish. To start, gather all your ingredients. You will need: - 2 cups cooked chicken, shredded - 3 cups broccoli florets, steamed - 1 cup pickles, chopped - 1 cup ranch dressing - 1 cup shredded cheddar cheese - 1/2 cup cream cheese, softened - 1 teaspoon garlic powder - 1 teaspoon onion powder - 1/2 teaspoon salt - 1/4 teaspoon black pepper - 1/4 cup breadcrumbs (optional) Make sure the chicken is cooked and shredded. Steam the broccoli until it is bright green and tender. Chop the pickles into small pieces. This blend of flavors is what makes this casserole special. Now, let's mix everything together. In a large bowl, combine the shredded chicken, steamed broccoli, and chopped pickles. In another bowl, mix the ranch dressing, softened cream cheese, garlic powder, onion powder, salt, and black pepper. Blend them well until smooth. Pour this creamy mixture over the chicken, broccoli, and pickles. Stir gently to coat all the pieces evenly. Next, transfer everything to a greased 9x13 inch baking dish. Top with shredded cheddar cheese for a cheesy finish. If you like a crunchy topping, sprinkle breadcrumbs over the cheese. Preheat your oven to 350°F (175°C) and bake the casserole for 25-30 minutes. It’s ready when the cheese is bubbly and golden brown. Let it cool for a few minutes before serving. For a creamy and rich texture, use softened cream cheese. This helps it blend smoothly with the ranch dressing. Make sure to steam the broccoli just right. Overcooking can make it mushy. If you want a crispy topping, bake the casserole without covering it. This allows the cheese to brown nicely. You can also add more cheese for an extra gooey texture. If you follow these tips, your Pickle Ranch Chicken and Broccoli Casserole will turn out delicious every time! For the full recipe, check out the [Full Recipe]. When making Pickle Ranch Chicken and Broccoli Casserole, avoid undercooking your broccoli. Cook it until it is tender but still bright green. If you skip this step, the broccoli may turn mushy in the oven. Another mistake is not mixing the ranch dressing well. Make sure the cream cheese blends completely for a smooth taste. Lastly, don’t use stale breadcrumbs if you decide to add a topping. Fresh breadcrumbs give a better crunch. You can easily change the flavor of your casserole. Want it spicy? Add some diced jalapeños or a dash of hot sauce. For a tangy twist, try using sweet pickles instead of dill. You can also swap ranch dressing for blue cheese or a yogurt-based dressing. If you love herbs, mix in fresh dill or parsley. Each twist adds a new element and keeps it exciting! Serve your casserole hot and bubbly right from the oven. Garnish with fresh parsley for a pop of color. You can also add extra pickle slices on top for a fun look and flavor. This dish pairs well with a fresh garden salad or crusty bread. For a complete meal, serve it with rice or quinoa on the side. For the full recipe, check out the details above! {{image_2}} You can switch chicken for other proteins. Try turkey or pork for a new taste. These meats blend well with the pickles and ranch dressing. If you want a lighter option, use shredded rotisserie chicken. It adds great flavor with less work. Each protein brings its own flavor twist to the dish. If you want a meat-free meal, go for a vegetarian version. Replace the chicken with chickpeas or white beans. They add protein and fiber. You can also use mushrooms for a savory bite. Make sure to keep the broccoli and pickles for that crunch and tang. This version tastes great and is filling. You can easily swap ingredients to fit your diet. If you're dairy-free, try plant-based cream cheese and cheese alternatives. For gluten-free options, use gluten-free breadcrumbs. You can also use Greek yogurt instead of ranch dressing for a healthier twist. These swaps keep the casserole tasty while meeting your needs. For the full recipe, check out the details above. Enjoy making it your own! After enjoying your casserole, let it cool first. Place any leftovers in an airtight container. Store it in the fridge. This dish stays fresh for up to three days. If you want to keep it longer, try freezing it. To reheat, take the casserole out of the fridge. Preheat your oven to 350°F (175°C). Cover the dish with aluminum foil. Heat for about 20-25 minutes. Check if it's hot all the way through before serving. You can also use a microwave for quicker reheating. Just heat one serving at a time. If you want to freeze the casserole, cool it completely first. Place it in a freezer-safe dish. Wrap it tightly with plastic wrap and foil. It can last for up to three months in the freezer. When ready to eat, let it thaw in the fridge overnight before reheating. This way, you still get that great taste from the Full Recipe. Yes, you can use frozen broccoli in this dish. Just thaw it first and drain any extra water. Frozen broccoli can save time and still taste great in the casserole. It adds a nice texture and flavor. If you don’t have ranch dressing, try using a mix of sour cream and herbs. You can also use yogurt mixed with garlic and dill. These options give a similar creamy texture and taste. You can even experiment with your favorite dressings. This casserole will last about three to four days in the fridge. Just cover it tightly with plastic wrap or foil. For the best taste, eat it within this time frame. Always check for any off smells or changes in texture before eating. Yes, you can prepare this casserole ahead of time. Just assemble it and cover it. You can store it in the fridge for up to a day before baking. This makes it easy for busy nights. Just pop it in the oven when you’re ready to eat. For the full recipe, check the details above. In this article, we explored the tasty Pickle Ranch Chicken and Broccoli Casserole. We covered key ingredients and shared optional swaps for your needs. You learned how to prepare and cook the dish for the best texture. I also shared tips to avoid common mistakes and ways to customize flavors. Finally, we discussed variations, storage tips, and answered common questions. This casserole offers great flavor and is easy to make. Enjoy crafting your perfect dish!](https://dailydishlab.com/wp-content/uploads/2025/07/cf154b41-3af7-41bb-b9a3-230edc58aa3b-768x768.webp)


 for all the details! {{image_2}} You can easily change the protein in your fajitas. Try using steak or shrimp instead of chicken. Both options add great flavor and texture. For steak, slice it thinly to cook evenly. Shrimp cooks fast, so watch it closely. You can also mix up the veggies. Instead of just bell peppers and onion, consider adding zucchini, mushrooms, or corn. Each veggie brings its own taste. This way, you can create your own flavor profile. If you need a gluten-free option, skip the tortillas and serve the fajitas on a bed of lettuce. This keeps the meal light and crunchy. For a vegetarian version, swap the chicken for black beans or tofu. Season them the same way as chicken. This adds protein and keeps it filling. You can also add extra veggies to enhance the dish. These swaps and modifications make it easy to customize your sheet pan chicken fajitas. Enjoy making them your own! You can find the full recipe above. After cooking, let your fajitas cool down. This helps keep the taste fresh. Store leftovers in the fridge. Use airtight containers to keep them safe. Make sure the lid seals tight to prevent air from getting in. You can keep them in the fridge for up to three days. If you want to save them longer, try freezing them. They will last about three months in the freezer. You can reheat your fajitas in two main ways: the microwave or the oven. - Microwave: Place the fajitas on a microwave-safe plate. Cover them with a damp paper towel to keep moisture. Heat for about one minute. Check if they are warm enough. If not, heat in 30-second bursts until hot. - Oven: Preheat your oven to 350°F (175°C). Place the fajitas on a baking sheet. Cover with foil to keep them moist. Heat for about 10-15 minutes. This method keeps the texture nice and crispy. To keep flavor and texture, avoid overheating. This way, your fajitas taste just as good as when you first made them. Enjoy your meal again with the same great taste! For the full recipe, check the recipe section. How long to bake chicken fajitas? Bake chicken fajitas for 20-25 minutes at 400°F (200°C). Check that the chicken is fully cooked. The veggies should be tender and slightly caramelized. This timing helps the flavors blend well. Can I use frozen chicken for this recipe? Yes, you can use frozen chicken. However, thaw it first to ensure even cooking. If you cook it from frozen, increase the baking time by 10-15 minutes. Always check the chicken’s internal temperature for safety. What toppings go well with fajitas? Toppings can make your fajitas special. Here are some great ideas: - Fresh cilantro - Sour cream - Guacamole - Salsa - Shredded cheese How to make homemade tortillas? Making homemade tortillas is easy and fun. You need flour, water, salt, and oil. Mix the ingredients, knead the dough, and let it rest. Then, roll out small balls and cook them on a hot skillet. This adds a fresh touch to your fajitas. What sauces pair best with chicken fajitas? Many sauces can enhance your chicken fajitas. A few popular choices are: - Salsa verde - Chipotle sauce - Creamy ranch dressing - Spicy barbecue sauce These sauces add extra flavor and make each bite even better. This blog post covered how to make delicious sheet pan chicken fajitas. We discussed the key ingredients, preparation steps, and cooking instructions. I shared tips for perfecting your dish and suggested ways to serve it. We also explored ingredient swaps and dietary options to suit your needs. Lastly, I provided storage and reheating advice to enjoy leftovers. With these insights, you can create flavorful fajitas that impress your family and friends. Enjoy your cooking adventure!](https://dailydishlab.com/wp-content/uploads/2025/06/92060734-80b3-49a4-9e1c-290f85b37bb8-768x768.webp)