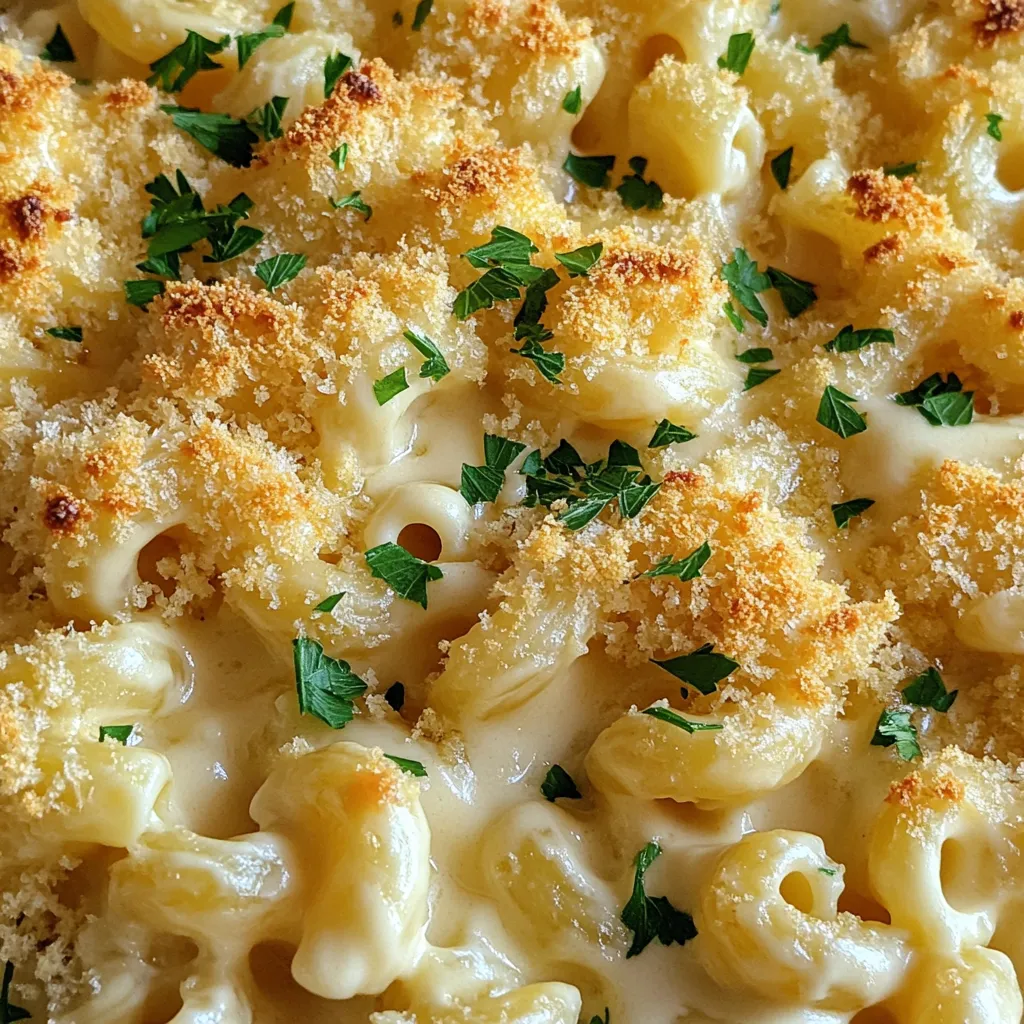
Creamy White Cheddar Mac and Cheese Simple Delight
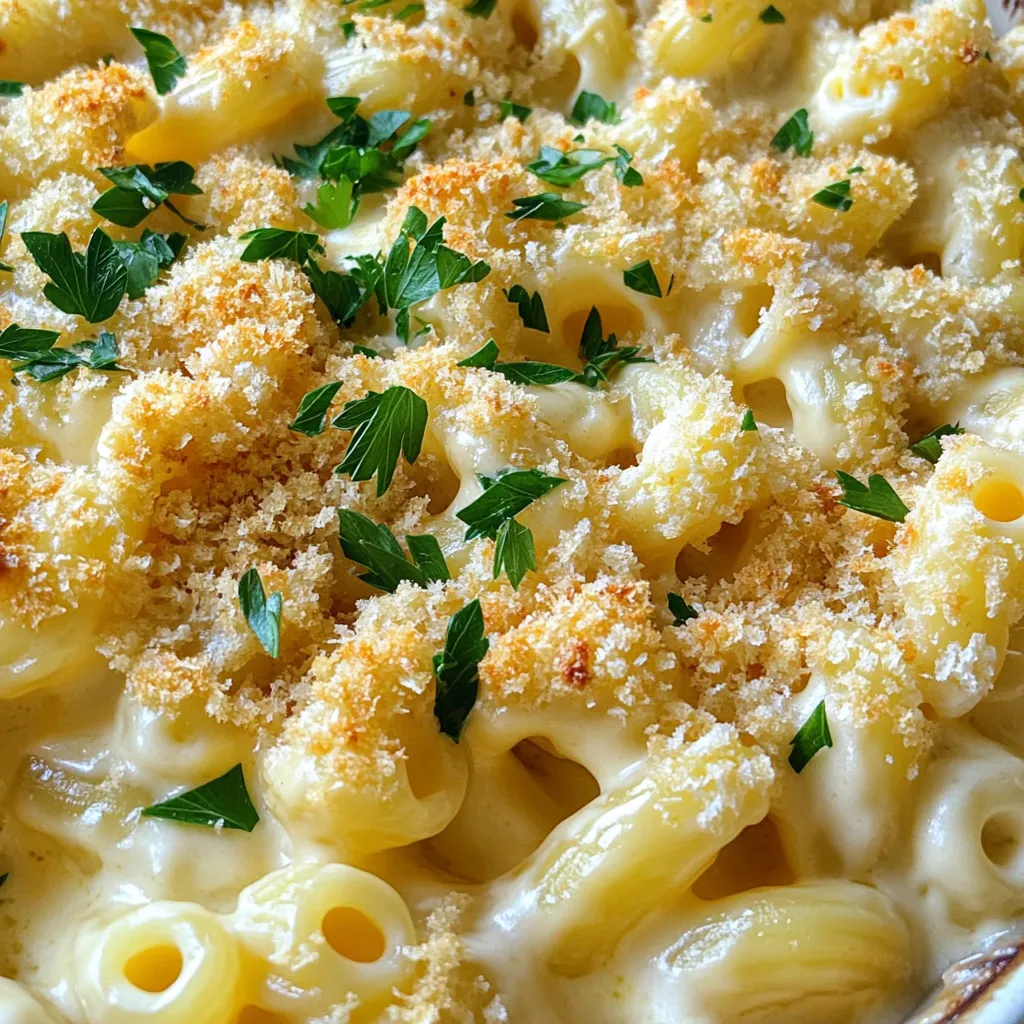

If you crave a cozy dish that warms your heart, look no further! My Creamy White Cheddar Mac and Cheese is a simple delight you’ll want to make again and again. With its rich, velvety sauce and just the right amount of cheese, this recipe is perfect for any meal. Let’s dive into the ingredients and steps to create your new favorite comfort food!
Why I Love This Recipe
- Comforting Creaminess: This mac and cheese delivers a luxurious, creamy texture that warms the soul, making it the ultimate comfort food.
- Cheesy Goodness: The combination of white cheddar and Gruyère creates a rich, flavorful cheese sauce that elevates the dish to gourmet status.
- Easy to Make: With simple ingredients and straightforward steps, this recipe is perfect for both novice cooks and seasoned chefs.
- Customizable: Add your favorite proteins or vegetables to make it your own, ensuring everyone at the table can enjoy their perfect bowl of mac and cheese.
Ingredients
Main Ingredients for Creamy White Cheddar Mac and Cheese
To make this creamy delight, you need:
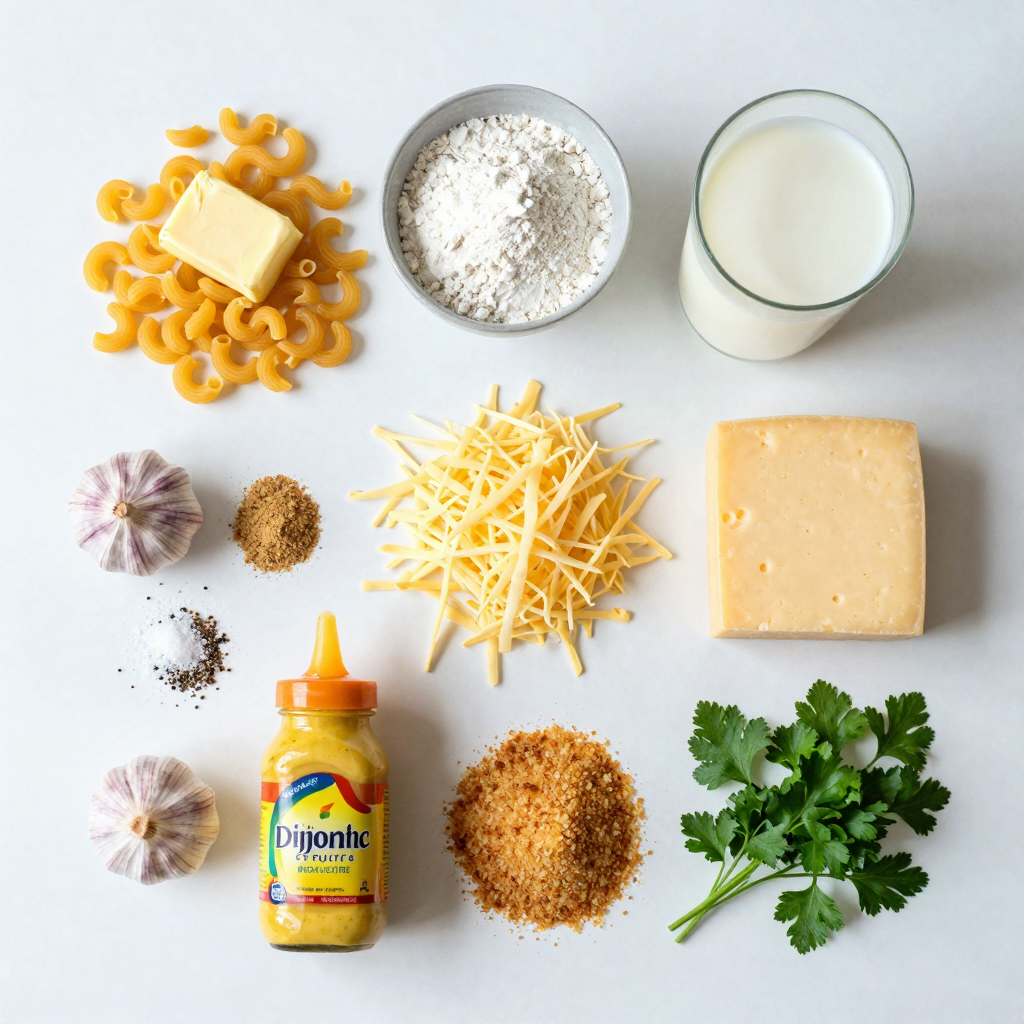
- 8 ounces elbow macaroni
- 2 tablespoons unsalted butter
- 2 tablespoons all-purpose flour
- 2 cups whole milk
- 1 cup shredded white cheddar cheese
- 1 cup shredded Gruyère cheese
- 1 teaspoon Dijon mustard
- ½ teaspoon garlic powder
- ½ teaspoon onion powder
- Salt and pepper to taste
- ½ cup breadcrumbs (panko for extra crunch)
- 2 tablespoons chopped fresh parsley (for garnish)
Each ingredient plays a key role. The macaroni holds the sauce well. The butter and flour create a rich roux. The white cheddar and Gruyère provide a deep, creamy flavor. The seasonings add depth, while the breadcrumbs give a nice crunch.
Optional Garnishes and Toppings
You can make your mac and cheese even better with these toppings:
- Extra cheese (like Parmesan or mozzarella)
- Crispy bacon bits
- Cooked and chopped vegetables (like broccoli or peas)
- Hot sauce for a kick
These add-ons can change the dish’s flavor and texture. Feel free to mix and match based on your taste.
Ingredient Substitutions
If you need to swap out some ingredients, here are some ideas:
- Use gluten-free pasta if needed.
- Swap whole milk for low-fat milk or almond milk.
- Try different cheeses, like sharp cheddar or Monterey Jack.
- Use olive oil instead of butter for a dairy-free option.
These swaps can help you cater to dietary needs. They can also give a new twist to this classic dish.
Step-by-Step Instructions
How to Cook the Pasta
Start by boiling salted water in a large pot. Add 8 ounces of elbow macaroni. Cook the pasta until it’s al dente, following the package instructions. This usually takes about 8 to 10 minutes. Drain the pasta and set it aside.
Making the Roux and Cheese Sauce
In the same pot, melt 2 tablespoons of unsalted butter over medium heat. Once it’s melted, whisk in 2 tablespoons of all-purpose flour. Cook this mixture for about 2 to 3 minutes until it turns lightly golden. Next, slowly pour in 2 cups of whole milk while whisking. This helps to avoid lumps. Cook for about 5 minutes until the mix thickens. Then, reduce the heat to low and stir in 1 cup of shredded white cheddar cheese and 1 cup of shredded Gruyère cheese. Keep stirring until the cheese melts and the sauce is smooth. Finally, add 1 teaspoon of Dijon mustard, ½ teaspoon of garlic powder, and ½ teaspoon of onion powder. Season with salt and pepper to taste.
Combining and Baking the Dish
Fold the cooked macaroni into the cheese sauce. Make sure every piece of pasta is well coated. Preheat your oven to 350°F (175°C). Transfer the mac and cheese into a baking dish. In a small bowl, mix ½ cup of breadcrumbs with a little olive oil. Sprinkle this over the mac and cheese for a crunchy topping. Bake it in the oven for 20 to 25 minutes. You want the top to be golden brown and crispy. Once baked, let it sit for a few minutes. Garnish with 2 tablespoons of chopped fresh parsley before serving. Enjoy your creamy white cheddar mac and cheese!
Pro Tips
- Use Fresh Cheese: Opt for freshly shredded cheese instead of pre-packaged to enhance flavor and meltability.
- Customize Your Cheeses: Experiment with different cheese combinations like mozzarella or fontina for unique flavors.
- Extra Creaminess: Add a splash of cream or sour cream for a richer and creamier texture.
- Breadcrumb Variation: Mix in some grated Parmesan with the breadcrumbs for a savory topping with added depth.
Tips & Tricks
Achieving the Perfect Creamy Texture
To get that creamy texture, you must use whole milk. It adds richness. When you make your roux, cook it just enough to turn golden. Don’t rush this step. Slowly whisk in the milk. This helps avoid lumps. Stir the cheese in on low heat. This keeps the cheese from clumping. Use fresh cheese, as it melts better than pre-shredded.
Storing Leftovers Safely
If you have leftovers, let them cool first. Place them in an airtight container. You can store them in the fridge for up to three days. When you want to reheat, add a splash of milk. This keeps it creamy. Heat it slowly on low heat. Stir often to avoid burning.
Enhancing Flavors with Seasonings
To amp up the flavor, try adding spices. Smoked paprika gives a nice touch. You can also use fresh herbs like thyme or rosemary. A pinch of cayenne pepper adds heat without being too spicy. Always taste as you go. Adjust salt and pepper to make it just right.
Variations
Adding Protein (e.g., Chicken, Bacon)
You can boost your mac and cheese by adding protein. Chicken is a great choice. Cook it first, then chop it into small pieces. Stir it into the cheese sauce before adding the pasta. Bacon adds a smoky flavor. Cook bacon until crispy, chop it, and mix it in. These proteins make your dish heartier and more filling.
Vegetable Add-ins (e.g., Broccoli, Spinach)
Adding veggies can make your dish healthier. Broccoli is a popular choice. Steam or blanch it first, then mix it in with the pasta. It adds color and crunch. Spinach is another great option. You can add it fresh or sauté it until wilted. Both options give you extra nutrients and flavor.
Different Cheese Combinations
While white cheddar and Gruyère are delicious, you can mix it up. Try mixing in Monterey Jack for a creamier taste. Add some Parmesan for a salty kick. You could even use mozzarella for a stretchy texture. Experiment with your favorite cheeses to create a unique flavor. Each blend offers a different twist on the classic dish.
Serving Suggestions
Ideal Accompaniments
Creamy White Cheddar Mac and Cheese pairs well with many foods. Try crispy bacon bits for a salty crunch. You can also add fresh herbs like basil or chives for a pop of flavor. A sprinkle of chili flakes can add some heat if you like spice.
Perfect Side Dishes for Mac and Cheese
Serve your mac and cheese with a light salad. A simple green salad with vinaigrette works great. Roasted vegetables are also a tasty choice. Try seasoned broccoli or carrots for a healthy touch. You can even serve it with garlic bread for a comforting meal.
Suggested Wine Pairings
For wine lovers, choose a Chardonnay. It complements the cheese well with its creamy taste. A light Pinot Grigio also works if you prefer something crisper. If you enjoy red wine, a light Merlot can balance the dish nicely.
FAQs
Can I make Creamy White Cheddar Mac and Cheese ahead of time?
Yes, you can make this dish ahead of time. Cook the pasta and cheese sauce as usual. After combining them, let the mix cool. Cover it and store it in the fridge for up to two days. When ready to eat, bake it until hot and bubbly. This method saves time on busy days.
How do I make mac and cheese creamier?
To make your mac and cheese creamier, use high-fat milk. Whole milk gives a rich texture. You can also add more cheese. Mixing in cream cheese or sour cream works wonders too. Another tip is to stir the pasta in the cheese sauce while it’s warm. This helps the sauce cling better.
Can I use other types of pasta for this recipe?
Yes, you can use other pasta types. Shells, cavatappi, or even penne work well. Choose pasta shapes that hold sauce well. Adjust the cooking time based on the pasta you use. Just ensure it’s cooked al dente to avoid mushiness in the final dish.
This blog post covered all you need for creamy white cheddar mac and cheese. We reviewed key ingredients, cooking steps, and tips for the best texture. I shared ways to mix in proteins and veggies for a twist. You discovered perfect sides and wine to pair with your dish.
In conclusion, making this mac and cheese can be fun and flexible. Experiment with flavors and enjoy your meal!

Creamy White Cheddar Mac and Cheese
Ingredients
8 ounces elbow macaroni
2 tablespoons unsalted butter
2 tablespoons all-purpose flour
2 cups whole milk
1 cup shredded white cheddar cheese
1 cup shredded Gruyère cheese
1 teaspoon Dijon mustard
½ teaspoon garlic powder
½ teaspoon onion powder
Salt and pepper to taste
½ cup breadcrumbs (panko for extra crunch)
2 tablespoons chopped fresh parsley (for garnish)
Instructions
Cook the Pasta: In a large pot, bring salted water to a boil. Add the elbow macaroni and cook until al dente, according to package instructions. Drain and set aside.
Make the Roux: In the same pot, melt the butter over medium heat. Once melted, whisk in the flour to form a roux, cooking for about 2-3 minutes until lightly golden.
Add Milk: Slowly pour in the whole milk while continuously whisking to avoid lumps. Cook for about 5 minutes or until the mixture begins to thicken.
Add Cheeses: Reduce heat to low and stir in the white cheddar and Gruyère cheeses until melted and smooth.
Season: Mix in the Dijon mustard, garlic powder, onion powder, and season with salt and pepper to taste.
Combine: Fold the cooked macaroni into the cheese sauce, ensuring all pasta is well coated.
Prepare for Baking: Preheat your oven to 350°F (175°C). Transfer the mac and cheese into a baking dish.
Top with Breadcrumbs: In a small bowl, mix breadcrumbs with a drizzle of olive oil. Sprinkle evenly over the mac and cheese.
Bake: Place the dish in the oven and bake for 20-25 minutes, or until the top is golden brown and crispy.
Garnish and Serve: Once baked, remove from the oven and let sit for a few minutes. Garnish with fresh parsley before serving.
Prep Time: 15 mins | Total Time: 40 mins | Servings: 4
Creamy White Cheddar Mac and Cheese
Ingredients
- 8 ounces elbow macaroni
- 2 tablespoons unsalted butter
- 2 tablespoons all-purpose flour
- 2 cups whole milk
- 1 cup shredded white cheddar cheese
- 1 cup shredded Gruyère cheese
- 1 teaspoon Dijon mustard
- ½ teaspoon garlic powder
- ½ teaspoon onion powder
- to taste Salt and pepper
- ½ cup breadcrumbs
- 2 tablespoons chopped fresh parsley
Instructions
- In a large pot, bring salted water to a boil. Add the elbow macaroni and cook until al dente, according to package instructions. Drain and set aside.
- In the same pot, melt the butter over medium heat. Once melted, whisk in the flour to form a roux, cooking for about 2-3 minutes until lightly golden.
- Slowly pour in the whole milk while continuously whisking to avoid lumps. Cook for about 5 minutes or until the mixture begins to thicken.
- Reduce heat to low and stir in the white cheddar and Gruyère cheeses until melted and smooth.
- Mix in the Dijon mustard, garlic powder, onion powder, and season with salt and pepper to taste.
- Fold the cooked macaroni into the cheese sauce, ensuring all pasta is well coated.
- Preheat your oven to 350°F (175°C). Transfer the mac and cheese into a baking dish.
- In a small bowl, mix breadcrumbs with a drizzle of olive oil. Sprinkle evenly over the mac and cheese.
- Place the dish in the oven and bake for 20-25 minutes, or until the top is golden brown and crispy.
- Once baked, remove from the oven and let sit for a few minutes. Garnish with fresh parsley before serving.

![- 4 large onions, thinly sliced - 4 tablespoons unsalted butter - 1 tablespoon olive oil - 4 cups beef broth (or vegetable broth) - 1 teaspoon sugar - 1 sprig of fresh thyme - 1 bay leaf - 1 teaspoon salt - 1/2 teaspoon black pepper - 1 tablespoon balsamic vinegar - Optional: Fresh parsley for garnish - 4 slices of baguette, toasted - 1 ½ cups grated Gruyère cheese Classic French onion soup needs sweet, rich flavors. The onions bring that sweetness. Onions are the star. You want to slice them thinly for even cooking. Use a heavy pot to help with the caramelization. Butter and olive oil work great together. Butter adds creaminess, while olive oil gives flavor. The broth is the base. Beef broth adds depth. You can also use vegetable broth if you prefer. For seasoning, sugar helps the onions caramelize. Thyme and bay leaf bring herbal notes. Salt and pepper round out the taste. Balsamic vinegar adds a nice tang. For toppings, you need toasted baguette slices. They soak up the soup and add crunch. Gruyère cheese melts beautifully on top, creating a cheesy layer. I recommend checking out the full recipe for detailed steps to make this comforting dish. - Melt butter and oil in a pot. - Add onions and sugar, and cook until caramelized. Start with a heavy pot. I use my trusty Dutch oven for even heat. Melt 4 tablespoons of unsalted butter with 1 tablespoon of olive oil over medium heat. The blend gives a rich flavor. Next, add 4 large, thinly sliced onions and 1 teaspoon of sugar. Stir them well so they coat in the butter and oil. This sugar helps the onions turn a lovely golden brown. Cook them slowly for about 25-30 minutes. Stir often to prevent burning. Be patient, as caramelization brings out the sweet notes in the onions. - Pour in the broth and add seasonings. - Bring to a gentle simmer and cook. Once the onions are caramelized, it's time to add the broth. Pour in 4 cups of beef broth, or use vegetable broth for a lighter taste. Add 1 sprig of fresh thyme, 1 bay leaf, 1 teaspoon of salt, 1/2 teaspoon of black pepper, and 1 tablespoon of balsamic vinegar. These seasonings give depth to the soup. Bring the soup to a gentle simmer. Let it cook uncovered for about 20 minutes. This time allows the flavors to blend well together. It will smell amazing! - Preheat the oven to broil. - Prepare bowls with bread and cheese for broiling. Before finishing, preheat your oven to broil. Remove the thyme sprig and bay leaf from the soup. Ladle the soup into oven-safe bowls. For the topping, place a toasted slice of baguette on each bowl. Then, sprinkle 1 ½ cups of grated Gruyère cheese on top. The cheese should be generous; it melts beautifully and creates a rich layer. Now, place the bowls on a baking sheet and broil them for about 3-5 minutes. Watch closely to avoid burning! You want the cheese to be bubbly and golden. Take them out carefully and let them cool slightly. If you like, garnish with fresh parsley before serving. Enjoy your comforting bowl of French onion soup! For the full recipe, check out the details above. To make great French onion soup, you need to cook the onions slowly. This step is key. Start over medium heat. Stir the onions often to help them cook evenly. Add a pinch of salt to draw out moisture. Be patient. It can take 25 to 30 minutes for the onions to turn golden brown. Watch closely to avoid burning. If you notice browning too fast, lower the heat. A little sugar can help speed up caramelization, but don't let it burn. Broiling the cheese adds a perfect touch. First, preheat your oven to broil. Ladle the soup into oven-safe bowls. Place a slice of toasted baguette on top of each bowl. Then, sprinkle a generous amount of Gruyère cheese on top. Position the bowls on a baking sheet. This makes it easy to remove them from the oven. Broil for 3 to 5 minutes. Keep an eye on the cheese. You want it bubbly and golden, not burnt. Using different broths can change the flavor. Beef broth gives a rich taste, but vegetable broth works well too. For an extra kick, add a splash of white wine. It adds depth and pairs well with the onions. Feel free to experiment! You can even mix broths for a unique flavor. Adding a tablespoon of balsamic vinegar can also brighten the soup. It balances the sweetness of the onions. For more tips and a full recipe, check out the [Full Recipe]. {{image_2}} You can make a vegetarian version of French onion soup. Start by using vegetable broth instead of beef broth. This broth gives the soup a rich flavor without meat. You can also add extra vegetables. Try carrots, celery, or even leeks. These veggies add sweetness and depth to the soup. Cheese plays a big role in this dish. You can try different cheeses for fun. Gruyère is classic, but Comté or Emmental work well too. These cheeses melt nicely and add a creamy texture. Grate your cheese finely for even melting. Each cheese brings a unique flavor to the soup. You can personalize your soup with add-ins. Fresh herbs like basil or oregano can brighten the dish. Just sprinkle them in before serving. You can also add sautéed mushrooms for an umami boost. Mushrooms add earthiness and enhance the soup’s flavor. Mix and match these ideas to make your perfect bowl of comfort. Check out the Full Recipe for more tips! To keep your soup fresh, let it cool first. After it cools, pour it into a clean, airtight container. Seal the lid tightly. Store the soup in the fridge for up to five days. When you are ready to eat, heat it on the stove or in the microwave. Stir well to make sure it warms up evenly. Freezing soup is easy and convenient. First, let the soup cool completely. Then, use freezer-safe containers or bags. Pour the soup into containers, leaving some space at the top. This allows it to expand. You can freeze it for up to three months. To reheat, thaw it overnight in the fridge. Then, heat it on the stove until it’s hot. You can also add a little broth if it seems too thick. Fresh ingredients are key for great soup. Onions last about two weeks if stored in a cool, dark place. Keep them away from potatoes. Butter can last months in the fridge if sealed tight. Broth can stay good for up to a week in the fridge. Always check for any signs of spoilage before cooking. Fresh ingredients lead to the best flavors in your soup. The classic choice is Gruyère cheese. It melts well and has a rich flavor. Emmental cheese is also great. It adds a nutty taste. For a twist, try Comté or Fontina. These cheeses bring depth and creaminess. Mix different cheeses to create your own blend. Yes, you can make French onion soup ahead of time. Cook the soup and store it in the fridge. It stays fresh for about three days. Just reheat it before serving. You can also freeze it for up to three months. Thaw in the fridge overnight before reheating. A toasted baguette is the best choice for French onion soup. It adds crunch and holds the cheese well. You can also use sourdough or ciabatta. These breads give a nice flavor and texture. Avoid soft bread, as it may fall apart in the soup. Look for a deep golden-brown color in the onions. They should be soft and sweet in taste. This process takes about 25 to 30 minutes. Stir them often to avoid burning. If you see dark spots or they smell bitter, reduce the heat. Classic French onion soup combines simple ingredients for rich flavor. Using onions, butter, and broth creates a warm, comforting dish. Remember to caramelize the onions slowly for depth and to broil cheese to perfection. You can also customize the soup with different broths and cheeses for a unique twist. Whether you’re enjoying it on a cold night or sharing with friends, this soup warms the heart. Embrace your creativity and make this recipe your own!](https://dailydishlab.com/wp-content/uploads/2025/06/d4b3c813-7d13-4313-85c6-6f7cc6d3bfc5-768x768.webp)
![- Fresh okra - Cherry tomatoes - Olive oil - Spices and seasonings - Lemon zest - Fresh basil To make this dish, you need fresh ingredients. Start with 1 pound of fresh okra. Trim and halve them for even cooking. Next, grab 2 cups of cherry tomatoes. Halve these as well to help them roast nicely. You will also need 3 tablespoons of olive oil. This oil helps the veggies get crispy and adds great flavor. For spices, use 1 teaspoon of smoked paprika, 1 teaspoon of garlic powder, and ½ teaspoon of onion powder. Add ½ teaspoon of crushed red pepper flakes if you like some heat. Season with salt and pepper to taste. Don't forget the zest of 1 lemon. It adds a bright taste at the end. Lastly, have some fresh basil on hand. This herb adds color and a fresh touch to your dish. For the complete recipe, check out the [Full Recipe]. - Preheat the oven Start by preheating your oven to 425°F (220°C). This high heat helps the vegetables roast perfectly. - Prepare the vegetables Take 1 pound of fresh okra, trim the ends, and cut it in half. Next, halve 2 cups of cherry tomatoes. This mix gives great flavor and color. - Seasoning combinations In a large bowl, add the okra and tomatoes. Drizzle with 3 tablespoons of olive oil. Then, sprinkle in 1 teaspoon of smoked paprika, 1 teaspoon of garlic powder, ½ teaspoon of onion powder, and red pepper flakes to taste. Don’t forget salt and pepper! Toss until everything is well coated. - Spreading on the baking sheet Line a baking sheet with parchment paper. Spread the seasoned vegetables in a single layer. This helps them roast evenly. - Roasting details Place the baking sheet in the preheated oven. Roast for about 25-30 minutes. The okra should be tender and slightly crispy, while the tomatoes blister beautifully. - Final touches Once done, take the tray out of the oven. Sprinkle the zest of 1 lemon over the hot veggies. This adds a fresh zing. Toss gently and let it cool for a minute. Serve warm, topped with fresh basil leaves for extra flavor and color. For the full recipe, check out the Zesty Roasted Okra & Tomato Medley. To make your roasted okra and tomatoes burst with flavor, start with spices. I love using smoked paprika, garlic powder, and onion powder. These spices add depth and warmth to each bite. Olive oil is key too. It helps the spices stick and enhances the dish's richness. Don't forget red pepper flakes! They add heat. You can adjust the amount to suit your taste. Temperature matters when roasting. Set your oven to 425°F (220°C) for the best results. Use a sturdy baking sheet for even cooking. A parchment-lined sheet helps prevent sticking and makes cleanup easy. Check the doneness of your vegetables. Okra should be tender with crispy edges, while tomatoes should be blistered and juicy. Fresh herbs brighten the dish. I recommend using basil for a lovely touch. A squeeze of lemon juice adds a zesty kick. For serving, pile the roasted vegetables on a plate and sprinkle with lemon zest. This makes for a beautiful presentation. You can enjoy them as a side dish or toss them into a salad for extra flair. For the full recipe, check out the Zesty Roasted Okra & Tomato Medley. {{image_2}} You can change up the veggies in this dish. Try using zucchini, bell peppers, or eggplant. Each adds a unique taste and texture. If you want a creamy touch, add cheese like feta or goat cheese. It pairs well with the roasted flavors. For a twist, consider swapping spices. Instead of smoked paprika, use Italian seasoning or curry powder for a new flavor profile. You can also add a splash of balsamic vinegar for extra depth. If you want a smoky flavor, grill the okra and tomatoes instead of roasting. Just toss them on the grill for about 10-15 minutes. The char adds a nice touch. You can also use an air fryer. Set it to 400°F and cook for about 15 minutes. This method gives you a crispy finish without much oil. Another option is sautéing on the stovetop. Heat some olive oil in a pan. Add the okra and tomatoes, cooking them for about 10 minutes, stirring often. This keeps the veggies tender while still flavorful. Roasted okra and tomatoes go great with proteins. Serve it alongside grilled chicken or fish for a complete meal. You can also use this dish in salads or wraps. Add some grains like quinoa or brown rice for a hearty option. This medley of flavors and textures makes it a versatile side dish. You can enjoy it in many ways, making every meal special. For the full recipe, check out Zesty Roasted Okra & Tomato Medley. To keep your roasted okra and tomatoes fresh, start by cooling down any leftovers. This step is key. Allow the dish to sit for about 30 minutes at room temperature before storing. Next, place the cooled vegetables in an airtight container. This helps keep moisture in and prevents them from drying out. In the fridge, your roasted okra and tomatoes can last for about three to four days. For the best taste, eat them within this time. When you’re ready to enjoy your leftovers, the best way to reheat them is in the oven. Set it to 350°F (175°C) and heat for about 10-15 minutes. This helps restore their crispy texture. If you plan to keep the dish longer, freezing is a great option. Pack the cooled vegetables in a freezer-safe container. They can last for up to three months in the freezer. When you want to eat them, thaw them in the fridge overnight before reheating. Enjoy the flavors and textures just like they were fresh out of the oven! Can I use frozen okra? Yes, you can use frozen okra. However, fresh okra gives the best flavor. If you use frozen okra, thaw it first. Pat it dry to remove excess moisture before roasting. What can I substitute for cherry tomatoes? If you don’t have cherry tomatoes, use regular tomatoes. Cut them into small pieces. You can also use grape tomatoes or sun-dried tomatoes. Each option adds a unique flavor. How do I know when the okra is cooked properly? Okra is done cooking when it is tender and slightly crispy. You want it to have a nice texture. The tomatoes should be blistered and softened. Check around the 25-minute mark. Can I make this vegan? Yes, this dish is already vegan! It contains no animal products. Enjoy it as is or add your favorite vegan protein for a heartier meal. How do I add protein to this dish? You can add protein by mixing in chickpeas or black beans. Grilled chicken or shrimp also works well. Just add them to the mix before roasting. What are some gluten-free options? This recipe is gluten-free! All the ingredients are safe for those avoiding gluten. Enjoy this dish with no worries. Nutritional value of okra and tomatoes Okra is low in calories and rich in vitamins. It contains fiber, vitamin C, and folate. Tomatoes are also nutritious, packed with vitamins A and K. Together, they make a healthy pair. Health advantages of roasting vegetables Roasting enhances the natural flavors of vegetables. It also helps retain nutrients. This cooking method makes veggies more enjoyable and encourages healthy eating. Possible allergens in the recipe This recipe is generally safe. However, check for any allergies to spices or olive oil. If you have specific allergies, adjust the ingredients as needed. Roasting fresh okra and cherry tomatoes brings out their great flavors. I shared essential ingredients, step-by-step tips, and variations to enhance your dish. Remember, choosing the right spices and olive oil is key for taste. Explore cooking methods like grilling or sautéing for new twists. Proper storage keeps leftovers fresh. With this guide, you can enjoy delicious, healthy meals any day. Embrace your creativity in the kitchen, and enjoy the process!](https://dailydishlab.com/wp-content/uploads/2025/07/82f1db9d-d538-4cbd-a935-2876753fc949-768x768.webp)