
Slow Cooker Creamy Tuscan Lentil Soup Delight


Are you ready to indulge in a cozy bowl of Slow Cooker Creamy Tuscan Lentil Soup? This rich and velvety dish is not only simple to make but is packed with flavor. I’ll guide you through the easy steps, share tips for the perfect texture, and suggest tasty variations to suit your palate. Whether you’re a seasoned cook or a beginner, this soup will warm your soul and impress your guests. Let’s get started!
Why I Love This Recipe
- Healthy and Nutritious: This soup is packed with protein-rich lentils and a variety of vegetables, making it a wholesome meal.
- Easy Preparation: With just a few simple steps, you can set it and forget it in your slow cooker, freeing up your time.
- Comforting Flavor: The creamy texture from coconut milk and the herbs create a warm, comforting dish perfect for any season.
- Customizable: You can easily adjust the ingredients based on what you have on hand or your personal preferences.
Ingredients
List of Ingredients
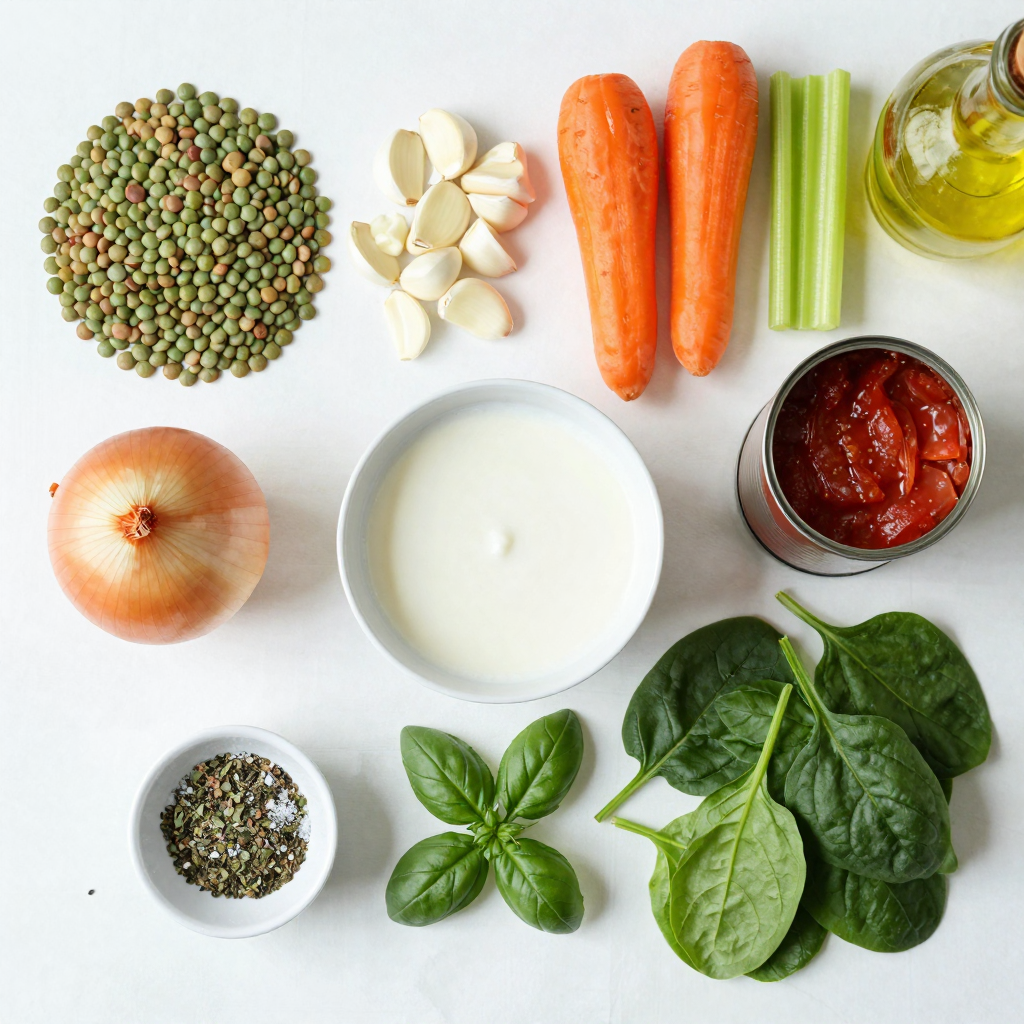
To make this creamy Tuscan lentil soup, gather these ingredients:
- 1 cup green or brown lentils, rinsed
- 1 medium onion, diced
- 2 cloves garlic, minced
- 2 medium carrots, diced
- 1 celery stalk, diced
- 1 can (14 oz) diced tomatoes, with juices
- 4 cups vegetable broth
- 1 cup coconut milk (or heavy cream for a richer flavor)
- 2 cups fresh spinach, roughly chopped
- 1 teaspoon dried oregano
- 1 teaspoon dried basil
- Salt and pepper to taste
- 2 tablespoons olive oil
- Optional: Fresh basil for garnish
Ingredient Substitutions
You can easily swap some ingredients to fit your taste or diet.
- Lentils: Use red lentils for a faster cook time.
- Coconut Milk: Swap for heavy cream if you want a rich flavor.
- Spinach: Use kale or Swiss chard for a different green.
- Diced Tomatoes: Fresh tomatoes work well if you have them.
- Broth: Chicken broth adds a meaty flavor.
Fresh vs. Dried Herbs
Using fresh herbs can brighten the soup’s taste. They add a vibrant flavor.
- Fresh basil gives a sweet and aromatic touch. Add it near the end.
- Dried oregano and basil are great for slow cooking. They release flavors over time.
- If you have both, mix them for a more complex flavor. Use double the amount of fresh herbs compared to dried.
Step-by-Step Instructions
Preparation Steps
Start by rinsing 1 cup of lentils. This removes any dust or debris. In your slow cooker, add the rinsed lentils, 1 diced onion, and 2 minced garlic cloves. Next, add 2 diced carrots and 1 diced celery stalk. Pour in 1 can of diced tomatoes, juices and all, along with 4 cups of vegetable broth. Stir everything together. Drizzle 2 tablespoons of olive oil over the mix. Then, add 1 teaspoon of dried oregano and 1 teaspoon of dried basil. Season with salt and pepper to your liking.
Cooking Time and Temperatures
Cover the slow cooker. Set it to cook on low for 6-8 hours or on high for 3-4 hours. The lentils should be tender and soft when done. About 30 minutes before serving, stir in 1 cup of coconut milk or heavy cream, depending on your choice. Add 2 cups of chopped spinach at this time. Let it cook until the spinach wilts and becomes tender.
Final Touches Before Serving
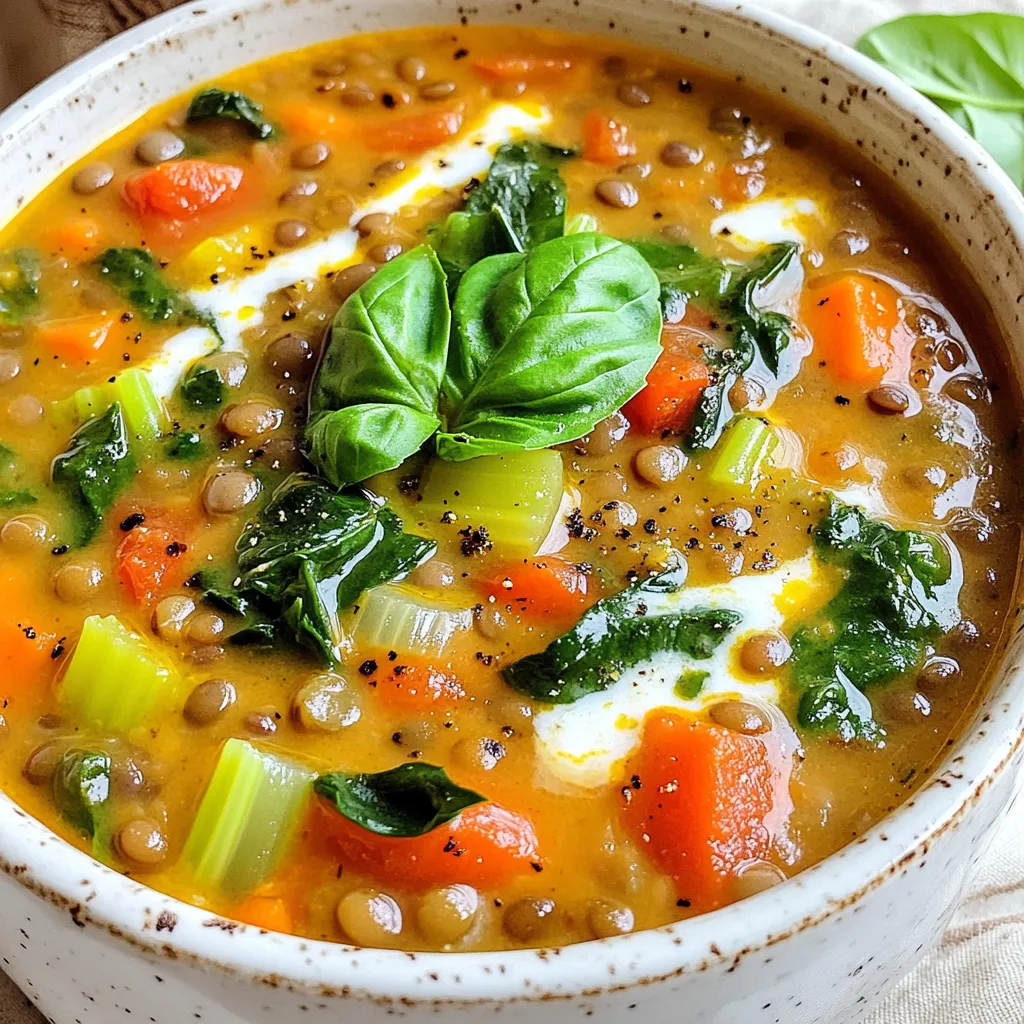
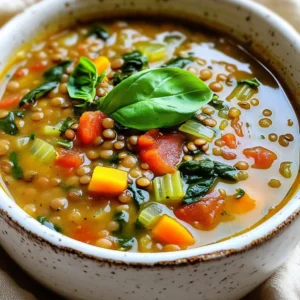
Once the cooking time is up, taste the soup. Adjust the seasoning if needed. If you want a creamier texture, use an immersion blender to puree part of the soup. Leave some lentils whole for a nice bite. Serve the soup hot in bowls. For a lovely finish, garnish with fresh basil and a drizzle of olive oil. Enjoy your comforting bowl of creamy Tuscan lentil soup!
Pro Tips
- Soak the Lentils: Soaking lentils for a few hours before cooking can reduce the cooking time and help them cook more evenly.
- Experiment with Spices: Feel free to add spices like smoked paprika or red pepper flakes for an added depth of flavor and a hint of heat.
- Coconut Milk Substitution: If you prefer a lighter soup, you can use almond milk or cashew cream as a substitute for coconut milk.
- Batch Cooking: This soup freezes well, making it perfect for batch cooking. Just store in airtight containers for a quick meal later!
Tips & Tricks
Best Practices for Slow Cooking
To make great soup, start with good ingredients. Rinse your lentils well before use. Dice your onion and garlic small for even cooking. Add veggies like carrots and celery to boost flavor. Layer the ingredients in the slow cooker. This helps the flavors mix well. Always season your soup. Salt and pepper enhance the taste.
How to Achieve the Creamiest Texture
For a creamy soup, use coconut milk or heavy cream. Add this 30 minutes before serving. This prevents curdling and keeps the texture smooth. If you want a thicker soup, blend a small part. This gives a nice mix of creamy and chunky. Stir in fresh spinach right before serving. It wilts quickly and adds color.
Common Mistakes to Avoid
One mistake is not rinsing lentils. This can lead to a gritty texture. Avoid overcooking the soup. Lentils should be tender, not mushy. Don’t skip the seasoning. It makes a big difference in taste. Lastly, check your slow cooker settings. Cooking on high can make the soup too thick. Always taste before serving. Adjust seasoning as needed for the best flavor.
Variations
Vegetarian and Vegan Options
This soup is already vegetarian and can be vegan too! To keep it vegan, use coconut milk instead of heavy cream. The coconut milk adds a rich flavor. You can also use vegetable broth instead of chicken broth. This way, everyone can enjoy it!
Adding Protein (e.g., sausage or beans)
If you want extra protein, consider adding sausage or beans. Cooked sausage adds a nice, hearty flavor. You can use Italian sausage for a spicy kick. If you prefer beans, add a can of drained beans, such as cannellini or kidney beans. They mix well and boost the protein.
Flavor Enhancements and Add-ins
To make this soup even tastier, try adding more herbs or spices. Fresh herbs like parsley or thyme brighten the flavors. A splash of lemon juice adds a zesty twist too! You can also stir in some red pepper flakes for heat. Don’t forget to top it with fresh basil or a swirl of olive oil before serving!
Storage Info
Proper Storage Methods
After you finish your delicious soup, let it cool down. Once cooled, store it in an airtight container. This keeps the soup fresh and tasty. Place it in the refrigerator if you plan to eat it within a few days. It can stay fresh for up to five days.
Reheating Instructions
To reheat, pour the soup into a pot over medium heat. Stir it often until it’s hot. You can also use a microwave-safe bowl. Heat it in the microwave for about two to three minutes. Stir halfway through to warm it evenly. If the soup is too thick, add a splash of vegetable broth or water.
Freezing and Thawing Guidelines
You can freeze this soup too! Just make sure it is completely cool. Pour the soup into freezer-safe containers. Leave some space at the top for expansion. Seal tightly and label with the date. It can freeze for up to three months. To thaw, place it in the fridge overnight. Reheat it as discussed above, adding liquid if needed.
FAQs
Can I make this soup on the stovetop?
Yes, you can make this soup on the stovetop. Start by sautéing the onion and garlic in olive oil. Then, add the carrots, celery, and rinsed lentils. Pour in the diced tomatoes and vegetable broth. Bring it to a boil, then reduce the heat. Let it simmer for about 30 to 40 minutes. Stir in the coconut milk and spinach before serving.
How do I adjust the recipe for more servings?
To adjust for more servings, simply double the ingredients. Use two cups of lentils, two cans of diced tomatoes, and eight cups of broth. You can also increase the seasoning to match the larger batch. Just keep an eye on the cooking time, as it may change slightly with more volume.
What are the best side dishes to serve with Tuscan Lentil Soup?
Pair this soup with a crisp green salad or crusty bread. A light side of roasted vegetables works well too. If you want something hearty, serve it with a side of garlic bread. These options complement the rich flavors of the soup and make for a complete meal.
This blog post covered key steps to make a tasty Tuscan Lentil Soup. We explored ingredients, possible swaps, and herb options. I shared clear steps for prep, cooking times, and last touches. You learned best practices for slow cooking and how to get a creamy texture. We also discussed fun variations and storage tips.
In the end, making this soup is easy and rewarding. Enjoy creating something delightful for you and your loved ones!
Slow Cooker Creamy Tuscan Lentil Soup
Ingredients
1 cup green or brown lentils, rinsed
1 medium onion, diced
2 cloves garlic, minced
2 medium carrots, diced
1 celery stalk, diced
1 can (14 oz) diced tomatoes, with juices
4 cups vegetable broth
1 cup coconut milk (or heavy cream for a richer flavor)
2 cups fresh spinach, roughly chopped
1 teaspoon dried oregano
1 teaspoon dried basil
Salt and pepper to taste
2 tablespoons olive oil
Optional: Fresh basil for garnish
Instructions
In the bowl of your slow cooker, add the rinsed lentils, diced onion, minced garlic, carrots, and celery.
Pour in the diced tomatoes along with their juices and the vegetable broth. Stir to combine the ingredients.
Drizzle the olive oil over the mixture and add the dried oregano and basil. Season with salt and pepper to taste.
Cover the slow cooker and set it to cook on low for 6-8 hours or on high for 3-4 hours, until the lentils are tender.
About 30 minutes before serving, stir in the coconut milk (or heavy cream) and the chopped spinach. Allow the soup to continue cooking until the spinach is wilted and tender.
Once done, taste the soup and adjust seasoning as needed. If desired, use an immersion blender to puree a small portion of the soup for a creamier texture while leaving some lentils whole for texture.
Serve hot, garnished with fresh basil if using.
Prep Time: 15 mins | Total Time: 6-8 hrs | Servings: 6-8
– Presentation Tips: Serve the soup in rustic bowls with a sprinkle of fresh basil on top and a drizzle of olive oil for an elegant touch.
Slow Cooker Creamy Tuscan Lentil Soup
Ingredients
- 1 cup green or brown lentils, rinsed
- 1 medium onion, diced
- 2 cloves garlic, minced
- 2 medium carrots, diced
- 1 stalk celery, diced
- 1 can (14 oz) diced tomatoes, with juices
- 4 cups vegetable broth
- 1 cup coconut milk (or heavy cream for a richer flavor)
- 2 cups fresh spinach, roughly chopped
- 1 teaspoon dried oregano
- 1 teaspoon dried basil
- to taste salt and pepper
- 2 tablespoons olive oil
- optional fresh basil for garnish
Instructions
- In the bowl of your slow cooker, add the rinsed lentils, diced onion, minced garlic, carrots, and celery.
- Pour in the diced tomatoes along with their juices and the vegetable broth. Stir to combine the ingredients.
- Drizzle the olive oil over the mixture and add the dried oregano and basil. Season with salt and pepper to taste.
- Cover the slow cooker and set it to cook on low for 6-8 hours or on high for 3-4 hours, until the lentils are tender.
- About 30 minutes before serving, stir in the coconut milk (or heavy cream) and the chopped spinach. Allow the soup to continue cooking until the spinach is wilted and tender.
- Once done, taste the soup and adjust seasoning as needed. If desired, use an immersion blender to puree a small portion of the soup for a creamier texture while leaving some lentils whole for texture.
- Serve hot, garnished with fresh basil if using.
- Presentation Tips: Serve the soup in rustic bowls with a sprinkle of fresh basil on top and a drizzle of olive oil for an elegant touch.


![- 1 medium head of cauliflower, cut into florets - 2 tablespoons olive oil - 1 teaspoon smoked paprika - 1 teaspoon ground cumin - 1 teaspoon garlic powder - Salt and pepper to taste - 8 small corn tortillas - 1 cup red cabbage, thinly sliced - 1 avocado, sliced - 1/4 cup fresh cilantro, chopped - Lime wedges, for serving When making roasted cauliflower tacos, the key is to choose fresh, high-quality ingredients. Start with a firm head of cauliflower. Look for florets that are tight and free of brown spots. This ensures your cauliflower is fresh and flavorful. Next, olive oil plays a crucial role. It helps the cauliflower roast evenly and adds richness. You can use other oils, but olive oil enhances the taste best. Seasonings are where the magic happens. Smoked paprika gives a lovely depth. Ground cumin adds warmth, while garlic powder boosts flavor. Don't forget to season with salt and pepper. These basic seasonings are essential for bringing out the natural flavors of the cauliflower. Tortillas are the base of your tacos. Small corn tortillas add a nice texture. They are soft and hold the fillings well. Fresh toppings like red cabbage and avocado add crunch and creaminess. Finally, lime wedges are a must. They add a burst of zest that brightens up the whole dish. This recipe brings together all these ingredients to create a vibrant, delicious meal. For the full recipe, refer to the earlier section. First, you need to preheat your oven to 425°F (220°C). This heat makes the cauliflower crispy and tasty. Next, take a large bowl and toss the cauliflower florets with olive oil. Add smoked paprika, ground cumin, garlic powder, salt, and pepper. Mix it well until every piece gets coated. This step is key for flavor. Now, arrange the seasoned cauliflower on a baking sheet. Make sure the florets are in a single layer. This helps them roast evenly. Place the baking sheet in the preheated oven. Roast the cauliflower for about 25 to 30 minutes. You want them golden brown and tender. Remember to toss them halfway through. This helps them cook evenly. While the cauliflower roasts, take a dry skillet and warm the corn tortillas over medium heat. Heat each side for about 30 seconds. They should be soft and slightly charred. Now it’s time to build your tacos! Start with a corn tortilla and layer on a generous amount of roasted cauliflower. Then, add sliced red cabbage and avocado. Sprinkle fresh cilantro on top for that bright flavor. Don’t forget to serve your tacos with lime wedges. Squeeze some lime over the tacos for an extra zing. Enjoy every bite of your delicious roasted cauliflower tacos! You can find the [Full Recipe] for more details. Roasting cauliflower brings out its natural sweetness. I love it more than grilling. Roasting gives you a crispy outside and a tender inside. To achieve this, use high heat. Preheat your oven to 425°F (220°C). Spread the cauliflower in a single layer. This helps it roast evenly. Spices make a big difference. Try smoked paprika for a deep flavor. Ground cumin adds warmth, while garlic powder gives a nice touch. You can also add chili powder for heat. For balance, serve your tacos with fresh toppings. Red cabbage adds crunch, while avocado brings creaminess. Pair your tacos with simple sides. I recommend black beans or a fresh salad. These sides add fiber and nutrients. For toppings, you can get creative! Try pickled onions for tang, or a drizzle of spicy sauce for extra kick. Don't forget lime wedges for zest! They brighten every bite. {{image_2}} You can easily adjust this recipe to fit your needs. For a gluten-free option, use corn tortillas. They add a nice crunch and pair well with the roasted cauliflower. If you want a vegan meal, this recipe is already vegan! It uses no meat or dairy. You can also try low-carb options by using lettuce wraps instead of tortillas. This keeps the meal light and fresh. Feel free to swap out cauliflower for other veggies. Broccoli or Brussels sprouts work well too. Each veggie brings a unique taste. You can use sweet potatoes for a sweet twist. When it comes to tortillas, consider using whole wheat or spinach wraps. They add different flavors and colors to your tacos. Try giving your tacos an international flair! For an Asian twist, add soy sauce and sesame oil to the cauliflower before roasting. Top with pickled veggies and sriracha. For Mediterranean flavors, use herbs like oregano and serve with tzatziki sauce. You can also add seasonal produce. In summer, fresh corn and tomatoes shine. In fall, roasted squash adds warmth. These variations keep your tacos exciting and new. Check out the Full Recipe for more details! To keep your tacos fresh, store them in a sealed container. Place them in the fridge right away. They will stay good for about three days. If you want to keep the tacos crispy, store the cauliflower and tortillas separately. Wrap the tortillas in foil or plastic wrap to avoid drying out. When you want to eat the leftovers, reheat them gently. You can use a skillet on low heat. Just warm the cauliflower for a few minutes. This helps it stay tasty and not soggy. For an easy option, pop them in the microwave for about 30 seconds. If you have leftover cauliflower, add it to salads or grain bowls for extra flavor. You can freeze roasted cauliflower too! Just let it cool down before you pack it. Place it in a freezer bag and squeeze out the air. It can last up to three months in the freezer. For tortillas, stack them and wrap tightly before freezing. When you’re ready to use them, thaw the cauliflower in the fridge overnight. Warm the tortillas in a skillet before serving. For more details, check the Full Recipe. Yes, you can make these tacos ahead of time. They are great for breakfast, lunch, or quick meals. If you want to prepare in advance, roast the cauliflower and store it in the fridge. Warm it up when you are ready to eat. You can also prepare the toppings ahead. Just slice the avocado and cabbage, then keep them in separate containers. This way, you can enjoy fresh tacos anytime! Toppings can make your tacos shine. Here are some great ideas: - Sliced red cabbage adds crunch. - Avocado gives a creamy texture. - Fresh cilantro brings bright flavor. - Lime wedges add a zesty kick. - You can also use salsa or hot sauce for spice. Mix and match to find your favorites! You can use frozen cauliflower, but it needs some tips. Thaw the cauliflower first and drain any water. This keeps your tacos from getting soggy. You may need to roast them a bit longer to get them crispy. Check them halfway to see if they need more time. Frozen cauliflower can still taste great in your tacos! This blog post covers the delicious journey of making roasted cauliflower tacos. We explored the key ingredients, detailed step-by-step instructions, and shared tips for enhancing flavor. You learned how to store leftovers and adapt recipes to meet different dietary needs. Remember, you can enjoy these tacos in many creative ways. Try new toppings or flavors to keep things fresh. Delicious meals should always spark joy and inspire you to cook more. Dive into this tasty recipe and enjoy every bite!](https://dailydishlab.com/wp-content/uploads/2025/06/61582cbb-5ce3-472b-acca-9a15eb330d0c-768x768.webp)

![To make this tasty dish, you need some key items. Here is what you will need: - 2 cups cooked pasta (penne or rotini works best) - 1 lb chicken breast, diced - 8 oz mushrooms, sliced - 2 cups broccoli florets (fresh or frozen) - 3 cups Alfredo sauce (store-bought or homemade) - 1 cup shredded mozzarella cheese - ½ cup grated Parmesan cheese - 2 tablespoons olive oil - 2 cloves garlic, minced - Salt and pepper to taste - 1 teaspoon Italian seasoning These ingredients create a rich and creamy flavor that everyone will love. The right seasonings make your casserole pop. Salt and pepper add basic flavor. Italian seasoning gives it a nice herbal touch. I often use fresh garlic to add depth. The garlic will make your kitchen smell amazing as it cooks. Don’t skip these steps; they make a big difference! Garnishes can make your dish look more inviting. I like to use fresh parsley for a burst of color. You can also add extra cheese on top if you want a cheesier finish. These little touches make your casserole feel special and more appealing. Use what you enjoy most! If you want the full details, check the Full Recipe. Start by gathering your ingredients. You need cooked pasta, chicken, mushrooms, broccoli, and sauce. Also, have mozzarella and Parmesan cheese ready. Dice the chicken and slice the mushrooms. This helps the cooking go fast. Mince the garlic too. Don’t forget to measure out the olive oil and seasonings. In a large skillet, heat olive oil over medium heat. Once hot, add the diced chicken. Season it with salt, pepper, and Italian seasoning. Cook for 5-7 minutes until the chicken turns white. It should not be pink inside. Next, add minced garlic and sliced mushrooms. Sauté these for 3-4 minutes. The mushrooms will become soft and tasty. Finally, stir in the broccoli florets. Cook for an extra 2 minutes until they turn bright green. In a big bowl, mix the cooked pasta with the chicken and vegetables. Pour in the Alfredo sauce and stir well. Make sure everything is coated evenly. Transfer this mixture to a greased baking dish. Spread it out evenly. Now, top it with mozzarella and Parmesan cheese. Bake it in a preheated oven at 375°F for 25-30 minutes. Look for bubbly, golden cheese on top. When it’s ready, let it cool for 5 minutes before serving. You can find the Full Recipe for more details and serving tips. To cook chicken well, use a skillet over medium heat. First, add olive oil and let it warm. Then, add diced chicken to the hot oil. Season with salt, pepper, and Italian seasoning. Cook for 5-7 minutes until the chicken turns white and is no longer pink. This step ensures juicy chicken for your casserole. The key to creamy Alfredo sauce is gentle heating. If you use store-bought sauce, warm it on low heat. If you make it from scratch, stir constantly to avoid lumps. You want it smooth and silky. Mix the sauce well with pasta before adding other ingredients. This helps coat everything evenly and keeps it creamy. Ovens can vary, so check your casserole while it bakes. I suggest baking for 25-30 minutes. If the top isn’t golden, leave it for a few more minutes. To avoid overcooking, always look for bubbling cheese. When the cheese is melted and golden, it’s ready to serve. Adjust your time based on your oven’s heat. {{image_2}} You can switch out the chicken for other meats. Try diced turkey or cooked ham. Shrimp works well too. Each option adds a different taste to the dish. You can also use ground beef for a heartier flavor. Just make sure it's fully cooked. If you want a meatless meal, skip the chicken. Replace it with tofu or tempeh. Both will soak up the sauce and add protein. You can also use chickpeas for a fun twist. This way, you keep it filling and tasty. Boost the health of your casserole by adding more vegetables. Spinach, bell peppers, or zucchini are great choices. You can mix in frozen peas or corn too. Just remember to keep the cooking time in mind. You want all the veggies to be tender but not mushy. They add color and flavor to your dish! To keep your Chicken and Mushroom Alfredo Casserole fresh, store it in an airtight container. Place it in the fridge right after it cools down. It will stay good for up to three days. Make sure to label the container with the date. This helps you track how long it has been stored. When you’re ready to enjoy your leftovers, preheat your oven to 350°F (175°C). Place the casserole in an oven-safe dish. Cover it with foil to keep it moist. Heat for about 20 minutes or until it's warm all the way through. You can also use the microwave. Just heat in short bursts and stir in between until hot. If you want to save the casserole for later, freezing is a great option. Allow the dish to cool completely before freezing. Use a freezer-safe container or wrap it tightly in plastic wrap and foil. It can last for up to three months in the freezer. To reheat, thaw it overnight in the fridge and then bake as mentioned above. Enjoy your creamy, cheesy meal anytime! Yes, you can make this dish ahead of time. Prepare the casserole, but do not bake it. Cover it tightly with plastic wrap or foil. Store it in the fridge for up to two days. When you are ready to eat, bake it straight from the fridge. Just add a few extra minutes to the cooking time. This keeps the flavors fresh and tasty. If you need a substitute, try cream cheese mixed with milk. This gives a creamy texture. You can also use a white sauce made from butter, flour, and milk. For a lighter option, consider using Greek yogurt mixed with a bit of cheese. These options will still keep your casserole rich and delicious. Yes, frozen chicken and vegetables work well in this recipe. If using frozen chicken, thaw it first. Cut it into small pieces before cooking. For frozen vegetables, you can add them straight to the skillet. Just cook them a little longer to ensure they heat through. This makes the prep easy and quick, while still tasting great. You can find the full recipe for Chicken and Mushroom Alfredo Casserole [Full Recipe]. This blog covered everything you need for Chicken and Mushroom Alfredo Casserole. We discussed the ingredients, from required items to tasty garnishes. I shared easy steps for preparing, cooking, and assembling the dish. Plus, I gave tips for perfect chicken and sauce. We explored variations, storage, and answered common questions. Creating this dish can be simple and fun. You can enjoy different flavors and textures. Don't hesitate to try your own spin on it. Enjoy your cooking adventure!](https://dailydishlab.com/wp-content/uploads/2025/06/668e601b-10d5-4ca8-81a3-3ea93e17acf1-768x768.webp)