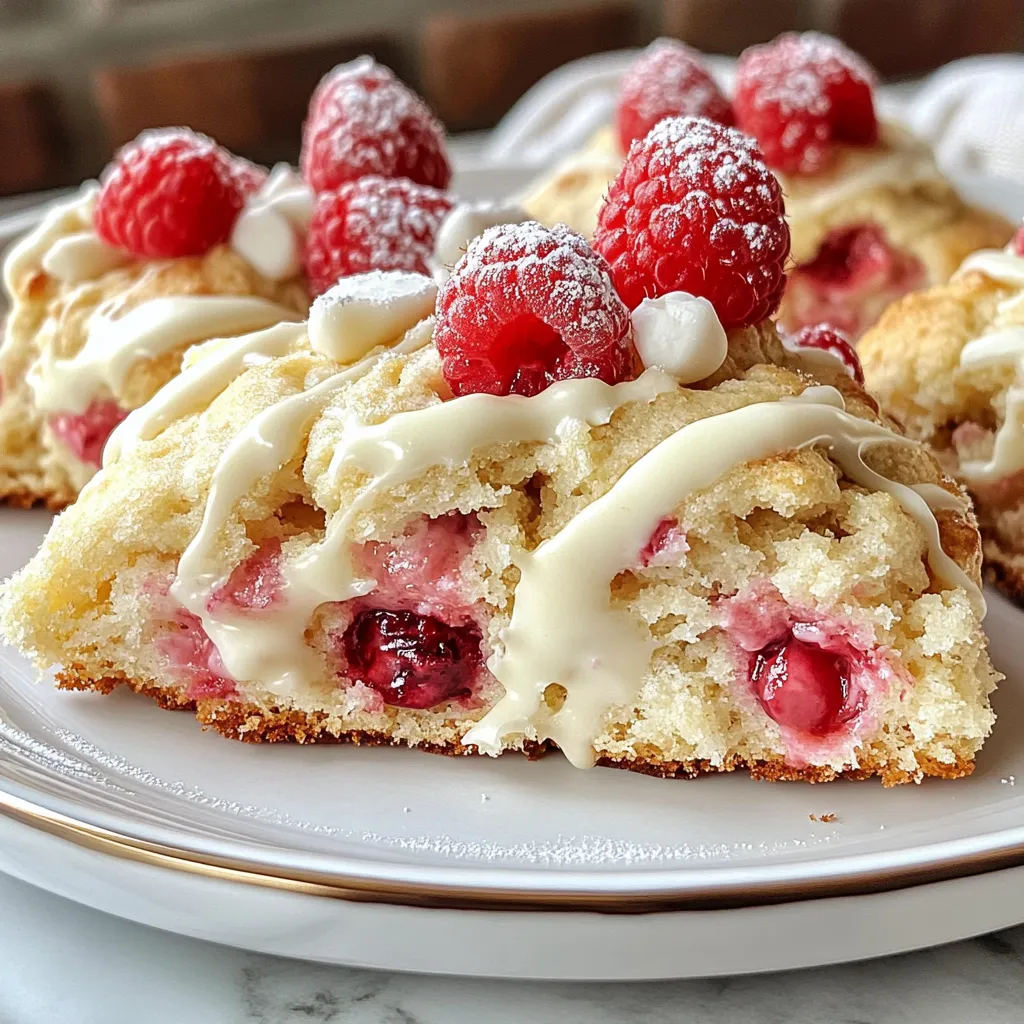
Raspberry White Chocolate Scones Easy and Delicious Treat


Want an easy and delicious treat that will impress everyone? My Raspberry White Chocolate Scones are just what you need! With fresh raspberries and creamy chocolate, they melt in your mouth. In this post, I’ll share simple steps, tips for perfecting your scones, and fun variations to try. Let’s dive into making this delightful treat that’s perfect for any occasion!
Why I Love This Recipe
- Delicious Flavor Combination: The tartness of fresh raspberries pairs perfectly with the sweetness of white chocolate, creating a delightful balance in every bite.
- Easy to Make: This recipe requires just a few simple ingredients and can be prepared in under 40 minutes, making it perfect for a quick breakfast or afternoon treat.
- Perfect for Any Occasion: Whether it’s a cozy weekend brunch or a special gathering, these scones are a crowd-pleaser that everyone will enjoy.
- Customizable: You can easily adapt this recipe by adding different fruits or chocolate types, allowing for endless variations to suit your taste.
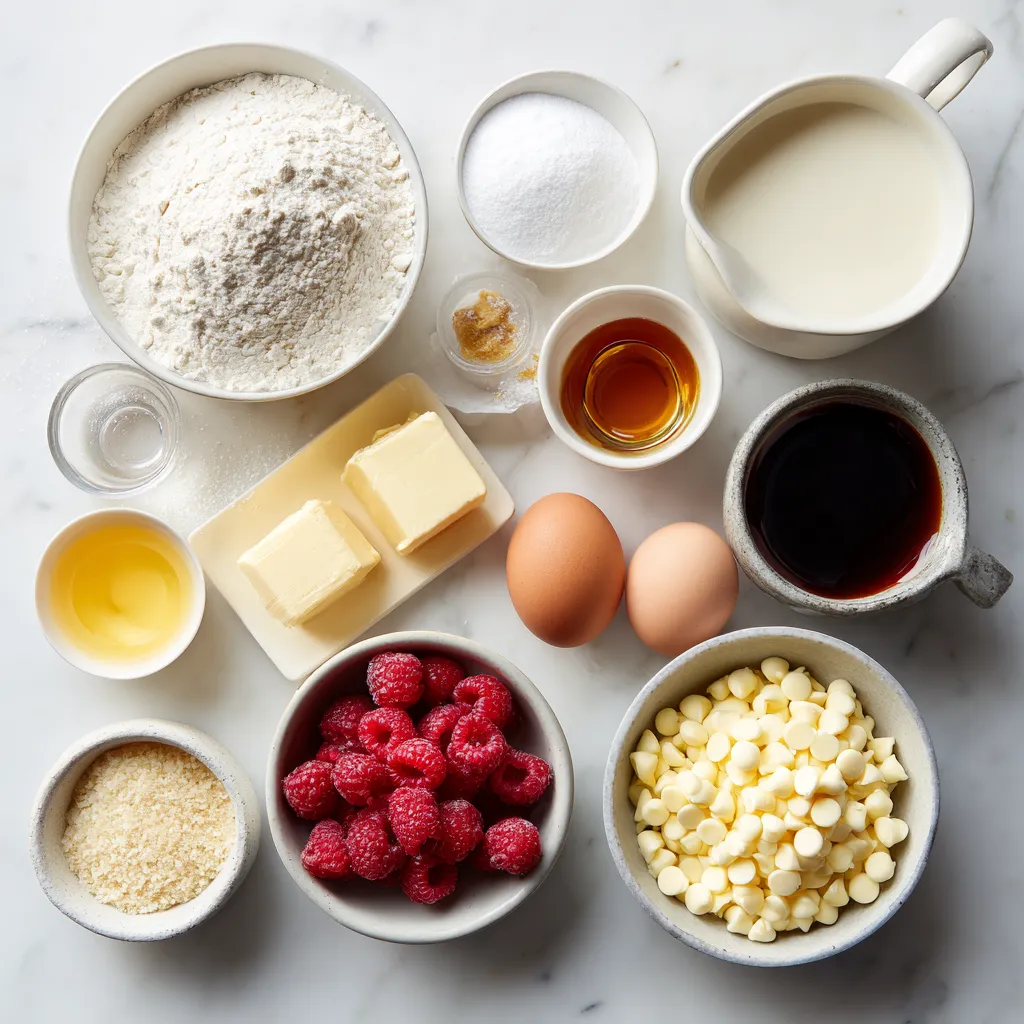
Ingredients
Full list of ingredients needed
To make Raspberry White Chocolate Scones, gather these ingredients:
- 2 cups all-purpose flour
- 1 tablespoon baking powder
- 1/4 teaspoon salt
- 1/4 cup granulated sugar
- 1/2 cup unsalted butter, cold and cubed
- 1/2 cup heavy cream
- 1 large egg
- 1 teaspoon vanilla extract
- 3/4 cup fresh raspberries
- 1/2 cup white chocolate chips
- Extra cream for brushing
- Raw sugar for sprinkling
Measurements and substitutions
For the flour, you can use whole wheat flour for a nuttier taste. If you want a dairy-free option, try coconut cream instead of heavy cream. You can swap the white chocolate chips for dark chocolate chips if you prefer a richer flavor. Use frozen raspberries if fresh ones are not available; just be careful not to overmix.
Tips for choosing quality ingredients
Always pick fresh raspberries; they should be firm and bright red. For butter, choose unsalted for better control over the scone’s sweetness. Use pure vanilla extract instead of imitation for a more natural taste. When it comes to chocolate, select high-quality white chocolate chips for a creamy melt. These choices will enhance your scones and elevate your baking experience!
Step-by-Step Instructions
Prepping the oven and baking sheet
First, set your oven to 400°F (200°C). This high heat helps the scones rise well. Next, line a baking sheet with parchment paper. This prevents the scones from sticking and makes cleanup easy.
Mixing dry ingredients
In a large bowl, combine 2 cups of all-purpose flour, 1 tablespoon of baking powder, 1/4 teaspoon of salt, and 1/4 cup of granulated sugar. Whisk these dry ingredients together until they mix well. This step ensures that the baking powder spreads evenly.
Combining wet ingredients and forming the dough
In another bowl, whisk together 1/2 cup of heavy cream, 1 large egg, and 1 teaspoon of vanilla extract. Mix until it looks smooth. Now, pour this wet mixture into the dry ingredients. Stir gently until just combined. Be careful not to overmix. This will keep the scones light and fluffy.
Shaping and cutting the scones
Turn the dough onto a floured surface. Shape it into a disc that is about 1 inch thick. Use a sharp knife to cut the disc into 8 wedges. Place each wedge on the prepared baking sheet. Make sure to leave some space between each scone.
Tips for perfect baking time and temperature
Brush the tops of the scones with extra cream for a golden finish. Sprinkle raw sugar on top for a nice crunch. Bake for 18-22 minutes. Check for a golden color and a clean toothpick when inserted. Let the scones cool for a few minutes on the baking sheet before moving them to a wire rack. Enjoy them warm for the best taste!
Tips & Tricks
How to achieve the perfect scone texture
To get that soft and fluffy scone, handle your dough gently. Overmixing can ruin the texture. When you mix wet and dry ingredients, stir just until combined. The dough should be a bit sticky. Use cold butter and cream; this helps create layers.
Common mistakes to avoid when making scones
One big mistake is using warm butter. Cold butter makes a lighter scone. Another error is not measuring flour correctly. Too much flour can make the scones dry. Avoid pressing the dough too hard when shaping it. Keep it light and airy for the best results.
Storage tips for leftover scones
If you have leftover scones, store them in an airtight container. They stay fresh for about two days at room temperature. For longer storage, freeze them. Wrap each scone in plastic wrap and place them in a freezer bag. They last up to three months in the freezer. Just reheat them in the oven when you’re ready to enjoy!
Pro Tips
- Use Cold Butter: Make sure your butter is very cold. This helps create flaky layers in the scones as the butter melts during baking.
- Don’t Overmix: When combining the wet and dry ingredients, mix just until combined. Overmixing can lead to tough scones.
- Fresh Raspberries: Use fresh raspberries for the best flavor and texture. If using frozen, be careful as they can make the dough too wet.
- Brush with Cream: Brushing the tops with cream before baking gives the scones a beautiful golden color and a slightly crunchy texture.
Variations
Alternative fruit options
You can switch out raspberries for other fruits. Blueberries work great in this recipe. Strawberries also add a nice sweet touch. You could even try diced peaches or cherries. Just make sure the fruit is fresh and ripe. This keeps your scones tasting amazing.
Adding different types of chocolate
While white chocolate is sweet, you can try dark or milk chocolate instead. Dark chocolate gives a rich flavor that pairs well with fruit. Milk chocolate adds extra sweetness, perfect for those who love a sweeter bite. You can mix and match chocolate types for fun flavor combos.
Gluten-free or dairy-free adaptations
To make these scones gluten-free, use a gluten-free flour blend. Look for one that has a good mix of ingredients. For a dairy-free version, swap the butter for coconut oil or a vegan butter. Use almond or oat milk in place of heavy cream. These adaptations keep the scones tasty and enjoyable for everyone!
Serving Suggestions
Pairing with jams and spreads
Raspberry white chocolate scones taste amazing with jams. I love to serve them with raspberry jam. It adds a fruity burst that matches the scones. You can also try clotted cream for a rich touch. Honey or lemon curd works too. Each spread adds a unique flavor twist.
Recommended beverages to enjoy with scones
A warm cup of tea pairs perfectly with these scones. Try a nice Earl Grey or chamomile tea. Coffee is another great choice, especially a smooth latte. If you want something fruity, a berry smoothie is refreshing. Each drink enhances the scone experience.
Ideas for presentation and serving
Serve the scones warm for the best taste. I like to dust them with powdered sugar. Place them on a pretty plate to impress your guests. You can also add fresh raspberries on the side. Use a small bowl for jams or clotted cream. The colors and textures make the meal look special.
FAQs
How do I know when the scones are done baking?
You can tell scones are done when they turn golden brown. A toothpick inserted in the center should come out clean. If it has wet dough on it, give them a few more minutes. The tops should feel firm to the touch.
Can I freeze unbaked scones?
Yes, you can freeze unbaked scones! Shape the scones and place them on a baking sheet. Freeze them for about an hour, then transfer them to a freezer bag. They can last in the freezer for up to three months. When ready to bake, add a few extra minutes to the baking time.
What’s the best way to reheat scones?
To reheat scones, preheat your oven to 350°F (175°C). Place the scones on a baking sheet. Heat them for about 5 to 10 minutes. This method keeps them soft and warm. You can also microwave them for about 15 seconds but they may become a bit tough.
How can I enhance the flavor of scones?
You can enhance the flavor of scones by adding spices. A pinch of cinnamon or nutmeg works well. You can also try adding citrus zest, like lemon or orange, for a fresh taste. Using high-quality ingredients, like real vanilla extract, makes a big difference too.
You learned the key ingredients and how to prep them for scones. We explored step-by-step instructions to make baking easy. I shared tips and tricks to avoid common mistakes and ensure great texture. You can also try fun variations to suit your taste. Finally, serving ideas help elevate your scone experience.
Baking scones can be simple and rewarding. Use this guide to impress friends and family with your delicious treats. Enjoy your time in the kitche

![To make chewy oatmeal raisin cookies, you need key ingredients. Here is what you should have: - 1 cup all-purpose flour - 1 teaspoon baking soda - 1 teaspoon cinnamon - 1/2 teaspoon salt - 1/2 cup unsalted butter, softened - 3/4 cup brown sugar, packed - 1/4 cup granulated sugar - 1 large egg - 1 teaspoon vanilla extract - 1 1/2 cups old-fashioned oats - 1 cup raisins These ingredients work together to create that soft and chewy texture. The oats give the cookies a hearty feel, while the raisins add natural sweetness. You can make your cookies even better with some optional add-ins. Here are a few ideas: - 1/2 cup chopped walnuts - 1/2 cup chocolate chips - 1/2 cup shredded coconut Feel free to mix and match these extras. Each add-in brings its own tasty twist. The walnuts add crunch, while chocolate chips can make them extra special. Choosing the right ingredients matters a lot. Here are some tips: - Butter: Use unsalted butter for better control over saltiness. - Oats: Choose old-fashioned oats for the best texture. - Raisins: Look for fresh, plump raisins; they should not be dry or hard. Fresh ingredients lead to better cookies. Always check expiration dates. For the full recipe, see the recipe section above. To start, gather all your ingredients. You will need flour, baking soda, cinnamon, salt, butter, brown sugar, granulated sugar, an egg, vanilla, oats, raisins, and optional walnuts. 1. Preheat your oven to 350°F (175°C). Line a baking sheet with parchment paper. 2. In a medium bowl, whisk the flour, baking soda, cinnamon, and salt. Set this aside. 3. In a large bowl, cream together the softened butter, brown sugar, and granulated sugar. Mix until it’s light and fluffy. 4. Beat in the egg and vanilla extract until everything is well combined. 5. Gradually mix the dry ingredients into the wet mixture. Stir until just combined. 6. Lastly, fold in the oats, raisins, and walnuts (if you’re using them). Now it’s time to bake! 1. Use a spoon to drop rounded tablespoons of dough onto your prepared baking sheet. Leave about 2 inches between each mound. 2. Bake in your preheated oven for 10-12 minutes. Look for golden edges, but keep the centers soft. Once baked, let the cookies cool. 1. Allow them to sit on the baking sheet for 5 minutes. This helps them set. 2. Carefully transfer the cookies to a wire rack to cool completely. 3. If you want to store them, keep them in an airtight container. They stay fresh for several days. For the full recipe, visit the recipe section above. Enjoy your chewy oatmeal raisin cookies! To get that perfect chewy texture in your cookies, use old-fashioned oats. They soak up moisture well, keeping your cookies soft. Also, do not overmix the dough. Just mix until the dry ingredients blend in. This keeps your cookies tender. Lastly, take them out of the oven while they still look a bit soft. They will firm up as they cool. One common mistake is using quick-cooking oats instead of old-fashioned oats. Quick oats can make your cookies dry. Another mistake is baking them too long. Watch the edges; they should be golden, but the center must stay soft. Lastly, make sure your butter is softened, not melted. Melted butter can change your cookie’s texture. For a lovely presentation, place the cookies on a nice platter. Dust them lightly with powdered sugar for a sweet touch. You can also serve them with a bowl of fresh fruit. Adding a side of flaxseeds or sunflower seeds gives a nice crunch. These ideas make your cookies not just tasty but also pretty! For the full recipe, check back to ensure you have all the steps. {{image_2}} You can make your cookies healthier. Use whole wheat flour instead of all-purpose flour. This adds fiber and nutrients. You can also swap in coconut oil for butter. This change gives a nice flavor and is a great fat source. For sweetness, try using honey or maple syrup instead of sugar. This can cut down on refined sugars and add a unique taste. Get creative with flavors! Add dark chocolate chips for a richer taste. You can also mix in dried cranberries or apricots for a fruity twist. Try spices like nutmeg or ginger to add warmth. Even a splash of orange juice can brighten the cookies. These fun changes keep the recipe exciting and fresh! If you need gluten-free cookies, use almond flour or a gluten-free flour blend. Make sure your oats are labeled gluten-free. For vegan cookies, skip the egg and use flaxseed meal. Mix one tablespoon of flaxseed with three tablespoons of water and let it sit for a few minutes. This makes a great egg substitute. These options let everyone enjoy chewy oatmeal raisin cookies! For the full recipe, check out the details above. To keep your chewy oatmeal raisin cookies fresh, store them in an airtight container. You can place a piece of bread in the container to help keep them soft. The bread will absorb extra moisture, ensuring your cookies remain chewy. You can freeze the cookies if you want to save some for later. First, let the cookies cool completely. Then, place them in a single layer on a baking sheet. Freeze them for about an hour. Once they are firm, transfer them to a freezer bag or container. This way, you can enjoy them anytime! Stored cookies stay fresh for about one week at room temperature. In the freezer, they can last up to three months. When you are ready to eat frozen cookies, let them thaw at room temperature for a few minutes. For a warm treat, heat them in the oven for a few minutes. Don’t forget to check the [Full Recipe] for more tips! Your oatmeal raisin cookies may not be chewy for a few reasons. First, check your oven temperature. If it is too hot, the cookies may bake too fast and dry out. Second, over-mixing the dough can lead to tough cookies. Mix only until the ingredients combine. Lastly, using too much flour can also make them dry. Always measure flour correctly. Yes, you can substitute some ingredients in the recipe. If you do not have brown sugar, use white sugar instead. This will change the flavor a bit, but the cookies will still be good. For a dairy-free option, use coconut oil or a dairy-free butter. You can also swap raisins for chocolate chips or nuts if you like. To find the best chewy oatmeal raisin cookies, check local bakeries or farmers' markets. Many bakeries make fresh cookies daily. You can also look at online stores that specialize in baked goods. They often ship cookies right to your door. If you want to try some now, check out the Full Recipe for a simple and tasty way to make them at home! To make chewy oatmeal raisin cookies, use key ingredients like oats and raisins. Remember to mix in optional flavors for a fun twist. Follow the step-by-step guide to prepare, bake, and store your cookies. For perfect texture, avoid common baking mistakes. Explore creative variations like gluten-free or vegan recipes. Proper storage extends their lifespan. With these tips, you’ll bake delicious cookies every time. Enjoy the baking process and share with others to spread the joy!](https://dailydishlab.com/wp-content/uploads/2025/07/06db6db4-aa4f-466c-8591-6bfd0fae1d2e-768x768.webp)