Chickpea Tikka Masala Flavorful and Simple Recipe

Are you ready to bring a burst of flavor to your dinner table? My Chickpea Tikka Masala recipe is both tasty and easy to make, perfect for anyone craving a hearty meal. Packed with spices and creamy goodness, this dish is a hit with vegans and meat-lovers alike. Join me as we explore the simple steps, helpful tips, and variations to make it your own. Let’s dive in and create something delicious!
Why I Love This Recipe
- Quick and Easy: This recipe can be made in just 30 minutes, making it perfect for busy weeknights.
- Flavorful and Wholesome: The combination of spices and coconut milk creates a rich, comforting sauce that is both nourishing and satisfying.
- Vegetarian and Vegan-Friendly: Chickpeas are a great source of protein, making this dish ideal for anyone following a plant-based diet.
- Versatile Serving Options: Serve it over basmati rice or with warm naan for a delicious meal that can be easily adapted to your preferences.
Ingredients
Main Ingredients for Chickpea Tikka Masala
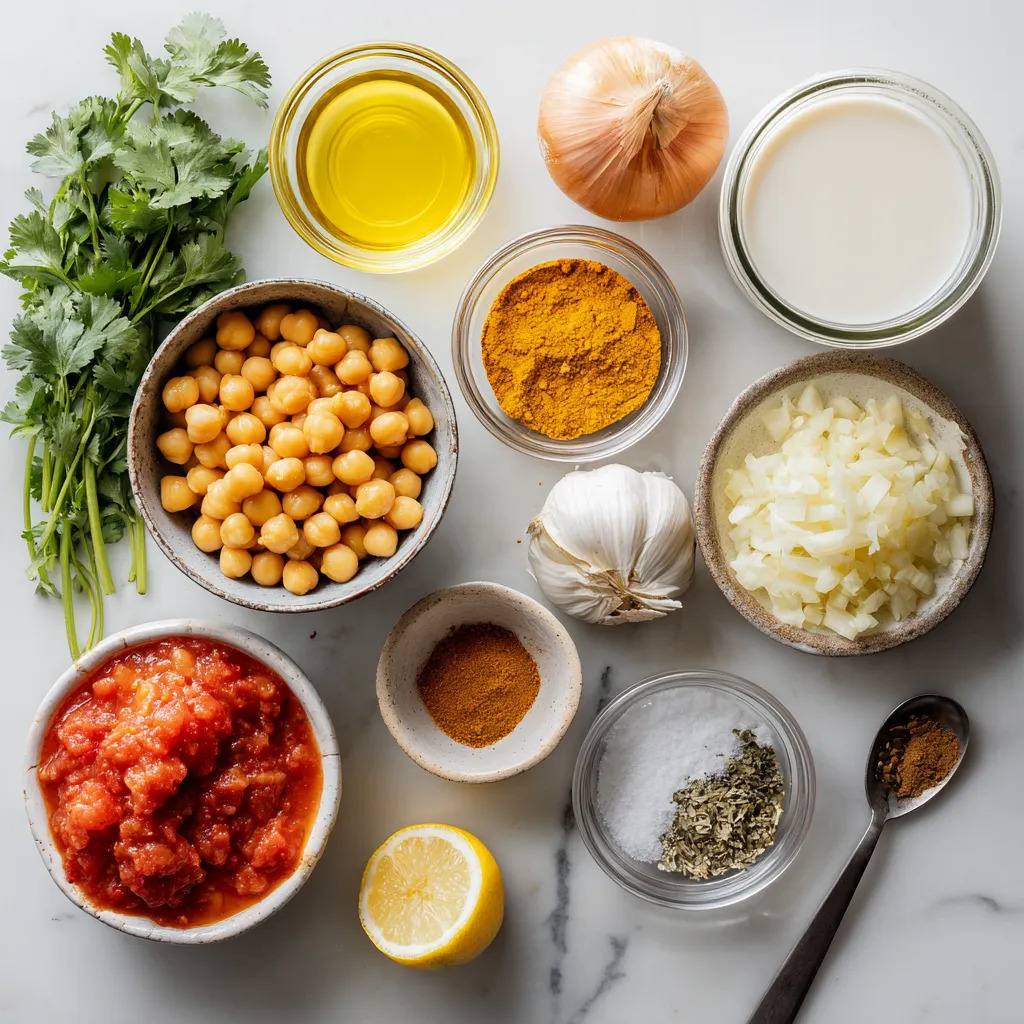
To make Chickpea Tikka Masala, you need some key ingredients:
- 2 cups canned chickpeas, drained and rinsed
- 2 tablespoons olive oil
- 1 large onion, finely chopped
- 4 cloves garlic, minced
- 1 tablespoon ginger, grated
- 2 tablespoons Tikka Masala spice blend
- 1 teaspoon ground cumin
- 1 teaspoon turmeric powder
- 1 can (14.5 oz) diced tomatoes
- 1 cup coconut milk
- 1 tablespoon lemon juice
- Salt and pepper to taste
- Fresh cilantro, for garnish
- Cooked basmati rice or naan, for serving
These ingredients work together to create a rich and flavorful dish.
Common Substitutes
If you don’t have all the ingredients, don’t worry! Here are some common substitutes you can use:
- Chickpeas: You can use white beans or lentils instead.
- Olive oil: Any cooking oil works well, like canola or vegetable oil.
- Coconut milk: Try using almond milk or regular milk for a different taste.
- Tikka Masala spice blend: You can mix curry powder with paprika as a quick fix.
- Lemon juice: Lime juice can give you a similar zing.
These swaps can help you make the dish with what you already have on hand.
Optional Garnishes
Garnishes can make your dish look and taste even better. Here are some tasty options:
- Fresh cilantro
- A squeeze of lemon juice
- A dollop of yogurt or sour cream
- Sliced green chilies for heat
Feel free to get creative with your garnishes. They can add color and extra flavor to your Chickpea Tikka Masala!
Step-by-Step Instructions
Preparing the Base
Start by heating 2 tablespoons of olive oil in a large skillet on medium heat. Once the oil is hot, add 1 large onion that you’ve finely chopped. Cook the onion for about 5 minutes. You want it to be soft and translucent. Next, add 4 cloves of minced garlic and 1 tablespoon of grated ginger. Stir them in and cook for 1 to 2 minutes. You will smell the nice aroma from the garlic and ginger.
Now it’s time to add the spices. Pour in 2 tablespoons of Tikka Masala spice blend, 1 teaspoon of ground cumin, and 1 teaspoon of turmeric powder. Stir everything together, letting the spices coat the onions. Let this cook for another 1 to 2 minutes. This will deepen the flavors.
Cooking the Chickpea Tikka Masala
Pour in a can of diced tomatoes, which is about 14.5 ounces. Make sure you include the juices. Stir everything together and let it simmer for about 5 minutes. This allows the flavors to meld nicely. After that, add 2 cups of drained and rinsed chickpeas. Give it a good stir.
Next, pour in 1 cup of coconut milk. Bring the mixture to a gentle simmer. Let it cook for 10 to 15 minutes. You want the sauce to thicken a bit. Once it’s done, add 1 tablespoon of lemon juice and season with salt and pepper to taste. Stir well and take it off the heat.
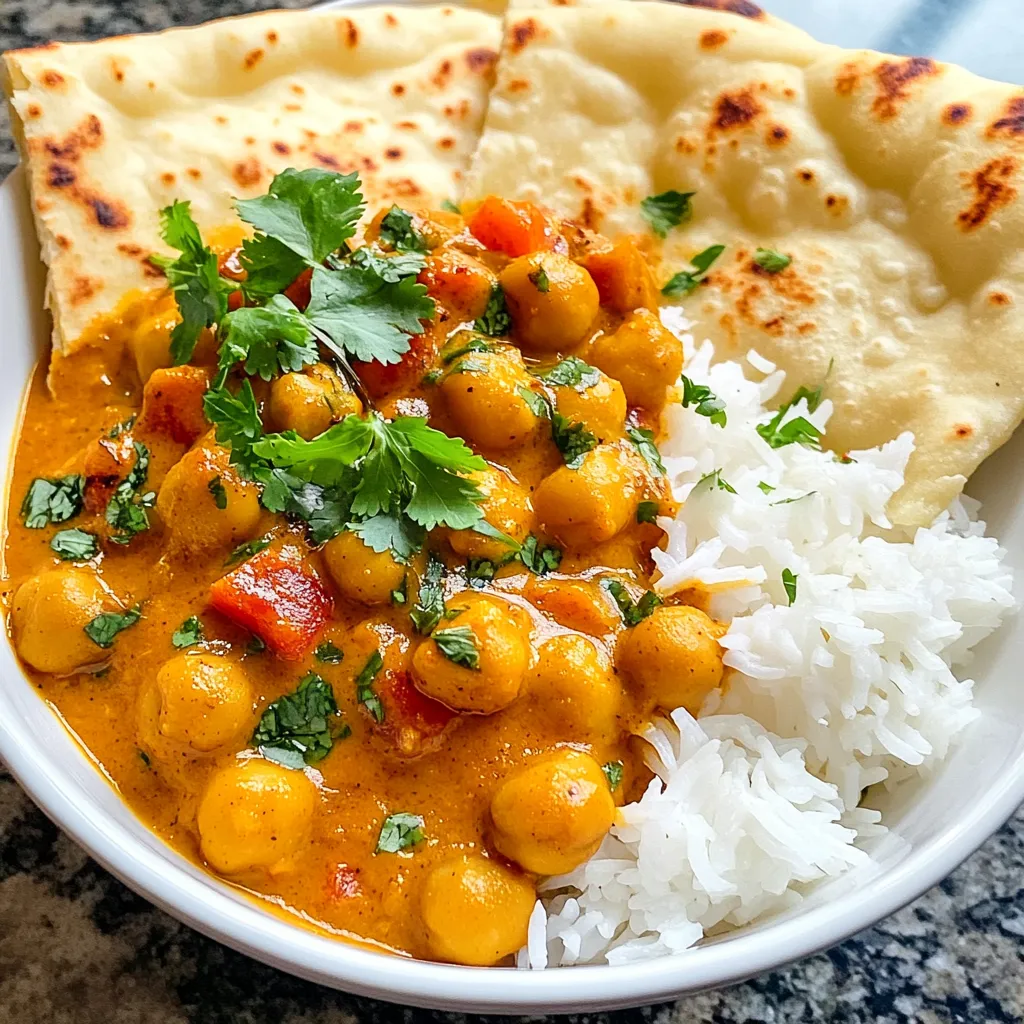
Serving Suggestions
Serve your chickpea tikka masala hot. Garnish it with fresh cilantro for a pop of color. Pair it with cooked basmati rice or warm naan for a complete meal. Enjoy the rich flavors and creamy texture!
Tips & Tricks
How to Achieve the Best Flavor
To get the best flavor in your Chickpea Tikka Masala, use fresh spices. Fresh spices bring more taste than old ones. Toast your spices in the pan for a minute before adding other ingredients. This step wakes up the spice oils and boosts their flavor. Also, add a squeeze of lemon juice at the end. This brightens the dish and balances the rich coconut milk.
Cooking Techniques to Perfect the Dish
Start by cooking your onions until they are soft and golden. This builds a strong flavor base. When adding garlic and ginger, don’t rush. Cook them just until they smell great. Stirring in the spices helps coat the onions well. This adds depth and warmth to the dish. Lastly, let your Chickpea Tikka Masala simmer gently. This allows all the flavors to meld and become rich.
Time-Saving Tips
If you want to save time, use canned chickpeas. They are quick and easy. You can also chop your onions and garlic ahead of time. This makes cooking faster. Another trick is to use a pre-made Tikka Masala spice blend. This cuts down on measuring spices. Finally, cook your basmati rice or naan while the tikka masala simmers. This way, everything is hot and ready to serve at the same time.
Pro Tips
- Use Fresh Spices: For the best flavor, use fresh Tikka Masala spices. Store your spices in a cool, dark place to maintain their potency.
- Adjust the Creaminess: If you prefer a creamier sauce, add more coconut milk. You can also use full-fat coconut milk for richer flavor.
- Make It Spicy: For a spicier dish, add chopped green chilies or a pinch of cayenne pepper to the skillet when cooking the onions.
- Serve with Sides: Pair the chickpea tikka masala with a side of raita (yogurt sauce) or a fresh salad to balance the spices.

Variations
Vegan and Vegetarian Adaptations
Chickpea Tikka Masala is naturally vegan and vegetarian. You don’t need to change much. The main ingredients are already plant-based. Use coconut milk for creaminess. If you want more protein, add tofu or tempeh. Both soak up flavors well. You can also swap chickpeas for lentils for a twist.
Gluten-Free Substitutes
This dish is easy to make gluten-free. Use rice or gluten-free naan for serving. Most spice blends are gluten-free, but check labels. If you want a thicker sauce, use cornstarch instead of flour. Just mix it with water before adding it to the dish. This keeps the texture smooth and tasty.
Spicy vs. Mild Versions
Do you like heat? You can add fresh chili or cayenne pepper. Start with a small amount, then taste. If you want it milder, skip the heat. Use more coconut milk to balance flavors. You can also add a bit of sugar to tone down the spice. Adjust the heat to match your taste.
Storage Info
How to Store Leftovers
To store leftover chickpea tikka masala, let it cool first. After it cools, place it in an airtight container. You can keep it in the fridge for up to 4 days. Make sure the lid seals tightly to keep it fresh.
Reheating Instructions
When you are ready to eat, reheat the tikka masala on the stove or microwave. If using the stove, put it in a pan over low heat. Stir often to avoid sticking. If using the microwave, heat in short bursts, stirring in between. Make sure it’s hot all the way through before serving.
Freezing Chickpea Tikka Masala
You can freeze chickpea tikka masala for later. Place it in a freezer-safe container. Leave some space at the top for expansion. It will keep well for up to 3 months. To use it, thaw overnight in the fridge before reheating.
FAQs
What is Tikka Masala?
Tikka Masala is a popular Indian dish. It combines marinated meat or vegetables with a rich and spiced tomato sauce. The sauce often includes cream and yogurt, making it creamy and smooth. In our Chickpea Tikka Masala, we use chickpeas for protein and texture. The dish is full of flavor from spices like cumin, turmeric, and Tikka Masala blend.
Can I use dried chickpeas instead of canned?
Yes, you can use dried chickpeas. However, you’ll need to soak and cook them first. Soak the chickpeas overnight in water. The next day, boil them until they are soft. This process may take a bit longer than using canned chickpeas. But the taste will be fresh, and you’ll have more control over the texture.
What can I serve with Chickpea Tikka Masala?
Chickpea Tikka Masala pairs well with several sides. You can serve it with basmati rice or warm naan bread. Both options help soak up the delicious sauce. You might also add a side of steamed vegetables or a simple salad for freshness. Don’t forget to garnish with cilantro for a burst of color and flavor!
Chickpea Tikka Masala is simple and tasty. You learned about key ingredients, quick cooking steps, and smart tips. Variations suit many diets, making this dish flexible. Storing leftovers is easy too. Enjoying this recipe brings warmth and flavor to your meals. I hope you try it and have fun cooking. Your taste buds will thank yo

Chickpea Tikka Masala
Ingredients
- 2 cups canned chickpeas, drained and rinsed
- 2 tablespoons olive oil
- 1 large onion, finely chopped
- 4 cloves garlic, minced
- 1 tablespoon ginger, grated
- 2 tablespoons Tikka Masala spice blend
- 1 teaspoon ground cumin
- 1 teaspoon turmeric powder
- 1 can diced tomatoes (14.5 oz)
- 1 cup coconut milk
- 1 tablespoon lemon juice
- Salt and pepper to taste
- Fresh cilantro, for garnish
- Cooked basmati rice or naan, for serving
Instructions
- In a large skillet, heat the olive oil over medium heat. Add the finely chopped onion and sauté until soft and translucent, about 5 minutes.
- Stir in the minced garlic and grated ginger, cooking for an additional 1-2 minutes until fragrant.
- Add the Tikka Masala spice blend, ground cumin, and turmeric powder to the skillet. Stir well to coat the onions in the spices and cook for 1-2 minutes.
- Pour in the canned diced tomatoes (with juices) and stir to combine. Simmer for about 5 minutes, allowing the flavors to meld.
- Add the drained chickpeas and stir to incorporate. Pour in the coconut milk and bring to a gentle simmer. Cook for 10-15 minutes until the sauce thickens slightly.
- Add lemon juice and season with salt and pepper to taste. Stir well and remove from heat.
- Serve the chickpea tikka masala hot, garnished with fresh cilantro alongside cooked basmati rice or warm naan.


![- 6 boneless, skinless chicken thighs - 1/4 cup honey - 1/4 cup soy sauce - 1 tablespoon rice vinegar - 4 cloves garlic, minced - 1 tablespoon fresh ginger, grated For this dish, the main star is the chicken thighs. They are juicy and tender. The honey adds sweetness, while soy sauce brings depth. Rice vinegar gives a nice tang. Garlic and ginger add a burst of flavor. - 2 green onions, thinly sliced - Sesame seeds Garnishes make the dish pop. Green onions add a fresh crunch. Sesame seeds add a nutty touch. These small details can elevate your meal. - 2 tablespoons olive oil - Salt and pepper to taste - 1 teaspoon sesame oil Seasoning is key for great taste. Olive oil helps with cooking and flavor. Salt and pepper enhance the natural flavors. Sesame oil adds a rich aroma. You can adjust these to fit your taste. For the complete recipe, check out the [Full Recipe]. To start, gather your ingredients. In a medium bowl, whisk together: - 1/4 cup honey - 1/4 cup soy sauce - 1 tablespoon rice vinegar - 4 cloves garlic, minced - 1 tablespoon fresh ginger, grated - 2 tablespoons olive oil - 1 teaspoon sesame oil Mix until smooth. This honey garlic blend will give your chicken a sweet and tangy taste. Next, place the 6 boneless, skinless chicken thighs into a large resealable plastic bag or bowl. Pour the marinade over the chicken. Make sure each piece gets coated well. Seal the bag or cover the bowl. Refrigerate the chicken for at least 30 minutes. For even better flavor, marinate for up to 4 hours. You can choose to grill or pan-sear your chicken. - Grilling: Preheat your grill to medium-high heat. - Pan-searing: Heat a large skillet over medium heat. Once ready, take the chicken out of the marinade. Let the excess marinade drip off. Season your chicken with salt and pepper. Cook the chicken thighs for about 6-7 minutes on each side. Make sure they reach an internal temperature of 165°F (75°C) and get a nice caramelized look. In the last few minutes, you can brush some reserved marinade over the chicken. Just remember, only use marinade that has not touched raw chicken. Enjoy your meal! The full recipe is easy to follow, making a delicious dish. For the best flavor, marinate your chicken thighs for at least 30 minutes. You can let them sit for up to 4 hours for a bolder taste. Use a large resealable bag or a bowl to coat the chicken fully. Make sure you flip the bag or stir the bowl occasionally. This helps the marinade reach every spot. To check if your chicken is done, use a meat thermometer. The safe internal temperature is 165°F (75°C). This ensures the chicken is juicy and safe to eat. Always wash your hands and surfaces after touching raw chicken. It’s key to avoid cross-contamination. For serving, place the chicken thighs on a big platter. Drizzle some honey or leftover marinade over them for extra shine. Serve with steamed rice or colorful stir-fried vegetables for a complete meal. Garnish with green onions and sesame seeds for a beautiful look. Enjoy your dish! {{image_2}} You can add a bright flavor to your honey garlic chicken thighs. Just include some orange or lemon zest. This little move gives your dish a fresh taste. The citrus adds a nice zing that works well with the sweet honey. Simply mix the zest into your marinade for a tasty twist! Want to kick it up a notch? Try adding chili flakes or sriracha. This gives your chicken a spicy kick that balances the sweetness of the honey. Start with a little, then taste as you go. You can adjust the heat to match your preference. It’s a fun way to switch up the flavor! If you're looking for a lighter meal, use skinless chicken thighs. This keeps your dish flavorful without the extra fat. You can also swap regular soy sauce for low-sodium soy sauce. This small change makes your honey garlic chicken healthier while still tasting great. Small tweaks can lead to big benefits! For the full recipe, check out the detailed instructions to create your flavorful dish. Store your leftover honey garlic chicken thighs in an airtight container. This keeps them fresh. Ensure they cool down before sealing. They will stay good for up to four days in the fridge. If you want to eat them later, avoid leaving them out for more than two hours. This helps prevent bacteria growth. You can freeze cooked chicken thighs too. First, let them cool completely. Then, wrap each thigh in plastic wrap. Place them in a freezer-safe bag or container. They will last up to three months in the freezer. When you're ready to eat, move them to the fridge for overnight thawing. To reheat, use the oven for best results. Preheat the oven to 350°F (175°C). Place the chicken on a baking sheet and cover with foil. Heat for about 15-20 minutes, or until warmed through. You can also use a microwave. Just place the chicken on a plate, cover it, and heat for about 1-2 minutes. Check every 30 seconds to avoid overcooking. Reheating this way keeps the chicken juicy and tasty. For more detailed steps, check the Full Recipe. To make Honey Garlic Chicken Thighs, follow these simple steps: 1. Prepare the marinade by mixing honey, soy sauce, rice vinegar, minced garlic, grated ginger, olive oil, and sesame oil in a bowl. 2. Marinate the chicken in a bag or bowl for at least 30 minutes. 3. Cook the chicken on a grill or in a pan for about 6-7 minutes per side. 4. Glaze the chicken with some reserved marinade in the last minutes of cooking. 5. Rest and serve the chicken after cooking, garnished with green onions and sesame seeds. This process creates juicy, flavorful chicken with a sticky glaze that you will love. You have many options for side dishes that pair well with Honey Garlic Chicken Thighs: - Steamed rice - Stir-fried vegetables - Quinoa salad - Garlic mashed potatoes - Roasted broccoli Each of these sides complements the sweet and savory notes of the chicken. Yes, you can use chicken breasts, but there are pros and cons: - Pros: Chicken breasts are leaner and cook faster. - Cons: They can dry out more easily than thighs if overcooked. Chicken thighs offer more flavor and tenderness, making them a great choice for this recipe. Yes, this recipe is perfect for meal prep. Here are some tips: - Cook a larger batch and store in airtight containers. - Divide into single servings for easy lunches or dinners. - Keep the chicken in the fridge for up to four days or freeze for longer storage. Meal prepping makes it easy to enjoy delicious Honey Garlic Chicken Thighs all week! For the complete cooking process, check out the [Full Recipe]. This blog post covered a simple recipe for Honey Garlic Chicken Thighs. We explored the main ingredients, the marinade process, and cooking methods. I shared tips on marinating, cooking, and presenting your dish. You also learned about variations and how to store leftovers. In closing, enjoy the rich flavor of this dish. It’s easy to make, healthy, and perfect for sharing. Experiment with the variations to keep your meals exciting. Whether you grill or pan-sear, this recipe is sure to impress. Happy cooking!](https://dailydishlab.com/wp-content/uploads/2025/07/290d04f4-f0f3-4f16-8110-9751a8193952-768x768.webp)