
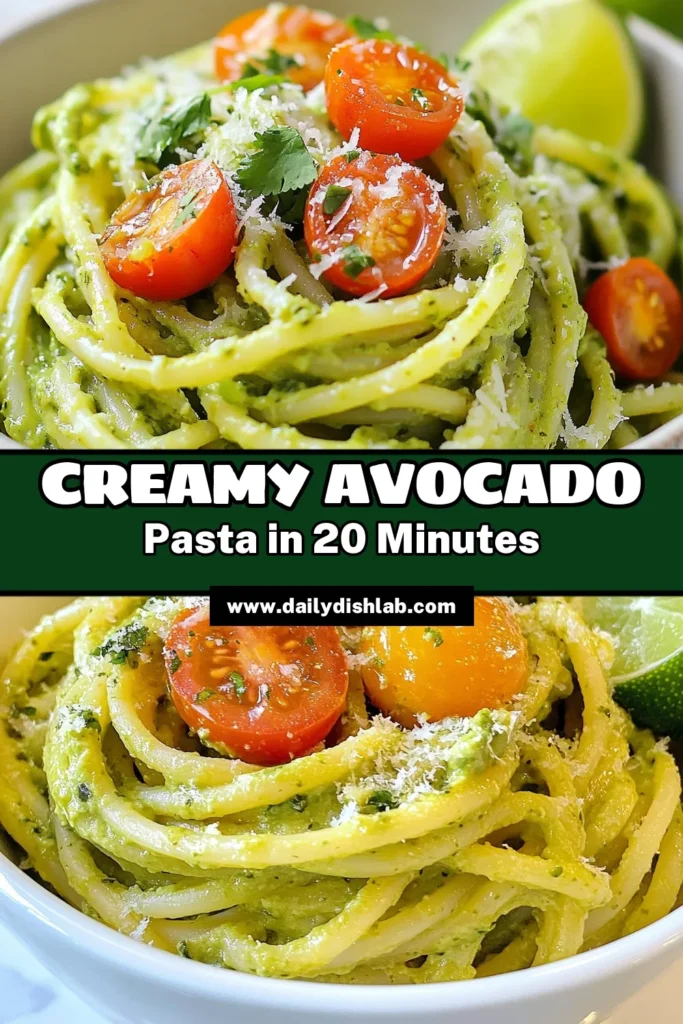
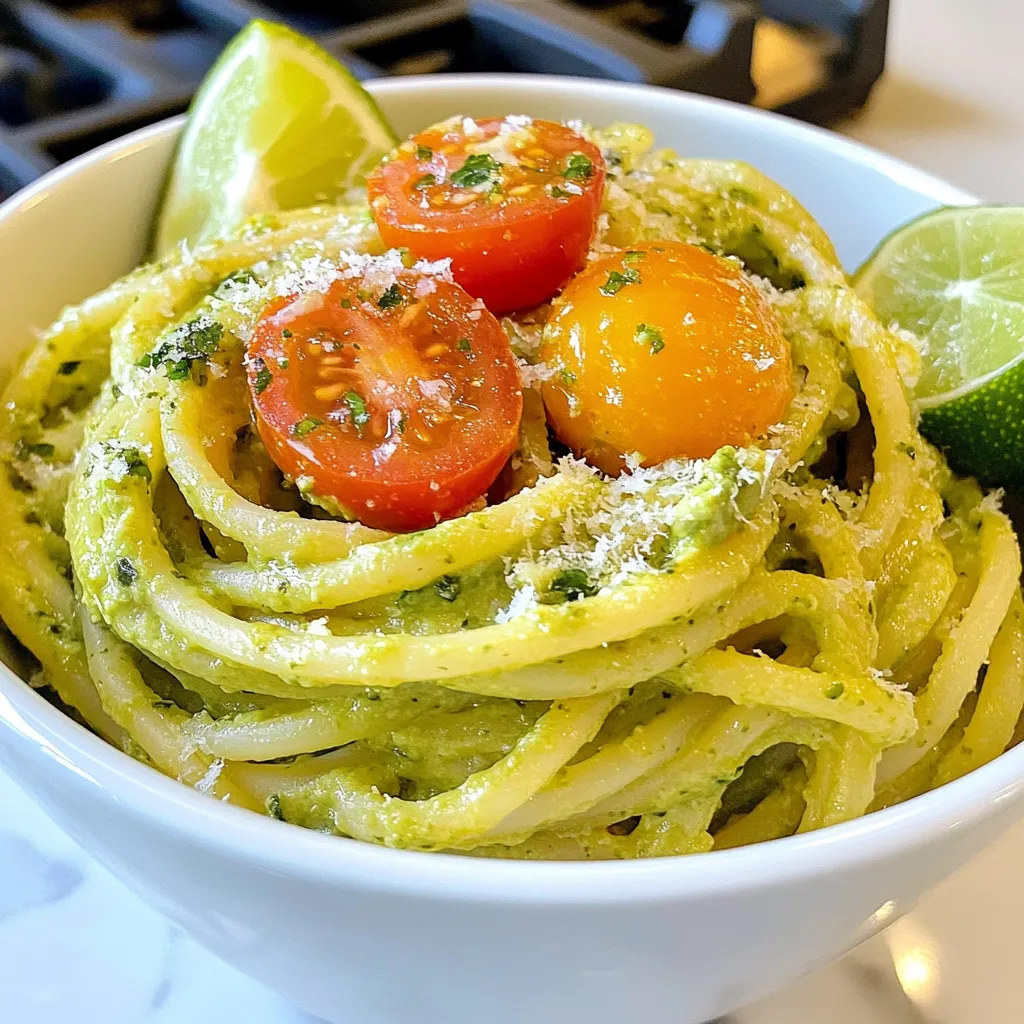
Creamy Avocado Cilantro Pasta Rich and Flavorful Dish
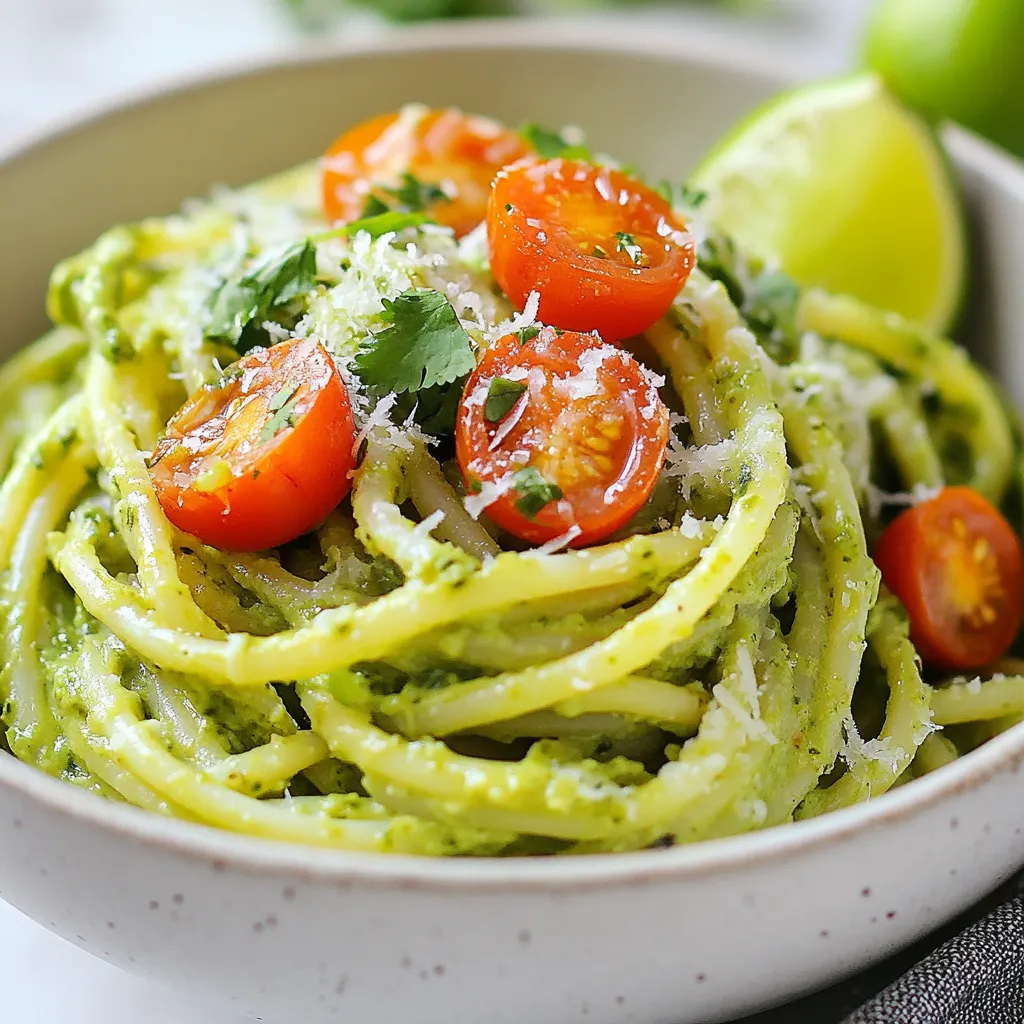
Are you ready to elevate your pasta game? This Creamy Avocado Cilantro Pasta combines rich flavors with fresh ingredients for a meal you’ll love. Perfect for weeknights or special occasions, this dish is easy to make and packs a punch. In this post, I’ll guide you through everything from the main ingredients to helpful tips and variations. Let’s get cooking and create a bowl of creamy goodness together!
Why I Love This Recipe
- Fresh and Creamy: This pasta dish features a rich and creamy avocado sauce that brings freshness and flavor to each bite.
- Quick and Easy: With a total preparation time of just 20 minutes, it’s perfect for a busy weeknight dinner.
- Healthy Ingredients: Made with wholesome ingredients like avocados and Greek yogurt, it’s a nutritious choice that doesn’t compromise on taste.
- Customizable: You can easily adjust the flavors and toppings to your liking, making it versatile for any palate.
Ingredients
Main Ingredients List
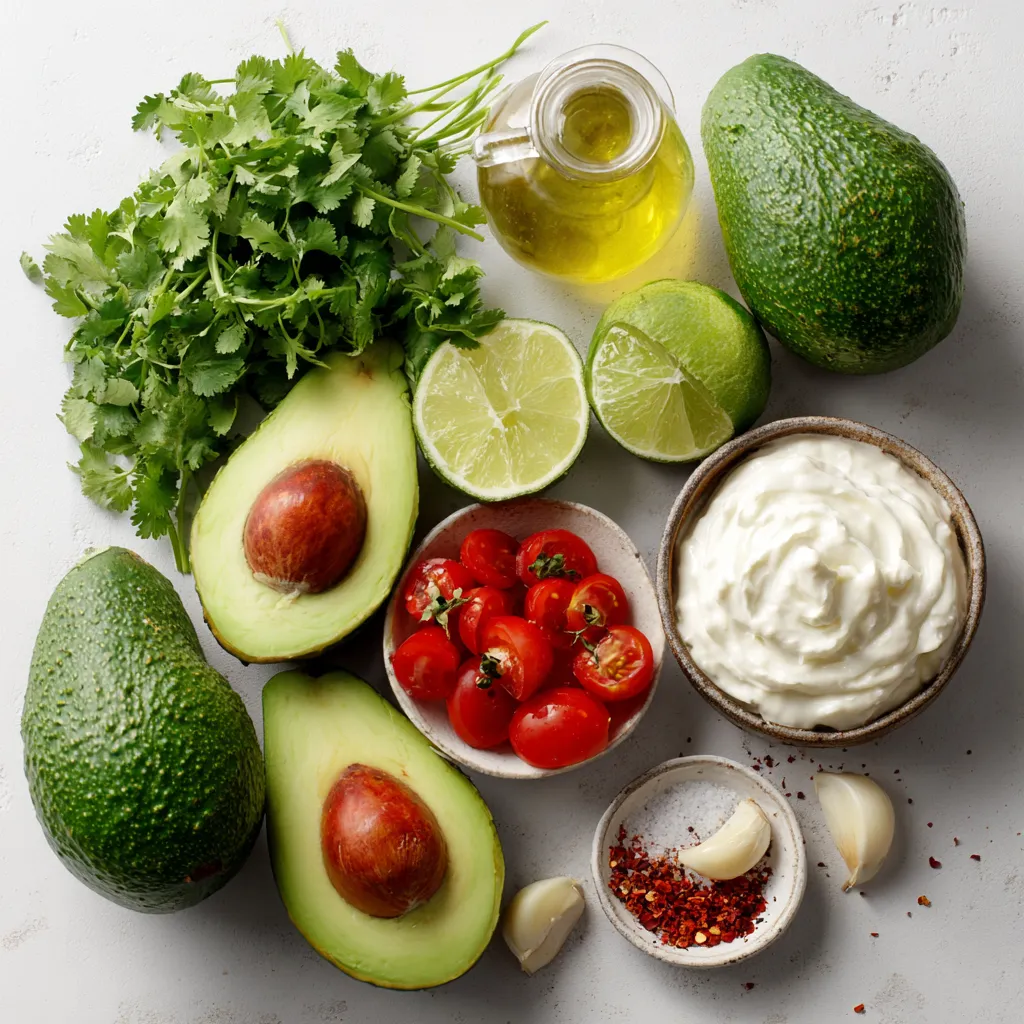
To make creamy avocado cilantro pasta, gather these key items:
- 12 oz pasta (spaghetti or fettuccine)
- 2 ripe avocados
- 1/4 cup fresh cilantro leaves
- 2 cloves garlic, minced
- 1/4 cup Greek yogurt or sour cream
- 2 tablespoons olive oil
- 2 tablespoons lime juice
- Salt and pepper to taste
- 1/4 teaspoon red pepper flakes (optional)
Optional Garnishes
Adding garnishes can make your dish look even better. Here are some fun options:
- Grated Parmesan cheese
- Cherry tomatoes, halved
Substitutions for Ingredients
You can swap some ingredients if needed. Here are some ideas:
- Use any pasta you like, or try a gluten-free version.
- If you don’t have Greek yogurt, sour cream works well.
- No cilantro? Try parsley or basil for a different taste.
- For a vegan option, use a dairy-free yogurt alternative.
These choices keep your creamy avocado cilantro pasta tasty and fun!
Step-by-Step Instructions
Cooking the Pasta
First, fill a large pot with water. Add a good amount of salt. Bring the water to a boil. Once boiling, add 12 ounces of pasta. I like spaghetti or fettuccine for this dish. Cook the pasta until it is al dente. This usually takes about 8 to 10 minutes. Keep an eye on it. Before draining, save about 1 cup of the pasta water. This water is useful later. Drain the pasta and set it aside in a large bowl.
Preparing the Avocado Sauce
Now, let’s make the creamy sauce. Grab 2 ripe avocados and cut them in half. Remove the pits and scoop the flesh into a blender. Add 1/4 cup of fresh cilantro leaves, 2 minced garlic cloves, and 1/4 cup of Greek yogurt or sour cream. Drizzle in 2 tablespoons of olive oil and 2 tablespoons of lime juice. Season with salt and pepper to taste. Blend everything until it is smooth and creamy. If the sauce seems too thick, add some reserved pasta water a little at a time until it is just right.
Combining Pasta and Sauce
Take the warm pasta from earlier and place it in a large mixing bowl. Pour the avocado sauce over the pasta. Toss gently to coat each strand of pasta. If the sauce needs to be thinner, add more reserved pasta water. Taste the dish and adjust the seasoning with more salt, pepper, or lime juice if needed. For a spicy kick, sprinkle in 1/4 teaspoon of red pepper flakes. Your creamy avocado cilantro pasta is ready to serve!
Tips & Tricks
Perfecting the Sauce Texture
To get the right sauce texture, use ripe avocados. They should feel soft but not mushy. Blend the avocados with the cilantro, garlic, Greek yogurt, and olive oil until smooth. If the sauce is too thick, add reserved pasta water slowly. This helps create a creamy and light sauce. The goal is to coat the pasta well without making it runny.
Flavor Enhancements
To boost the flavor, add more lime juice for a zesty kick. A pinch of salt and pepper can make a big difference. If you enjoy heat, include red pepper flakes. Fresh herbs can also add depth. Consider adding a bit of basil or parsley for extra freshness. Taste as you go and adjust as needed.
Serving Suggestions
Serve the creamy avocado cilantro pasta in wide bowls. This allows the colors to shine. Top with halved cherry tomatoes for a pop of red. You can also sprinkle grated Parmesan cheese on top. For added fun, place extra cilantro leaves and a lime wedge on the side. This not only looks great but also gives guests a choice to add more flavor.
Pro Tips
- Choose Ripe Avocados: Make sure your avocados are ripe for the creamiest sauce. They should yield slightly when gently squeezed.
- Adjust Consistency: If your sauce is too thick, gradually add the reserved pasta water until you achieve your desired creaminess.
- Fresh Ingredients Matter: Using fresh cilantro and lime juice will significantly enhance the flavor of your dish, making it more vibrant and tasty.
- Serving Suggestions: For an extra touch, serve with a sprinkle of toasted pine nuts or walnuts for added crunch and flavor contrast.
Variations
Additional Ingredients to Mix In
You can boost the flavor of creamy avocado cilantro pasta by adding extra ingredients. Here are some ideas:
- Protein: Add cooked chicken, shrimp, or chickpeas for protein.
- Veggies: Toss in spinach, bell peppers, or broccoli for more nutrition.
- Nuts: Sprinkle toasted pine nuts or walnuts for a crunchy texture.
- Seasoning: Try adding cumin or smoked paprika for a unique twist.
Dietary Modifications (Vegan, Gluten-Free)
Making this pasta dish fit your diet is easy. For a vegan version, simply swap Greek yogurt for a plant-based yogurt. You can also skip the cheese topping. To make it gluten-free, choose gluten-free pasta made from rice or quinoa. This way, everyone can enjoy this creamy dish.
Alternative Pasta Types
You can use different pasta shapes for this recipe. Here are a few options:
- Whole Wheat Pasta: For a healthier option, use whole wheat spaghetti or fettuccine.
- Zoodles: For a low-carb meal, spiralize zucchini to make zoodles.
- Pasta Alternatives: Try chickpea or lentil pasta for added protein and fiber.
These variations let you customize your creamy avocado cilantro pasta. Enjoy experimenting with your favorite flavors!
Storage Info
How to Store Leftovers
To keep your creamy avocado cilantro pasta fresh, place it in an airtight container. Make sure to cool the pasta to room temperature first. Store the container in the fridge. It will stay good for up to three days. If you notice the pasta getting dry, add a splash of olive oil or reserved pasta water before serving.
Reheating Instructions
When you’re ready to eat the leftovers, heat them gently. You can use a microwave or a pan on the stove. If using a microwave, heat in short bursts. Stir often to avoid hot spots. If using a pan, add a splash of water or olive oil to help it heat evenly. This keeps the pasta creamy.
Freezing Options
You can freeze creamy avocado cilantro pasta, but the texture may change. To freeze, place the pasta in a freezer-safe container. Be sure to leave some space for expansion. It can last for up to three months in the freezer. When you’re ready to eat it, thaw it in the fridge overnight and follow the reheating instructions.
FAQs
Can I use another type of yogurt instead of Greek yogurt?
Yes, you can use sour cream or regular yogurt. Both will still add creaminess. If you want a dairy-free option, try using coconut yogurt. It gives the sauce a nice texture and flavor. Just keep in mind that coconut yogurt adds a subtle sweetness.
How can I make the sauce spicier?
To spice up the sauce, add more red pepper flakes. Start with half a teaspoon, then taste. You can also use fresh jalapeños or a dash of hot sauce. Blend them in with the other sauce ingredients. This way, you control the heat level perfectly.
What can I serve with creamy avocado cilantro pasta?
This pasta pairs well with many dishes. A simple green salad adds freshness. Grilled chicken or shrimp enhances the meal’s protein. For a lighter option, serve with roasted vegetables. You can also add crusty bread to soak up any leftover sauce.
This blog post covered all you need to make creamy avocado cilantro pasta. We looked at ingredients, cooking steps, and tips to boost flavor. You learned how to store leftovers and ways to customize the dish.
Enjoying this pasta is easy, and it works for many diets. Experiment with your own flavors and variations. Keep it fun, keep it fresh, and share it with friend

Creamy Avocado Cilantro Pasta
Ingredients
- 12 oz pasta (spaghetti or fettuccine)
- 2 ripe avocados
- 0.25 cup fresh cilantro leaves
- 2 cloves garlic, minced
- 0.25 cup Greek yogurt or sour cream
- 2 tablespoons olive oil
- 2 tablespoons lime juice
- Salt and pepper to taste
- 0.25 teaspoon red pepper flakes (optional)
- Grated Parmesan cheese for serving (optional)
- Cherry tomatoes, halved for garnish (optional)
Instructions
- In a large pot of salted boiling water, cook the pasta according to package instructions until al dente. Reserve about 1 cup of pasta water, then drain the pasta and set it aside.
- In a blender or food processor, combine the ripe avocados, cilantro, minced garlic, Greek yogurt (or sour cream), olive oil, lime juice, salt, and pepper. Blend until smooth and creamy. If the sauce is too thick, add reserved pasta water a little at a time until you reach the desired consistency.
- In a large mixing bowl, add the cooked pasta and pour the avocado sauce over the warm pasta. Toss gently to coat the pasta evenly with the sauce. If needed, adjust the consistency with more reserved pasta water.
- Taste and adjust seasoning with more salt, pepper, or lime juice as desired. If you like a bit of heat, sprinkle in the red pepper flakes.
- Plate the creamy avocado cilantro pasta and garnish with cherry tomatoes and a sprinkle of grated Parmesan cheese if using.
![Here’s what you need for Easy Sheet Pan Salmon Fajitas. Gather these ingredients for a fun and tasty meal: - 1 lb salmon fillet, cut into bite-sized pieces - 2 bell peppers (any color), sliced - 1 medium onion, sliced - 3 tablespoons olive oil - 2 teaspoons chili powder - 1 teaspoon ground cumin - 1 teaspoon garlic powder - 1/2 teaspoon smoked paprika - Salt and pepper to taste - 8 small flour or corn tortillas - Fresh cilantro, for garnish - Lime wedges, for serving These ingredients work together to create a dish that is both simple and full of flavor. The salmon brings a rich taste, while the vegetables add crunch and color. Each spice adds a unique depth, making every bite exciting. You can find the full recipe to guide you through the cooking process. Enjoy crafting this delightful meal! - Preheat your oven to 400°F (200°C). - Line a baking sheet with parchment paper. - In a large bowl, combine sliced bell peppers and onion with 3 tablespoons of olive oil, chili powder, ground cumin, garlic powder, smoked paprika, salt, and pepper. - Toss well to coat the veggies evenly. - Spread the seasoned vegetables on one side of the sheet pan. - Coat salmon pieces with olive oil and place them on the other side of the pan. - Bake everything for 15-20 minutes. Check for doneness to ensure the salmon is cooked through. - Warm the tortillas in a dry skillet or microwave until soft. - Once done, assemble salmon and veggies in the warm tortillas. - Add fresh cilantro and a squeeze of lime juice for extra flavor. You can find the complete instructions in the Full Recipe. Enjoy your cooking! I love to play with flavors. For a zestier kick, add more chili powder. If you prefer a milder taste, reduce it. You can also mix in some lime zest for a fresh twist. For a smoky flavor, increase the smoked paprika. Experiment with spices to find what you love. Cooking time depends on the salmon's thickness. Thicker pieces need a bit more time, while thinner ones cook faster. Check your salmon at 15 minutes. If it flakes easily with a fork, it's done! Different ovens heat unevenly, so keep an eye on your dish. If your oven runs hot, reduce the time slightly. These salmon fajitas shine with simple sides. A fresh avocado salad pairs well. You can also serve with black beans or corn on the side. For dips, try a creamy avocado sauce or salsa. A cold drink, like lemonade or iced tea, complements the meal perfectly. Enjoy your colorful, tasty dish! {{image_2}} You can switch salmon for chicken or tofu. Chicken works well because it absorbs flavors nicely. Cut chicken into small pieces like the salmon. Cook it for about 20-25 minutes. Tofu is a great choice for a plant-based option. Press it to remove extra water, then cut it into cubes. Bake it for 15-20 minutes too. Both options are tasty and keep the dish simple. Feel free to add more veggies for fun and flavor. Zucchini, corn, or mushrooms are great choices. Slice zucchini into thin rounds and add it to the mix. Corn can bring a sweet crunch. You can chop mushrooms and toss them in for extra depth. Mixing different vegetables keeps every bite exciting. Don’t be shy to use what you like! Want it spicier? Add more chili powder or fresh jalapeños. You can sprinkle red pepper flakes for an extra kick. If you prefer it milder, use less chili powder. You can also add more lime juice to balance the heat. Adjusting spice levels makes this dish fun for everyone. Your taste buds will thank you! For the complete recipe, check out the [Full Recipe]. To store your leftover salmon fajitas, first let them cool. This step helps keep the food fresh. Use an airtight container for best results. You can separate the salmon, veggies, and tortillas or store them together. If you store them together, the tortillas may get soggy. I recommend using glass containers or heavy-duty plastic bags. When you reheat salmon fajitas, you want to keep them moist. The best method is to use the oven. Preheat your oven to 350°F (175°C). Place the salmon and veggies on a baking sheet. Cover them with foil to trap moisture. Heat for about 10-15 minutes. You can also use a skillet over medium heat. Just add a splash of water to help steam them. If you prefer the microwave, use a microwave-safe dish. Cover it with a damp paper towel. Heat in short bursts, checking often. Freezing salmon fajitas is simple. Pack the leftovers in airtight containers or freezer bags. Remove as much air as possible. They can last up to three months in the freezer. When ready to eat, thaw them in the fridge overnight. Reheat them as mentioned above. This keeps the flavor and texture nice. You’ll have a quick meal ready to go! For the full recipe, visit the section above. Yes, you can prep ahead. Chop the veggies and salmon in advance. Store them in the fridge. You can mix the spices and keep them in a small jar. This way, you save time when cooking. Just remember to bake everything fresh for the best taste. Salmon fajitas pair well with many sides. Here are some tasty options: - Rice or quinoa for a filling base - Black beans for extra protein - A fresh salad with lime dressing - Guacamole for a creamy touch - Chips for a crunchy contrast You can easily lighten up this dish. Try these tips: - Use less oil when roasting the veggies - Add more vegetables like zucchini or corn - Choose whole wheat tortillas for more fiber - Skip the cheese or use a low-fat option - Serve with a side of steamed veggies To reheat salmon fajitas, use a skillet. Warm it over medium heat. Add the salmon and veggies, and cover with a lid. This keeps them moist. You can also use the microwave. Heat in short bursts to avoid drying them out. Just remember, fresh is always best! This recipe highlights the joy of making salmon fajitas. You learned about the key ingredients, step-by-step instructions, and helpful tips. I shared ideas for variations and storage. Remember, you can customize flavors and spices to suit your taste. Whether you enjoy it with chicken, tofu, or extra veggies, it’s all about creating a meal you love. Use these pointers to enjoy cooking and eating. Your salmon fajitas can be a hit at every meal. Cooking should be fun and tasty!](https://dailydishlab.com/wp-content/uploads/2025/07/cbf1539a-7436-4928-932a-7fda2b4117aa-768x768.webp)
![To make this creamy spinach stuffed salmon, you need simple and fresh ingredients. Here’s what you will use: - 4 salmon fillets, skinless - 2 cups fresh spinach, chopped - 1 cup cream cheese, softened - 1/2 cup feta cheese, crumbled - 1/4 cup grated Parmesan cheese - 2 cloves garlic, minced - 1 tablespoon olive oil - 1 teaspoon lemon juice - Salt and pepper to taste These ingredients create a rich, flavorful filling that pairs perfectly with salmon. The cream cheese adds creaminess, while feta offers tang. Spinach gives a fresh taste. Adding garnishes makes the dish look great and taste even better. Here are some options: - Fresh dill or parsley - Lemon wedges These garnishes add color and freshness. They also enhance the flavor of your dish. Having the right tools helps make cooking easier. You will need: - A skillet - A mixing bowl - A baking dish - Toothpicks (if needed) - A knife These tools help you prepare and cook the salmon. They ensure everything goes smoothly. If you want to see the full recipe, check it out here: [Full Recipe]. To start, gather your ingredients. You need: - 4 salmon fillets, skinless - 2 cups fresh spinach, chopped - 1 cup cream cheese, softened - 1/2 cup feta cheese, crumbled - 1/4 cup grated Parmesan cheese - 2 cloves garlic, minced - 1 tablespoon olive oil - 1 teaspoon lemon juice - Salt and pepper to taste - Fresh dill or parsley, for garnish First, preheat your oven to 375°F (190°C). This step helps cook the salmon evenly. Next, heat a skillet over medium heat. Add the olive oil and sauté minced garlic for about 1 minute. You want it fragrant but not burnt. Then, add the chopped spinach to the skillet. Cook until it wilts, which takes about 2-3 minutes. Remove the skillet from heat and let the spinach cool a bit. In a bowl, mix the softened cream cheese, feta cheese, grated Parmesan, sautéed spinach, lemon juice, salt, and pepper. Stir until combined, creating a creamy filling. Now, take your salmon fillets and place them on a cutting board. Make a slit in the side of each fillet. This creates a pocket for your filling. Next, generously fill each pocket with the creamy mixture. If needed, use toothpicks to secure the openings. Place the stuffed salmon fillets in a lightly greased baking dish. Bake in the preheated oven for 20-25 minutes. The salmon should cook through and flake easily with a fork. This timing ensures a moist and flavorful dish. To ensure you cook the salmon just right, use a meat thermometer. The internal temperature should reach 145°F (63°C). This helps you avoid overcooking, which can make the fish dry. Let the salmon rest for a few minutes after baking. This allows the juices to redistribute. For a beautiful finish, garnish with fresh dill or parsley. Serve it on a bed of sautéed asparagus or a light salad for a colorful plate. Enjoy your creamy spinach stuffed salmon! If you want the full recipe, check out the [Full Recipe]. When picking salmon, freshness is key. Look for bright, shiny skin without any brown spots. The flesh should be firm and spring back when you press it. Wild-caught salmon often has a richer taste than farmed salmon. If you can, ask your fishmonger for the best catch of the day. You can prepare this dish ahead for a busy weeknight. Make the creamy spinach filling and stuff the salmon up to one day before cooking. Wrap the salmon tightly in plastic wrap and store it in the fridge. This way, the flavors meld nicely. Just bake it when you’re ready to eat! Avoid these pitfalls for the best results. First, do not overstuff the salmon. Too much filling can make it hard to cook evenly. Second, don’t skip the resting time after baking. Letting it rest helps the juices settle. Lastly, be careful not to overcook the salmon. It should flake easily but still be moist. Enjoy your delicious meal! {{image_2}} You can switch up the cheeses in this recipe. Cream cheese gives a rich taste. Feta adds a nice tang. You can try goat cheese for a creamy twist. Mozzarella works well for a mild flavor. Each cheese brings a unique taste to the dish. Want to make this dish lighter? Use low-fat cream cheese. You can also swap out feta for a lower-fat cheese. Instead of olive oil, try using a cooking spray. This will cut down on extra calories while keeping the flavors intact. Adding fresh herbs can boost the dish's taste. Try basil or thyme for a fresh kick. A sprinkle of red pepper flakes adds heat if you want spice. For a zesty touch, squeeze more lemon juice before serving. These simple changes bring new life to the salmon. For the full recipe, check the details above. To store leftovers of creamy spinach stuffed salmon, let it cool first. Place the salmon in an airtight container. Keep it in the fridge for up to three days. This helps maintain its flavor and texture. If you have extra stuffing, store it in a separate container. Reheat the salmon gently to avoid drying it out. Preheat your oven to 350°F (175°C). Place the salmon on a baking sheet. Cover it with foil to keep moisture in. Heat for about 10-15 minutes. You can also use a microwave. Heat it on low power in short intervals. Check to ensure it warms evenly. You can freeze creamy spinach stuffed salmon for longer storage. Wrap each piece tightly in plastic wrap. Then, place it in a freezer-safe bag. It can last for up to three months in the freezer. To thaw, move it to the fridge overnight before reheating. This keeps the salmon moist and tasty. For the best results, avoid refreezing after thawing. Yes, you can use frozen salmon. Just make sure to thaw it first. Place it in the fridge overnight or submerge it in cold water for faster thawing. Frozen salmon works well, but fresh salmon gives the best flavor and texture. You can pair this dish with many sides. Here are a few ideas: - Sautéed asparagus - Lemon rice - Garlic mashed potatoes - A light salad with vinaigrette - Steamed broccoli These sides will balance the rich flavors of the salmon. To check if salmon is cooked, look for a few signs: - The flesh should be opaque and flake easily with a fork. - The internal temperature should reach 145°F (63°C). - The color should change from bright pink to pale pink. These tips will help ensure your salmon is safe and tasty. For the full recipe, check the details above. In this article, we covered how to make creamy spinach stuffed salmon. We looked at key ingredients, preparation, and baking steps. I shared tips for choosing the best salmon, making ahead, and avoiding common mistakes. You also learned about tasty cheese swaps and ways to enhance flavor. Lastly, I explained how to store, reheat, and freeze leftovers. Enjoy this dish that combines ease and flavor. With practice, you’ll master it!](https://dailydishlab.com/wp-content/uploads/2025/07/597501d1-48c7-4a9b-bedb-1c262109b33c-768x768.webp)
![To make Easy Chicken and Dumplings, gather these key ingredients: - 1 lb (450g) boneless chicken thighs, diced - 4 cups chicken broth - 1 medium onion, chopped - 2 cloves garlic, minced - 2 cups carrots, sliced - 1 cup celery, chopped - 1 tsp dried thyme - 1 tsp dried rosemary - Salt and pepper to taste - 1 cup all-purpose flour - 2 tsp baking powder - 1/2 tsp salt - 1/2 cup milk - 2 tbsp butter, melted - Fresh parsley, chopped (for garnish) These ingredients combine to create a warm and filling dish. The chicken provides protein, while the veggies add flavor and color. The broth forms a rich base, and the dumplings offer a fluffy texture. You can add your own twist to this dish with these optional ingredients: - Frozen peas for extra sweetness - Corn for a pop of color - Different herbs like oregano or basil - A splash of cream for a richer broth Feel free to mix and match these to suit your taste. Personalizing your dish can make it even more special. To make this recipe, you will need: - A large pot for cooking - A cutting board and knife for chopping - A mixing bowl for the dough - A whisk for mixing dry ingredients - A spoon for dropping dumplings Using the right tools keeps your cooking smooth and easy. Having everything ready helps you enjoy the process more. For the full recipe, check out the detailed instructions that follow! Start by heating a bit of olive oil in a large pot over medium heat. Add 1 lb of diced boneless chicken thighs. Sauté the chicken until it turns golden brown, which takes about 5 to 7 minutes. Once done, remove the chicken and set it aside. In the same pot, toss in 1 medium chopped onion, 2 minced garlic cloves, 2 cups of sliced carrots, and 1 cup of chopped celery. Sauté these veggies for 5 to 6 minutes, until they soften. This step builds a great flavor base. In a mixing bowl, combine 1 cup of all-purpose flour, 2 teaspoons of baking powder, and 1/2 teaspoon of salt. Mix well. Create a well in the center of the dry mix. Pour in 1/2 cup of milk and 2 tablespoons of melted butter. Stir until the mixture just combines into a dough. Be careful not to overmix; it should remain a bit lumpy for fluffy dumplings. Return the cooked chicken to the pot with the sautéed veggies. Pour in 4 cups of chicken broth and add 1 teaspoon each of dried thyme and dried rosemary. Season with salt and pepper to your taste. Bring this mixture to a gentle simmer. Once simmering, drop spoonfuls of the dumpling dough into the pot. Cover the pot with a lid and let the dumplings cook for about 15 to 20 minutes. This steaming process makes them rise and become fluffy. After cooking, taste and adjust the seasoning if needed. Serve hot, garnished with fresh parsley for a touch of color. For the full recipe, check [Full Recipe]. To make fluffy dumplings, use the right ratio of flour and liquid. The dough should be soft, not too dry or runny. Mix gently; over-mixing leads to tough dumplings. Drop spoonfuls of the dough onto the simmering broth. Cover the pot and let them steam. This helps them rise and stay fluffy. One common mistake is cooking the dumplings uncovered. This can make them dense. Another mistake is using old baking powder. Always check the expiration date for the best rise. Be careful not to stir the dumplings while they cook. Agitation can break them apart and ruin their fluffy texture. To make your dish pop, add fresh herbs like parsley or thyme at the end. A squeeze of lemon juice brightens the flavors. For deeper flavor, sauté the vegetables longer until they caramelize. You can also add a splash of cream for a richer broth. These tips make your chicken and dumplings even more comforting. For the full recipe, check out the recipe section above. {{image_2}} You can make easy chicken and dumplings even creamier. To do this, add 1 cup of heavy cream or half-and-half to the chicken broth. This change gives the dish a rich texture. You can also use a can of cream of chicken soup. It adds creaminess and flavor with little effort. For a fun twist, try using different types of meat like turkey or even a mix of chicken and sausage. If you want a lighter meal, swap chicken thighs for chicken breasts. This reduces fat and calories. You can also use low-sodium chicken broth. For a gluten-free version, replace all-purpose flour with a gluten-free baking mix. Just be sure to check the mix for baking powder. Lastly, you can add more vegetables like peas or spinach for extra nutrients. You can boost the taste of your chicken and dumplings with spices. Add paprika for a smoky flavor or cayenne for some heat. Fresh herbs like parsley, dill, or chives can brighten the dish. You can mix in a squeeze of lemon juice for a fresh zing. Don’t forget to taste as you go! Adjust the seasoning to make it just right for you. These variations make it easy to customize this dish. You can check the Full Recipe for more ideas and tips! To keep your chicken and dumplings fresh, let them cool first. Use an airtight container for storage. This helps keep moisture in and prevents drying out. Store them in the fridge for up to three days. Label the container with the date to track how long it's been there. When ready to eat your leftovers, use a pot for reheating. Add a splash of broth or water to keep the dish moist. Heat on low to medium heat, stirring gently. This helps prevent the dumplings from breaking apart. You can also use the microwave, but stir halfway through for even heating. You can freeze chicken and dumplings for later. Place them in a freezer-safe container or bag. Remove as much air as possible to prevent freezer burn. They can last up to three months in the freezer. To reheat, thaw overnight in the fridge before warming on the stove. This keeps the texture nice and fluffy. For the full recipe, check the main article. I recommend using boneless chicken thighs for chicken and dumplings. They stay juicy and tender during cooking. Thighs also add rich flavor to the dish. If you prefer, you can use boneless chicken breasts. Just keep in mind that they can dry out more easily. Yes, you can use frozen vegetables! Frozen veggies are a great time-saver. They cook quickly and still add good taste. If using frozen carrots or peas, add them to the pot for the last few minutes of cooking. This way, they stay bright and flavorful. Dumplings need about 15 to 20 minutes to cook. Cover the pot with a lid during this time. This helps them steam and rise properly. You’ll know they are done when they puff up and feel firm to the touch. Enjoy the fluffy goodness! For the full recipe, check out the [Full Recipe]. You have all you need to create easy chicken and dumplings. The key ingredients set a strong base. You can customize flavors with optional ingredients and cool spices. Following the step-by-step process ensures a warm and comforting meal. Remember to learn from tips to avoid mistakes and make your dumplings fluffy. Store any leftovers properly and enjoy them later. This dish can change with simple variations, making it a staple in your kitchen. Now, get cooking and share this delightful meal with family.](https://dailydishlab.com/wp-content/uploads/2025/06/21507376-38c9-4f66-b35b-162bfb5424ce-768x768.webp)