Coconut Curry Ramen Bowl Flavorful and Nutritious Dish
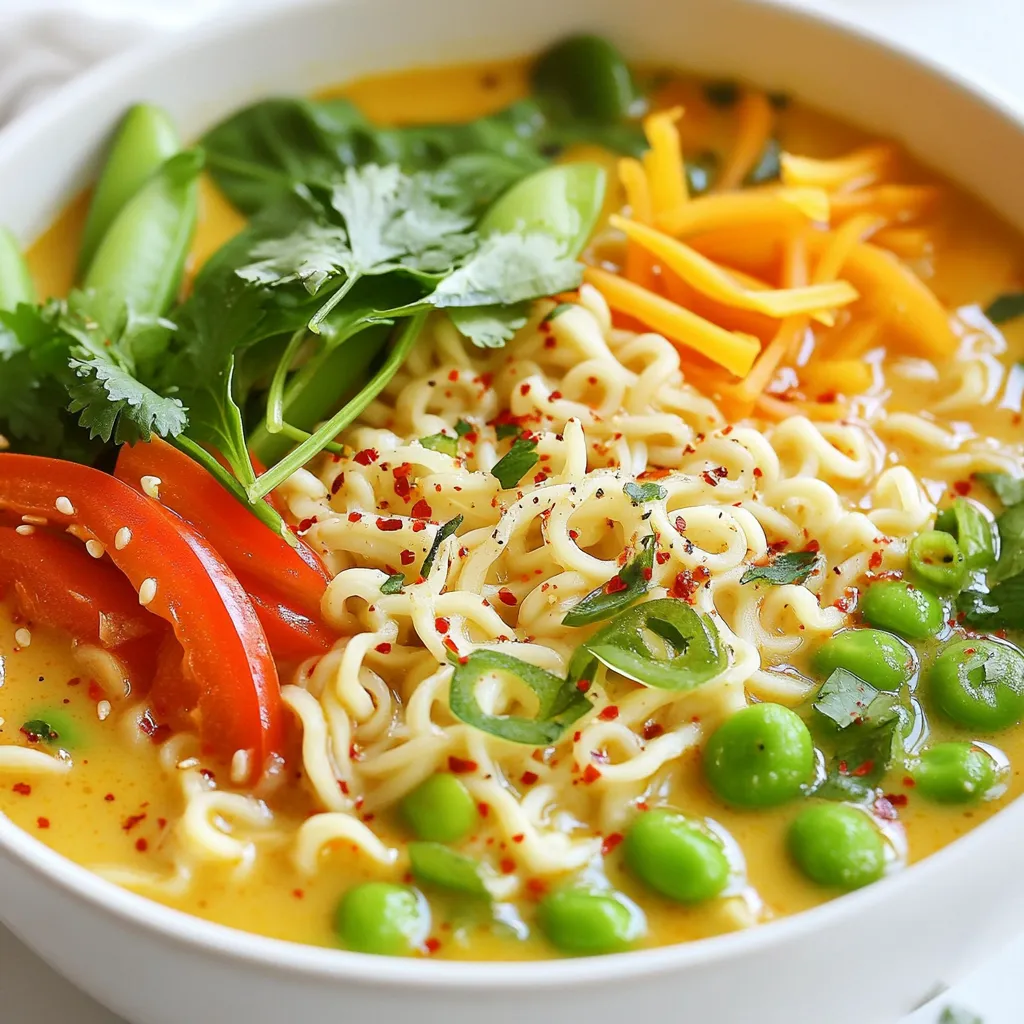

Are you ready to elevate your dinner game? This Coconut Curry Ramen Bowl is not just tasty; it’s also packed with nutrients. In this post, I’ll share how to make a rich, creamy, and vibrant dish that’s easy to customize. Whether you’re a busy parent or a novice cook, I’ll guide you through every step to create a bowl of comfort that your family will love. Let’s dive into the ingredients and start cooking!
Why I Love This Recipe
- Quick and Easy: This dish comes together in just 30 minutes, making it perfect for a weeknight dinner.
- Flavorful and Cozy: The combination of coconut milk and curry creates a rich, comforting broth that’s perfect for warming up.
- Customizable: You can easily swap in your favorite vegetables or proteins to make it your own.
- Healthful Ingredients: This recipe is packed with nutritious veggies and can be made gluten-free by using tamari.
Ingredients
List of Key Ingredients
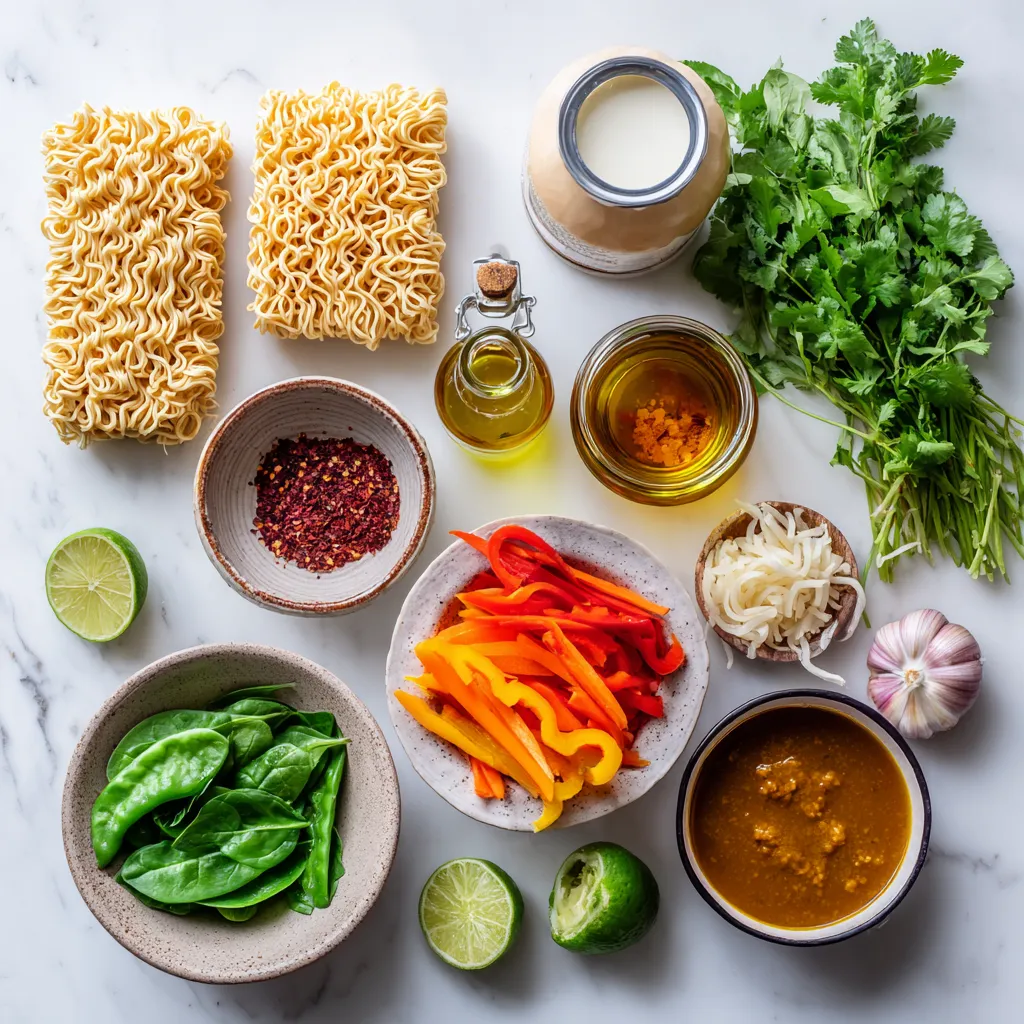
To make a tasty Coconut Curry Ramen Bowl, gather these key items:
- 2 packs of ramen noodles (discard the seasoning packets)
- 1 can (13.5 oz) coconut milk
- 2 cups vegetable broth
- 2 tablespoons curry paste (red or yellow)
- 1 tablespoon olive oil
- 1 onion, sliced
- 2 cloves garlic, minced
- 1-inch piece of ginger, grated
- 1 bell pepper, sliced (any color)
- 1 cup snap peas or green beans
- 1 carrot, julienned
- 1 cup baby spinach
- 2 tablespoons soy sauce (or tamari for gluten-free)
- Juice of 1 lime
- Fresh cilantro, for garnish
- Crushed red pepper flakes (optional)
These ingredients bring flavor and nutrition to your bowl. The coconut milk adds creaminess, while the curry paste gives a warm spice. Fresh veggies keep it vibrant and healthy.
Optional Garnishes
To make your dish even better, consider these garnishes:
- Fresh cilantro
- Crushed red pepper flakes
- Lime wedges
- Sliced green onions
- Sesame seeds
These garnishes add color and extra flavor. A squeeze of lime brightens each bite, and cilantro gives a fresh note.
Suggested Ingredient Substitutions
If you need to swap some items, here are great options:
- Use chicken or beef broth instead of vegetable broth for more flavor.
- Swap ramen noodles for rice noodles or zucchini noodles for a gluten-free dish.
- Replace curry paste with curry powder for a milder taste.
- Use any seasonal vegetables you have on hand, like zucchini or broccoli.
These substitutions help you customize the dish to your taste. Feel free to experiment with what you have in your kitchen.
Step-by-Step Instructions
Detailed Cooking Process
1. Start by heating the olive oil in a large pot over medium heat.
2. Add the sliced onion and sauté for about 3-4 minutes until it is soft.
3. Stir in the minced garlic and grated ginger. Cook for another 1-2 minutes until you smell the great aroma.
4. Add the curry paste to the pot. Stir well to coat the onions. Cook for 2 minutes to boost the flavor.
5. Pour in the coconut milk and vegetable broth. Stir until the curry paste mixes completely. Bring this mix to a gentle simmer.
6. Once it simmers, add the sliced bell pepper, snap peas, and julienned carrot. Cook for 5-7 minutes until the veggies are tender but still crisp.
7. In a separate pot, boil water and cook the ramen noodles as per package instructions, usually 4-5 minutes. Drain them and set aside.
8. Now, add the baby spinach to the coconut curry broth. Pour in the soy sauce and lime juice. Stir until the spinach wilts.
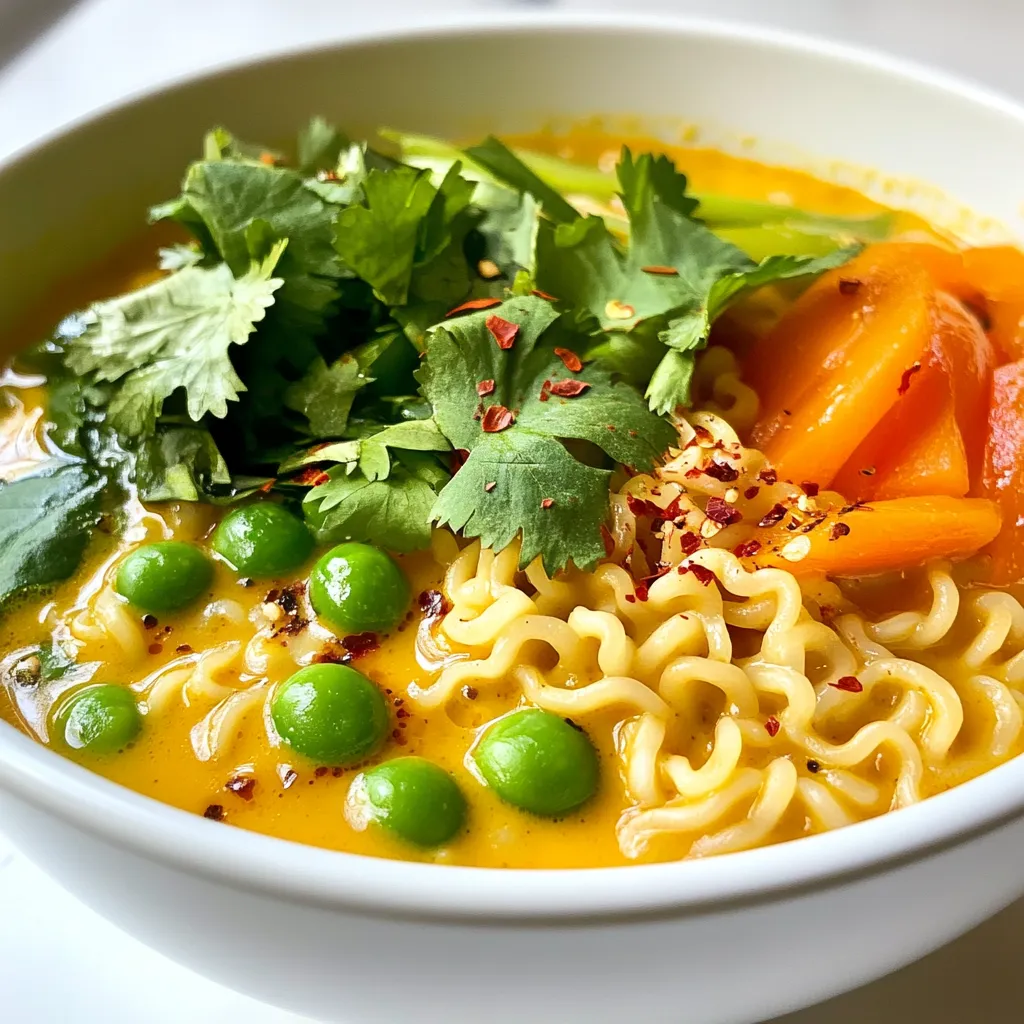
9. To serve, place a serving of ramen noodles in a bowl. Ladle the coconut curry and veggies over the noodles.
10. Garnish with fresh cilantro and crushed red pepper flakes if you want extra heat.
Tips for Each Cooking Stage
- Heating the Oil: Make sure the oil is warm before adding the onion. This helps to release the onion’s sweetness.
- Sautéing: Keep an eye on the onion. You want it soft, not brown.
- Adding Garlic and Ginger: Stir often. Garlic burns easily, which makes it bitter.
- Curry Paste: Taste as you go. You can add more or less based on your spice preference.
- Cooking Veggies: Cut your veggies evenly. This helps them cook at the same rate.
- Cooking Noodles: Don’t forget to drain the noodles well. You don’t want a watery bowl.
- Serving: Serve hot for the best taste. The flavors blend beautifully when fresh.
Visual Aids or Process Images
*Consider adding photos at each step to guide you. Visual aids help you see the color and texture you should achieve.*
1. Photo of sautéed onions until soft.
2. Image showing the mix of curry paste with the onion.
3. Picture of the simmering broth with vibrant veggies.
4. Final shot of the bowl, topped with cilantro and red pepper flakes.
Each image helps you understand the process better. Enjoy your cooking journey!
Tips & Tricks
How to Enhance Flavor
To boost the flavors in your coconut curry ramen, start with fresh ingredients. Use ripe vegetables for more taste. Sauté the onions until soft for sweetness. Add garlic and ginger for depth. Curry paste is key here. Choose red for heat or yellow for a milder touch. Always taste as you go. Adjust with soy sauce or lime juice to balance flavors.
Cooking Techniques for Perfect Noodles
Cooking noodles properly is vital for a great ramen bowl. Boil water in a separate pot. Follow package instructions and cook noodles for 4-5 minutes. Drain them well but keep them slightly firm. Rinse under cold water to stop cooking. This keeps them from getting mushy. Add the cooked noodles just before serving for the best texture.
Making Ahead for Meal Prep
You can easily meal prep this dish. Cook the coconut curry base and store it separately. Cool it down before putting it in the fridge. This curry can last for up to three days. When ready to eat, reheat the curry and cook fresh noodles. This keeps the noodles from getting soggy. You’ll enjoy a fresh, warm meal without much hassle.
Pro Tips
- Use Fresh Ingredients: Fresh vegetables and herbs will enhance the flavor of your coconut curry ramen, making it more vibrant and delicious.
- Choose Your Curry Paste Wisely: Depending on your heat preference, select red or yellow curry paste. Red paste is generally spicier, while yellow is milder and slightly sweeter.
- Customize Your Veggies: Feel free to swap in your favorite vegetables or whatever you have on hand. Broccoli, zucchini, or mushrooms would also work great!
- Experiment with Toppings: Add extra toppings like sliced scallions, lime wedges, or toasted sesame seeds for added flavor and texture.
Variations
Protein Additions (Tofu, Chicken, Shrimp)
You can boost your Coconut Curry Ramen Bowl with protein. Tofu is a great choice for a vegetarian option. Just press and cube the tofu, then pan-fry it until golden. Chicken is another tasty choice. Simply cut it into bite-sized pieces and cook it in the pot with the onions. Shrimp cooks quickly, so add it just a few minutes before serving. It should turn pink and opaque.
Vegetarian/Vegan Alternatives
For a vegan dish, swap the chicken and shrimp for tofu or chickpeas. Both options add protein and flavor. Use vegetable broth to keep it vegetarian. Check the curry paste too; some brands may have shrimp paste. Always read the label to ensure it’s vegan-friendly.
Low-Carb or Gluten-Free Modifications
If you prefer low-carb, skip the ramen noodles. Instead, use zucchini noodles or kelp noodles. They add texture without the carbs. For a gluten-free version, choose gluten-free soy sauce or tamari. You can also find gluten-free ramen noodles made from rice or buckwheat. These swaps keep your dish flavorful and enjoyable.
Storage Info
Best Practices for Storing Leftovers
To keep your coconut curry ramen fresh, store it in an airtight container. Make sure it cools down first. Place the noodles and broth in separate containers. This way, the noodles won’t get soggy. Leftovers can last in the fridge for about three days. When you’re ready to eat, check for any off smells or colors.
Reheating Tips
When you reheat your ramen, do it gently. Pour the broth into a pot and heat it on medium. Once warm, add the noodles. Stir everything together to ensure even heating. You can also use a microwave, but heat it in short bursts. Stir in between to avoid hot spots. Add a splash of water if it seems dry.
Freezing Options and Limitations
You can freeze the coconut curry broth, but avoid freezing the noodles. The texture won’t be the same after thawing. To freeze, let the broth cool completely. Pour it into freezer-safe bags or containers. Label them with the date. It can last for up to three months in the freezer. When you’re ready to enjoy it, thaw it overnight in the fridge. Reheat as mentioned above for best results.
FAQs
What is the best type of ramen for this recipe?
The best ramen is fresh or dried wheat noodles. These have great texture and flavor. Instant noodles work too, but skip the seasoning packets. Fresh noodles cook fast and soak up the curry well. Dried noodles take a bit longer but are just as good.
Can I use other types of curry paste?
Yes, you can use different curry pastes! Red or yellow curry paste both work well. Each type adds its own unique flavor. Green curry paste could be a fun choice for a bolder taste. Adjust the amount to suit your spice level.
How can I make it spicier?
To add heat, use more curry paste. You can also sprinkle in crushed red pepper flakes. Fresh chopped chili peppers are a great option too. Start with a little, then taste. You can always add more spice, but it’s hard to take it out.
What can I serve alongside this coconut curry ramen bowl?
Serve this dish with a fresh salad or steamed veggies. A side of spring rolls adds a nice crunch. You can also try pickled vegetables for a tangy bite. Rice or quinoa can make it more filling if you want.
This blog post covered key ingredients and step-by-step instructions for making coconut curry ramen. I shared tips to enhance flavor and cooking techniques for perfect noodles. We also explored variations for different diets and effective storage methods.
In closing, this dish is not only simple to make but it also allows for creativity. You can adjust it to fit your taste and needs. Enjoy making this delicious rame

Coconut Curry Ramen Bowl
Ingredients
- 2 packs ramen noodles (discard the seasoning packets)
- 1 can coconut milk (13.5 oz)
- 2 cups vegetable broth
- 2 tablespoons curry paste (red or yellow)
- 1 tablespoon olive oil
- 1 onion sliced
- 2 cloves garlic, minced
- 1 inch piece of ginger, grated
- 1 bell pepper sliced (any color)
- 1 cup snap peas or green beans
- 1 carrot julienned
- 1 cup baby spinach
- 2 tablespoons soy sauce (or tamari for gluten-free)
- 1 lime juice of
- 1 bunch fresh cilantro, for garnish
- 1 teaspoon crushed red pepper flakes (optional, for heat)
Instructions
- In a large pot, heat the olive oil over medium heat. Add the sliced onion and sauté for about 3-4 minutes until soft.
- Stir in the minced garlic and grated ginger, and cook for another 1-2 minutes until fragrant.
- Add the curry paste to the pot, stirring to coat the onions, and cook for 2 minutes to enhance the flavor.
- Pour in the coconut milk and vegetable broth, stirring until the curry paste is fully blended. Bring to a gentle simmer.
- Once simmering, add the sliced bell pepper, snap peas, and julienned carrot to the pot. Cook for 5-7 minutes until the vegetables are tender but still crisp.
- In a separate pot, boil water and cook the ramen noodles according to package instructions (usually 4-5 minutes). Drain and set aside.
- Add the baby spinach to the coconut curry broth, followed by the soy sauce and lime juice. Stir until the spinach is wilted.
- To serve, place a serving of ramen noodles in a bowl and ladle the coconut curry and vegetables over the noodles.
- Garnish with fresh cilantro and a sprinkle of crushed red pepper flakes if desired for extra heat.
![To make Lemon Dill Grilled Salmon, you need a few simple yet fresh ingredients. Here’s the list: - Fresh Salmon Fillets - Fresh Dill - Lemon - Garlic - Olive Oil - Honey - Seasoning: Salt and Pepper - Lemon Slices for Garnish Each ingredient plays a key role in creating the bright and delicious taste of this dish. Fresh salmon fillets give you a rich flavor and perfect texture. The fresh dill adds a fragrant herb note that pairs well with the fish. Lemon provides the zesty brightness that cuts through the richness of the salmon. Garlic gives depth, while olive oil adds a smooth finish. Honey balances the flavors with just a hint of sweetness. Finally, salt and pepper enhance everything, and lemon slices make for a lovely garnish. You can find the full recipe with detailed steps to prepare this dish easily. Enjoy the process of cooking and savor the delightful taste! - In a mixing bowl, combine the chopped dill, lemon zest, lemon juice, minced garlic, olive oil, honey, salt, and pepper. - Whisk the ingredients together until well blended to create a marinade. This step is key. The mix of flavors will soak into the salmon. - Place the salmon fillets in a resealable plastic bag or shallow dish. Pour the marinade over the top. - Seal the bag or cover the dish. This ensures the salmon gets coated well. Marinate in the refrigerator for 30 minutes to 1 hour for maximum flavor. The longer you marinate, the more taste you get. - Preheat your grill to medium-high heat. This helps cook the salmon evenly. - Remove the salmon from the marinade and let any excess drip off. Discard the marinade for safety. - Grease the grill grates with a little olive oil. This helps prevent sticking. - Place the salmon fillets skin-side down on the grill. Grill for 4-6 minutes without moving them. This allows the skin to become crispy. - Carefully flip the salmon fillets using a wide spatula. Grill for an additional 4-6 minutes. The fish should be opaque and flake easily with a fork. Adjust the time based on the thickness of your fillets. - Remove the salmon from the grill and let it rest for a couple of minutes. Resting helps keep it juicy. - Serve the grilled salmon garnished with fresh lemon slices and a sprinkle of additional dill if desired. Enjoy the fresh taste! For the complete recipe, check out the Full Recipe link. To enhance flavor with the marinade, use fresh ingredients. Fresh dill, garlic, and lemon add zest to the salmon. Combine these ingredients in a bowl and whisk until well mixed. This step makes every bite burst with flavor. Marinating is key, too. Let the salmon sit in the marinade for at least 30 minutes. This time allows the flavors to soak in deeply. For best results, aim for one hour. To prevent sticking on the grill, grease the grates with olive oil. This simple tip helps the salmon slide off easily. Place the salmon skin-side down on the grill first. Grill for 4-6 minutes without moving it. This helps the skin get crispy. To check for doneness, look for opaque flesh that flakes easily. If your salmon is thick, it may need a bit more time. Always use a wide spatula when flipping. This supports the fillet and keeps it intact. For a complete meal, pair your salmon with fresh vegetables or a light salad. Steamed asparagus or roasted broccoli complement the dish well. You can also serve it with rice or quinoa for a filling side. Don’t forget to garnish with lemon slices. They add a bright touch and extra flavor. Enjoy your delicious meal! For the full recipe, check out the detailed steps above. {{image_2}} Alternative Herbs and Spices You can switch up the herbs in this dish. Try fresh parsley or basil instead of dill. These herbs add unique tastes and aromas. Adding a pinch of red pepper flakes gives a bit of heat. This twist can make your salmon extra special. Different Citrus Options Lemon is great, but don’t stop there. Use lime or orange juice for a different kick. Each citrus option brings its own flavor. You can mix citrus juices for a fun blend. This variation makes the dish exciting and fresh. Oven-Baked Lemon Dill Salmon Baking salmon is simple and tasty. Preheat your oven to 375°F. Place the marinated salmon on a baking sheet. Bake for 15 to 20 minutes. Check for flakiness to know when it's done. This method keeps the salmon moist and flavorful. Pan-Seared Lemon Dill Salmon Pan-searing gives a crispy outer layer. Heat oil in a pan over medium heat. Add the salmon skin-side down and cook for 4-5 minutes. Flip and cook for another 4-5 minutes. This method enhances the flavor and adds a nice texture. Low-Carb and Keto Options This recipe is already low in carbs. You can keep it keto-friendly by using healthy fats. Olive oil works great here. You can also serve it with low-carb veggies like zucchini or asparagus. Gluten-Free Modifications This dish is naturally gluten-free. Just make sure all your ingredients are gluten-free. Check the labels on the olive oil and honey. This way, you can enjoy this dish without any worries. For the full recipe, check the earlier section and get started on this delicious meal! After grilling your lemon dill salmon, you may have some leftovers. To keep your salmon fresh, follow these best practices for refrigeration: - Cool it down first. Let the salmon reach room temperature before storing. - Use an airtight container. This helps prevent odors and keeps the salmon moist. - Refrigerate within two hours. This keeps bacteria from growing. If you want to enjoy your salmon later, freezing is a great option. Here's how to freeze salmon safely: - Wrap each fillet tightly. Use plastic wrap or aluminum foil to prevent freezer burn. - Place in a freezer bag. Squeeze out as much air as possible before sealing. - Label and date it. This helps you keep track of how long it’s been in the freezer. When it's time to enjoy your leftover salmon, reheating correctly is key to keeping the flavor and texture. Here are some recommended methods: - Oven method: Preheat your oven to 275°F (135°C). Place the salmon on a baking sheet and cover it with foil. Heat for about 15 minutes. - Stovetop method: Heat a non-stick skillet over medium-low heat. Add a splash of water or broth. Place the salmon in the skillet, cover, and heat for 5-7 minutes. To maintain the flavor and texture, avoid using a microwave. Microwaving can dry out the salmon and make it tough. Enjoy your delicious lemon dill grilled salmon again with these easy tips. And don't forget to check out the Full Recipe for more details! Marinating salmon for 30 minutes to 1 hour works best. This time allows the flavors to soak in without overpowering the fish. If you marinate for too long, the texture may change. Always keep it in the fridge while marinating to keep it fresh. Yes, you can use dried dill instead of fresh. Use about one-third of the amount since dried herbs are stronger. Fresh dill gives a brighter flavor, but dried dill still works well in a pinch. Grill your salmon at medium-high heat, around 375°F to 400°F. This heat helps create a nice sear while keeping the inside tender. If your grill runs hotter, reduce the heat slightly. - What if my salmon fillets are thick or thin? For thick fillets, increase the grilling time by a few minutes. For thin fillets, decrease the time. Always check for doneness by seeing if the fish flakes easily with a fork. Salmon is rich in omega-3 fatty acids, which are good for your heart. It also has high-quality protein that helps build muscle. Salmon is packed with vitamins like B12, D, and selenium. Eating salmon can boost brain health and improve mood. For the full recipe, please refer to [Full Recipe]. This blog post gives you the keys to grill perfect salmon. We covered essential ingredients, marinating tips, and grilling techniques. With the right marinade and careful cooking, you'll impress at every meal. Plus, explore tasty variations to keep it fresh and exciting. Store leftovers smartly and reheat without losing flavor. By following these steps, you can enjoy delicious salmon that is healthy and easy to make. Embrace these tips to make every salmon dish a hit!](https://dailydishlab.com/wp-content/uploads/2025/06/c925202d-eb72-4cda-aa67-938206b6f665-768x768.webp)